Over the last few years, the poncho has become very popular in the wardrobe of many women, and knitting it yourself using a new pattern with a description of the most fashionable style will add relevance and a special twist to it.
What is a poncho? What to wear with this wardrobe item
This traditional Indian clothing has been known since the 15th century, came to the world of modern fashion from South and Central America, and very quickly began to gain popularity among the fair sex. The secret of this trendy cape is that it not only allows you to comfortably and originally warm up in our cold climate, but also hide some figure flaws.
Recently, modern designers have developed many original and varied styles, from which every fashionista can choose the one that suits her style and figure features.
Poncho with knitting needles (diagrams and descriptions are easy to understand even for a beginner) is the simplest option for making your own fashionable product. It is enough to knit a rectangular or square fabric with a cutout for the head.
This cape will highlight your slender legs and will look good with the following clothing combinations:
- skinny trousers;
- long skirt;
- jeans;
- pencil skirt;
- tapered mini dress;
- leggings, tights.
It should be taken into account that a poncho adds volume and some massiveness to the image, so it is better to combine it with tight clothing that fits the figure, preferably of a different texture.
The most common length is considered to be mid-thigh. It looks great in any version and is considered universal.
Shortened models visually lengthen the legs, which is especially important for those with short stature.
The most popular now are bright colored models of ethnic style or with catchy geometric patterns. Large checks or stripes are also still relevant. All these colors are best combined with monochromatic clothes of neutral colors.
A poncho is a completely self-sufficient item that does not require additional decoration or accessories. Fringe or large knitted braids along its edge will be quite sufficient.
Currently, boho styles are gaining popularity. Designers decorate models with bright patterns, unusual fittings, various tassels or fringe. Natural fabric, freedom of movement and asymmetrical length speak of boho.
Traditional Indian ponchos were woolen: llama wool was used for the poor, while the rich could afford alpaca. The colors of the garments were motley and patterned according to a certain area, so a stranger could be recognized immediately by the colors of his clothes.
From the Indian tribes, this clothing migrated to the army, and began to be used to keep soldiers warm. It was popularized by hippies in the late 60s. Then the baton was picked up by housewives, who began to create an original knitted wardrobe item.
What do you need to knit a poncho with your own hands?
It is easy to make a knitted poncho (patterns and descriptions of models are given below) if you have at least basic knitting skills and a little patience. The beauty of this product is that it is accessible even for beginners. After all, there is no need to adjust the figure, there is no need to get the size exactly right.
Rectangular cut options look more massive than square models. This poncho is distinguished by its original asymmetry, which attracts many girls. But the independent process of making this product will take a lot of time: it depends on the skills and speed of knitting.
Selecting yarn
As for the choice of color of the product, it is better to give preference to basic colors that never go out of fashion. Monochrome products of white, black and gray of any tone are present in the models of this season. Shades of dusty rose, gray-blue, rich green are also in fashion. The classic combination of black with red, blue with white always looks relevant.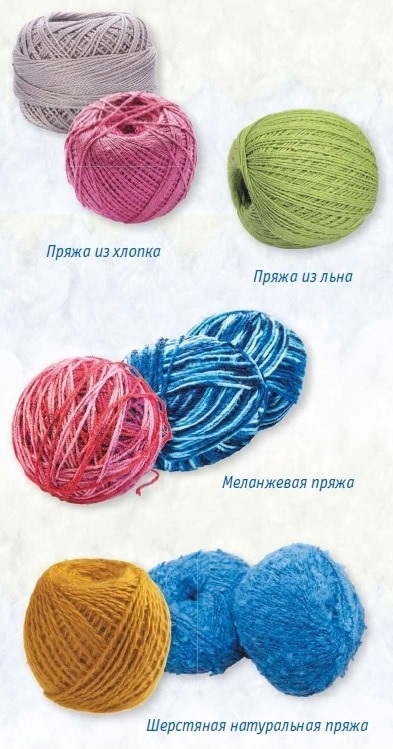
The type of finished product and its seasonality will depend on the yarn you choose. There are no restrictions here. A poncho is a completely universal wardrobe item that looks appropriate both in a smart openwork version and in a warm, voluminous version.
The only limitation will be the level of skill of the needlewoman. The lower it is, the thicker the thread is recommended to take, so the knitting process will go faster, and a simple pattern will look more advantageous. Delicate and noble cashmere will give the product sophistication and luxury. Such a poncho will look good with classic things, will suit mature women.
Mohair products are very warm, light and soft, but are considered not very modern today. In addition, it is not so easy to knit from fluffy thread, so it is recommended for high-level craftswomen to perform. Woolen products are universal, suitable for both young and old for everyday wear. Depending on the color and style, they can be of any style.
Selecting spokes
Each needlewoman has her own knitting style and density, which determines the experienced selection of knitting needles for the intended result. You can use the manufacturer's hint on the label of most factory threads.
| Yarn thickness, length in 100 g, in m | Recommended needle size |
| 50 or less | from 9 to 15 |
| 100 | from 6 to 8 |
| 150 | from 5 to 6 |
| 200 | from 4 to 5 |
| 300 | from 3 to 4.5 |
| 400 | from 2 to 3.5 |
| 800 | from 1.5 to 3 |
But there are general rules that are suitable for use by a novice craftswoman:
- The diameter of the knitting needle should be approximately twice the thickness of the thread.
- If you need a dense structure for your product, it is better to use knitting needles one size smaller.
- And if you want to knit loosely, it is better to increase the thickness of the knitting needles.
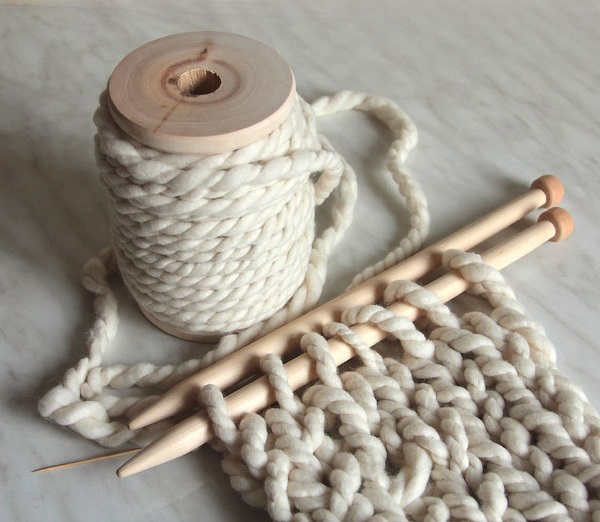
For knitting from soft wool or acrylic, a good option would be metal knitting needles with a Teflon coating. The thread slides easily along their smooth surface and does not cling. On the contrary, it is more convenient to knit silk threads or viscose with less slippery bamboo or wooden knitting needles. They are also suitable for beginners if loops slip off and get “lost” during the process of creating a product.
For thick yarn for large, voluminous fabrics, it is recommended to choose light plastic knitting needles that are flexible, strong and durable.
And another important point: since we are planning a rather voluminous product, it is better to take knitting needles on a long flexible cord or fishing line from 100 cm.
Calculating the amount of yarn
When calculating the required amount of threads, it is necessary to keep in mind that the greatest consumption will be when knitting a product with intertwined braids and arans. Much less thread will be required for an openwork airy fabric. But it is important to consider that too holey knitting does not look good in products made of smooth yarn; a fluffy thread with pile is better suited for it.
To calculate accurately, you will need to put in a lot of effort: make a knitting sample with the planned pattern, be sure to wash and dry it. Then write down all the dimensions of the test fabric, calculate the density, then unravel everything and measure the length of the thread.
Now you can accurately calculate the required footage: multiply the planned area in square centimeters by the length of the sample thread in meters and divide by the area of the sample in square centimeters.
It is much easier to use ready-made calculators for calculating yarn consumption. They can be found on many websites on the Internet. The result obtained will be less accurate, so it is recommended to increase it by 10%.
Types of patterns for knitting ponchos with knitting needles
There are a huge number of different interesting patterns that are perfect for a knitted poncho.
But the simplest basic knitting patterns, familiar to every needlewoman, will look great:
- Stockinette stitch: The front rows are knitted with the front stitch, while the back rows are knitted according to the pattern, i.e. with purl stitches. When creating a circular fabric, all stitches are knitted only with the front stitch.
- Garter stitch: In all rows knit only face loops. In circular rows, on the contrary, alternate a row of face loops with a purl row.
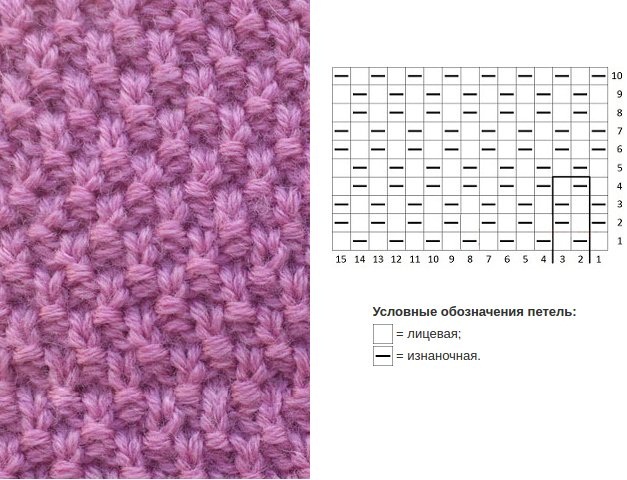
- Pearl pattern consists of alternately knitted loops with front and back stitches. Then the loops of each row are shifted: knit a back stitch with front stitch and vice versa.
- Different types of simple elastic: when on the front side of the product a certain number of loops of front and back knitting are knitted with alternation, and in the back row the loops are knitted according to the pattern.
The described patterns are very easy to make, and they look quite interesting due to the color of the yarn in a large canvas, without overloading the product with unnecessary details. In addition, they are perfect for a beginner craftswoman for knitting from any wool yarn. For summer models from thin threads, it is better to choose openwork patterns, but this is already a high-level skill.
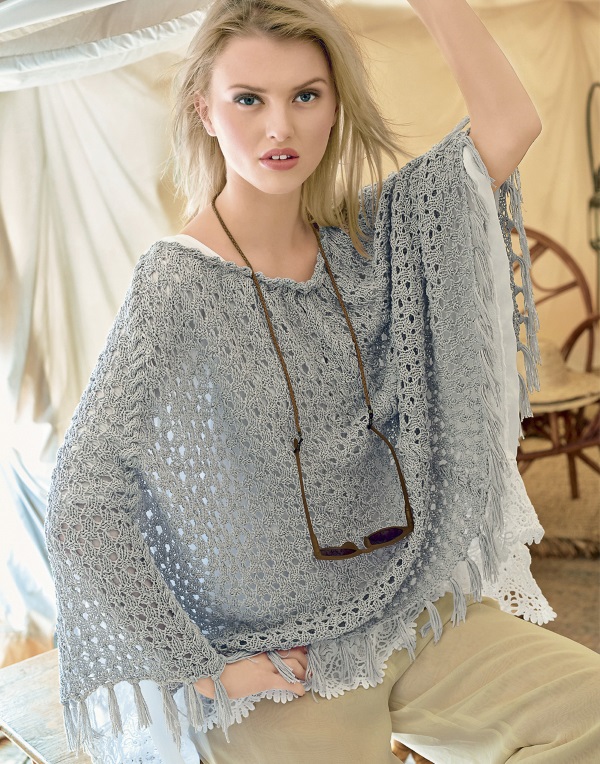
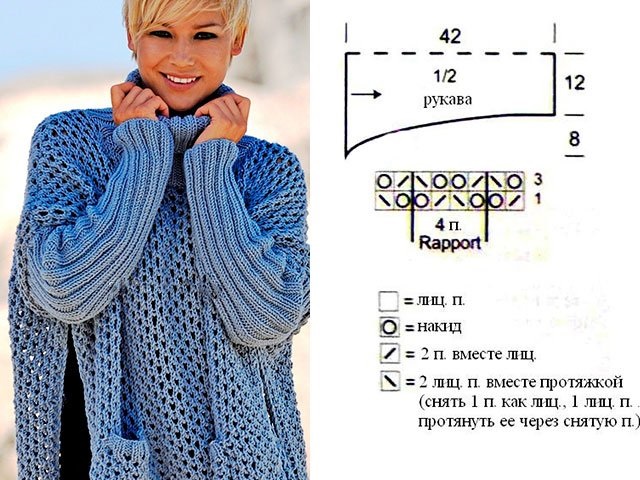
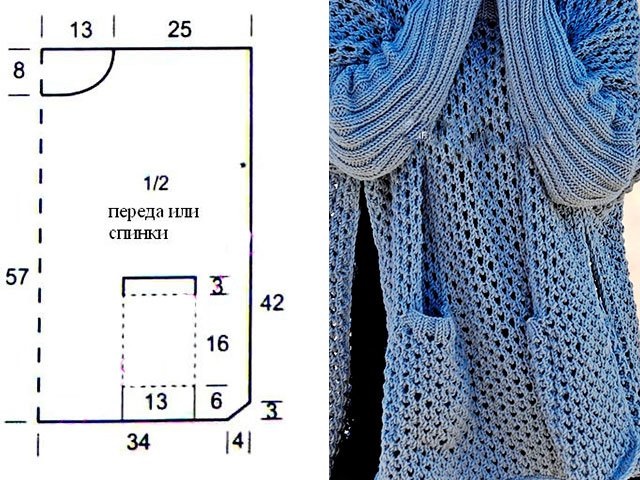
Step-by-step instructions for knitting a classic women's poncho with a simple pattern
Poncho with knitting needles (diagrams and description of a simple classic style) is not so difficult even for a beginner needlewoman to knit. It is knitted entirely without seams in one piece from top to bottom. For the classic women's model, you will need 800 g of sectional dyeing threads and knitting needles No. 4-5 on a long line for knitting in a circle.
Knitting patterns
The stripes are worked alternating 12 rows of stocking stitch with 4 rows of garter stitch. The pattern alternation is: work 4 cm in the round in garter stitch, which is 12 rows, then 144 rounds in stripe pattern, ending with 8 rows of garter stitch. 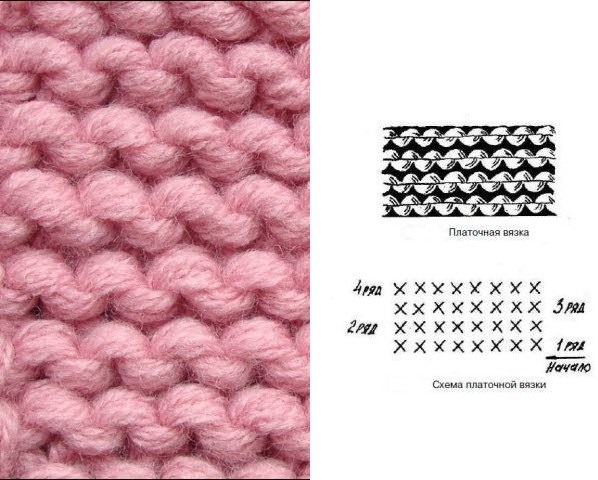 Approximate density: a 10 x 10 cm square consists of 17 loops and 29 rows.
Job Description
Step by step instructions:
- First, you need to close the 84 loops you have collected into a circle. Knit all the loops in the first row with a face stitch, marking each 21 with special markers.
- When knitting subsequently, every 2nd row on each side of these marks it is necessary to make an increase from crossed drawstrings between the loops, gradually including them in the main knitting pattern.
- After 60 cm from the cast-on edge, all loops of the product are closed in sequence.
- You can add a stand-up collar to the poncho. This will give the product a more closed look, which will look appropriate in a warm model. To do this, you need to pick up all the loops along the neckline and knit in a garter stitch in a circle without adding loops for about 15 cm, then close the loops, cut the thread and hide the tail.
- If there are any threads left, you can decorate the bottom of the product with tassels.
How to knit a smart poncho for a girl with sleeves and a hood
A hooded poncho knitted with knitting needles looks elegant and interesting. Suitable for a girl of any age, if you increase or decrease the patterns specified in the description to the desired sizes. For work, you need to select elegant threads and suitable knitting needles.
Job Description
Step by step guide:
- The product starts from the hood by casting on 41 loops on knitting needles with a long line. It is necessary to knit an even fabric 23-25 cm long with a pearl pattern, knitting 3 outer loops at the beginning and at the end of the row with garter stitch to form a neat edge of the hood.
- Separate the knitted fabric with two rows of garter stitch. Make an even decrease along the entire row of 5 loops for the neckline.
- Next, start knitting the main part of the product with the front surface, not forgetting to knit the loops of the strip with garter stitch. To add loops, put 4 colored markers in places of the raglan line. Every second row, add 1 loop on each side of the mark with the marker, knitting them from crossed broaches. Repeat 20 times.
- Next, put the sleeve loops on additional knitting needles, a pin or thread, and continue knitting, connecting the side parts of the back and front. Finish the product with 8 rows of pearl knitting, close the loops.
- Knit each sleeve separately to the desired length, finishing each with a garter stitch cuff.
- Make a back seam on the hood from the wrong side of the product.
- Thread the ribbon through and decorate it with pom-poms.
It is worth noting the variability of this model. It can be made as a single piece or with a front fastening, buttons or snaps.
In addition, this style is good because it is possible to adjust the sleeves and the length of the product if the child unexpectedly outgrows it. There is an option for knitting without sleeves, as in the women's model described above. But this is suitable for older girls.
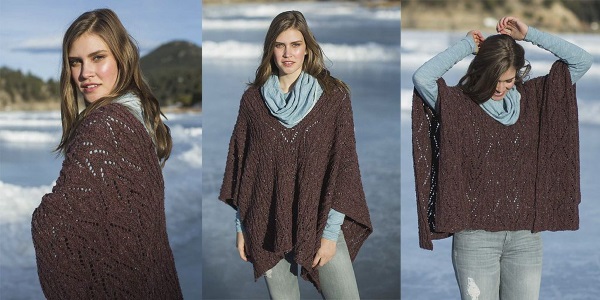
Model of poncho with voluminous braids
Poncho with knitting needles (patterns and description of the model with braids are given for several sizes) looks simply luxurious, and also very warm. This voluminous product, knitted from 100% wool yarn with thick knitting needles No. 7 and 9, can be worn as a summer coat.
Size range
Dimensions:
- 80-90 (90-102, 102-110) cm.
- Poncho circumference: 140 (148, 160) cm.
- Finished length of the product: 92 (96, 101) cm.
- The numbers in brackets are for other sizes; if they are not available, the number applies to all sizes.
- Materials: 14 (15, 16) skeins of 100% wool thread.
- Density: a square with a side of 10 cm, made with garter stitch on knitting needles No. 9, is 11 loops by 18 rows.
Designations Used
Crosses over 20 to the left: put aside, without knitting, the first 10 loops of the braid on an additional needle, place them in front of the work, knit the next 10 loops in knit stitch, then go back and knit the 10 put aside loops from the additional needle in knit stitch.
Crossings over 6 to the left: remove 3 loops without knitting, using an additional needle, placing it in front of the work, knit the next 3 loops as front loops, return to the 3 set aside loops from the additional needle, knitting them as front loops.
Crossing over 6 to the right: place 3 removed loops behind the working fabric on an additional needle, knit 3 front loops, then return the set aside 3 loops and knit them with the front knitting.
Main detail
It is knitted with knitting needles No. 9 in garter stitch in the form of a rectangular fabric, a row consists of 98 (102, 108) loops, after about 198 (206, 212) knitted rows, the loops are closed in any way. Cuffs with large cables are knitted separately in the amount of 2 pieces: on knitting needles No. 9 cast on 28 (32, 36) loops.
- 1st row: knit all stitches.
- 2nd row: 4 (6, 8) knit stitches, 20 purl stitches, 4 (6, 8) knit stitches.
- Repeat up to and including row 14.
- 15th row: 4 (6, 8) knit stitches, crossing 20 loops to the left, 4 (6, 8) knit stitches.
- Row 16: knit as in Row 2.
- From rows 17 to 42, alternate knitting as indicated in rows 1-2.
- Repeat row 43 as described in row 15.
- Row 44: knit as in Row 2.
- From rows 45 to 70, alternate as indicated in rows 1-2.
- 71st row: knit according to the description of the 15th row.
- Row 72: repeat as in Row 2.
- From rows 73 to 98, alternate as indicated in rows 1-2.
- 99th row: knit according to the description of the 15th row.
- Row 100: repeat as in Row 2.
- From rows 101 to 115, alternate knitting as indicated in the description of rows 1-2.
- All loops can be closed in any way.
Right side of the front
It is knitted from 23 loops with knitting needles No. 9.
- 1st row: knit all the cast-on stitches with the front stitch.
- 2nd row: knit 2 stitches, purl 6 stitches, knit the remaining 15 stitches again.
- From rows 3 to 8, alternate as indicated in rows 1-2.
- 9th row: knit 15 loops, cross 6 to the left, knit 2 loops.
- Knit the 10th row as the 2nd row.
- Repeat rows 1 through 10 of the pattern until the height of the product is 53 (56, 64) cm, then from the wrong side to knit the neck, close the first 14 loops from the edge, knit the pattern on all the remaining 9 loops until the end of the row.
- In the next row, knit the pattern loops to the 2 remaining ones, knit them together according to the pattern.
Knitting needles diagram and description - Continue knitting, decreasing the stitches of the neckline to the end of the shelf. Close the last stitches of the shoulder.
Left side front
It is knitted symmetrically according to the description of the right side, only to finish knitting the neckline you need to go to the front side.
Collar
You need to cast on 83 stitches using size 7 knitting needles.
- 1st row: start knitting 1 front loop, 2 loops with purl knitting, repeat in the indicated sequence to the end of the row, knit the last loop with a front loop.
- 2nd row: 1 purl stitch, 2 knit stitches, 1 purl stitch, alternate to the end of the row according to the pattern.
- Repeat rows 1-2 sequentially 17 times and close all loops.
Assembly of the finished product
Step by step instructions:
- Fold the main piece in half along the long side.
- Sew cuffs on both sides along the bottom of the sleeves.
- Sew the sleeves along the seams.
- Turn the product right side out. Make a mark in the center of the back neckline with a contrasting thread or a special marker.
- Sew the left and right front pieces down from the marks.
- Mark the center of the collar, align it with the back mark so that the markers match, sew the collar along the neckline on the back and front panels.
- Turn up the collar and hem the edge.
- Tuck in all cut thread tails.
A poncho knitted according to any pattern or description will help you master the process of creating a new interesting piece of clothing and will be a good training in knitting skills.
Article formatting: Vladimir the Great
Video about knitting a poncho with knitting needles
Master class on knitting a poncho and a hat: