Drawing geese in different styles will help the child learn to distinguish this type of poultry from others. The child will also learn to correctly depict the silhouette of a goose and paint it in suitable colors. To conduct classes, adults should prepare all the necessary materials, as well as consider several step-by-step descriptions of different variations of the drawing.
What you need to draw a goose
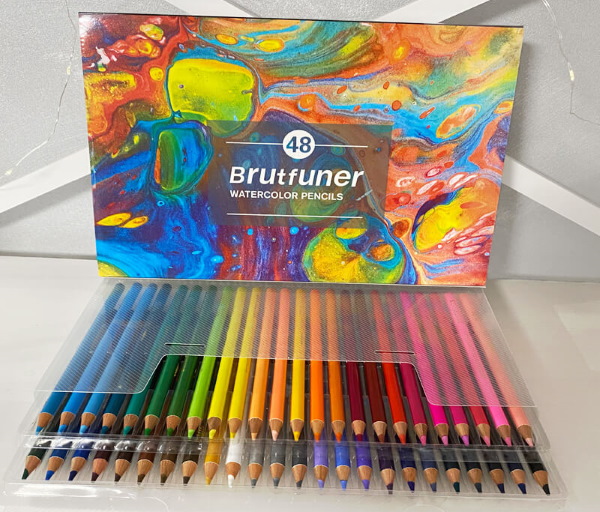
You can use different pencils for drawing:
- simple;
- colored;
- wax;
- watercolor.
You can use felt-tip pens, ballpoint pens or gel pens. The technique of drawing with these tools is almost no different from pencil. To make a black and white drawing with a simple pencil, you will need 3 tools of different degrees of hardness.
| Lead hardness | Letter designations |
| Solid | T, H |
| Hard-soft | TM, HB |
| Soft | M, B |
The softer the pencil, the richer the line will be.
For classes with children under 5 years old, you can use regular office paper or album sheets. First of all, kids need to learn how to hold the instrument in their hand correctly and also how to depict the silhouette of a bird.
School-age children need to be able to correctly apply strokes, shade them, and also choose colors correctly. The clarity of the stroke and the quality of shading directly depend on the texture of the paper. In this case, it is advisable to purchase special matte coated sheets or watercolor paper.
It is important to pay attention to the quality of the eraser. It should be able to remove graphite from paper without smearing it. The best option is a double-sided rubber eraser, where one end is designed to erase soft graphite, and the other for harder graphite.
You should also always have a sharpener on hand. All pencils should be sharpened before you start working so that they leave thin and neat lines.
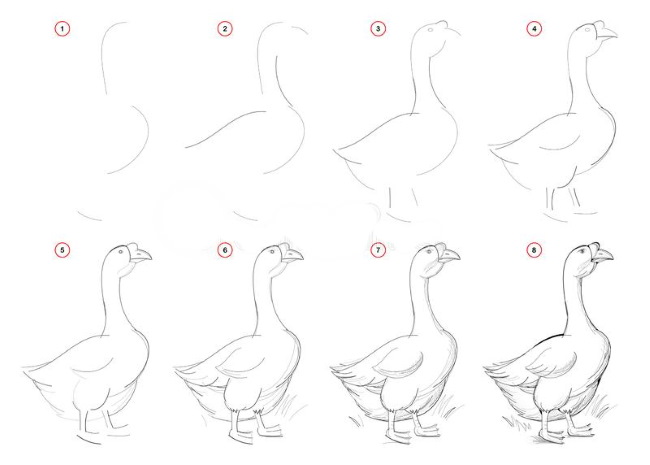
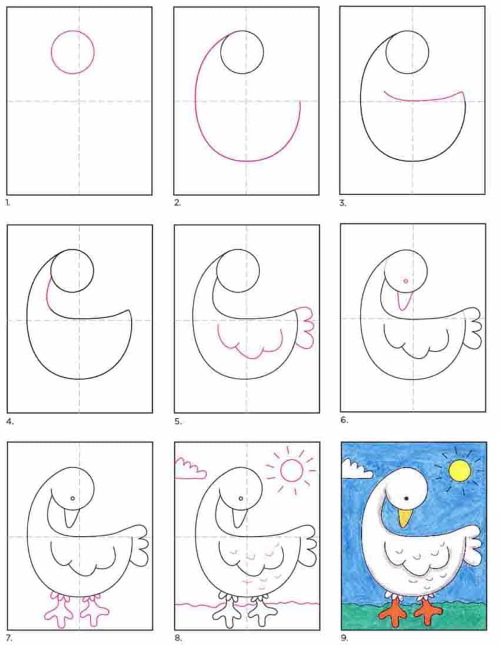
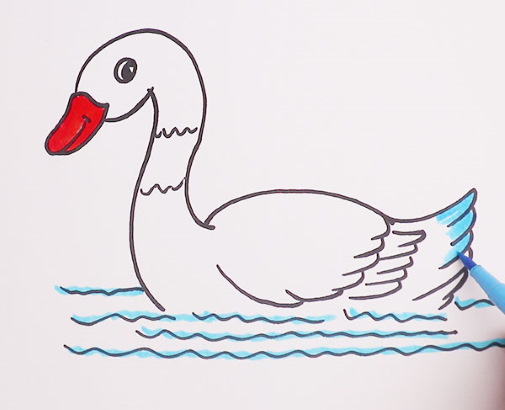
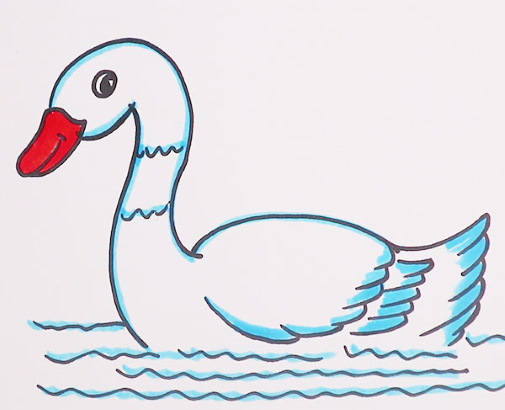
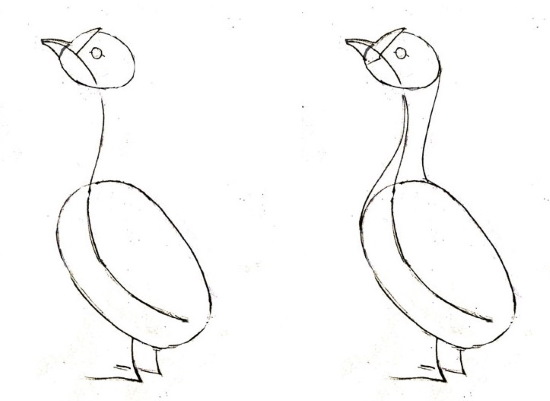
Contour drawing with a simple pencil
A goose (a drawing for children under 5 years old should be large, without detailed details), drawn in an outline style, despite the lack of color and superimposed shadows, can look beautiful.
How to draw:
- Place a sheet of A4 paper horizontally on the table.
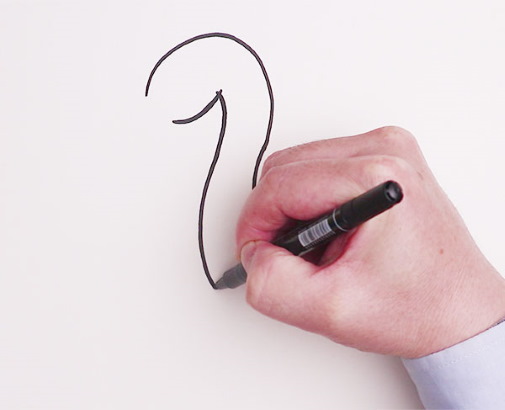
- Using a hard-soft pencil, without pressing, draw a large oval in the center of the sheet. This is the bird's body.
- A little higher, on the right side, draw a small circle. This is the head.
- Connect the head and body with 2 smooth lines.
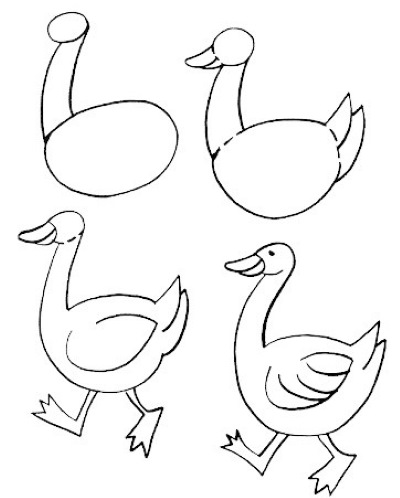
- Use the eraser to remove lines where the drawn shapes intersect each other.
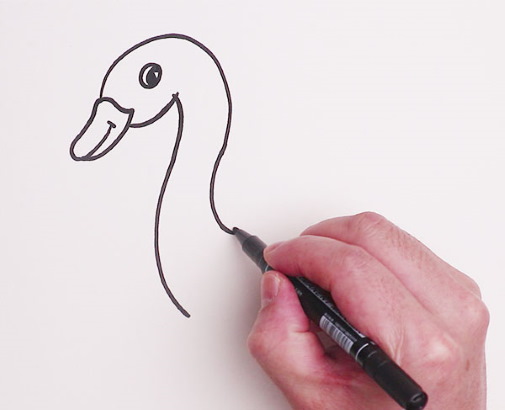
- Draw the goose's beak. The upper part should be wider and larger than the lower one.
- Add a tail in the form of 2 feathers sticking up.
- Erase all unnecessary lines.
- Draw the paws. The webbing can be depicted with 3 teeth.
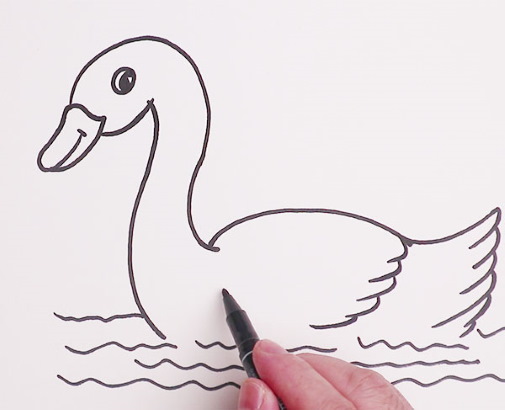
- Draw a wing on the side.
- Using short, smooth lines, draw a few feathers on it.
- Use a thin, rounded line to separate the lower part of the head from the neck, but not all the way.
- Draw a dot for the goose's eye.
- Clean the background with an eraser, erase any extra strokes and outline the picture, pressing lightly on the pencil.

This drawing can be done in 5 minutes, so the contour drawing technique is suitable for restless children who cannot concentrate on one lesson for too long.
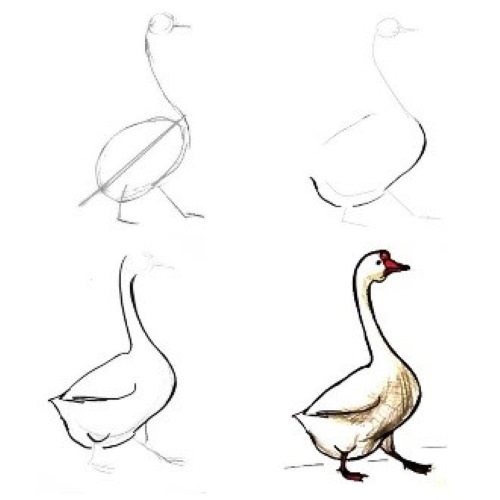
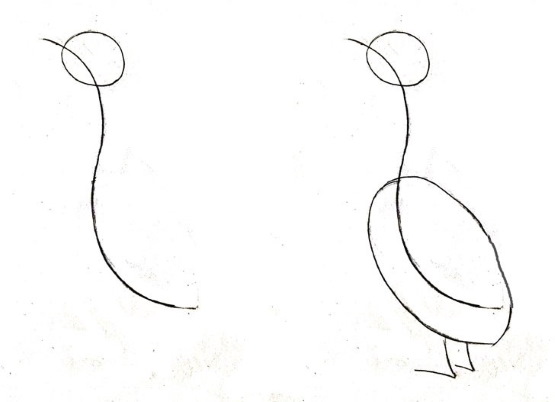
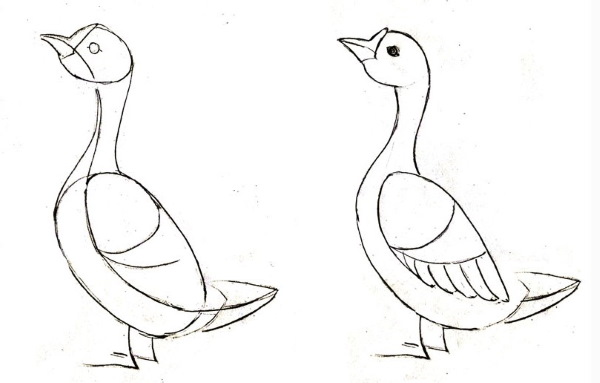
Drawing with shading
A more detailed version of the drawing, done with simple pencils.
Procedure:
- Using a hard pencil, draw a large oval in the center of the sheet, and draw a small head to the right above it.
- Connect the figures with 2 smooth lines.
- Use an eraser to erase unnecessary lines.
- Draw a large, long beak for the goose. On the upper part, you can depict a small hump, typical for these birds.
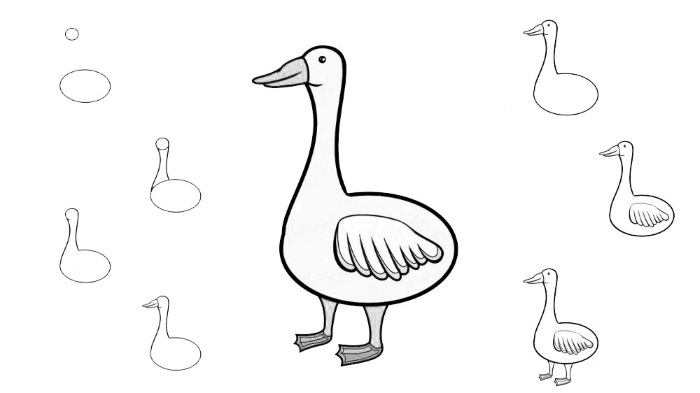
- Draw a large wing on the body. Divide its lower part into several feathers with rounded ends.
- Draw webbed paws.
- Add a small round eye.
- If desired, you can draw a short tail of 3 feathers.
- Draw a glare inside the eye.
- Use smooth lines to highlight the tips of all the feathers.
- Draw stripes on the membranes.
- Using a hard pencil, without pressing, densely shade the goose's body.
- Blend the strokes.
- Using a hard-soft pencil, without pressing, paint the beak, paws and tips of the feathers on the wing.
- Use a soft pencil to shade the eye without touching the highlight.
- Trace the outline of the picture.
- Use an eraser to clean the background.
This style of drawing is suitable for children aged 7. They will learn to mark dark and light areas of the picture using simple pencils of varying degrees of hardness.
A flock of flying geese drawn with a gel pen
You can draw with a gel pen without using a pencil, but you need to have basic artistic skills. When teaching children, you should make pencil sketches to be able to correct some mistakes.
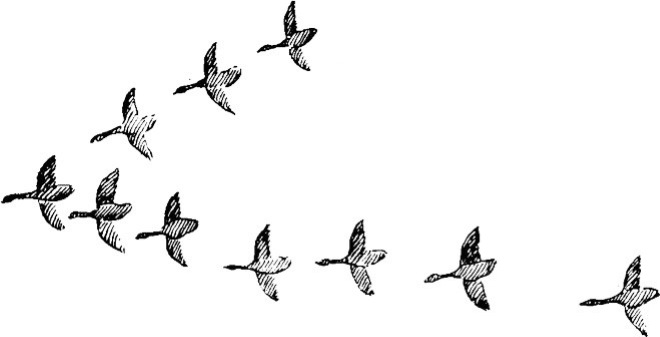
How to draw a flock of flying geese:
- Place a sheet of A4 paper horizontally on the table.
- Choose the direction in which the geese will fly.
- Visually divide a sheet of paper into 2 parts horizontally.
- Use a dot to mark the location of the very first goose in the flock.
- Using a hard pencil, draw 2 barely noticeable lines to indicate the flight path of the remaining birds.
- Use dots to indicate their location. It is not necessary to strictly follow the direction of the line. The marks can be placed slightly to the left or slightly to the right. The distances between the dots should increase slightly as they move away. It is also important to remember that at the next stage, all the marks will acquire three-dimensional forms, so they should not be placed too close to each other.
- Around each point, with light movements, draw small ovals. In the area of the tails, you need to narrow the figures a little.
- Draw thin necks and small, flattened heads in the front.
- Draw 2 wings for each goose.
- Use the eraser to erase all auxiliary lines.
- Use a gel pen to shade the wings and bodies of the birds. All strokes should be applied in one direction.
- Completely paint over the necks, beaks and heads.
- Carefully trace the outline of the bird's body.
This drawing technique is suitable for children aged 8-10. Children will learn to calculate the distances between objects in the drawing, as well as to apply even strokes.
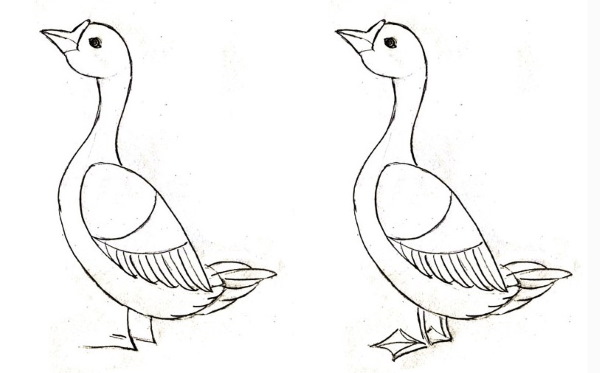
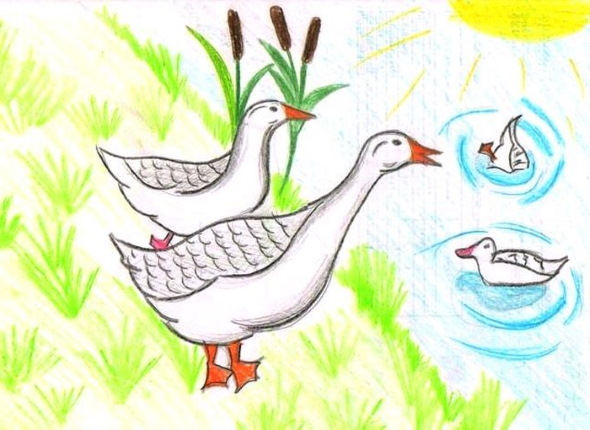
Drawing with colored pencils, felt-tip pens
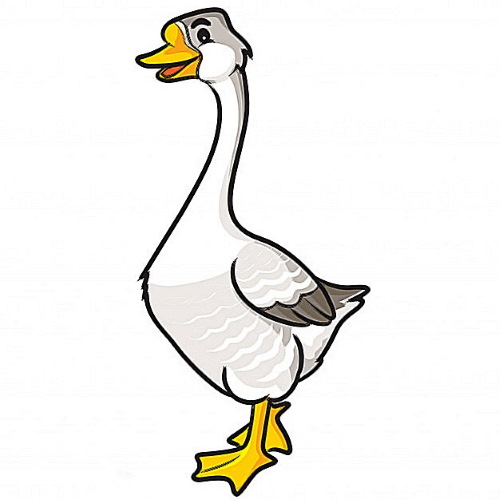
A goose (a drawing for children aged 6-10 can be done in a cartoon style), colored with colored pencils, will turn out bright and beautiful.
What colors of pencils will you need for this work:
- yellow;
- orange;
- red;
- light gray;
- dark gray;
- black.
How to draw:
- Place a sheet of paper vertically on the table.
- Using a hard-soft pencil, draw a large oval in the center of the sheet, placing it diagonally.
- Draw a small circle above the oval.
- Connect the figures with each other using 2 smooth lines.
- Draw an open beak on the goose. The lower part should be rounded, and the upper part should be longer and more elongated.
- Step back a few millimeters from the base of the beak and place a dot.
- Connect this mark with the back edge of the head with a smooth line. This will be the bump characteristic of these birds.
- Separate the beak from the head with a smooth line.
- Use an eraser to erase the old line between the beak and the head.
- Inside the lower part of the beak, mark the shape of the bird's mouth.
- Use an eraser to erase the border between the head and neck.
- Draw a round cheek in this place.
- Draw 2 protruding feathers on the back of the head.
- Draw a round eye for the goose. Mark out a small highlight inside.
- Add an arched eyebrow above the eye, and draw a thin line below it to imitate the border of the cheek.
- Use an eraser to erase all unnecessary lines.
- Finish drawing a large breast for the goose. Draw 2 small, protruding feathers in the front.
- Draw a tail sticking out towards the top and a large wing.
- Use an eraser to erase all unnecessary lines.
- Draw a convex shin under the wing.
- Add webbed paws. The right paw can be depicted hidden behind the left.
- Use short strokes to indicate the folds of skin on the membranes.
- From the cheek to the base of the wing, draw a smooth line, placing it closer to the right edge of the neck. At the bottom, connect this line with the most convex point of the chest. This will be the border between the white and gray colors of the plumage.
- On the wing and body, depict large feathers using wavy lines.
- Select the tips of the feathers on the wing and tail.
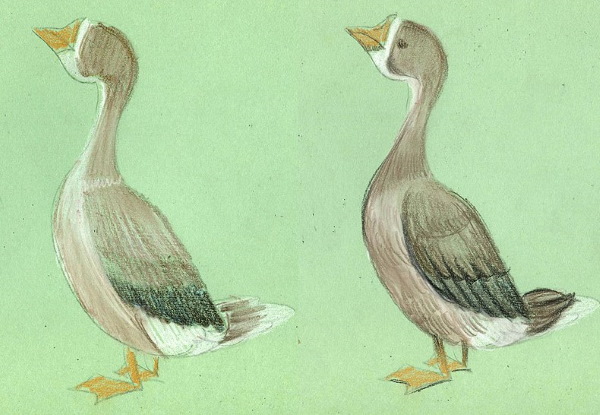
- Use a yellow pencil to color the beak, without touching the mouth cavity.
- Paint the paws completely.
- Using a light grey pencil, shade the top of the head and the right side of the neck, without going beyond the line drawn in point #23.
- Shade the wing and body, without touching the wavy lines.
- Paint the upper part of the shin and tail.
- Use an orange pencil to darken the base of the beak and its lower part.
- Color the right side of each paw, applying strokes over the yellow.
- Shade the goose's mouth with a red pencil.
- Paint the feathers on the wing and tail with dark gray.
- Darken the lower part of the tail and the area under the wing, going around the white wavy lines.
- Using a black pencil, without pressing, paint the tips of the feathers on the right side, as well as the upper part of the tail and the crown.
- Shade the eye without touching the highlight.
- Color the eyebrow.
- Trace the outline of the drawing.
Drawing with colored pencils will be useful for children of all ages. Little ones will learn to color a picture without going beyond the contours, and schoolchildren will learn how to show light and shadows in a colored drawing.
Goose drawn with wax crayons
The drawing in this master class can be done by older children who have basic artistic skills. The thing is that only the base is drawn with a simple pencil. The rest of the lines will be drawn with wax crayons, which cannot be erased with an eraser in case of a mistake.
To use this tutorial with younger children, you will need to draw the entire bird silhouette in pencil, then trace it and color it.
What colors of wax crayons will you need:
- black;
- yellow;
- brown;
- red.
How to draw:
- Place a sheet of A4 paper vertically on the table.
- Using a hard-soft pencil, draw a large oval, placing it diagonally.
- Draw a round head above the oval.
- Connect the figures with 1 smooth line.
- Draw the paws schematically.
- Take a black wax pencil and use intermittent strokes to increase the volume of the lower part of the goose's body.
- Enlarge the chest.
- Draw a line connecting the bird's body and head.
- Outline the shape of the wing, draw the other part of the neck, repeating the curve of the first line.
- Finish drawing a small tail.
- At the bottom, with an arched line, mark the location of the front shin. Draw the back shin.
- Draw the top of the head. Bring the end of the line to the beginning of the beak and draw a small circle.
- Finish drawing the beak.
- Increase the volume of the head slightly at the bottom. Connect this line with the neck.
- Draw a round eye on the goose.
- Draw the webbed paws.
- Use short strokes to indicate folds in the skin.
- Add small hooked claws to the paws.
- Use red chalk to color the beak and the circle located directly above it.
- Paint the paws.
- Use yellow chalk to shade the lower part of the head and the left side of the neck. The strokes can be applied in a chaotic manner.
- By analogy, shade the goose's chest and belly, legs and the area under the wing.
- Using brown chalk, apply short, chaotic strokes, darkening the left shin, lower abdomen, and body under the wing.
Goose (a drawing for preschoolers, can be colored using crayons of unnatural colors, such as blue, pink and purple, to maintain interest in the activity), drawn with wax crayons, will look three-dimensional if you shade the dark areas of the picture correctly.
Goose in the village, drawing with watercolor pencils
A goose (a drawing for children under 7 years old should be done together with adults), drawn with watercolor pencils against the background of a village yard, will look bright and realistic.
What colors of pencils will you need for this work:
- light green;
- dark green;
- brown;
- yellow;
- red;
- light gray;
- dark gray;
- blue;
- black.
You will also need 2 soft-bristled art brushes: medium and thin. A container with clean water and a hair dryer (optional) to quickly dry the picture.
How to draw:
- Place a sheet of paper vertically on the table.
- Draw an oval in the center of the sheet, placing it diagonally.
- Draw a small circle above the oval and connect both figures with 2 smooth lines.
- Draw a wing on the goose.
- Add the shins and draw the webbed paws.
- Draw a bump on the head.
- Draw the beak.
- Use an eraser to remove all unnecessary lines.
- From the tubercle on the beak, to the base of the wing, draw a line, closer to the left side of the neck. This will be the border between the gray and white feathers.
- Draw a round eye and a nostril on the goose's beak.
- Behind the bird, on the left side, draw a square house with a triangular roof.
- Add a window.
- On the right, draw a fence made of crooked picket. You can draw an inverted jug placed on one of the boards.
- You can start coloring. First, apply light tones. Without pressing on the pencil, you need to shade the sky with blue. The shading should be loose.
- Use a light green pencil to paint the lower part of the background.
- Wet a medium-sized brush in water. Blur the blue strokes, and then, after rinsing the brush, blur the green color. Make the borders of the 2 colors smooth.
- Dry the drawing with a hair dryer. The surface of the paper must be completely dry.
- Lightly shade the house and roof with a brown pencil. When shading the window, press a little harder on the pencil.
- Draw the picket fence and paint the jug.
- Use a yellow pencil to draw a sun in the corner of the sheet. Shade it tightly.
- Wet the brush again in water and blur the strokes inside the house, as well as in the sun.
- Using a thin, damp brush, carefully blur the lines of the picket fence. They should not lose their shape.
- Dry the drawing again with a hairdryer until it is completely dry.
- Use a light grey pencil to colour the goose's head, neck and wing.
- Use a red pencil to color the beak and paws.
- Use a brown pencil to draw logs on the wall of the house. Outline the window.
- Draw grass on a green background. To do this, use green pencils.
- Darken the tips of the goose's wings with dark gray.
- Using light grey paint, draw feathers on the belly and chest in the form of wavy lines.
- Wet a thin brush in water and blur all the lines on the house separately.
- Carefully blur each blade of grass so that they do not lose their shape.
- Blur the dark lines on the tip of the wing and the light stripes on the abdomen.
- Dry the drawing with a hair dryer.
- Outline the house, the goose and the jug on the fence with a black pencil.
- Paint over the goose's eye.
It is not necessary to dry the drawing with a hairdryer. It can be used when the child is impatient to continue drawing.
Tips for young artists
To make your drawings beautiful, you need to follow some recommendations:
- When drying washed-out watercolor pencils, do not hold the hair dryer close to the surface of the sheet. A strong stream of air can blow the drops of colored water in the wrong direction and ruin the drawing.
- You need to blur the strokes of watercolor pencils gradually. If you first draw the entire picture and then wet it with water, all the colors will mix.
- When applying strokes with a gel pen, you should do so from left to right (if the child is left-handed, then from right to left) so as not to smear the ink on the paper.
- To draw with watercolor pencils you need thick paper, at least 200 g/m2.
- Pencil strokes should be shaded lengthwise, not across.
To teach a child to draw a goose, you need to conduct several lessons with him, using various materials and tools. You should start with simple contours, gradually moving on to more complex, detailed and colored drawings. Pictures for copying can be selected from those presented in the article.
Author: Frolova Ekaterina
Video about drawing
Goose drawing for kids: