The symbol of 2020 is a white mouse. Those who want to have such a pet, but are afraid of its aggressiveness, can create a souvenir using threads and a hook. You can give such a craft to friends and family, the main thing is to know the description of the patterns and the sequence of execution.
Patterns and description of knitting mice crochet for beginners
A crochet mouse can be made from different materials, such as mohair or silk thread, plush. You also need to first select a knitting option with a description and diagrams, and study it carefully.
This will help beginner needlewomen to understand complex loops and create a beautiful craft. There are many ways to crochet interesting figures, where the main thing is not the technique, but the right choice of idea. Depending on who the gift is intended for, you can choose a fairy tale or cartoon character.
This could be:
- Mickey Mouse;
- Roquefort mouse;
- Jerry the Prankster;
- Brain;
- Ratio.
Many of these heroes have been delighting children and adults on the screen for several decades, and their knitted version can become an original souvenir.
If you need a practical gift, you can:
- make an original keychain for a bunch of keys;
- make a beautiful case for a cell phone;
- knit a cosmetic bag or a pencil case for pens and pencils;
- create a fashionable clutch or handbag in the shape of a mouse.
When the year is over, knitted items can be placed on the shelf as a reminder of a pleasant moment.
The simplest option
A crochet mouse (the diagram and description of a simple version are described further in the article for beginners) in the amigurumi style is especially popular in Japan. This technique is distinguished by the fact that the head of the created figure is large, but at the same time attractive and touching when viewed. The mouse model will be small - about 8-10 cm in height.
To work you will need a small hook and brightly colored threads. It is advisable to use medium-thick yarn. Those who are just starting to knit need to learn to read and understand the patterns. If you succeed, then there should be no difficulties in the work.
The following symbols are used:
- KA - amigurumi ring;
- SBN – single crochet;
- PR - addition;
- UB - decrease;
- VP - air loop.
The general principles of the process include several stages:
- work on a product always begins with an amigurumi ring;
- First, knitting is done in a spiral without creating a rise;
- the knitted fabric should be of the same density, without seams and dips that occur when yarning over;
- to get volume, toys are filled with synthetic padding;
- to decrease, knit 2 stitches together;
- First, knit the 1st column of the next row into the 1st column of the previous one. Then put a mark at the beginning of the row so as not to get confused.
An easy version of the mouse figure is to start working from the center. To do this, make a double crochet. After the body is knitted, create the ears, muzzle, and tail.
Such products can be used as toys, souvenirs or glued to children's things or panels as an applique.
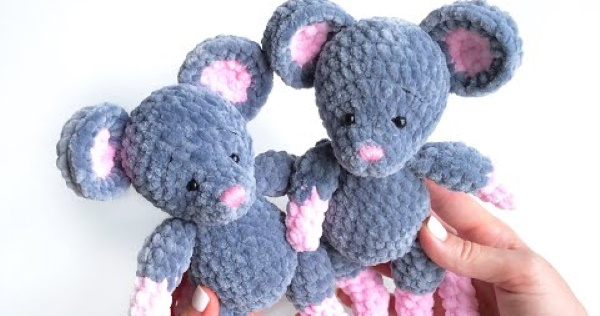
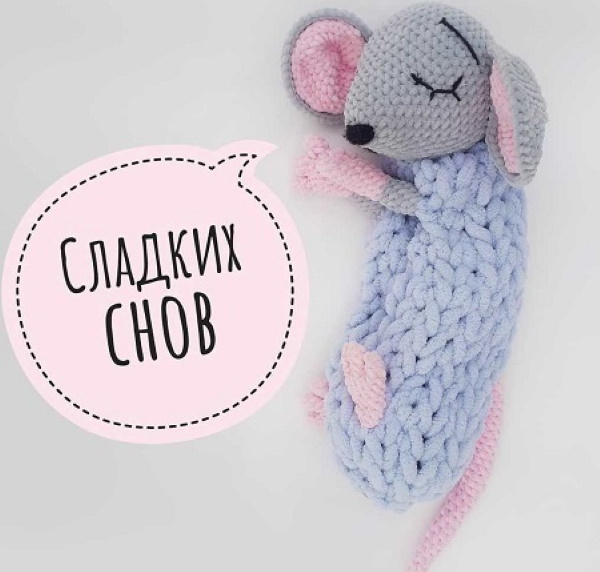
Plush mouse - symbol of 2020
A crocheted mouse toy made of plush yarn will appeal to children and adults. Such a product can be given to friends or a child on a birthday. The height of the craft is about 23 cm. The arms, legs and tail are knitted from the body, and not sewn to it.
To work you need to prepare:
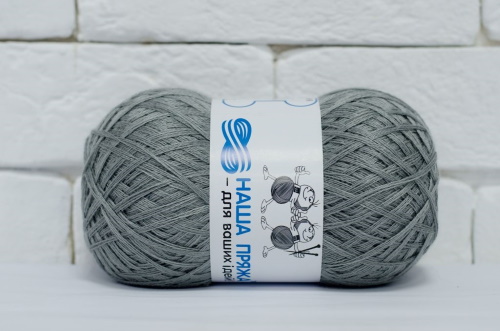
- grey ivy yarn (about 100 g);
- strong hook 4.0 mm;
- black threads for knitting eyebrows and nose;
- eyes with special fastening (16 mm);
- synthetic padding or other filler;
- tailor's scissors;
- a needle with a wide eye.
The schematic symbols are as follows:
- SBN – single crochet;
- PR - addition;
- UB - decrease;
- KA - amigurumi ring;
- SS - connecting column.
When working, remember that on the limbs and tail the thread must be secured inside.
The work is carried out as follows:
| Stage | Sequence of actions |
| Hands | 1. In the 1st row, collect 5 sc in KA. 2. In the 2nd row, make 5 inc, as a result the number of loops increases to 10. 3. In the 3rd row, knit 10 sc. 4. In the 4th, make 5 loops dec. 5. Fill the bottom segment with filler. 6. In rows 5-13, make 5 sc. 7. Connect the edges of the product by knitting 2 sc loops. |
| Legs | 1. In the 1st row, collect 6 sc into a ring.
2. In the 2nd row, knit 6 stitches. 3. In the 3rd and 4th rows, knit 12 sc. 4. In the 5th row 6 dec. 5. Add filling to the bottom. 6. Finish the work by knitting 6 sc from the 6th to the 1st row. 7. Connect the edges with 3 sc. |
| Tail | 1. In the 1st row, join 6 sc into a ring.
2. From the 2nd to the 21st row, knit 6 sc. 3. Do without filler or use it on the tip of the tail. 4. At the end, join 3 sc. |
| Torso | 1. In the 1st row, knit 6 sc and join into a sl st.
2. In the 2nd row make 6 pcs. 3. In the 3rd row, knit 1 sc and 1 inc. 4. In the 4th row make 2 sc and 1 inc. 5. In the 5th row, knit the legs: 4 sc, 3 sc together with the leg, 9 sc and another 3 sc with the leg, at the end 5 sc. 6. In the 6th row finish knitting in the tail. 7. Having unraveled 2 loops from the previous row, knit 3 sc together with the tail and knit the remaining loops 23 sc. 8. In the 7th-8th row, knit 24 sc. 9. In the 9th row, make 2 sc and dec to 18 loops. 10. Rows 10-12 should be knitted according to the pattern. 11. In row 13, knit the handles: 5 sc, then 2 sc together with the arm, 7 sc and another 2 sc with the handle, at the end – the remaining 2 sc. 12. In the 14th row, knit 18 sc. 13. After knitting 6 additional sc, make a SS. 14. Leave a long end of thread for sewing. 15. Finally, fill the piece with filler. |
| Ears | 1. In the 1st row, combine 6 sc into KA.
2. In the 2nd row make 6 pr. 3. In the 3rd row after 1 sc make inc up to 18 loops. 4. In the 4th row, knit 2 sc and etc. up to 24 loops. 5. In the 5th row make 1 sc, 5 inc, 3 sc, 1 inc, 2 sc. 6. Perform SS. |
| Muzzle | 1. In the 1st row you need to make 6 sc, collecting them into a ring.
2. The 2nd row should be knitted 6 sts with increases. 3. Rows 3-5 are made with 12 sc and ss. 4. Fill the finished part with filler. |
| Nose | 1. In the 1st row, connect 6 sc into a ring.
2. In the 2nd row, knit 6 sc. 3. Fill with a little filler. |
| Head | 1. In the 1st row 6 sc in a ring.
2. In the 2nd row, make 6 pr. 3. In the 3rd row after 1 sc make inc up to 18 loops. 4. In the 4th row, knit 2 sc and etc. up to 24 loops. 5. In the 5th row – 1 sc, 5 inc, then 2 more sc. 6. From the 6th to the 11th row, knit 30 sc. 7. In the 12th row, make 3 sc and dec to 24 loops. 8. In the 13th row, knit 24 sc. 9. In the 14th row, knit 2 sc and dec to 18 loops. 10. In the 15th row after 18 sc make SS, 11. Add filler for volume. |
When the parts are knitted, you can sew the muzzle to the body and the nose to the muzzle. Then insert the eyes, make eyebrows with black thread. Finally, sew on the ears and head. You can knit clothes for the mouse.
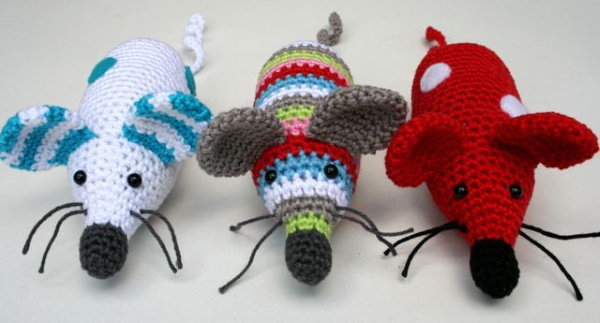
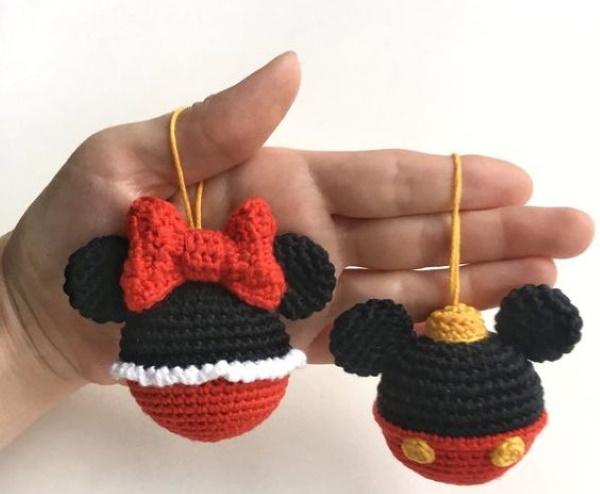
Mouseball
A crochet mouse (the pattern and description of the craft on a string can be simple or complex) in the form of a Christmas tree toy can be used as a pendant or keychain. The size of such a product depends on the thickness of the thread and the hook used.
For work you will need the following materials:
- several shades of yarn to make the body, nose and whiskers;
- convenient hook No. 2.0;
- filler;
- buttons or beads for eyes.
The designation is identical to the generally accepted one; the beginning of each row is marked with a bright thread.
You need to knit in the following order:
- 1st row – 6 sc in a ring (KA);
- 2nd row – 6 inc (12);
- 3rd row – 1 sc and 6 inc (18);
- 4th row – 2 sc and 6 inc (24);
- 5th row – 3 sc and 6 inc (30);
- 6th row – 4 sc and 6 inc (36);
- from 1st to 11th row – 36 sc;
- 12th row – 4 sc and 6 dec (30);
- 13th row – 30 sc;
- 14th row – 3 sc, 6 dec (24);
- Row 15 – 24 sc. After this, the finished segment is filled with filler;
- 16th row – 2 sc, 6 dec (18);
- from the 17th to the 22nd. – 18 sc each;
- 23rd row – 1 sc, 6 dec (12);
- from the 24th to the 26th row – 12 sc;
- 27th row – 6 kills;
- From the 28th to the 29th row – 6 sc;
- Row 30 – 3 dec. The thread is hidden inside the product so that at the end of the work the finished muzzle can be sewn to the body.
For the ears, 4 contrasting pieces are made, 2 of each color.
To do this:
- in the 1st row 6 sc are made;
- in the 2nd – 6 pr (12);
- in the 3rd - 1 sc, 6 inc (18);
- in the 4th – 2 sc, 6 inc (24).
The resulting ears are sewn together. A nose is made on the muzzle, ears and eyes are sewn in. A loop can be made to make it easy to hang.
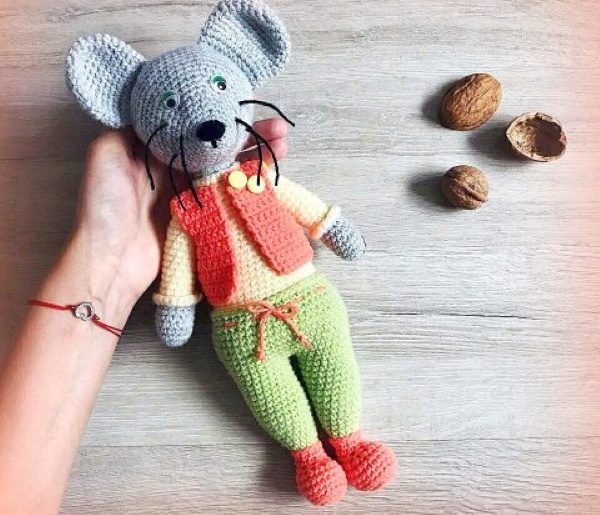
Pajama Mouse
To knit a mouse-shaped pajama set, you will need gray and pink yarn, as well as a crochet hook. The finished product will be about 50 cm.
The head is knitted as follows:
- 1 row – 6 sc in a ring;
- 2nd row – 12 pr;
- 3rd row – according to the pattern;
- 4th row – inc in every 2nd loop (18 loops);
- Row 5 – inc in every 3rd loop (24);
- Row 6 – according to the pattern;
- Row 7 – inc in every 4th loop (30);
- Row 8 – according to the pattern;
- Row 9 – inc in every 5th loop (36);
- Row 10 – inc in every 6th loop (42)
- Row 11 – inc in every 7th loop (48);
- Row 12 – according to the pattern;
- Row 13 – inc in every 8th loop (54);
- from 14th to 19th row – no inc;
- from the 20th row, in each subsequent row, decrease according to the increases - in each 8th, 7th, 6th, 5th, 4th and 3rd loop;
- stuff the head with stuffing, after decreasing in the next and subsequent rows of every 2nd and 1st loop, close the work and remove the thread inside.
Ears and arms are also knitted using increases. The body is knitted in a regular stocking stitch in a circle to the desired size, and then closed.
Mouse applications
A crochet mouse, the pattern and description of which is not limited to creating a toy, can be made in the form of an applique. Such a craft will make clothes and interior attractive. Parents, for example, like to decorate children's dresses and suits with animal figures. It looks especially interesting when it is crocheted.
The following materials and tools are required for the work:
- grey or white yarn;
- convenient crochet hook;
- a button or eye made of plastic;
- scissors and a needle.
Knitting is done as follows:
- Make a chain stitch and secure the 1st loop to it.
- Make several chain stitches to lift.
- From the existing loops, knit double crochet stitches.
- In the initial slip stitch, knit 18 air columns.
- Pull the sliding base together and secure it into a circle with a connecting post. This will be the body of the future craft.
- Form the muzzle. To do this, make a chain stitch, from which knit 4 simple columns.
- Turn the workpiece over and knit 3 more simple stitches, skipping the first of the existing loops.
- In the next row, knit the same 3 simple columns.
- Turn the knitting over again, knit 2 regular stitches and finish creating the muzzle with a single crochet stitch.
- Make the ears from connecting loops. It is better to use white thread for them. From the 1st air loop make 3 loops with 2 yarns.
- Make 4 more chain stitches and connect them together, securing them to the head.
- Make an edging for the ear using grey yarn, tying it around the workpiece with slip stitches.
- Make a tail out of white yarn by pulling a loop out of the body and tying a rope of the desired length with a chain.
- Glue the eye and secure the product in the desired place.
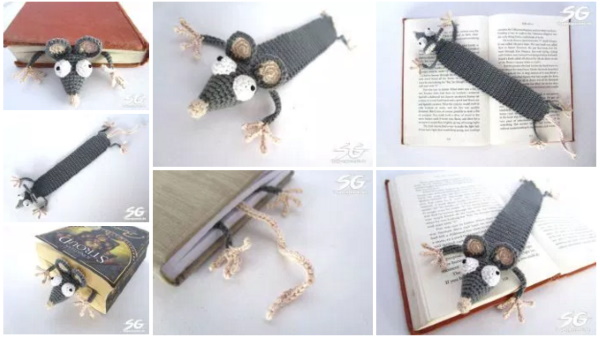
Bookmarks for a book
Like appliques, crochet mouse bookmarks have practical value. They are made using a spiral method, so you need to have a contrasting thread to mark the desired segments. For example, to make a bookmark in the form of a girl mouse, you will need a hook, gray and pink threads. White is used for the eyes, pink for the ears, and alternation for the body is at the discretion of the artist.
Knitting of the product is carried out as follows:
- 1 row – create 6 sc in KA;
- 2nd row – 1 sc and 2 sc in 1 loop, repeat until you reach 9 loops;
- 3rd row – knit 1 sc and 2 loops together sc, repeat 3 times;
- 4th row – make 1 sc and 2 sc in 1 loop, repeat 3 times;
- Row 5 – 2 sc and 2 sc in 1 loop, repeat 3 times until you reach 12 loops;
- Row 6 – 3 sc and 2 sc in 1 loop, repeat 3 times up to 15 loops;
- Row 7 – 6 sc and 2 sc in 1 loop, repeat 2 times up to 17 loops;
- from 8 to 10 row – add 1 sc;
- from 11 to 15 row – knit sbn in each loop;
- Row 16 – make 6 sc and knit 2 sc together, repeat 2 times;
- Row 17 – 3 sc and 2 sc knitted together, repeat 4 times, stuff the toy with filling and continue knitting;
- Row 18 – fold the pieces in half and connect their opposite loops with a crochet hook;
- from 19 to 21 rows – sc in 1 loop, 6 sc and 2 sc in 1 loop, continue knitting to the desired length, turning the product each time. No need to cut the thread, make the tail and paws from gray thread.
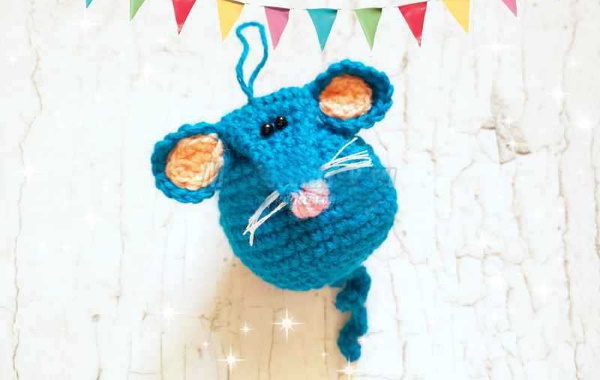
Original New Year's souvenir
This cute mouse will not only be a great souvenir, but also a handy bookmark.
To work you need to prepare:
- some grey and yellow yarn;
- hook No. 1.75;
- beads for eyes and nose.
The product should be made starting from the tail, and then, having collected 13 chain stitches with the same thread, continue knitting the body and head of the product. At the end of knitting, the thread can be broken.
For the ears, you need to make an amigurumi ring of 6 sc. In the next row, double the number of columns and then add 2 more times 6 loops. So you need to make 2 parts.
For the paws, take a chain of 9 air loops. Knitting is done according to the pattern. All parts are sewn to the body. Then the eyes and nose are made.
Fridge magnets
A crochet mouse (the pattern and description of this character differ in various execution options) is an interesting craft that will be a wonderful surprise for both a child and an adult. For example, an original magnet with the symbol of the year will attract attention.
To create it, you can use existing knitting patterns, which are supplemented with a sticker made of hard adhesive paper and a magnet. As a model, you can take a character from a cartoon or a fairy tale. It will turn out fresh and attractive.
Keychains
Another interesting idea for creating a souvenir with a mouse is a keychain. This could be, for example, a pendant in the form of Mickey Mouse.
To work you will need:
- red and black cotton yarn;
- 2 buttons of yellow or white color;
- hook (preferably 1.65 mm);
- yellow sewing thread;
- needles for yarn and sewing;
- scissors;
- synthetic padding;
- carbine.
It is important to know how to change the color of the yarn correctly. To do this, after tying the column with the 1st shade, you need to reach the yarn over when there are 2 loops on the hook. Then take another yarn and, having made a yarn over, pull this thread through both loops, thus completing the column. So, a thread of a different color will be on the hook.
The base of the product consists of 2 parts and is made as follows:
- First, take the red yarn and knit 14 loops into a chain with air loops.
- The same loops are knitted with single crochets, starting from the 2nd in the chain. Finish the row with a chain stitch and turn the product. The beginning of the row should be marked: this will be the front side of the product.
- From the 2nd to the 6th row, knit sc, inserted into the loops of the previous row, finish the row with an air loop with a turn to the next row.
- In the 7th row, make a sc in the same way. Then break the red thread and turn the work over with the front side up.
- In the 8th row, a black thread is inserted, with which sbn is made into the 1st loop, ch, sbn into it. Next, sbn are knitted into the loops of the previous row. After the ending air loop, a turn is made.
- From rows 9 to 12, sc are knitted from each loop of the previous row and after the air loop, a turn is made.
- In the 13th row, knit together the first 2 sc and knit the next 9 columns from the sc of the previous row. The last 2 sc are also knit together and finished with a chain stitch with a turn.
- In the 14th row, unlike the previous one, 7 sc are knitted in the middle.
- In row 15, sc is made from each loop of the previous row, ending the row with a chain stitch and a turn.
- In the 16th row, the first and last 2 sc are knitted together, then sc is made from the next 5 loops. At the end, 1 air loop and turn.
- In the 17th row, the first and last 2 sc together, in the middle knit 3 sc and finish with a chain stitch with a turn. The black thread is broken off, and the ends are hidden in the product.
In the decoration, buttons or beads are sewn onto 1 of the parts. Then the parts are folded with the wrong side facing each other and connected with simple loops. After that, the workpiece is turned inside out and stuffed with padding polyester. The binding is made with red thread. Also, for each model, you need to knit ears. To do this, you should prepare 4 identical parts.
This is done in a circular manner:
- Take a black thread and make 2 chain stitches and 6 sc in the 2nd loop.
- Without turning the work and without making a ring, complete 1 more row, turn.
- In the 2nd row, make 2 sc in each loop of the previous row. Again, do not turn the work or loop it.
- 3rd circular row: make 2 sc in the next loop. Repeat the same pattern to the desired size.
- When there are 18 loops, tighten the thread and break it.
Another keychain option is an image of Winnie the Pooh or Teddy Bears. They can also be crocheted using the amigurumi technique. They are made using the same pattern. After all the parts are crocheted, they are assembled. The ears are tied to the base of the head and the end of the thread is hidden inside. A chain must be attached to the top of the head.
For the Teddy look, you can add a small bow. You will get an original keychain made with your own hands. All that remains is to attach a ring with a carabiner to the chain and the stylish keychain can be used. The fact that the pattern for the products is the same is not an obstacle to creating a variety of models. Everything depends on the imagination of the master and the materials used.
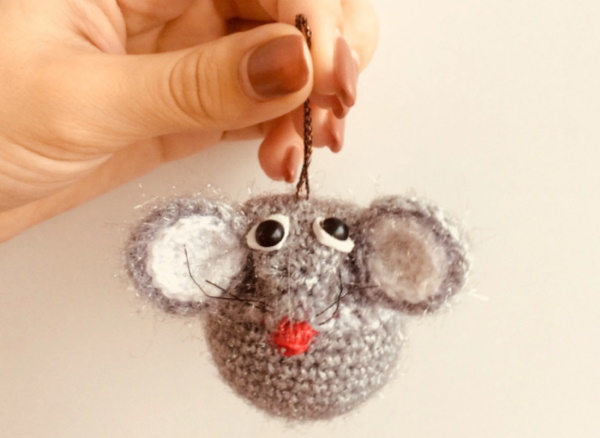
Christmas tree decorations
A handmade toy can be hung on the Christmas tree. Beautiful products in the amugurami style look very cute during the New Year. One of such characters can be a mouse in a dress.
To create it you need:
- threads in shades of grey, blue and pink;
- hook, scissors, needle;
- filler;
- 2 small black beads.
When working on the product, you first need to knit the muzzle and stuff it with padding polyester. Then knit the body and give it the desired shape. After that, make the paws, tail and ears. The nose is embroidered with pink thread and beads are sewn on instead of eyes.
The mouse girl's friend is made according to the same scheme. Only it is better to take darker threads. Otherwise, the work will be the same as in the first case. Additionally, you can make bright clothes for the toys by knitting a T-shirt for the boy and a beautiful dress for the girl. To be able to hang the figures, a loop is made at the head of each of them.
Interesting crafts in the form of the symbol of the year of the mouse will allow you not to worry about the gift. The love with which they are crocheted will testify to the warm attitude towards loved ones. Such a creative activity will give a lot of pleasant minutes, the main thing is not to forget to adhere to the patterns and descriptions during work.
Video about crocheting a mouse
How to easily crochet a mouse: