The fox is a predator with lush fur and a long red tail. Draw this beast with a pencil It is very simple, it will take no more than 10 minutes to create a drawing. The step-by-step schemes presented in the article will be understandable to both children and adults - beginners in the art business.
The cunning heroine of fairy tales
The fox is a popular fairy-tale character whose image is associated with cunning and roguery.
Kolobok
Drawing scheme of the Fox from the fairy tale "Kolobok":
- First, you need to make a general sketch of the entire drawing, roughly outlining the location of its elements. The stump is drawn first, it is located at the bottom of the sheet. Next, at a distance equal to 2.5 stump heights, you should sketch a large circle - this will be the fox's head. Below the circle, sketches of clothing are made, to the left of the stump - paws.
- The next stage is drawing the character's muzzle. First, the forehead is formed, then the elongated nose, after which the forehead is drawn. At this stage, it is important not to forget about the ears, which should have the shape of a rounded triangle and be located below the crown, as well as the eye, which should be placed between the forehead and nose. Finally, the back of the head and the lower line of the head are drawn.
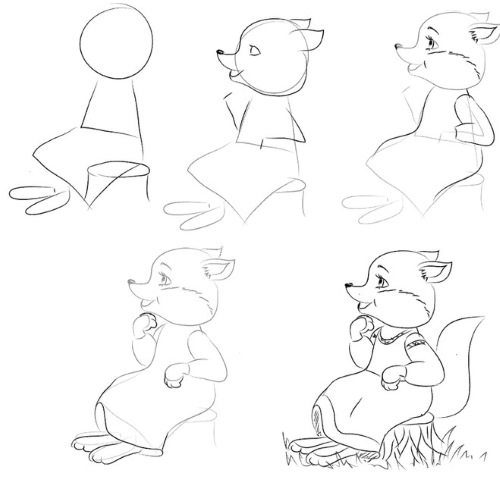
- The third stage is a more detailed elaboration of the drawing. With small curved lines you need to draw the area of the white cheek, after which you need to make eyelashes and a pupil on the eye, and an eyebrow above the eye. Next, the inner part of the ear is drawn, the sleeve is outlined, and the lines of the clothes are made smoother.
- The penultimate step is to draw the second arm, add paws sticking out of the sleeves, and make fingers on them. After that, the hem of the skirt and legs are drawn.
- The final stage is adding a fluffy tail and working out the details of the clothes: the neck of the dress, the openwork ribbon on the sleeves, the belt line and the hem. At the end, the coloring on the hind legs is separated and the tree bark is drawn on the stump.
The Fox and the Crane
How to draw a fox from the fairy tale "The Fox and the Crane":
- In the center of the sheet, you need to draw an oval located at a slight angle - this is the body of the fox. From it, you should draw 2 concave lines - the neck - which should go into a small circle - the head. At the bottom of the head, draw a long, sharp nose, at the top - 2 triangles - ears.
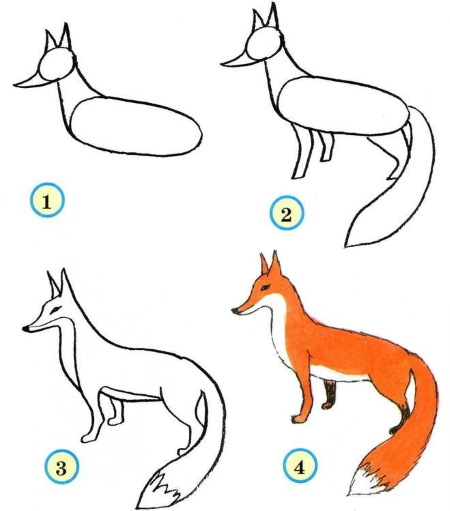
- The next step is to draw the paws - 2 front and 1 back are visible. The left front paw should be slightly longer and larger than the right one, as it is closer. Now you can start working on the tail: it should be slightly longer than the body and wider towards the end.
- Next, the details are drawn: the tip of the nose is colored, the eye with the pupil inside is drawn, the auxiliary lines on the head and neck are erased, the color on the neck and abdomen is separated. Then the auxiliary lines on the body are removed and the paws are carefully finished, the color of the tail is separated.
Teremok
A pencil drawing of a fox for children based on the fairy tale "Teremok" is created in a certain sequence of actions:
- First, the large parts of the drawing are marked out: in the upper part of the sheet, you need to draw an oval - this is the head; immediately below it - a small rectangle (the neck), from which the narrow part of the large trapezoid (the body) should begin.

- The next step is to round off the base of the trapezoid (make its bottom line round) and draw the hind legs with toes. Then you need to start drawing the face: the right part of the oval is lengthened and sharpened to create a nose with a black tip. The ears are drawn in the upper part of the oval, the eye with the pupil is in the middle, and the mouth is under the nose.
- Now you need to process the transition of the neck to the shoulder, then you need to finish drawing the arms resting on the sides, and the paws with fingers. Then you should think over the pattern on the sarafan, draw it, and then draw a fluffy tail on the back of the fox.
Character from the fable "The Crow and the Fox"
The rogue, a character from the fable “The Crow and the Fox”, is drawn according to the following scheme:
- In the middle of the sheet you need to draw a small circle - this will be the fox's head. On the left side you should draw an elongated triangle with a rounded top. The right edge of the triangle should be slightly concave.
- On the right side of the circle, a triangular ear is drawn, on which the inner part is immediately highlighted.
- Next, from the place where the nose connects to the head at its lower part, you need to start drawing the left part of the neck and the abdomen, not forgetting about the fluffy white pad located at the place where the neck turns into the abdomen.
- The right side of the body should be drawn from approximately the middle of the ear.
- Now you need to draw the front paws, and the left paw is drawn more carefully, since it is completely open to view.
- Then the back of the body and the tail thrown over to the right side are drawn.
- At the end, the auxiliary lines are erased and small details of the fox's face are drawn: the tip of the nose, mouth, eye, fur on the inside of the ear.
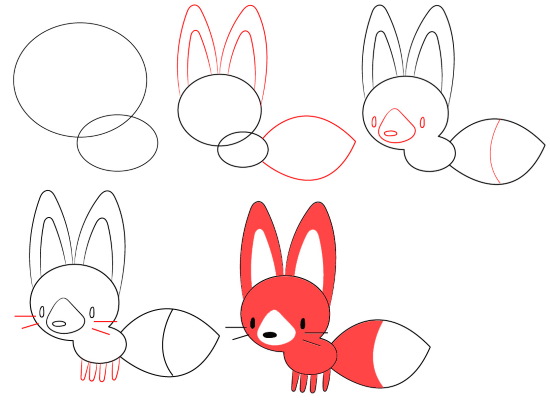
You can choose a simpler drawing scheme:
- First, you need to mark the main details of the drawing on the sheet: draw a small circle in the upper part, and under it, slightly shifted to the left, a larger uneven circle. Next, you need to draw 2 ovals: a small one under the circles, a large one on the right side of the sheet. At the bottom, you need to draw small figures - the future paws of the fox.
- The next step is to draw the ears, a long nose at the bottom of the face and a mouth. Next, connect all the figures with lines, draw the tip of the tail, and then erase all the auxiliary lines.
- Now you need to draw the face more carefully: make the fox's eyes, eyebrows and fluffy cheeks. After that, you need to draw the right paw and separate the white areas of color on the belly and tail.
- The last step is to draw the left hand, add fingers on both front paws and shape the eyes: you need to make the pupil and eyelashes.
Step-by-step pencil drawings of a fox for children to copy
You can draw a fox in pencil in different poses and images. It is not difficult to draw this animal, the scheme will be clear and accessible even for small children.
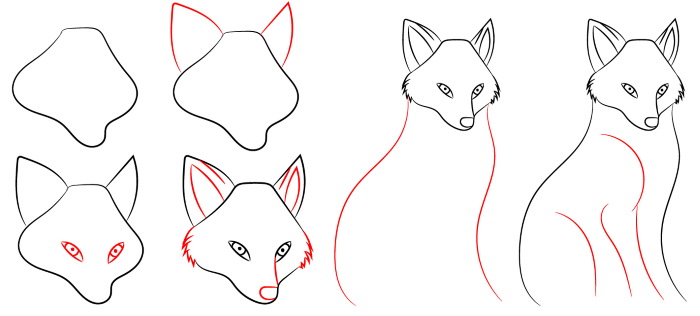
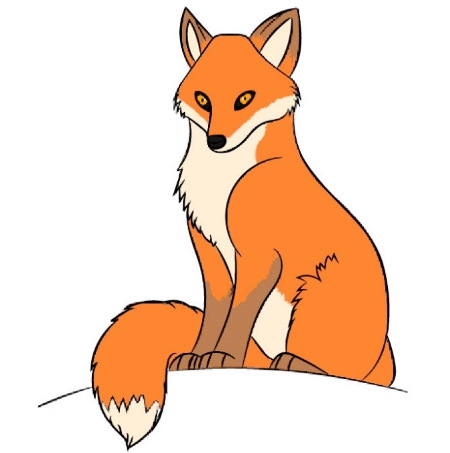
Sitting fox
Drawing diagram of a sitting fox:
- At the top of the sheet you need to draw a head, which should look like an uneven rhombus with rounded edges.
- On both sides, draw triangular ears. They should be different, because the fox sits half-turned.
- It is important to draw the eyes carefully. They should be placed diagonally, with the iris and pupil inside.
- Next, the inner part of the ears is drawn, volume lines are added. After that, you need to draw fluffy fur on the cheeks of the animal and carefully draw the nose.
- Using smooth lines, draw the back and the outer line of the left front paw.
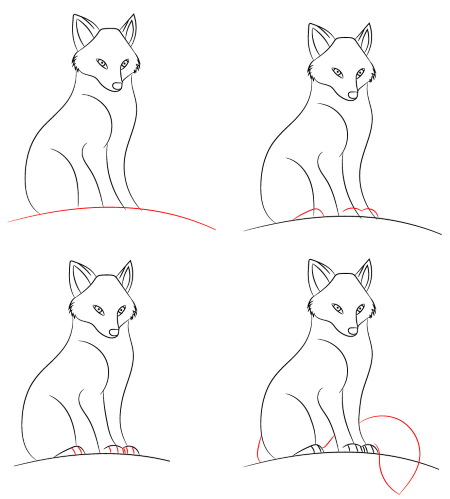
- Next, the right front paw is drawn and the outline of the back one is made.
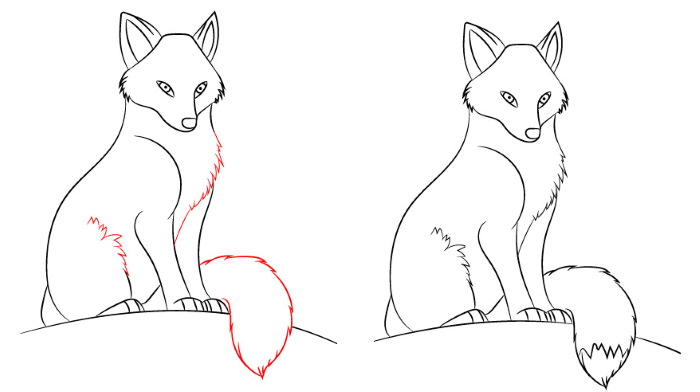
- Now you need to draw the feet and toes, and then start on the tail. It should be located behind the fox, and its tip should be carefully placed next to its left front paw.
- Using small lines, draw fluffy fur on the chest, hind leg and tail, not forgetting to leave lines that delimit the color.
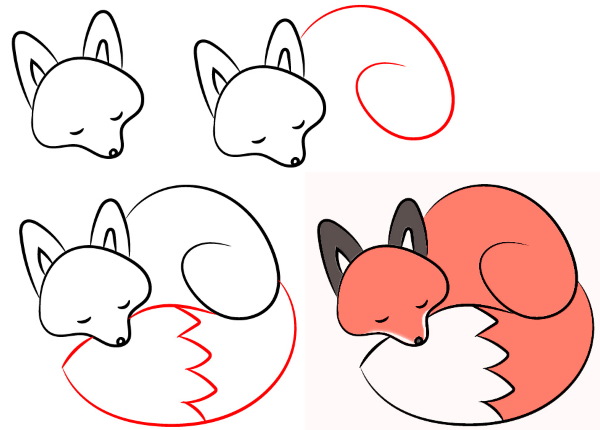
Sleeping fox
A drawing of a fox in pencil for children in a sleeping position is done according to the following scheme:
- On the left side of the sheet you need to draw the fox's head in the shape of a mushroom, draw the ears on top, and the eyes and nose inside.
- The back and hind leg should be depicted with one smooth, curl-shaped line.
- The last thing you need to do is draw a fluffy tail that hides the belly and paws from view. On the tail, you need to delimit the color with a zigzag line.
Another simple drawing of a sleeping fox is created using the following scheme:
- The muzzle should be drawn in the form of a mushroom, only the “leg” depicting the animal’s nose should be very small.
- Next, you need to draw the ears, and also give the fox eyes and a nose.
- The torso should be depicted with a semicircle extended on the left side, making the curve of the back more expressive.
- Then you need to draw the fox's front paws, extended on the sides of the head.
- The next step is to draw a lush tail, which should cover the lower back part of the body. The tail should not cover the entire belly - this will visually significantly reduce the volume of the animal's figure.
- At the end, you need to erase the auxiliary lines with an eraser and outline the drawing with a simple pencil so that the main lines become brighter.
Funny fox
To create an image of a cheerful fox with a mischievous look, you need to complete 6 steps:
- First, the frame of the drawing is sketched. It should consist of a circle (for the head), an oval (for the upper part of the body), a curved line (for the tail) and reference lines for the eyes, nose, ears, and paws.
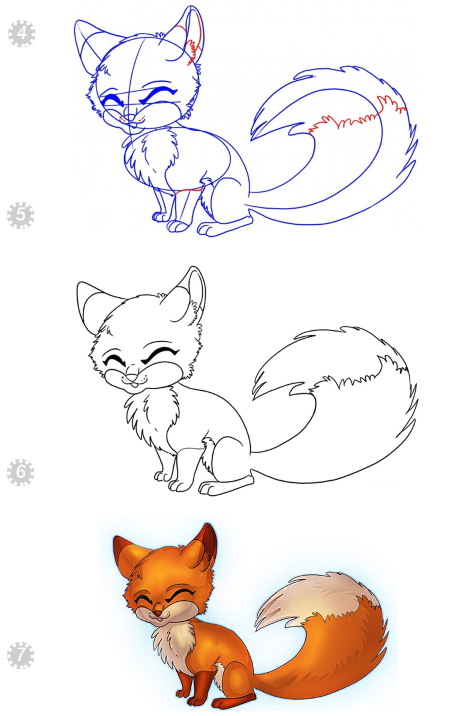
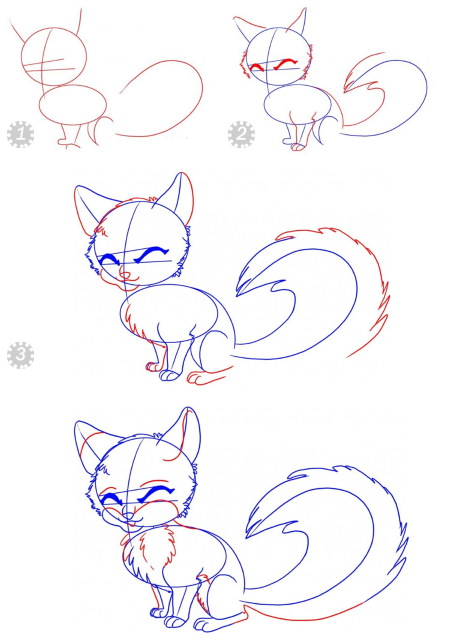
- The second stage involves drawing the ears, eyes, lower part of the body and the left front paw.
- Next, the fluffy fur on the animal's face is depicted, the chest, right front and left back paws, and the upper part of the tail are drawn. The color is delimited by a smooth line on the tail.
- The next stage is to draw the cheeks and eyebrows, differentiate the color on the ears and chest, and finish drawing the tail.
- At the end, the inner part of the left ear is drawn, the color on the paws is delimited and auxiliary lines are removed. The outline of the drawing is outlined with a simple pencil brighter.
Realistic drawing
Scheme for creating a realistic drawing of a fox:
- The contours of the future drawing are created as a frame of angular figures and lines. The head is depicted as a small trapezoid, under it a rectangle twice as large is drawn – the future body. Simple single lines mark the places of the four paws and the tail.

- At the next stage, the frame is outlined with smoothed contour lines. The result should be a "raw" sketch of the drawing without specifying details.
- The third stage is to refine the sketch. The sketch is transformed into a drawing close to realistic, using correct lines applied over the previous layers. Here, sharp ears, an elongated and slightly pointed nose, the place of the fluff on the cheek and neck, the mouth, feet, and the tip of the tail are drawn.
- Now you can start working on the details of the fox's image. Draw the tip of the nose, indicate the fluff on the forehead, cheeks, neck, belly, paws, etc.
- Next, the paws are carefully drawn, taking into account their position during movement.
- At the end, fluff is added to the ears and a lush tail is depicted.
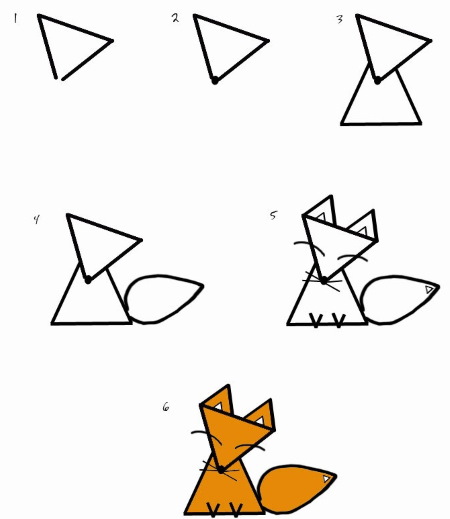
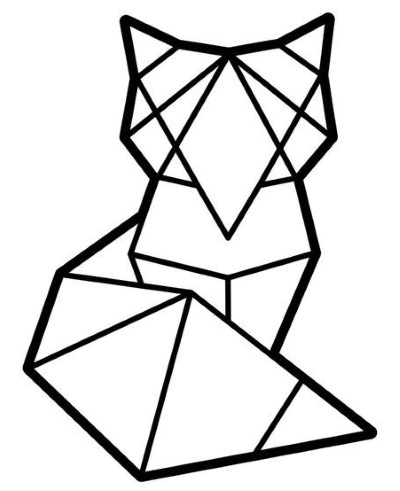
Techniques for drawing a fox with a pencil from geometric shapes
A fox drawing with a pencil for children from geometric figures can be simple and complex. Simple ones include, for example, a fox from triangles or ellipses. Complex ones include a fox drawing from polygons.
| Drawing variant | Step by step description |
| Fox of triangles |
|
| Fox of Ellipses |
|
| Fox of polygons |
|
Schemes designed especially for children will help you create a drawing of a fox using only pencils and paper.
Animal Drawing Videos
Fox pencil drawing for kids:
Thank you
great ideas