The fox appears in many fairy tales, well known from childhood. Its main distinguishing features are red fluffy fur, a narrow muzzle, and pointed eye slits. Otherwise, it is in many ways similar to ordinary dogs, so there should not be any big problems with drawing the animal.
The fox's nose is slightly elongated, and from the front it seems triangular. You can sharpen it, and then the fox will have a sly expression. The slanted eyes will also contribute to this.
Simple pencil drawing
The fox's muzzle (the drawing can be done with different tools) will be depicted on paper if you prepare a simple pencil and an eraser. With the help of the eraser, unnecessary lines drawn accidentally or intentionally at some stages will be removed.
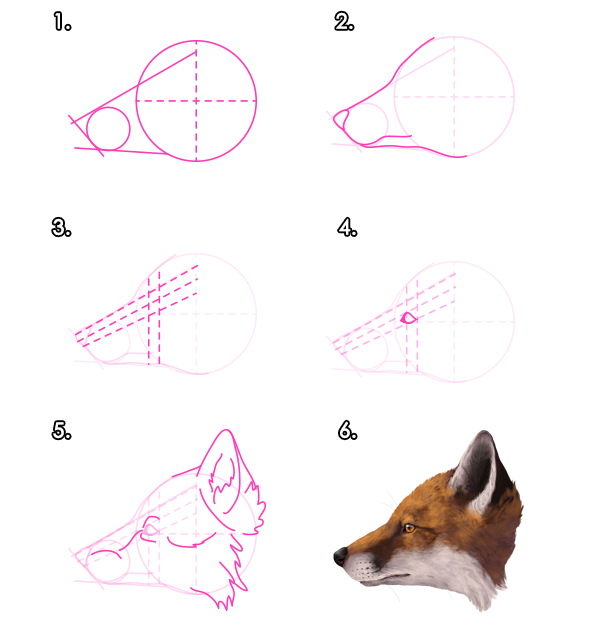
In profile
In this drawing it will be clearly visible that the fox's muzzle is elongated.
The stages of the image are as follows:
- Create guidelines for the head and muzzle. To do this, draw an oval on the right side of the paper sheet, it is better to make it a little crooked.
- To the left of the oval, place the animal's elongated muzzle.
- Add the left ear by drawing it above the head. It should look like a triangle with a rounded corner.
- Draw a small tuft of hair on the top of the head. To do this, make several strokes directed in different directions.
- Add hair to the lower part of the head in the cheek area. There should be more of it here. You can start drawing dashed lines from the ear and, going down, reach the lower part of the head.
- Draw the lower jaw. To do this, simply draw a wavy line from the bottom of the head to the end of the muzzle.
- Draw the right ear. It is drawn according to the same principle as the left one: it is a triangle with a rounded end. It should be placed slightly to the right of the left one, in fact, at the very top of the oval, which acts as the head.
- Add an eye. It should be located close to the muzzle. It can be depicted as a drop. It is important not to forget to draw the pupil, which can be represented by a short stroke.
- Draw the whiskers using several lines that extend from the muzzle. Since the fox's head is shown in profile in this drawing, only the left whiskers will be visible. The right ones are hidden behind the muzzle, so there is no need to draw them.
- Draw the nose. It is located at the tip of the muzzle. To draw it, it is enough to draw a couple of short strokes.
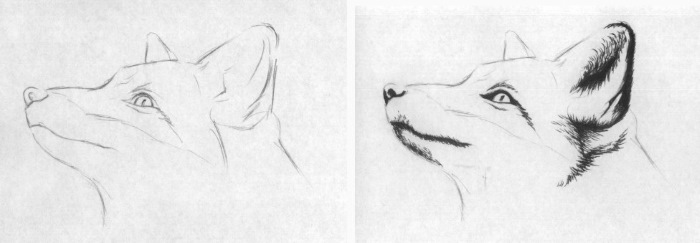
- Detail the fox's head. To do this, add an inner ear to the left ear by drawing a few wavy lines. The right ear faces the other way, so it doesn't need inner detailing.
- Add eyebrows above the eyes. And although in this case only one eye is visible, the eyebrow that is located above the other eye will also be visible. Each of the 2 eyebrows should be represented by 3 slightly curved lines, as if rising above the eyes. In many ways, they are similar to the previously drawn mustache, only shorter.
- Draw small lines under the eyes, several short lines on the top of the head, a small curved line approximately in the middle of the muzzle. The final stroke is intended to give the muzzle volume.
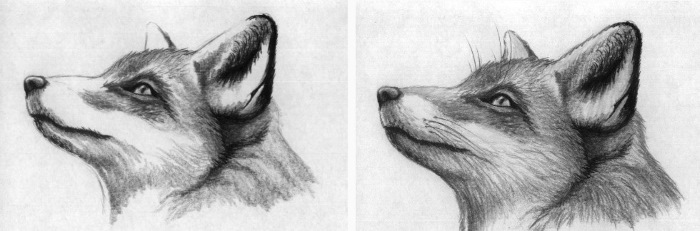
- Outline the shape of the neck. To do this, it is enough to draw 2 lines. One starts from the ear and goes towards the lower right corner of the paper sheet. The other line is shorter. It starts from the lower jaw and, slightly rounding, rushes towards the middle of the lower edge of the sheet.
- Give fluffiness to both lines. To do this, draw many strokes along them. The neck should be thick.
- Add a few short strokes on the surface of the neck to show fluffiness.
- Take an eraser and remove unnecessary lines (auxiliary and those that seem superfluous).
- Color the finished drawing. If desired, you can leave the fox head black and white.
Full face
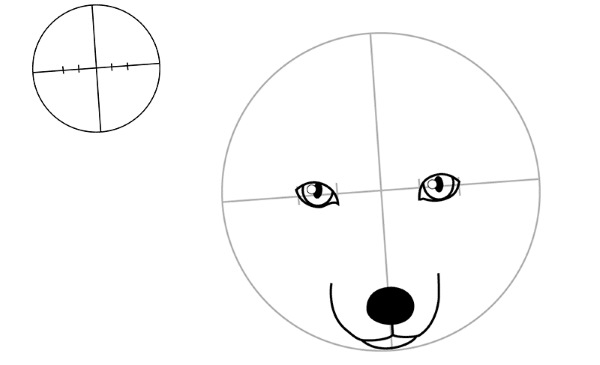
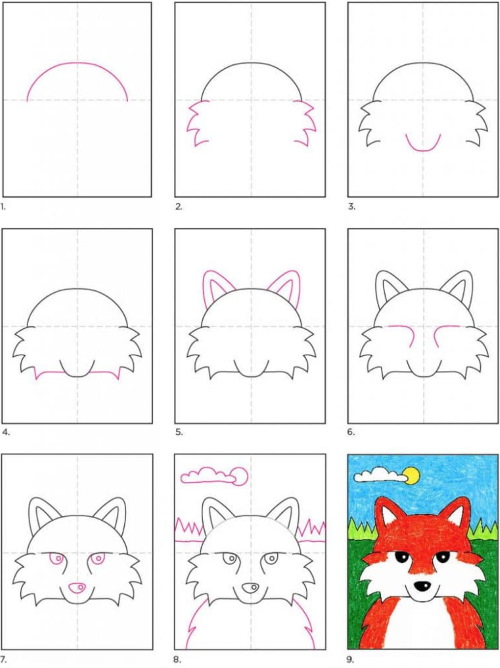
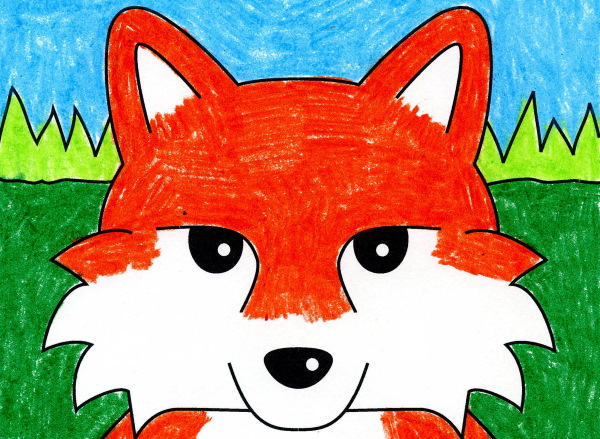
The fox's face (the drawing can be done either full-face or in profile) is depicted full-face on paper in the following stages:
| Stage | Description |
| 1 | To outline the fox's face:
|
| 2 | 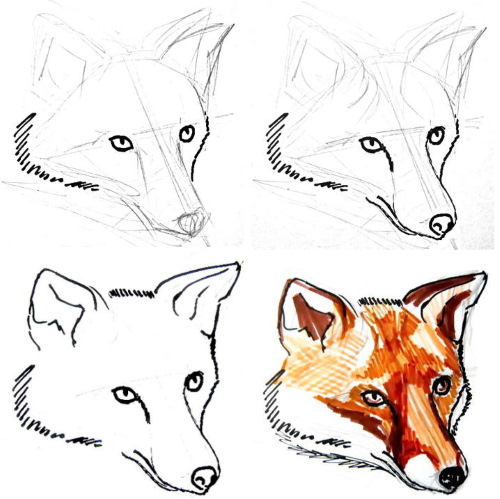 Draw the eyes. Since the fox is shown full face in this example, both eyes will be clearly visible. Each of them should be represented by a small circle. They should be located at the same distance from the center line. You should also add a couple of small elements - rounded lines. Each such line, similar to a comma, should be located under the eye. It is important to remember that these "commas" should be symmetrical relative to the center line. The "comma" that is located on the right side should be a mirror image of the left one. Important conditions for the image of eyes include:
|
| 3 | Draw the nose. It will be a small horizontal oval, which should be drawn inside the round muzzle. It is important to note that the lower part of the nose will be slightly narrower than the upper one. The lower jaw is almost invisible. |
| 4 | Mark the location of the curves on the fox's face. All lines have a mirror image effect, so it is necessary:
|
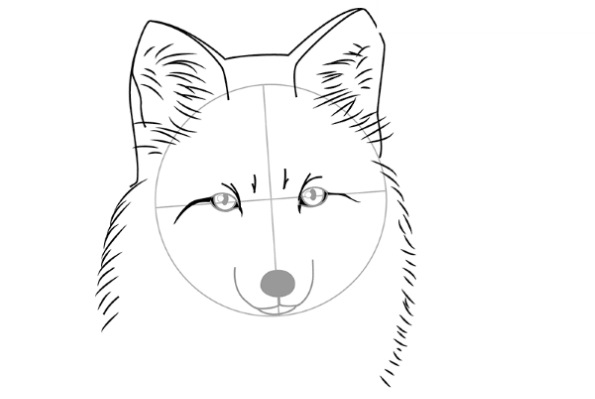
| 5 | Draw the ears. Their contours are similar to vertical ovals, but with clearly pointed tips. You can also compare each ear to a triangle, which has roundings instead of corners. Between the ears it is necessary to draw a smooth line with a bend towards the muzzle. |
| 6 | Detail the previously drawn organs of hearing. The fox has a lot of fur in its ears. It is also necessary to make the outer part of the ears thicker. To do this, it is necessary to draw another line. |
| 7 | Continue detailing the main part of the head. Here you need to add some folds, especially between the eyes, at the level of the eyebrows. It is also worth slightly touching the fur on the neck. It is important to remember that the right side will be smaller than the left. |
| 8 | Shade the eyes. First, draw the pupils and contours, because they are the darkest. Small areas should be left unpainted, these will be highlights. Shade the rest of the upper part, creating a shadow falling from the eyelids and eyelashes. |
| 9 | Shade the nose. Its shading should be denser. As a result, it should be darker than the eyes. This is an important nuance that the artist must remember, because the nose is closer to the viewer than the eyes, so it turns out darker. From the nose, add a few strokes, and inside draw a pair of nostrils. Each of them is a small circle, and both nostrils should be even darker than the nose itself. |
| 10 | Work with an eraser. It is necessary to remove all the lines that will no longer be needed in the final part of the work. After removing unnecessary lines, add some more short fur to the nose. |
| 11 | Gradually move from the nose to the detailing of the eyes. The shadow should be below and above. |
| 12 | Remove unnecessary lines under the nose with an eraser, and then draw the fur. The fur near the mouth will be darker, because there is a shadow cast by the nose. |
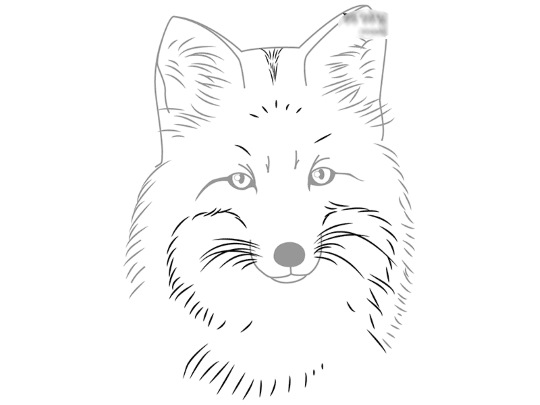
| 13 | Mark the fur along the entire lower part. Near the muzzle it will be lighter than at the edges. |
| 14 | Use dashed lines to draw the eyebrow arches and nose. The fur here will be long. |
| 15 | Work the fur up to the ears. It is important not to rush to separate the foreground from the background. |
Cute drawing
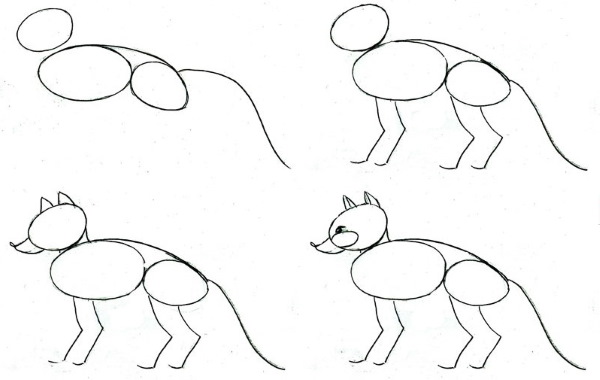
If drawing a real photorealistic fox is still difficult, you can try to depict a cheerful cartoon fox cub. As a result, the animal will turn out funny. The cutest and most suitable drawing for little artists is a cartoon fox cub with its mother.
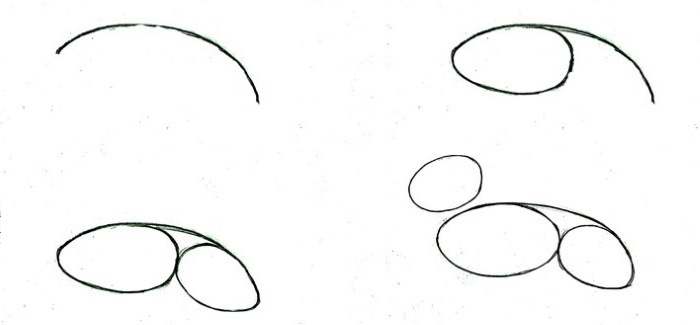
It is more convenient to divide the work into the following stages:
- Draw circles. Since there will be 2 animals in this picture, draw 4 circles.
- When connecting the circles to each other, mark the lines of the neck.
- Transform the upper right circle into the head of an adult fox. Its muzzle will be in profile.
- Sketch the ears for both animals.
- Draw the contours of the head and ears. Apply additional lines to the latter.
- Move on to drawing the eyes, nose and mustache.
- Draw the body of the fox using the lower circle as a basis. The body should smoothly transition into a large and fluffy tail.
- Using arced lines, outline the animal's hips. After that, draw additional lines on the tail.
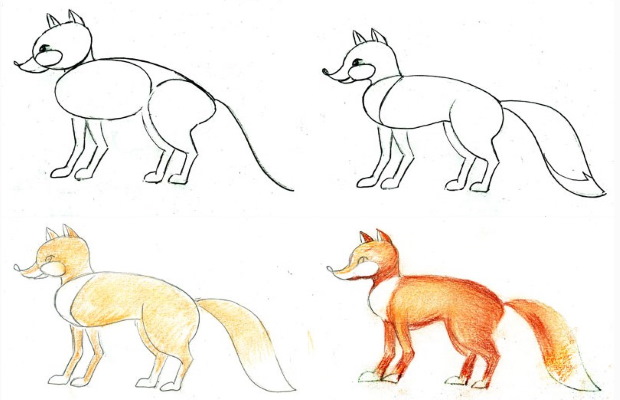
- Proceed to working on the baby, starting with the head. Draw the muzzle and ears, fluffy cheeks.
- Move on to drawing lines on the ears, and then to drawing the eyes, nose and mustache.
- Draw the body. The little fox should have a beautiful tail, which has the same fluffiness as an adult fox.
- Draw additional lines on the surface of the tail.
- Using an eraser, remove unnecessary elements, then take a pencil and go over all the contours and details again, giving the drawing brightness.
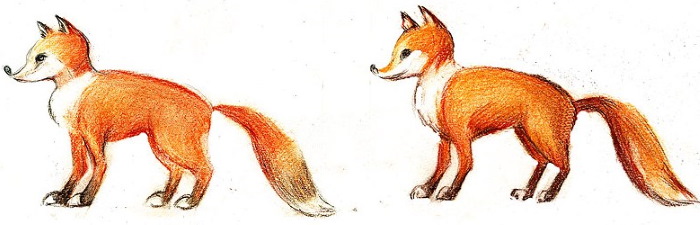
- Color the image. The main color here will be orange. You can use simple pencils or markers for coloring.
For children, you can draw a fox with pastels. To do this, you need to prepare paper and wax crayons.
The steps to create an image are as follows:
- Use grey to outline the head and body.
- Add a teardrop tail.
- Use long ovals to mark 4 paws.
- Draw round eyes and a nose.
- Use an upside-down check mark to mark the fox's mouth.
- Draw a small triangle to the right and left of the head to give the muzzle a pointed look.
- Draw triangular ears on top of the head.
- Color the fox with orange chalk, leaving the lower parts of the paws, the top of the tail, the lower part of the muzzle and the belly blank.
- Use black chalk to outline the head, marking the eyes, nose and mouth.
- Outline the body, coloring the lower parts of the legs black.
- Use green chalk to mark the grass on which the fox is standing.
Graphics
If you have a lot of problems with drawing a cartoon fox, you can use an easier method - creating a fox from simple geometric shapes.
Cartoon drawing
The face of a cartoon fox can be drawn using a triangle as a base.
To do this, you need to do the following:
- Draw a triangle.
- Draw the details of the head. The first will be the elongated muzzle. It is represented by an oval with a round nose at the end. Above, the eyes are drawn, these will be 2 circles.
- Draw a short arc line under the elongated muzzle. This will be the lower jaw.
- Add a pair of ears, each represented as a teardrop.
From triangles
You can depict not only the muzzle, but the entire fox.
All you need to do is draw 4 triangles and 1 drop:
- the largest of the 4 triangles will act as the body;
- the smaller triangle will become the fox's head;
- 2 small triangles of absolutely the same size will become the ears;
- The drop will be the tail. It should be about the same size as the triangle that plays the role of the body.
All that remains to be done at the final stage is to add the missing details.
These include:
- eyes - short arced lines located on both sides of the triangle that plays the role of the head;
- nose - located in the corner of the triangle representing the head;
- mustache – extending in different directions from the nose. It is enough to draw 2 lines on the left and the same number on the right;
- paws - will be located at the bottom of the triangle representing the body. Each paw is a small check mark;
- ears. Inside each of them there is 1 small triangle;
- the tip of the tail is a drop - at the very end it is indicated by several dots.
Lines
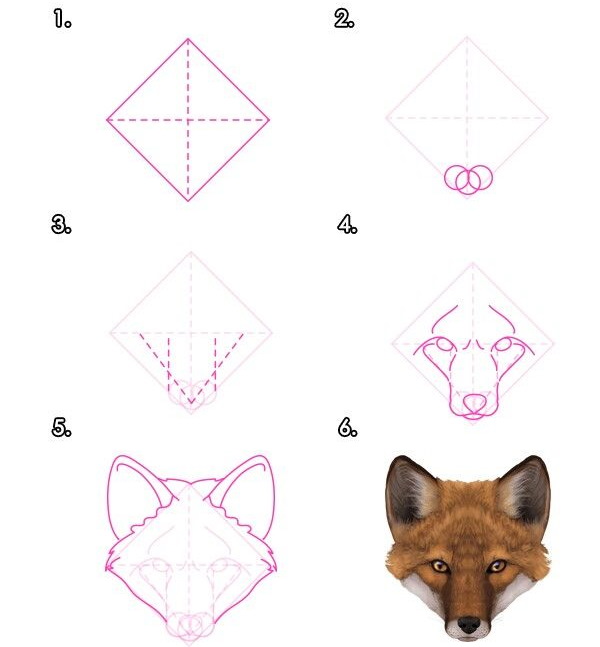
The fox's face (the drawing can be done on a simple sheet of checkered or watercolor paper) with a diamond-shaped base will be done in the following steps:
- Draw a rhombus, and then draw lines inside it that will divide the figure into 4 equal parts.
- To outline the eyes of the future fox, divide the horizontal line into 6 parts.
- Draw the nose and eyes. The nose is located at the bottom of the rhombus, and the eyes are on the horizontal line. At the same time, they should be symmetrical to each other relative to the vertical line.
- Finish drawing the cheeks and fur along the edges.
- Draw the ears. They will be quite large, slightly larger in size than the triangles into which the rhombus is divided.
- Mark the eyes. It is important to remember about highlights and shadows. It is also necessary to draw the fur in the eye area.
- Add fur all over the face and ears, then add contrast.
There are many ways to draw a fox's face in different styles and using different techniques. In reality, you can use just one simple pencil to create real masterpieces using the image of this rogue.
Video about drawing
Fox face drawing: