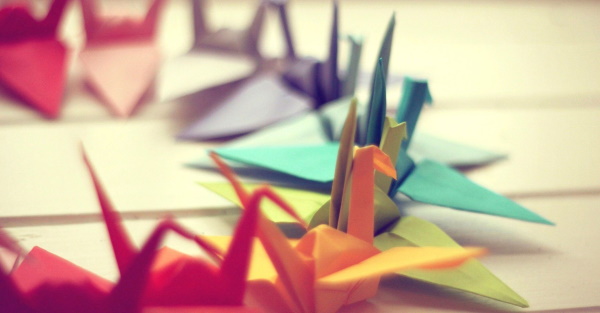
The Japanese paper crane (senbazuru), being a symbol of hope and happiness, is believed to be able to fulfill any wish. However, to do this you will need to make a thousand "senzaburu" yourself.
Features and differences of origami
The word origami translates as "folded paper" and is a type of decorative art. It involves folding figures from paper or other materials, without the use of additional tools: scissors, glue, unlike the related art form kirigami, where you can't do without scissors.

When working in origami technique, the following are widely used:
- folds and creating creases with them;
- various turns;
- combinations of folds, creases, turns.
Anyone who is seriously interested in this type of art will need to understand the following nuances:
- types of folds: external, internal, square, triangular;
- Varieties of basic shapes: double square, book, door, house, pancake, kite, fish;
- Basic folding techniques: internal and external inverted folds, accordions, petals, plunge folds.
It is also necessary to learn how to read assembly diagrams, starting with the most basic ones. Without this, making complex figures that require the use of several types of folds is impossible.
There are several types of origami, differing in complexity and the materials used.
Classic (simple) origami
This is a simple technique developed by British John Smith and is designed for beginner origami artists, children, and people with limited mobility. It involves working with one sheet of paper and using light, external and internal folds and simple folding techniques.
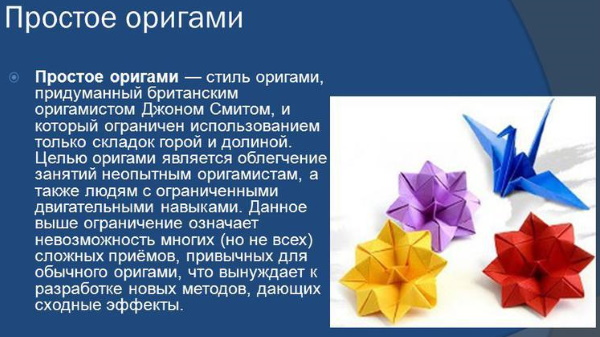
The patterns used in the classic technique are simple and clear. However, despite its simplicity, classic origami allows you to create original figures and acquire the skills necessary to move on to more complex techniques. The most famous classic origami products in our country are airplanes and boats, which any kindergarten-age child can make.
Modular origami
Unlike the classic technique, in this case several sheets of paper are used, each of which is folded in a certain way, according to the laws of simple origami, creating absolutely identical paper parts. The finished modules are fastened together (inserted into each other). Glue is not used: the integrity of the structure is ensured by friction, as well as various folds and pockets.
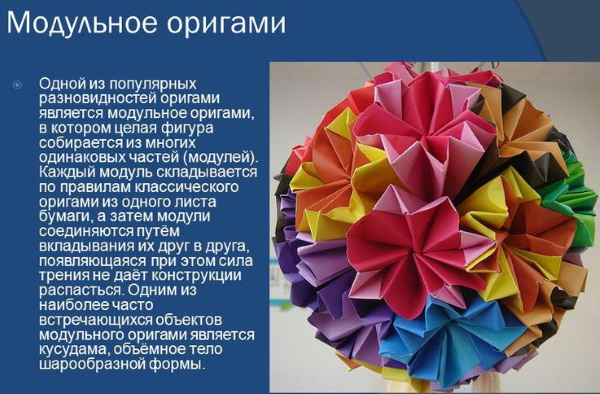
For this reason, paper and other materials with a smooth, slippery surface are not suitable for working in modular technology. Modular structures are voluminous, look stylish and attractive. Modular origami is a special case of multi-sheet origami, where it is possible to create modules of different shapes and sizes. Due to the high complexity and large dimensions of the figures being created, the use of glue is justified in this case.
Origami pattern
A pattern is an assembly scheme that is applied to paper in advance in the form of lines defining future folds. Origami pattern is one of the most complex techniques, since to perform the work it is not enough to just be able to read the pattern and follow the given algorithm.
Even the most detailed pattern on paper indicates only the main lines, and the master will have to figure out the order of folds and finalize the drawing on his own. Here you cannot do without a well-developed spatial imagination, intuition and fantasy.
Origami - wet folding
This technique uses wet paper, and the figures are rounded, without sharp corners and for this reason - realistic. When wet, the paper becomes flexible, due to which the maximum similarity to the original is achieved. When dry, the figures become rigid, retaining the shape given to them.
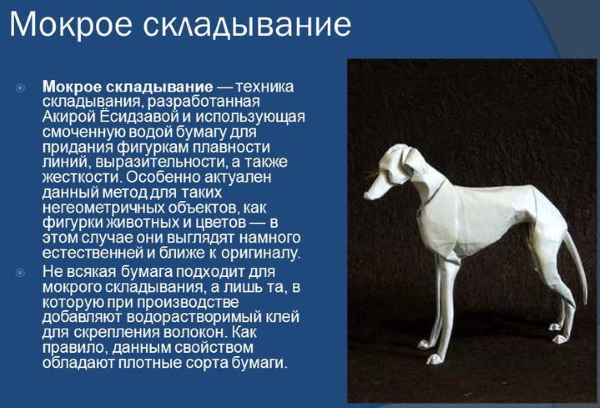
To work in the "wet" technique, you will need not only a lot of experience, but also special paper that will not tear during work. If you do not have it, you can wet only the folds, wait until the fold dries before making a new one. All this complicates the work, but the result is worth it.
"Money" origami
It involves folding figures from banknotes. You can create very interesting and beautiful combinations. The skills of "money" origami will come in handy in cases where it is customary to give money: such a souvenir will look more original than banknotes in an envelope.
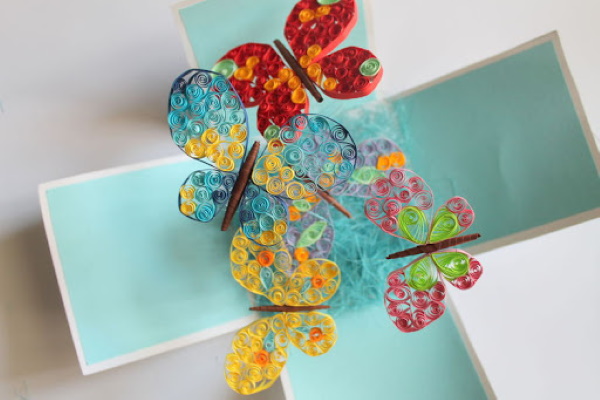
Quilling
The quilling technique originated in the 14th century, but today it is experiencing a peak of popularity again. Its second name is paper filigree, which accurately reflects the essence of the method: narrow and long paper strips twisted into a spiral are used as individual parts in quilling. The compositions made from them amaze with their openwork, lightness, and volume. However, you should only start working in the quilling technique after you have mastered its lighter analogues to perfection.
Whatever the technique, it is a big mistake to consider origami just a pastime: for an artist it has become a way of self-expression, architects and designers draw new ideas from paper figures to later embody them in stone, metal, glass. For doctors, folding paper figures has become one of the methods of psychotherapy, which helps their patients recover from a serious illness.
Origami classes are useful for children because:
- develop spatial imagination;
- improve fine motor skills of hands;
- teaches attentiveness, accuracy, and perseverance.
Story
The birthplace of origami is Japan, where initially improvised materials with the necessary properties were used as "raw materials". With the invention of paper, the art of creating figures became especially popular, spreading to other Eastern countries. At first, paper was an expensive material and, accordingly, surrounded by a mystical aura.
Therefore, it was used not only for writing, but also in religious ceremonies: paper, in particular, was used to fold "katashiro" - symbolic figures of deities, who were assigned the unenviable role of "scapegoats". After the ceremony, during which all the sins of the community were transferred to the figure, it was burned.
Later, when paper became generally available, turning into a material convenient for creativity, and the magical glow surrounding it faded somewhat, figurines not associated with religion appeared, many of which were traditionally attributed magical properties. The Japanese crane is one of them.
Legends of Living Paper Cranes
In Japan and other Eastern countries, the crane has been endowed with miraculous powers since ancient times. People believed that these long-legged birds were able to take on human form, turning into kind and beautiful monks, wandering around the world in search of those who needed help. For this reason, cranes were often called "people in feathers" and were surrounded with honor and respect. Moreover, for a long time this bird was considered sacred, and was the main character of numerous fairy tales and legends.
Paper and crane - an object and a creature endowed with sacred meaning, united together, giving life to a paper crane, a symbol of hope, faith, happiness. With its appearance, a belief arose that if you make a thousand cranes and give them to friends, then your most cherished wish will come true. This belief is associated with a true story that has become a legend.
This is the world-famous story of a little girl, Sadako Sasaki, who was irradiated during the Hiroshima explosion and ended up in a hospital in February 1955 with a terrible diagnosis of leukemia. The girl had only one cherished wish - to recover and survive. Like many Japanese children, Sadako believed in an ancient legend: she managed to make only 644 cranes and died on October 25, 1955.
Her friends finished the work, and the girl was buried along with the treasured thousand cranes, forever becoming a symbol of the rejection of nuclear wars. Today, several decades later, the children of Japan remember the little girl who became one of the many victims of Hiroshima.
Materials
In our country, we know about the tragic story of Sadako, but Japanese cranes are not so popular here, and even among adults there are few who have even a vague idea about them.
Any thin sheet material that can easily bend and subsequently retain its shape is suitable for working with materials. But a beginner origami artist is better off using ordinary paper, which has many advantages: cheapness, availability, ease of work.
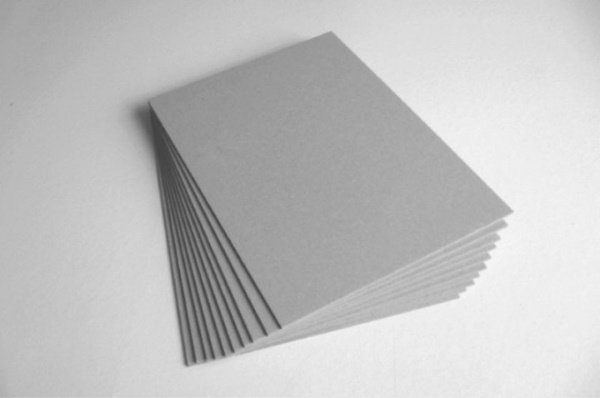
There are no special requirements for choosing paper, it is important that it is:
- thin;
- with a smooth surface (without relief or embossing);
- bent well;
- retained the shape given to it
- was strong enough and did not tear when bent multiple times;
- for colored paper - the paint layer should not crack at the folds.
Best options:
- newspaper;
- notebook sheet;
- printer paper;
- kraft paper (for simple models);
- baking paper.
Should not be used for these purposes:
- thin cardboard (will break at the folds);
- foil (crumples);
- napkins (fragile);
- non-woven wallpaper (does not hold a fold).
When preparing for your first origami lessons, there is no point in purchasing a set of expensive paper: this can be done when you gain experience.
For work you will need a sheet in the form of a square with sides of at least 15 cm long with perfectly even edges and right angles. Any distortions will inevitably affect the final result. It is necessary to take into account that the larger the size of the sheet and the smaller its thickness, the easier it is to perform all the necessary actions.
Master classes
A paper crane, which is easy to make with enough practice, is difficult to make at the first stages. Mistakes leading to incorrect folds are also possible, which will complicate the work later. For this reason, an inexperienced origami artist is advised to stock up on cheap and accessible paper.
Since success largely depends on the quality of the folds, it is recommended to follow a simple rule when forming them. For example, here is an algorithm for folding a square sheet of paper diagonally.
Necessary:
- Combine 2 vertices.
- Fix the paper near the top with one finger, and press the paper with the other, moving along it from the top to the future fold.
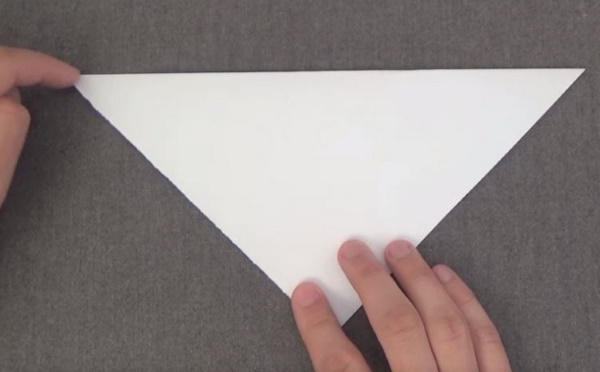
- Having reached the middle of the bend, move to the right, to the end.
- Return to the middle and continue moving to the left edge.
With this sequence, the paper does not shift, and the fold is even. Later, you can make it more precise by running a ruler or scissors rings along it. In origami technique, parts are sometimes straightened again after bending: the purpose of this operation is to form a fold line that will be used later.
In addition to folds, there may be difficulties when creating corners, especially in narrow areas: the paper in these places folds and does not want to lay flat, and any mistakes inevitably affect the final result. A metal ruler will help make the work easier: its narrow and thin end can do what fingers cannot do, and using fairly thin paper.
Traditional crane (crane of happiness)
A person who is just starting to learn origami should choose the simplest figure for their first product. The best option is a traditional crane or a crane of happiness. For work, you will need a sheet of paper in the shape of a square; the larger the dimensions of its sides, the easier it is to complete the task. A metal ruler will help to form neat folds. If the paper has a colored (front) and white (back) side, you should place it on the table with the front side up.
A paper crane (origami can be made in both the traditional and other versions) in the classic version can be made in the following stages:
- First fold the sheet along one of the diagonals, carefully iron the fold line, and straighten it.
- Fold the sheet along the other diagonal, also marking the fold.
- Turn the paper over so the other (white) side is facing up.
- Fold the sheet, aligning the top and bottom sides, iron the fold, and unfold.
- Fold the sheet, aligning the left and right sides.
- Turn the paper face up again. Now the sheet looks like this: solid lines correspond to folds directed upwards, dotted lines – downwards. In accordance with the terminology accepted among origami artists – peaks and valleys.
- Take the sheet by the corners "a" and "b" and combine the lines "ao" and "vo", following the existing folds. If everything was done correctly, the shape will resemble 2 squares connected to each other. This figure is called a double square, is considered basic in the origami technique and is a blank for many figures, including those that will be discussed below. The double square has a blind corner and an opening corner located opposite it.
- Now the square needs to be placed on the table so that the opening corner is closer and the blind corner is further away, and bend the right side of the top square to the center, aligning it with the fold line there.
- Do the same with the left side, then turn the figure over and repeat these manipulations with the 2nd square. Iron all the lines carefully, clearly marking them.
- Bend the resulting triangle at the top down, straighten it, turn the figure over and bend the triangle down, then straighten it. You just need to form a fold line.
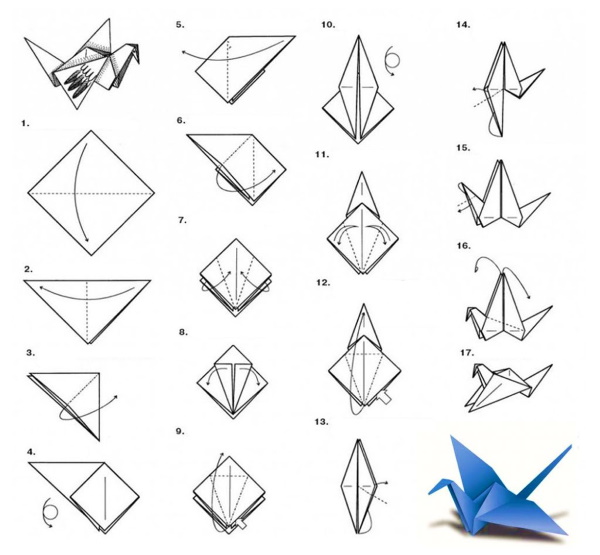
How to make a paper crane from paper in the classic way. - Straighten the sides: you will again get a double square, but with the marked fold lines.
- Take the corner of the top square (point a) and lift the edge of the sheet up, simultaneously bending it along the fold lines just formed. In this case, the lines "ab" and "ac" are aligned with the center, the triangle at the top does not open. To make the task easier, you can press it with your finger.
- Turn the figure over and do the same with the other side. The result should be an elongated rhombus, with a "cut" from the bottom vertex to the center along the long diagonal.
- Bend the corners of the resulting 4 “tails” towards the center again.
- Understand the “anatomy” of the future crane: the long tails that are now at the bottom are blanks for the neck and tail, the triangles at the top are the wings, the smaller triangle between the wings is the body.
- To give the workpiece the desired shape, fold the “tails” upward and inward, then pull them slightly, securing the resulting fold with your fingers.
- On one side form a head, for which bend the tip of the neck, bend the wings down and slightly stretch them to the sides. The crane is ready.
Crane on legs
A paper crane, which can be made with legs, will not cause any difficulties after making the traditional version. However, it is necessary to take into account that for this figure it will be necessary to fold the paper 1 more time, and the figure itself will have smaller dimensions. Therefore, a thin square sheet with a side of at least 20 cm is needed.
In addition to paper, you will need a ruler, which will help to form folds, and scissors. The beginning of the work is no different from that described in the first section, so it is necessary to perform a short "review of what has been covered". This will result in a figure in the form of a narrow long rhombus with a forked long tip.
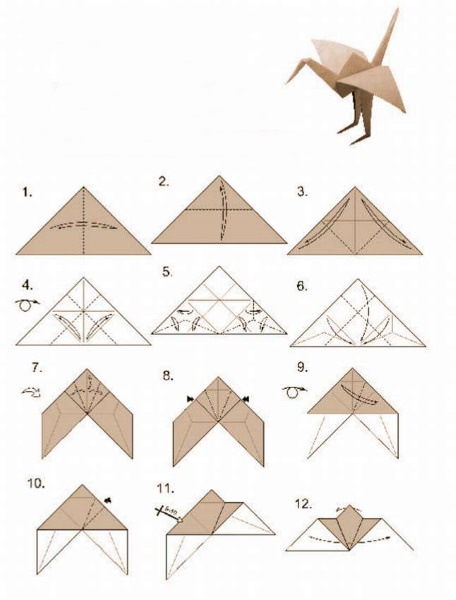
When making a traditional crane, the neck and tail were formed at this stage, but now everything is different:
- The sides of the tails are folded (aligned with the central axis of the figure) once again.
- The neck is formed: one of the long tails is bent upward and inward.
- The end of the neck is bent to form the head, and the wings are given the desired position.
- To make the legs, you will need scissors: use them to cut the second tail that remains straight along (approximately to the level of the neck).
- The crane is provided with feet by simply bending the ends of the legs.
Using scissors in the classic origami technique is unacceptable: the figures must be folded from a single sheet of paper. But you can deviate from the rules a little.
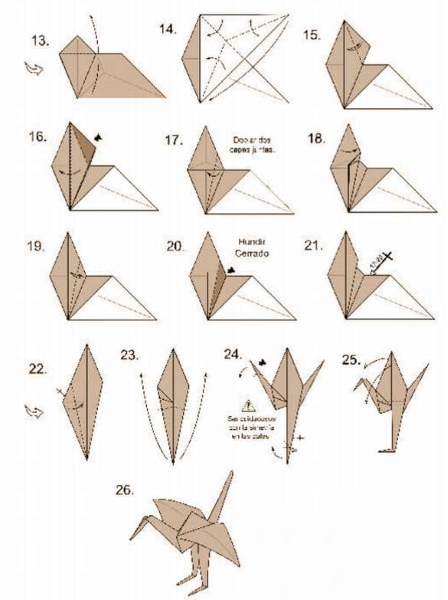
Principled origami artists may not make a cut, but limit themselves to creating a stand by bending the tip: then everything will be in full accordance with traditional canons.
Festive crane
A paper crane, which can be made festive, can have a luxurious tail and lush corrugated wings. It is considered one of the most beautiful figures available in the classic origami technique. It is usually made of colored paper and presented to friends as a souvenir. To make this figure, you will need some experience working with paper and knowledge of some basic origami techniques.
The initial stages, which boil down to creating a double square, have already been mastered, so next you need to do the following:
- Place the double square with the open side facing you, and fold the corners of the top square to the center, then fold the top corner down to form a fold line there.
- Form a rhombus, but the bottom square is not yet involved in the work.
- Turn the piece over: the remaining square is to be used to make the crane's tail and wings. To do this, folds are made on it, but in a different direction: from the blind corner to the center on both sides.
- Hide each of the resulting corners inside the square, for which open it slightly and fold the corner along the fold line inside and do the same with the other side of the square.
- Bend each of the resulting parts in half again. First the upper corners, which after bending are hidden inside again, and then the lower ones. The result should be a fairly complex part.
- Fold the resulting corner downwards.
- Turn the part over.
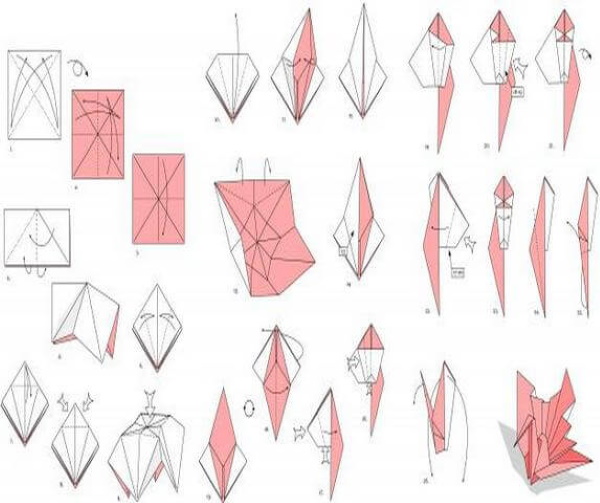
- To form the crane's neck, you need to process the upper (in the picture - the one on the left) corner, for which its left (lower) side is folded to the right (up), and then the right (upper) side - to the left (down). In this case, the folds are ironed only to the middle: to the intersection with the central axis.
- After the fold lines are formed, straighten the corner. Take the part in your hands and bend it along the axis of symmetry. The corner will rise up. Fix it in this position.
- Fold the top corner back so that it is parallel to the bottom piece, and there is a small gap between them.
- Straighten the triangle again, open it and fold the corner inside along the existing folds.
- To give the crane a head, simply bend the tip of the neck, then straighten the fluffy tail and the beautiful congratulatory crane is ready. If desired, you can decorate the tail by gluing a few rhinestones to its tip.
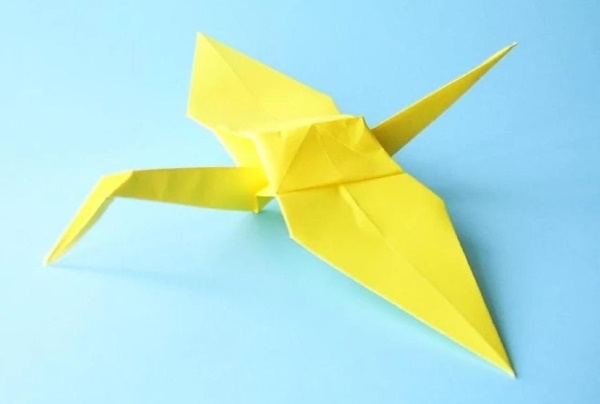
Crane in flight
As you know, a flying crane has its neck and tail in one line, and its wings are wide open.
To recreate such a figure using a square sheet of paper, you will need:
- Make a double square, and from it - a double rhombus, one part of which is forked, and the other is solid, and between the solid parts there is a small triangle. To access it, you need to bend down the top part of the rhombus.
- Fold the triangle along the middle line so that its apex lies on the fold line.
- Unbend the triangle, then take the double rhombus by the upper parts and stretch them slightly. The triangle will open up, turning into a square. Inside this square there is another, small one, marked with fold lines. These lines need to be made clearer by running your fingers over them.
- "Hide" the small square by pressing lightly on its center.
- Bend the solid parts of the rhombus upwards and “hide” the trapezoid between them.
- Figure out where and what is on the crane: the solid parts of the diamonds will become the wings, the trapezoid between them will be the back, and the forked tails will turn into the neck and tail.
- Bend one of the tails upwards, then bend it back and bend it again, but diagonally.
- Open the resulting figure and secure the folds.
- Fold the edges to the center and fold the piece in half. This will make a tail.
- Use the same algorithm to form the neck, the only difference is that its tip is bent to indicate the head.
- Open the wings and bend their tips slightly upward, otherwise they will fall under their own weight.
- Open the trapezium between the wings and iron it carefully: now it has become the back. The crane is ready to fly and can flap its wings if it is lifted up sharply.
There are also more complex varieties of cranes, as well as many other, no less interesting, figures. If the proposed samples are successfully assembled, it means that the origami lover has mastered the basics of this art and can move on, gradually gaining experience, honing his skills, making more and more new paper masterpieces.
Video on how to make a paper crane from paper
How to make an origami crane: