Kolobok is the very first fairy-tale character that children begin to portray. Drawing for children on this topic is very important, as it introduces drawing and allows you to master different techniques. However, for adults, this is also an interesting plot; on Kolobok, you can practice light and shadow when drawing a ball and depicting various emotions.
Tools and materials for drawing
Kolobok is a drawing for children that allows you to try different drawing techniques, so materials and tools should be selected based on the chosen style. When buying paper, you need to consider two features - density and texture. If the work combines several materials (for example, pastel and watercolor), then the paper should be universal.
| Type of work | Paper type |
| Pencils, crayons or oil pastels. | Album paper (density from 100 g/m2 and higher), slight ribbing. |
| Felt-tip pens and markers | High-quality album paper for drawing (from 120 g/m2), offset paper for printing is also suitable, but the drawing will show through. The texture of the paper does not matter. |
| Paints | Watercolor paper with a density of 160 g/m2, paper with worse parameters will get wet when working with paint and will create waves. |
| Plasticine | Thick watercolor paper or non-glossy cardboard. |

The most suitable pencil for children to work with is a medium-hard pencil with the TM (hard-soft) marking, it can also be marked in Latin letters - HB. This type of pencil is easily removed with an eraser and does not leave grooves on the sheet.
Colored pencils should be of the same softness. For little ones, it is better to choose felt-tip pens with the inscription "washable" (washable with water). Before starting work, you should check that they do not flow and do not leave stains. Schoolchildren can already work with a permanent liner 0.6-0.7 mm, preschoolers are better off drawing contours with a black felt-tip pen.
To work with gouache and watercolors, you must have a palette (white plastic) and a spill-proof glass. You also need to prepare a test sheet of paper to practice the stroke and check the color. Children need to be taught the culture of drawing, so you need to take care of a damp cloth or rag for wiping and drying the brush when changing colors.
A beginner artist should choose honey rather than professional watercolor. It is easier to pick up on a brush and the colors are more saturated. It would be logical to take gouache in primary shades, secondary colors can be mixed on a palette.
With wax crayons and plasticine
Materials and tools:
- Plasticine.
- Wax crayons or oil pastels.
- White or blue paper (preferably thick drawing paper or non-glossy cardboard).
- Templates (cardboard circles or other round objects).
- Stand for working with plasticine.
Kolobok is a drawing for children that can also be used to develop speech. At first, children recall the fairy tale about Kolobok and take turns telling its content. An adult can also make a simple riddle about this character. For example, draw a circle on a sheet of paper, cut it out and ask to guess what or who can be drawn using this figure.
You can draw a face on the cut out Kolobok and use it when telling a fairy tale, passing it from hand to hand. Then tell the children that they have to create a Kolobok that the Fox will definitely not eat, it will get stuck in her teeth, since you will need to draw not only with crayons, but also with plasticine. Then the work is built according to this plan:
Progress of work:
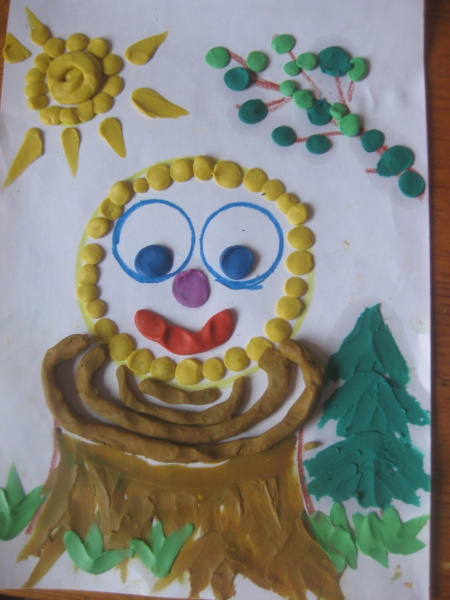
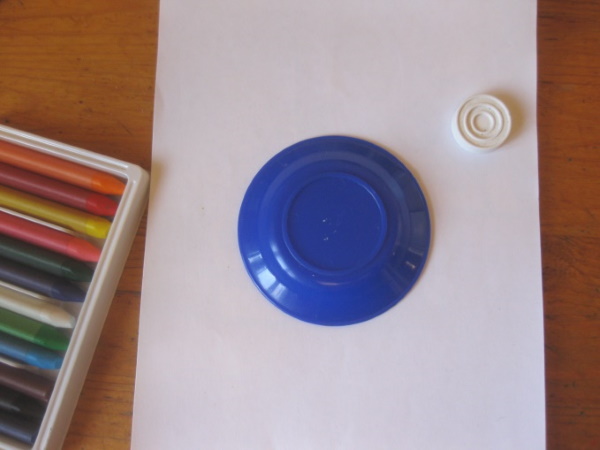
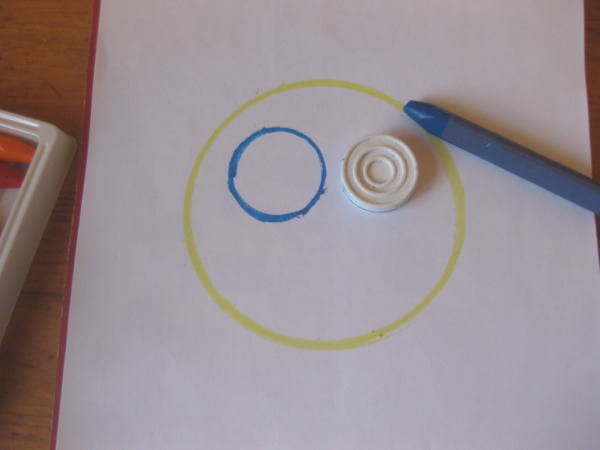
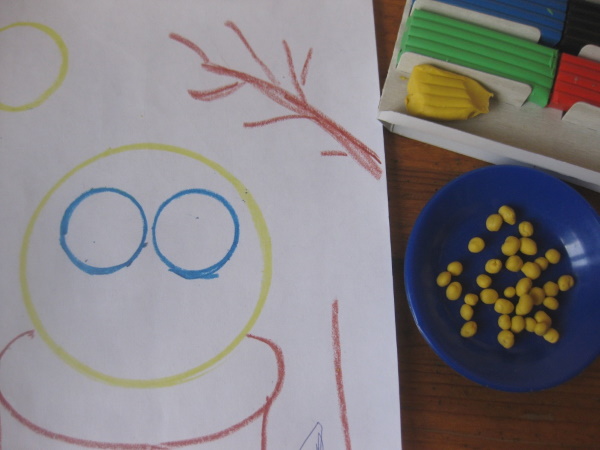
- It is difficult for children to draw a circle by hand, so first place a round template in the center of the sheet (made from improvised material - a lid or a plate from doll dishes will do). It will be easier for children to immediately trace the template with yellow pastel or wax crayon than to draw first with a pencil and then trace it evenly with crayon.
- Using a smaller template, trace two circles for the eyes with blue chalk.
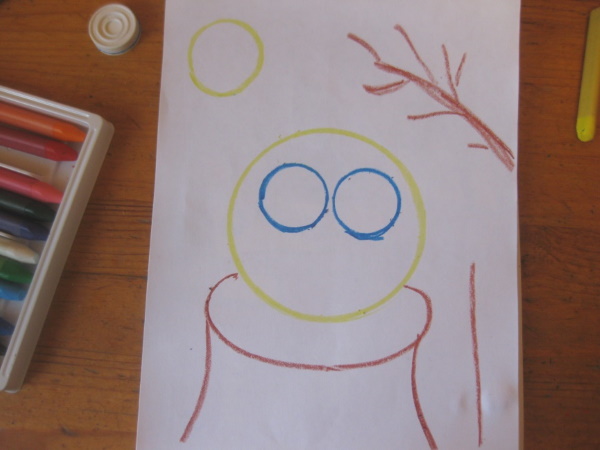
- Next, draw an oval around the bun with brown chalk, and two lines down from it. This is the stump blank.
- Then, using chalk, they draw a branch, the trunk of a tree, and the sun.
- Then you can continue drawing and coloring with crayons or watercolors, but the drawing is also ideal for plasticine plasticine. It allows you to practice all the simplest techniques of drawing with plasticine.
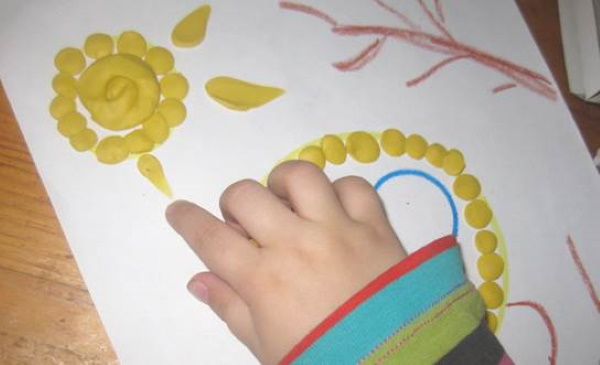
- First of all, children make small balls of 4-5 mm from yellow plasticine. Older children can fill the entire Kolobok with balls, while little ones will only have enough patience for the outline. Plasticine balls are laid out along the yellow circle and flattened with a finger.
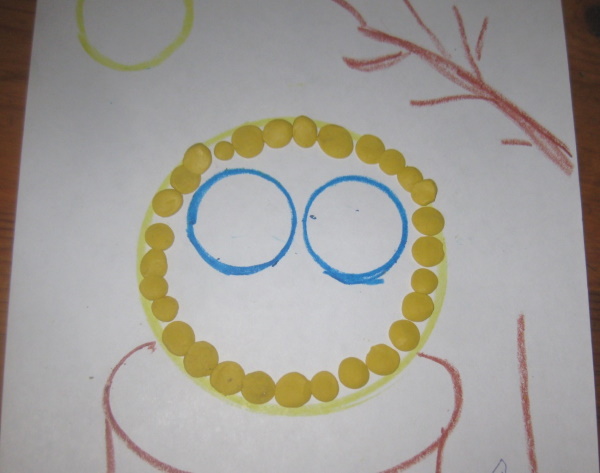
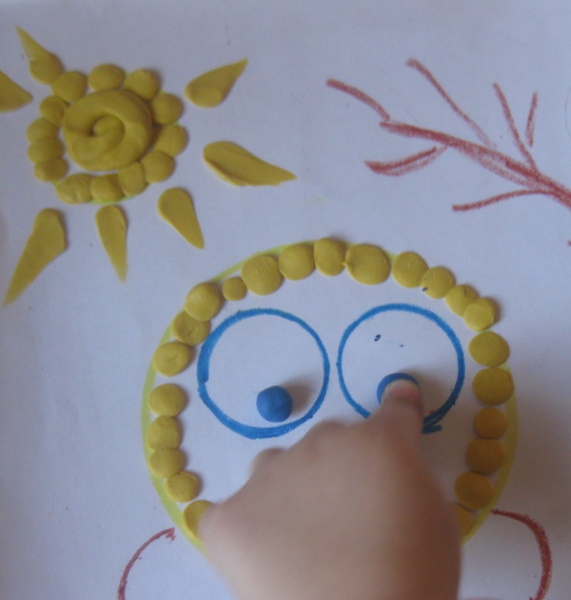
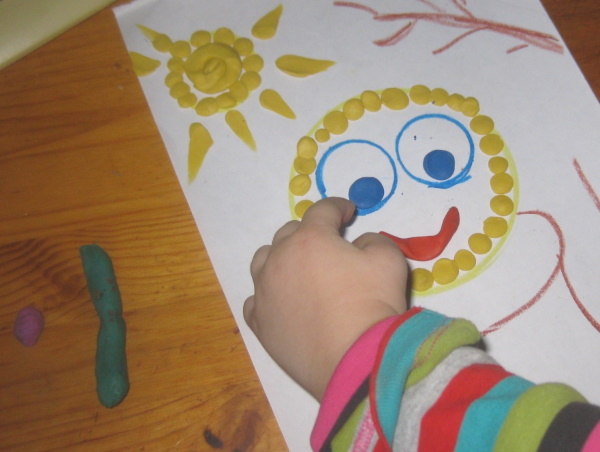
- Next, roll two larger blue balls and use them to make pupils. The nose is also made from a plasticine ball.
- For the mouth, roll a red sausage and attach it to the sheet in an arc.
- The remaining elements of the picture can be done in any order. For the stump, roll several thin sausages; these will be the annual rings. It is better to lay the rings from the middle. The base of the stump can be made using the "smearing" technique. Children prepare several balls of brown plasticine, and then smear it over the surface in a thin layer, filling the voids. At the bottom, make several long strokes; these will be the protruding roots. Unevenness is quite acceptable, since the plasticine repeats the texture of the bark.
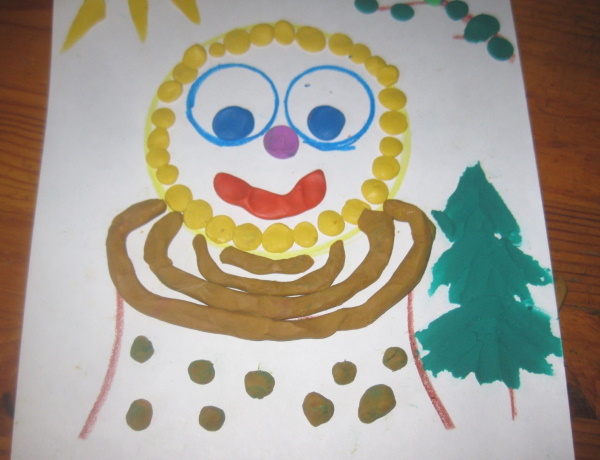
- The sun can be filled with balls or the sausage can be twisted into a snail. It is also interesting to combine the two techniques. To make rays, you need to smear the plasticine balls in the direction away from the sun. To get even plasticine drops-smears, it is worth practicing on a separate sheet.
- The leaves on the branch are best made with plasticine balls of different shades of green. The fir tree and grass can be drawn with plasticine strokes. To do this, place a plasticine ball at the base of a bunch of grass or one of the tiers of the fir tree, press it down and spread it in the desired direction.

Kolobok, a drawing for children, is not the only subject for plasticine plasticine. With the help of plasticine, kids can quickly color any picture, this method of drawing not only develops creativity, but also allows you to train fine motor skills, which are directly related to the development of speech. It is important not only to sculpt, but also to pronounce all the stages of the work, and at the end of the lesson to "revive" the homemade koloboks - sing their song together.
With wax crayons and watercolor paints
Tools and materials:
- Watercolor paper (not glossy).
- Simple pencil (TM).
- Wax crayons or oil pastels.
- Watercolor paints.
- Medium sized flat brush.
- Eraser.
- Palette.
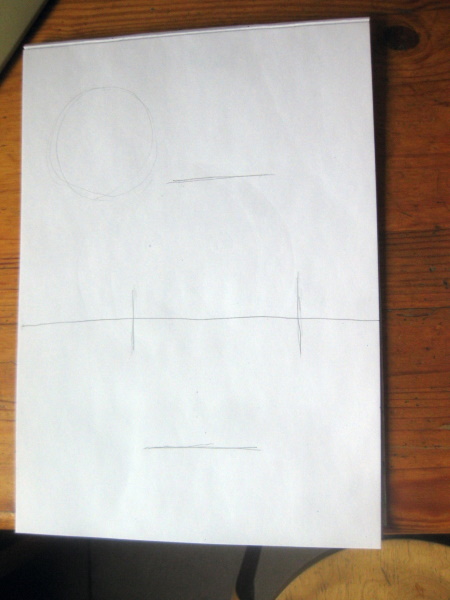
At the beginning of the lesson, you can draw a semicircle of the horizon on a white board or a large sheet of paper, explaining to the children that this is a line at eye level dividing the sky and the earth. Next, you should place a small cardboard ball next to the line, this is Kolobok. Then you should move the character closer and closer to the edge of the sheet and change it to a larger circle, asking the children why Kolobok has changed.
Children should conclude that it has come closer and has grown larger. You can also practice using flowers, houses and other simple objects.
Progress of work:
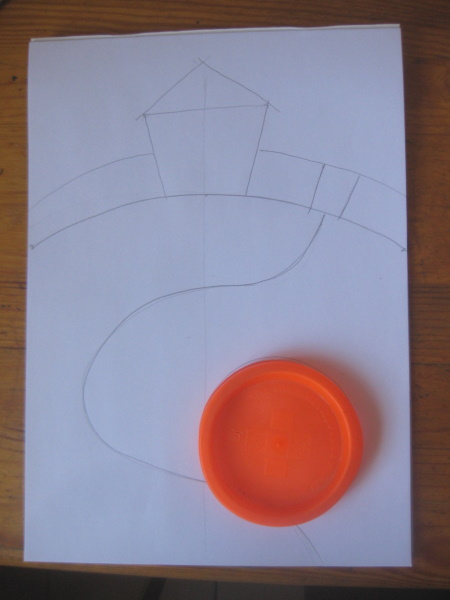
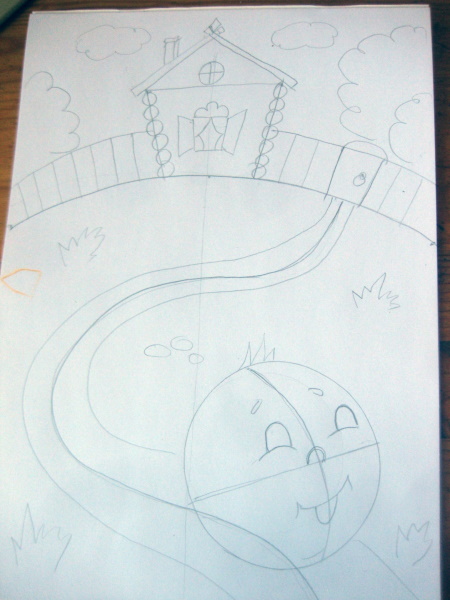
- First, mark the horizon line with a semicircle, it will be located slightly above the middle of the sheet. Then it is convenient to mark the middle of the image with a vertical line. In the middle, symmetrically, the contours of the house - a trapezoid and a triangle of the roof, from the house draw a fence line on both sides. Mark where the gate will be. From it, draw an arc of the road. On the road, to the right of the center line, draw (or trace according to the template) a circle for Kolobok.
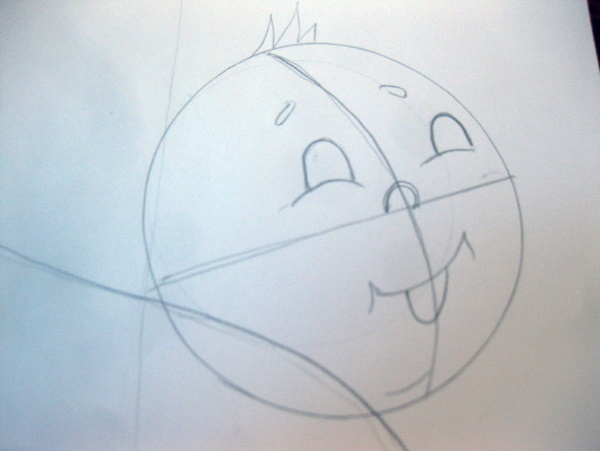
- At the next stage, some details are drawn with a pencil. The bun is divided into 4 parts with an offset to the right, since it is depicted half-turned. The symmetry lines are curved, they repeat the volume. The nose is drawn clearly in the middle, the eyes are in the form of arches on both sides of the central line. The line of symmetry divides the mouth exactly in half. At this stage, you still need to draw the road, it widens, moving towards the foreground. At the horizon line, it is narrower. It can be difficult for children to calculate this increase, so you can place dots along the line at different distances and gradually connect the segments. The remaining details can be drawn immediately with crayons.
- Next, erase the marking lines.
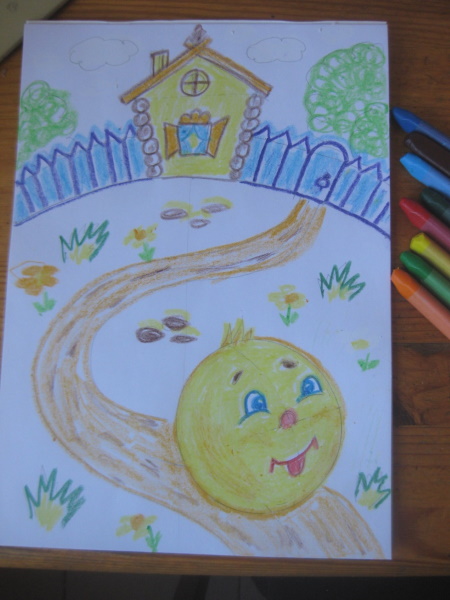
- Then, using crayons or oil pastels, they color and finish the picture. They start with Kolobok. The hero himself is yellow. In order to make Kolobok more realistic, the outline is outlined in orange, and a few strokes are made in the same color around the cheeks and under the eyes.

- The remaining colors for the painting should be, if possible, light. For the hut - brown and yellow, for the fence - blue and light blue, for the road - brown, orange, yellow. You can also draw yellow, white and pink flowers with chalk. It is necessary to draw several white clouds and green trees. This can be done with circular movements or hatching.
- The next step is to mix blue watercolor with a little water on the palette. The brush should be wet, but with an intense color. The sky is painted directly on top of the clouds and trees, the chalk showing through the paint.
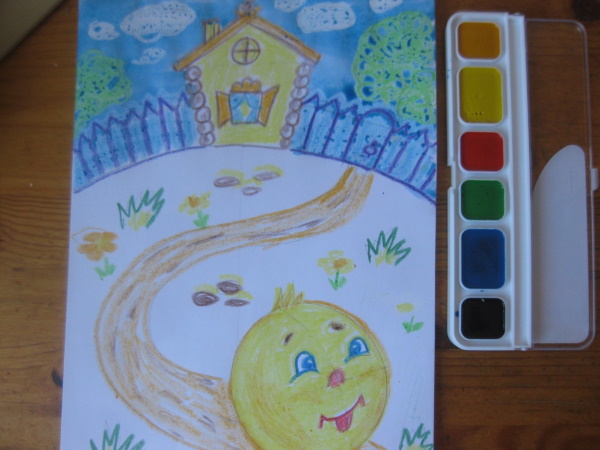
- The grass is tinted in a similar way. While the painting is still wet, excess paint can be removed from undeveloped details with a dry brush.
This master class demonstrates that Kolobok is not a primitive theme. This drawing for children allows you to master the basic concepts of perspective, gives an idea of the properties of wax crayons and pastels.
From the cartoon with marker and pencils
Tools and materials:
- Drawing paper (not glossy).
- Simple pencil (TM, 2M).
- Colored pencils.
- Thin black marker (liner).
- Eraser.
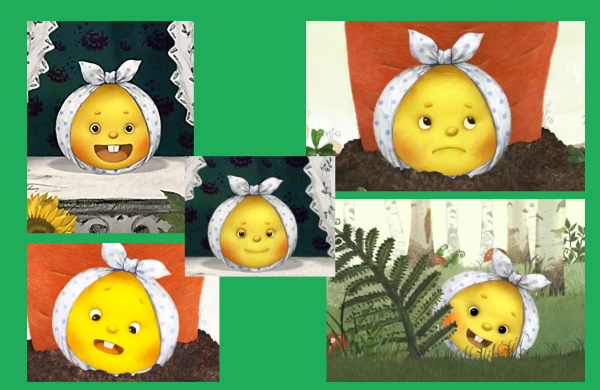
Before starting work, you can watch the cartoon "Kolobok" or look at different still frames, remembering how the plot unfolded. You also need to pay attention to how Kolobok's facial expressions change.
Progress of work:
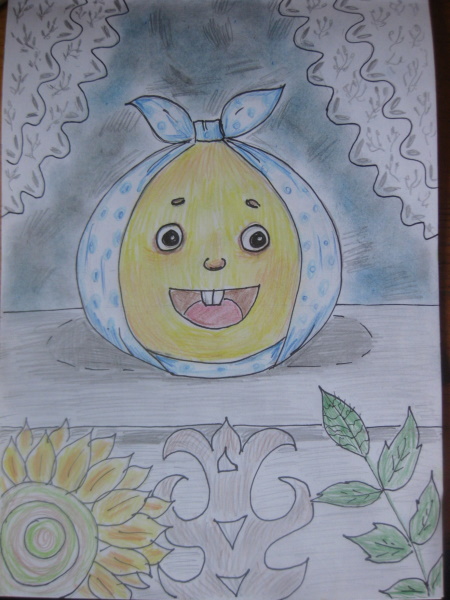
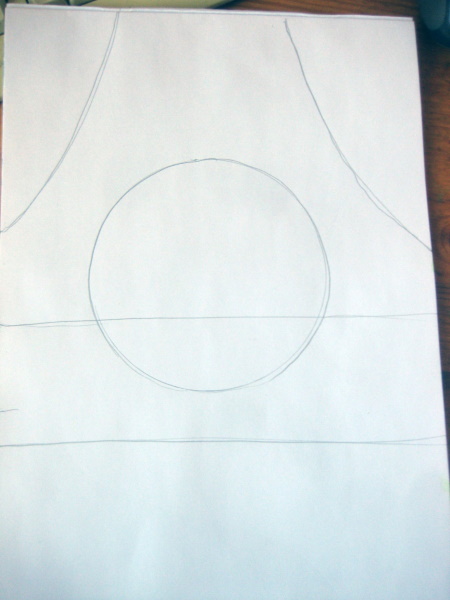
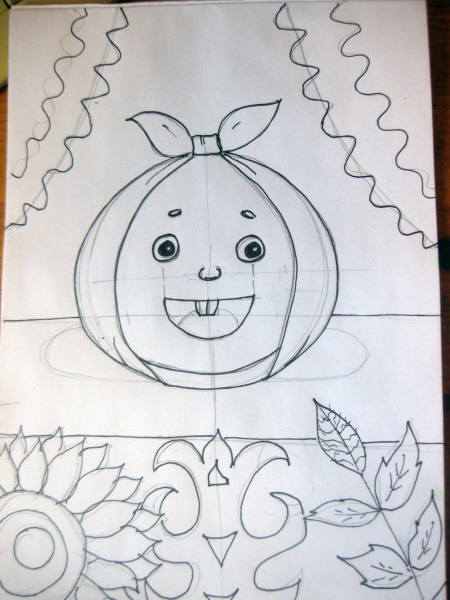
- First, draw a line of the window sill with a pencil, it goes approximately in the middle of the sheet. The second line of the window sill is 4 fingers lower. Then draw a circle, as a template you can use a lid or a plate from children's dishes. The bun touches the window sill approximately in the middle. On the sides draw the arcs of the curtains.
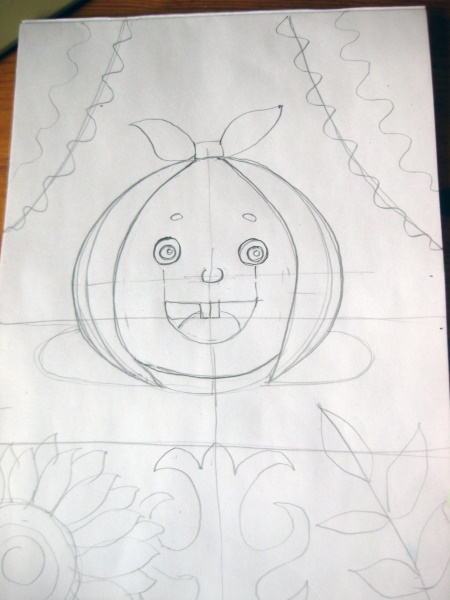
- The next step is to draw the main parts. In order for Kolobok's face to be proportional, it is most convenient to divide it into 4 parts with two intersecting perpendicular lines. The nose is drawn in the middle, at the intersection. The round eyes are at an equal distance from the vertical. If you mentally omit the lines from the pupils, these will be the corners of the open mouth. You can also choose another facial expression, focusing on the frames from the cartoon. The scarf does not fit Kolobok evenly, but expands slightly. The result is the shape of a flattened pear. An oval shadow is marked under Kolobok.
- Next, they finish drawing the surrounding objects – the waves of the curtains, the sunflower, the branches and the pattern of the door frames.
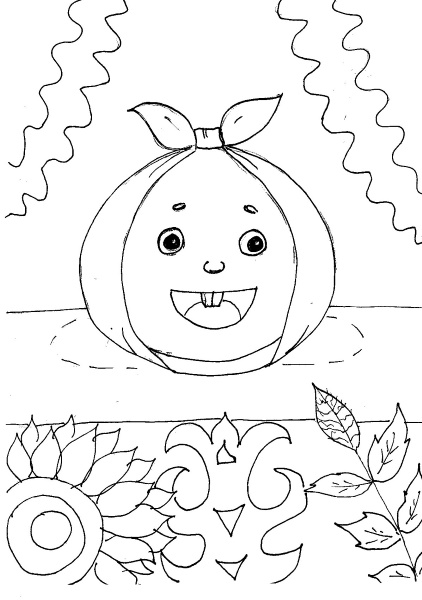
- Next, all the main lines are outlined with a black liner or felt-tip pen. Particular attention should be paid to the fact that an unpainted highlight must be left inside the pupil, then Kolobok will immediately “come to life”. The shadow can be left unlined.
- All auxiliary lines (markings) are erased.
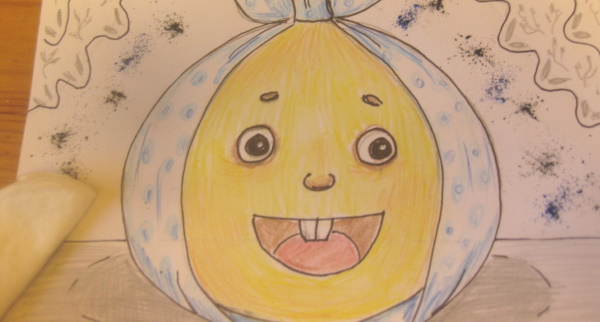
- When coloring, you can copy the colors from the cartoon or use your imagination. It is important to draw the children's attention to the fact that you can combine shades when coloring with a pencil. For example, the kerchief is light blue, but blue can be added to the folds. For Kolobok, yellow is chosen as the main color, but when the entire face is painted, Kolobok is "blushed" with orange, and light strokes are applied to the cheeks and crown. To make a smooth transition between colors, the colored area can be smoothed with a cotton pad.
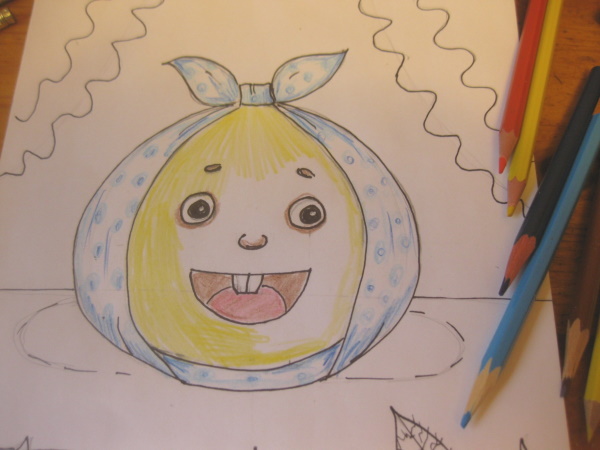
- The window sill and patterned casings do not have to be completely covered with color. You can use hatching and then rub the space with a cotton pad to smooth out the strokes. At this stage, you can explain and show the children what a shadow from an object is and how it looks in the drawing.
- The children can choose the pattern for the curtains and the colors for the sunflower and the branch themselves, but it may be difficult for children to paint the dark background behind Kolobok. Then an adult can use a stationery knife to whittle the core of a black and blue pencil, and the child rubs this powder with a cotton pad.
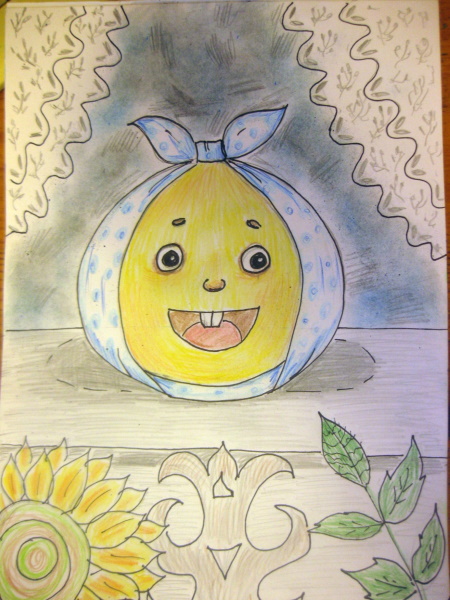
Kolobok is a drawing for children that can be tried with different age groups. Little ones can simply color Kolobok, which was drawn with a marker by an adult. Younger schoolchildren are already able to go through all the stages and repeat the path of the cartoonist who created such a positive image. Also, children, focusing on the basic algorithm, can draw Kolobok in a different environment and with different emotions on his face (in the forest, by the pond, in a hollow).
Gouache
Materials and tools:
- Drawing paper (thick).
- Gouache.
- Brushes (Thick flat, medium thick and thin).
- Palette.
- Pencil (TM).

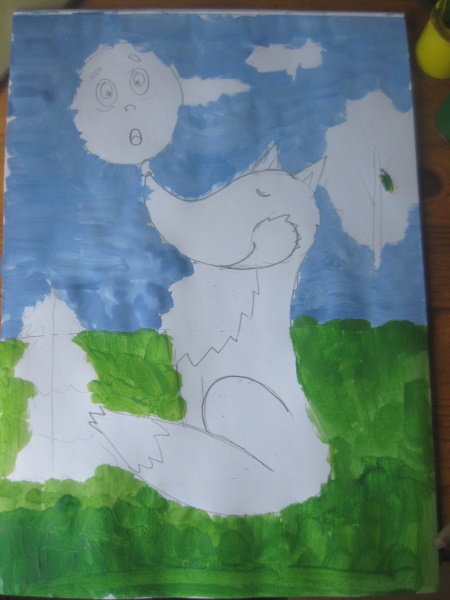
Kolobok is a drawing for children that can be repeated every year, reaching a new level of complexity. Before you start drawing, you need to remember the main characters of the fairy tale. Look at the final scene in the illustration in the book or ready-made drawings and ask the children what color the Fox is (red), the sky (blue), the grass (salad, light green). Then the children discover that they do not have such colors in their set, and repeat the basic rules for mixing paints.
Progress of work:
- First, draw a horizon line with a pencil just below the middle of the sheet. Use strokes to mark the size and location of the Fox. The area where Kolobok will be can be circled.
- The next step is to make a sketch without drawing. Start with the Fox's head - draw a circle, from which a sharp curved nose and two ears are drawn. An oval is used to mark the bent hind leg. A concave line is drawn from the head, this is the back, which without separation passes into the tail, overlapping the oval of the hip. Outline a smile and the Fox's eye closed with pleasure. The bun is drawn as a circle or oval. He can be given an expression of fear, then the mouth is open, the eyebrows are raised.
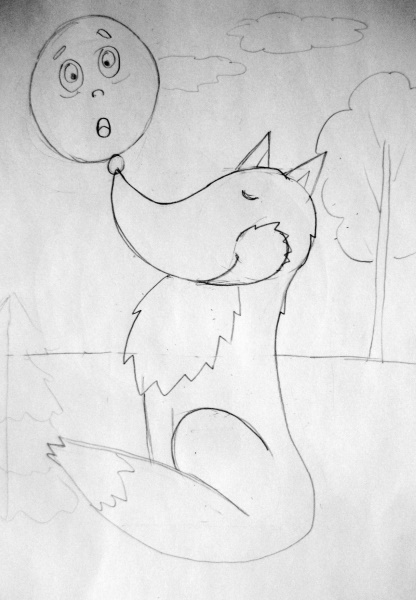
- Next comes the drawing of some details. The chest, cheek and tip of the tail are marked with a zigzag - these areas will later be white. The main lines are outlined thicker. Then the auxiliary lines are erased, the main ones can also be lightened a little with an eraser. At this stage, you can also outline what elements will fill the background - these can be trees and bushes. The crown can be shown schematically with a wavy line.
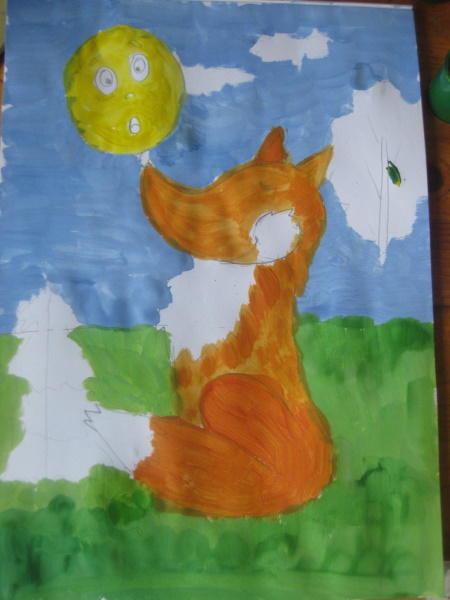
- The work with paints begins with the background. White gouache is placed on the palette and a little blue is mixed into it until a light blue or light blue color is obtained, then a little water is added. The paint is applied with a flat brush in horizontal strokes, without touching the image of the Fox, the bun and the tree. It is more convenient to move the brush in the direction from the image and first surround the characters with strokes, and then paint the rest of the space. Then green gouache is placed on the palette, a little yellow paint is mixed into it until a light green color is obtained and the grass is painted in a similar way, only it is better to make horizontal strokes.
- Then you need to make sure that the background is dry and move on to coloring the characters. For Kolobok, take yellow paint, and for the Fox, add a little red to the yellow gouache, achieving a red color. The characters are painted with a medium-sized brush, the brush is periodically moistened, no water is specially added to the paint. The color should be intense. The Fox's entire body is painted, except for the white areas. You can use the same red color to make Kolobok rosy, outlining his contours and emphasizing his cheeks.
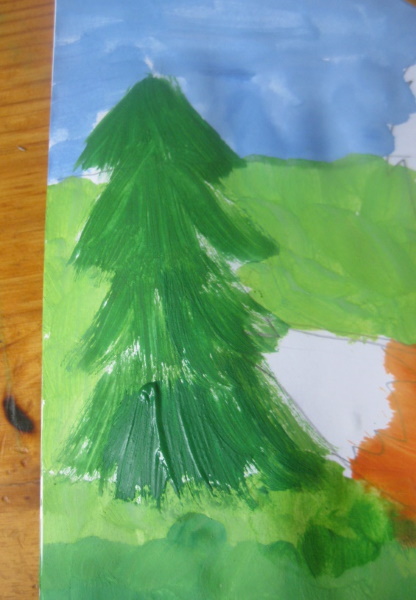
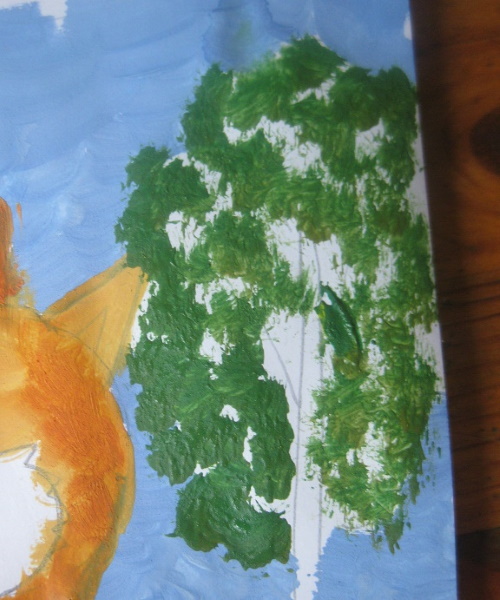
- Next, paint the tree crowns with green gouache. For the Christmas tree, use dry brush strokes (you can use a glue brush), for the birch, use dry brush jabs. To make the crown look natural, you can combine two shades of green.
- Next, the brush is carefully washed and wiped and the Fox's chest, cheek, and tail tip are painted with white gouache, as well as the birch tree trunk and clouds. You can also highlight the fur in some places with white strokes and make highlights in Kolobok's eyes. Water is not added to the gouache on purpose.
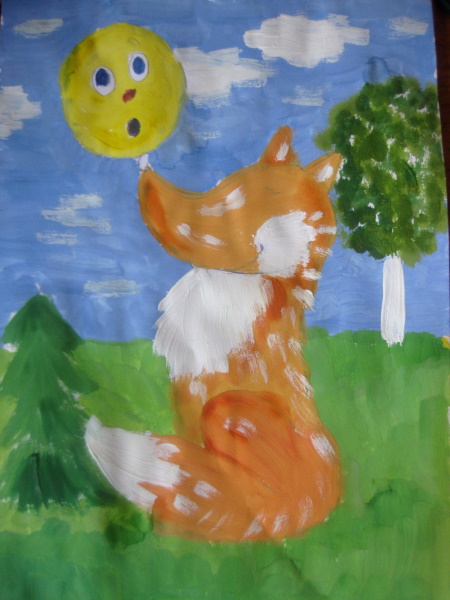
- When the image dries a little, take a thin brush and use black gouache to draw the tip of the nose, eye, smile, emphasize the structure of the fur and the line of the hip. Also, use black paint to mark the strokes on the crown of the birch.
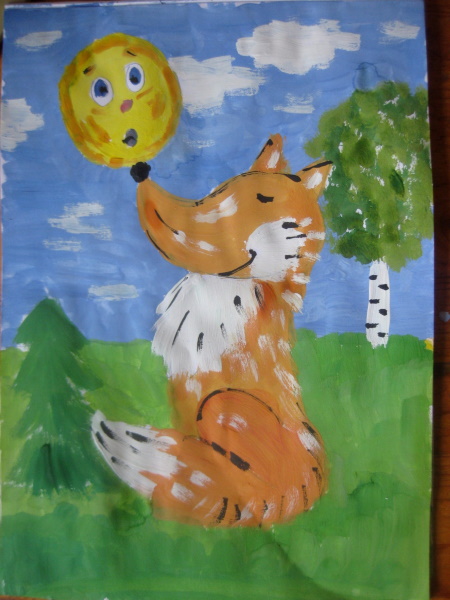
- Children can also add other details – flowers, mushrooms, berries, birds.
The "Kolobok" plot allows you not only to learn how to mix colors, this drawing for children gives the opportunity to practice different types of brushstrokes (toning with a thick brush vertically and horizontally, working with a dry brush, drawing with a thin brush).
Video on how to draw a bun
How to easily draw a bun for a child: