The pink flamingo is a beautiful representative of birds. Despite its huge beak and thin long legs, this bird is considered one of the most elegant and graceful in the world. To capture it on paper, you can use one of ways of copying.
How to draw a flamingo silhouette step by step for beginners
At the initial stages, it is better to draw a flamingo in full growth, using the silhouette of the bird as a basis for copying.
For such work it is necessary to prepare:
- A sheet of paper of a suitable size. It should be positioned so that there is enough space for the flamingo to grow. When calculating the proportions, it should be taken into account that in reality, a flamingo can reach a height of 1.5 m.
- Writing instruments. You can draw the outlines with a simple pencil, and for coloring you will need colored pencils or paints.
- Eraser. It will be used to remove extra lines left by a simple pencil. The eraser will be needed to remove possible errors when drawing contours, as well as auxiliary lines that will be drawn at early stages to simplify the work in the future.
All work can be divided into 5 main stages.
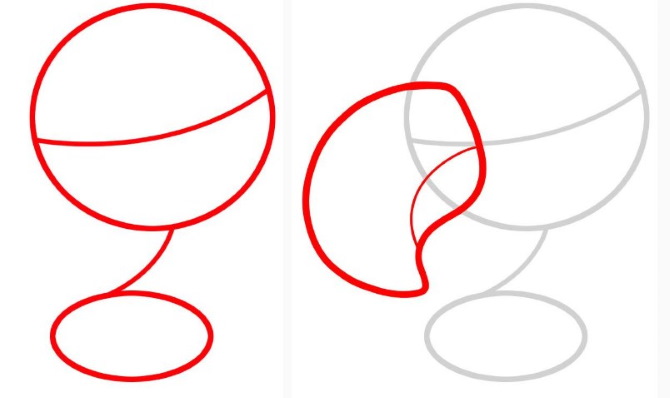
Drawing the contours of the body
The drawing starts with their image, so it is necessary:
- Find the center of the sheet and draw a circle. It does not have to be even or large.
- To the right of the central circle, draw another one – smaller.
- Draw a triangle on the left side of the large circle.
Drawing the contours of the neck and lower limbs
If you draw all the lines correctly, the drawing will vaguely resemble a real bird.

The lines should be drawn as follows:
- Connect both circles with an arc. The arc should pass over the circles.
- Draw a small rounded line to the right of the small circle. It should curve slightly towards the drawing.
- At the other end of this small line, draw a small circle. It should be smaller than all the other circles.
- From this small circle draw another short arc line, rounding towards the drawing. At its other end there should also be another small circle.
- Having finished working with the right part of the drawing, move on to its lower part. Here you need to draw 2 lines and 2 circles. These will be the bird's legs.
- The 2 lines coming out from the bottom of the big circle should be straight and positioned so as to intersect each other. Under each of the lines that indicate the flamingo's legs, there should be 1 small circle. Leave a small distance between these circles and the lines.
- Make a few strokes on the left side of the drawing. To do this, draw a couple of lines along the bottom side of the triangle you've already drawn. These lines should intersect under the triangle and end at the intersection point.
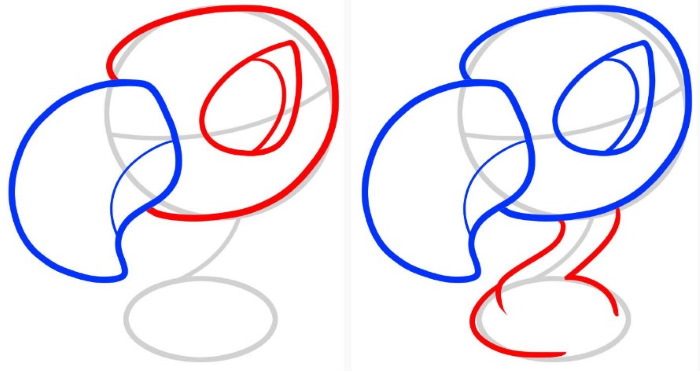
Drawing the outline of the head and lower legs with webbing
First you need to draw the head, or rather its outline.
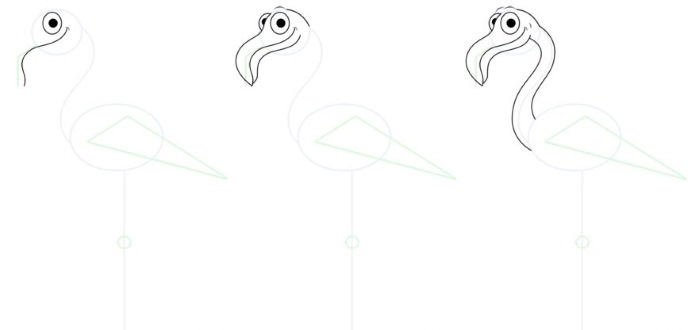
To do this:
- From the top small circle, located on the left side, draw an arced line, tending upward and at the same time slightly rounding in the direction away from the drawing.
- At the top end of this line, draw a circle that will be the outline of the head. This circle should be slightly larger in size than the other circles located below it on the neck, but smaller than the 2 main circles that were drawn at the very first stage.
Having finished drawing the outline of the flamingo's head, you can move on to the lower part of the drawing - to the bird's legs and to the outline of the wings.
To do this:
- From the 2 circles located at the very bottom of the drawing, draw along 1 long line. These will be the silhouettes of the thin legs characteristic of flamingos.
- Each leg should have webbing, so draw 2 short lines at the bottom. At this stage, work with the bird's legs is complete.
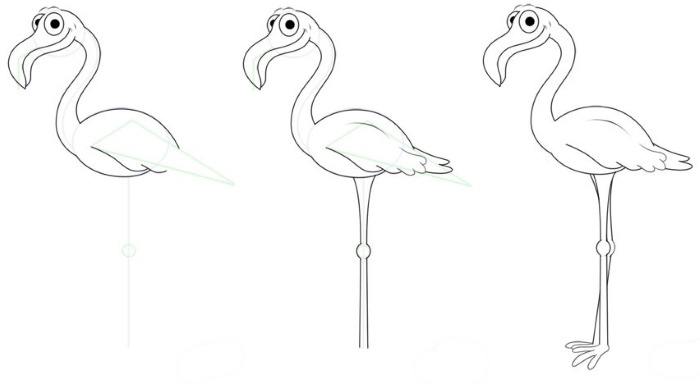
- Draw several lines in the central part of the drawing. Here it is necessary to depict the wavy contours of the right wing (since the bird is facing the artist and looking with its right side). Several wavy lines passing at the bottom of the largest circle will be enough.
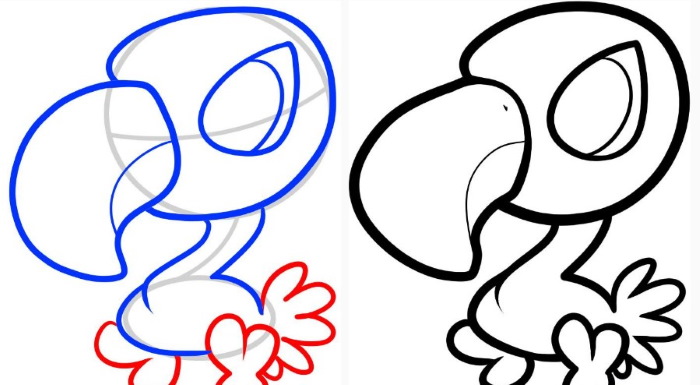
Drawing the beak and outlining the general outline
First, you need to draw the beak, which is different from many other birds. Its main features are an interesting shape and large size.
To draw a beak like a real one, it is enough to draw a couple of arced lines coming out from the lower right part of the head, rounding towards the main drawing and connecting with each other at the very bottom. Having drawn the beak, you need to use a thin pencil to outline the general outline of the bird - what was drawn earlier.

You need to circle:
- neck;
- torso;
- upper and lower legs;
- webbed feet;
- tail.
Correction and coloring of the drawing
Using an eraser, you will need to remove all auxiliary lines.
If necessary, add small details, including:
- eye (it will be 1, because the 2nd is located on the other side of the head);
- feathers;
- webbed feet;
- the line that divides the beak in half.
It will be difficult to call the bird a flamingo if it remains monochromatic, so it is necessary to color the drawing using different shades of pink.
Easy way with pencil
One of the simple ways to draw a flamingo with a simple pencil is to do the following:
- Draw a large circle in the center of the sheet. From it, draw a curved line of the neck, and at its other end place a small circle of the head.
- Draw an arced line for the beak from the head.
- From the large beak, draw 2 long lines for the legs and a line for the tail.
- Work out the details. Start with the head, drawing the eyes and beak.
- Draw a curved neck. Add some fluff to the head.
- Draw small wings and a feathered tail, as well as the upper parts of the legs.
- Finish drawing the lower parts of the legs, not forgetting about the webbing.

As you can see, it's quite simple.
With watercolor paints
Flamingo drawings for copying can be done with watercolors.
To work in this technique you need to prepare:
- watercolor with a small set of colors;
- special watercolor paper;
- brush. It can be a kolinsky or a squirrel. It is better to take 2 brushes of different sizes, so that the smaller one can draw small details. The main brush should be of medium size;
- a simple pencil, which is needed to create contours at the initial stage.
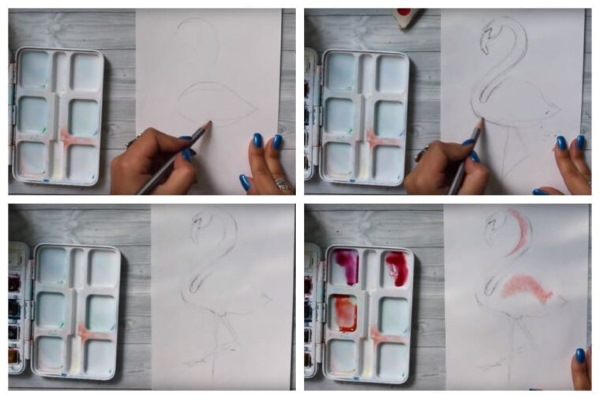
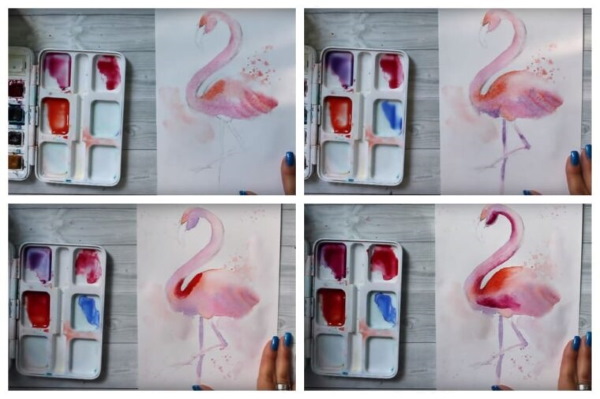

The work of painting a flamingo with paints takes place in 4 stages:
| No. | Stage | Sequence of actions |
| 1 | Making a sketch |
|
| 2 | Drawing the head |
|
| 3 | Painting with paints |
|
| 4 | Refinement of details |
|
In flight
Flamingo drawings for copying can be selected during the bird's flight.
To depict him flying, you need to:
- Start with the contours. It is important to arrange the sheet not vertically, as in the examples described above, but, on the contrary, horizontally. After all, the body of a flying flamingo is visually stretched from right to left.
- Draw an oval slightly above the center of the sheet. Draw lines to the left and right from it. The left line is the neck, and the right line is the legs.
- At the other end of the left line place a small head with a large beak.
- Finish the right line with a small oval, and place a small circle in its center.
- The left wing of the flamingo, as it flies to the left, is visible completely. To draw it, you first need to draw a horizontal line along the body. Then, from both ends of this line, lower it along the 1st curved arc. Also connect the arcs with a horizontal line at the bottom. This line will be the 1st side of the triangle that the wing ends with.
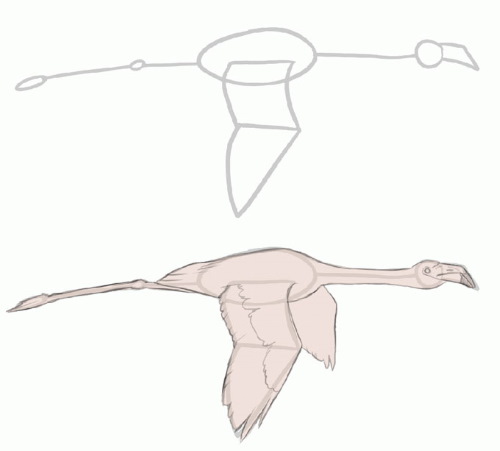
- Draw the details: beak, eye, plumage. The neck, legs and body need to be outlined, giving them volume. Finish drawing the right wing on the other side. Only its lower part should be visible.
- Color the bird. Pink should be the predominant color here.
In the lake
In water, a flamingo usually stands on one leg, raising the other. This is important to consider when drawing a bird in a lake. The water itself can be made blue. Do not forget about the pink reflection of the flamingo.
If the drawing is created with watercolor paints, then for water the following are used:
- ultramarine;
- blue;
- emerald.
To depict the reflection of a flamingo in water, you need to take the same colors as for the bird itself.When painting water, it is better to use a dry brush: in this case, the texture of the paper will be visible. Thanks to this, the person looking at the picture will get the impression that there are glares on the surface.
Cartoonish
The child will enjoy drawing a small cartoon flamingo, which is not only beautiful but also simple.
The work is carried out in 6 stages:
- Draw a large circle, and a small oval just below it. Draw the center line of the neck between the circles.
- On the left side of the head, draw a large, downward-curved beak.
- Outline the head shapes and draw the eyes. This cartoon creature will have large eyes.
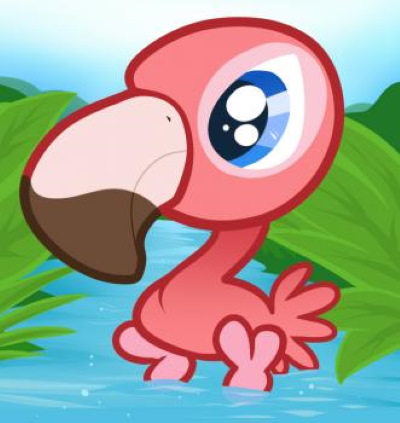
- Draw the neck and chest.
- To the right of the small oval, which represents the bird's body, draw a small fluffy tail.
- At the bottom, draw 2 paws extended forward.
- Remove excess lines with an eraser.
Sketchbook Drawings
Drawings of flamingos for copying can be made in a sketchbook. You can draw them with pencils or paints. You should also start with the contours. First of all, draw 2 ovals, 1 of which will become the head, and the 2nd - the body. Then you can finish drawing the remaining parts and add small details.
Often, sketchbook drawings are created quickly and may remain unpainted. The main feature of drawing in a sketchbook is that the drawings do not necessarily have to be masterpieces. The artist may not be afraid to make a mistake. His main task is to learn from his own mistakes and gain more experience with each new drawing.
By the cells
The easiest way to draw a flamingo is to use checkered paper as a canvas.
For this, in addition to the paper itself, you will need felt-tip pens of the following colors:
- light pink;
- dark pink;
- yellow;
- black.
In this example, the sheet should be 12 cells wide and 14 cells high.
The process of drawing in vertical rows is as follows:
- In the left vertical row, paint the 3rd cell yellow and the 4th cell black.
- In the next row, paint the 2nd cell light pink and the 3rd cell yellow.
- In the 3rd row, color the 1st, 3rd, 5th and 6th cells light pink, and the 2nd – black.
- In the 4th row, the 1st, 2nd, 3rd, 4th, and 6th cells should be light pink.
- In the 5th row, paint the 2nd, 3rd, 6th, 7th cells light pink.
- In the 6th row, the light pink cells are the 5th, 6th, 7th, 8th, and the last, 14th cell should be yellow.
- In the 7th row, the 5th, 7th and 8th cells are light pink, the 6th cell is dark pink. The 6 lower cells, starting with the 9th, are painted yellow.
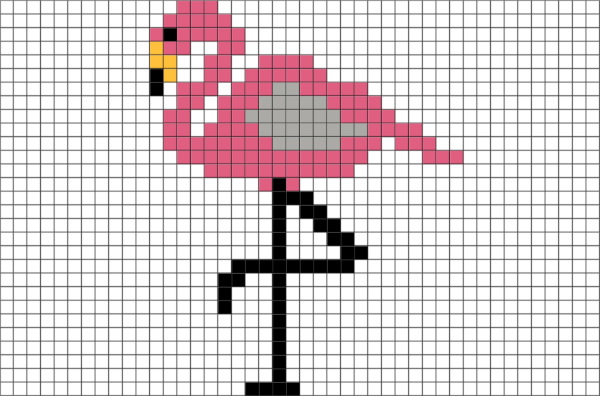
- In the 8th row, the light pink cells are the 5th, 7th, 8th. The 6th cell is dark pink. The bottom, 14th cell is yellow.
- In the 9th row, the light pink cells are the 5th, 7th, 8th, and the 6th is dark pink. The 9th and 13th cells are yellow.
- In the 10th row, the 6th and 8th cells are light pink. Between them is the dark pink 7th cell, and the 10th and 12th cells are yellow.
- In the penultimate row, the 6th and 7th cells are light pink, and the 11th cell is yellow.
- In the last row, the 7th and 8th cells are light pink.
Drawing is an exciting process. It is interesting to create something bright using paper, pencils and colored paints. Beginning artists can find ready-made samples and draw a drawing on the cells. If you use a notebook sheet, then masterpieces will be obtained quickly. With regular practice, easy drawings will eventually turn into complex compositions.
The beautiful and unusual flamingo bird is easy to recognize by its pink feathers, large curved beak, and long, thin legs. You won't often see such a creature in real life in our latitudes, but you can capture the bird in a drawing, copying it from a painting or photograph.
Video about drawing flamingo
Flamingo drawings for copying: