A warm knitted hat is a must-have accessory in the cold season. It is not always possible to buy a hat in a store that would fit perfectly and emphasize the beauty of a woman. Any model can be knitted with knitting needles. There are many descriptions of fashionable products. You can choose and make one that will suit your wardrobe and face shape. A couple of evenings are enough to become the owner of a stylish and beautiful accessory.
Openwork hat with knitting needles
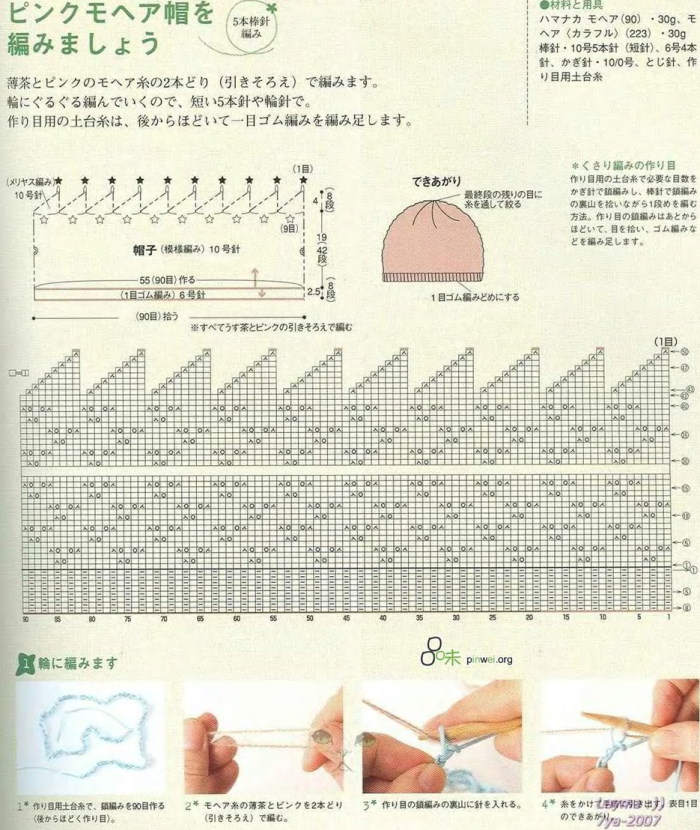
A knitted hat made of mohair yarn, knitted with knitting needles, looks very elegant thanks to the openwork fabric. The fashionable model is knitted in just a few hours. As a decoration, you can use a brooch or flowers knitted from cotton.
Before work it is necessary to prepare:
- mohair yarn (210 m in 50 g) – 25 g;
- knitting needles No. 4 straight;
- blunt-ended needle.
Instructions for making:
- Cast on 101 sts in 2 additions onto the knitting needles and knit 1 row with knit stitches (k).
- Start knitting the pattern. Row 1: knit 2 together knit stitches, inserting the tool into the thread from the front side*3 knit stitches, yarn over, knit stitch, yarn over, 3 knit stitches, 3 together knit stitches* 3 knit stitches, 1 knit stitch, yarn over, 3 knit stitches, 2 together knit stitches, inserting the tool into the thread located on the back side.
- Row 2 and all subsequent even rows. Knit with purl stitches (WS).
- Row 3: Knit 2 together knit stitches, inserting the needle into the thread from the front side, *2 knit stitches, yarn over, 3 knit stitches, yarn over, 3 together knit stitches*, 2 knit stitches, yarn over, 3 knit stitches, yarn over, 2 knit stitches, 2 together knit stitches, inserting the needle into the thread located on the back side.
- 5 rows. 2 together knit stitches, inserting the needle into the thread located on the wrong side, *knit stitch, yarn over, 5 knit stitches, yarn over, knit stitch, 3 together knit stitches*, knit stitch, yarn over, 5 knit stitches, yarn over, knit stitch, 2 together knit stitches, inserting the needle into the thread located on the wrong side.
- 7 rows. 2 together knit stitches, inserting the needle into the thread located on the wrong side, *yarn over, 7 knit stitches, yarn over, 3 together knit stitches*, yarn over, 7 knit stitches, yarn over, 2 together knit stitches.
- 9 rows. Repeat pattern from row 1.
- Knit a flat piece of fabric 32 rows.
- Start shaping the crown.
- Row 33. Lp, *3 lp, 2 together lp, inserting the tool into the thread from the front side*. 81 sts remain.
- 34 p. Knit ip.
- Row 35. Lp, *2 lp, 2 together lp, inserting the tool into the thread from the front side*. 61 sts remain.
- 36 p. Knit ip.
- Row 37. Lp, *lp, 2 together lp, inserting the tool into the thread from the front side*. 41 sts remain.
- 38 p. Knit ip.
- 39 rows. Lp, *knit all loops 2 together Lp, inserting the tool into the thread from the front side*. 21 sts remain.
- 40 p. *Knit all loops 2 together knitwise, inserting the knitting needle into the thread located on the wrong side, * ip. 11 p. remains.
- Break the thread, sew through all the loops, pull tight and tie a knot.
Ushanka hat
Ushanka hats are a fashionable accessory that is at the peak of popularity today. Knitting the model is not difficult, as it may seem at first glance. It is enough to strictly follow the instructions. The description is designed for making a headdress of size 51-54 (55-58).
For knitting you will need:
- grey and black melange yarn – 25 g each;
- knitting needles No. 3 straight, double pointed and circular;
- hook No. 2.5.

Instructions for knitting patterns:
- Elastic band. Alternate 1 knit stitch and 1 ip stitch.
- Stockinette stitch. In circular rows knit only knit stitches.
- Structural pattern:
- 1 row 4 knits with black thread.
- 2 rows 4 sts with black thread.
- 3-4 rows. 3 knit stitches with grey thread, remove 1 st as if it were a single stitch, with the thread behind the loop.
- Row 5: Knit as Row 1.
- Row 6. Knit similarly to Row 2.
- 7-8 rows. Knit with grey thread, remove 1 st as if to p, with the thread behind the loop, 2 knit with grey thread.
- Row 9. Knit as Row 1.
- Row 10: Knit as Row 2.
- Repeat from row 3.
Step by step production:
- To form the earmuff, cast on 18 sts with grey thread on #3 knitting needles.
- Knit 1 row. ip.
- Knit LP.
- Continue knitting with stockinette stitch pattern. D
- Make increases on both sides: in row 1 1 x 1 st, in each row 2 2 x 1 st, in each row 4 3 x 1 st and in each row 6 1 (2) x 1 st. Total 32 (34) sts.
- After knitting 10.5 cm, set aside the loops.
- Connect the 2nd earphone in the same way.
- Upper part. Cast on 13 (15) sts with grey yarn. Transfer loops of 1 earphone, cast on 30 (34) sts, transfer loops of 2 earphone, cast on 13 (15). Total is 120 (132).
- Knit 2 rows in a circle with a stockinette pattern using grey thread. Then 22 rows with a structured pattern. Continue knitting with a stockinette pattern using grey thread.
- After 15 (16) cm, decrease (as the number of loops decreases, knit first in the round, then switch to double-pointed needles). To do this, knit: *4 knit stitches, remove 1 st, knit 1 and pull it over the removed st, knit 2 sts together, knit 4 sts*. Perform the pattern 10 (11) times. You should end up with 80 (88) sts.
- In the next row knit: *2 knits, slip 1 st, 1 knit and pass it over the slipped st, 2 sts together knits, 2 knits*. Perform the pattern 10 (11) times. You should have 60 (66) sts.
- In the next row knit: 1 knit stitch, slip 1 st, 1 knit stitch and pass it over the slipped st, 2 sts together knit stitch, 1 knit stitch*. Complete 10 (11) rapports. You will get 40 (44) sts.
- Continue knitting: *1 knit, 2 sts together knit, 1 knit*. Perform the pattern 10 (11) times. You will get 30 (34) sts.
- Knit 15 (17) x 2 sts together knitwise. Cut the yarn and pull through the remaining loops twice. Pull tight and fasten the yarn.
- The bottom edge, including the headphones, is crocheted with black yarn using single crochet stitches.
- Cut 9 black threads 100 cm long. Thread through the set edge of each earphone and braid. Secure and trim the ends.
With an elongated crown
Knitted hat with knitting needles (fashionable model with an elongated crown) for beginner knitters. This is the easiest way to knit a headdress in an evening. This style is especially popular with young girls. This description is designed for a head circumference of 55 cm.
It is necessary to prepare:
- yarn – 50 g;
- knitting needles No. 3.5 on a fishing line;
- markers.
Step by step instructions:
- Calculate knitting 2.2 sts per 1 cm. This figure must be multiplied by the head circumference and subtract 15%.
- Cast on 96 sts in the usual way + 1 st to join into a round.
- Knit 23 rows with 1 x 1 rib pattern.
- Fix the turn-over in row 24. Knit, changing the places of the knit stitches and the ip stitches.
- Continue knitting 50 rows with 1 x 1 rib pattern.
- Proceed to form the crown. Divide the loops equally, selecting 11 sts in the center. It is worth noting that there should be LPs at the beginning and at the end. Mark with markers.
- Make a decrease in each row: after the marker with a tilt to the right, before with a tilt to the left.
- Decrease until 24 sts remain. Knit the last row 2 sts together. Thread the remaining sts onto a thread and tighten. Hand wash the product, lay it out flat and dry.
Double hat
A knitted hat with knitting needles (fashionable double) is considered one of the most stylish winter accessories. It is knitted with a garter stitch. It can be worn on one side or the other, making a contrasting edging. The description is calculated for a head circumference of 55 - 57 cm.
To work you will need:
- white and turquoise yarn (200 m in 50 g) – 2 skeins each;
- knitting needles No. 3.5 with fishing line;
- cotton thread in a contrasting color;
- ruler;
- hook.
Instructions for making:
- Using a crochet hook, cast on a chain of 90 air loops with a contrasting thread. Turn it over with the oblique side down and pick up 88 sts + 1 connecting st with the main thread. Knit them with a knit stitch.
- Distribute the loops on 2 knitting needles and join them into a circle. To do this, transfer the edge from the right tool to the left one and pull 1 st through the removed one to the right one.
- Knit 46 rows of sts.
- Start forming decreases. As you work, count all the rows so that both parts of the hat are the same.
- 1 row of decreases. Knit 8 knit stitches, transfer the next stitch to the right needle, knit the 2 stitches after it, pull the slipped stitch over the knitted stitch with the left needle, 1 knit stitch, 2 stitches together, inserting the needle under the threads on the front side of the work, 17 knit stitches, transfer the next stitch to the right needle from the left, knit the 2 stitches after it, pull the slipped stitch over the knitted stitch, knit stitch, 2 stitches together, inserting the needle under the threads on the front side of the work, 17 knit stitches, transfer the next stitch from the left needle to the right, knit the 2 stitches after it, pull the slipped stitch over the knitted stitch, knit stitch, 2 stitches together, inserting the needle under the threads on the front side of the work, 17 knit stitches, transfer the next stitch from the left needle to the right, knit the 2 stitches after it, pull the slipped stitch over the knitted stitch, knit stitch, 2 stitches together, inserting the needle under the threads on the front side of the work, 17 knit stitches, transfer the next stitch from the left needle to the right, knit the 2 stitches after it, pull the slipped stitch over the knitted stitch, knitted, knit, 2 sts together, inserting the knitting needle under the threads on the front side of the work, 9 knits.
- 2 rows of decreases. Knit LP. The number of loops in each new row of decreases will be 2 less.
- Alternate rows 1 and 2 until 16 sts remain.
- Cut the thread, pull it through all the loops and tighten. One part of the hat is ready.
- Unravel the chain of air loops, lifting the resulting loops onto the knitting needles. Attach a thread of a different color and knit similarly to Part 1 of the headdress.
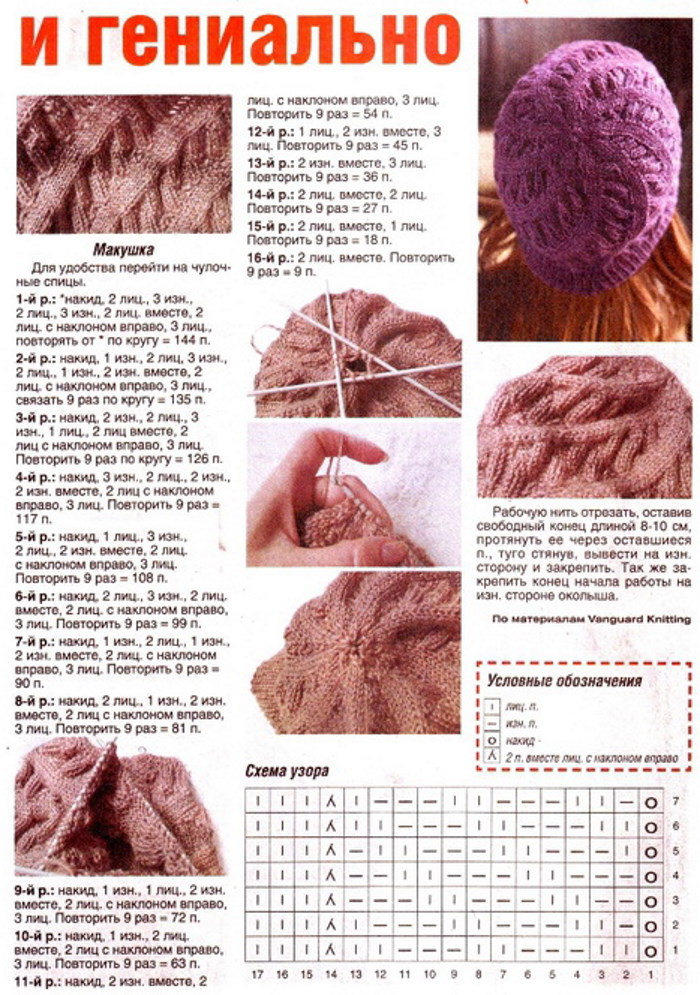
With a pattern
This model is knitted with a pattern. The headdress turns out very beautiful and stylish, and even a novice craftswoman can make a hat. You can use any yarn. It is recommended to knit the model for winter from mohair or angora.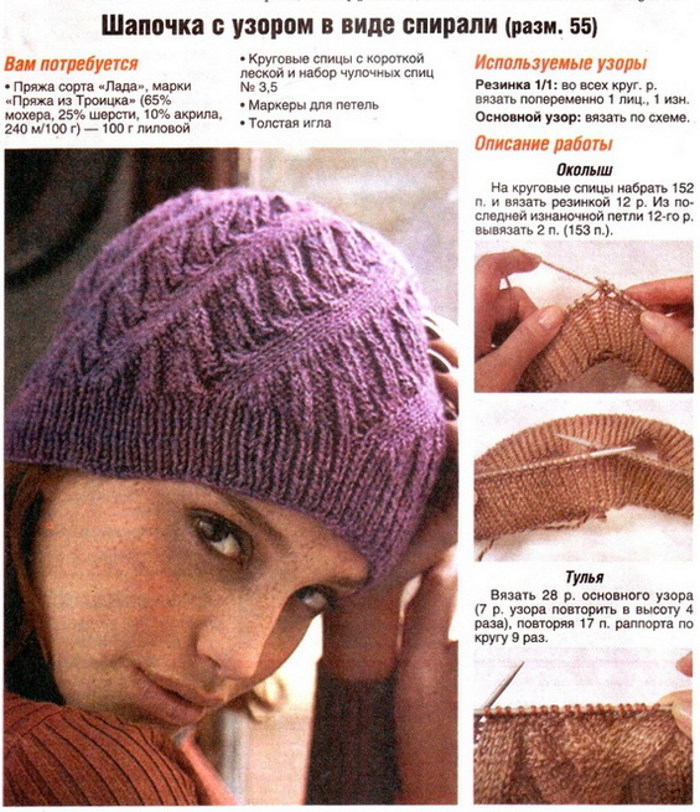
For knitting you will need:
- yarn – 150 g;
- knitting needles and a hook.
Step by step instructions:
- Cast on the required number of stitches, depending on the size. Their number should be divisible by 4 + 2 edge stitches (sl).
- Knit 5 cm with a 2 x 2 rib pattern.
- 1 row of headdress pattern. Remove kp. Knit 1 ip. Knit the next 2 sts crossed kp. For this st, skip and knit the next kp and then knit 1 p. kp. Next knit 2 ip, 2 crossed. Alternate to the end of the row 2 ip and 2 kp crossed. Finish the row ip, kp also knit.
- Row 2. Knit according to the pattern. Over knit stitches – knit stitches, over ip stitches – purl stitches.
- 3 rows of the pattern. Remove the knit stitch. Knit 2 sts together knit stitch. Make 2 yarn overs on the knitting tool and draw through: transfer the next stitch to the right knitting needle, knit the next stitch and then draw through it the stitch transferred to the right knitting needle. This results in a leftward tilt. Next knit 2 sts together knit stitch, make 2 yarn overs and draw through again. Continue knitting until the end of the row.
- Row 4. Knit according to the pattern. Knit 1 yarn over, knit 2 crossed knits.
- Row 5: Remove kp, lp, 2 ip. Again knit 2 kp crossed. Continue knitting until the end of the row.
- Row 6: Knit according to pattern.
- Row 7. Remove kn, make a yarn over, draw through, 2 together kn, 2 yarn overs, draw through, 2 sts together kn. Finish the row with a yarn over and kn.
- Row 8. Knit according to the pattern. Knit yarn overs with knit stitches, knit 1 yarn over with knit stitches, and 2 yarn overs with crossed stitches. Continue knitting until the desired height of the headdress is reached.
- After a row with crossed knit stitches, begin to form decreases by knitting 2 purl stitches together and knit stitches together.
- Knit the purl row according to the pattern.
- In the front row, decrease again, only now knit 2 LP together LP. You get: 1 ip, 1 LP.
- Knit the purl row according to the pattern.
- In the next row, knit 2 sts together.
- Remove the remaining loops onto the thread and tighten the crown of the headdress. Connect the edges of the product with a crochet hook using connecting posts. Turn the product inside out, wash by hand and dry on a horizontal surface.
With a lapel
Knitted hat with knitting needles (fashionable model with a lapel) has been popular for several seasons. Despite the simplicity, such headwear looks stylish and beautiful. They are warm and comfortable. Can be worn with 1 or 2 lapels. This master class on knitting the simplest model that any needlewoman can quickly knit. The description is designed for a head circumference of 52-60 cm.
It is necessary to prepare:
- yarn – 1 skein;
- circular knitting needles No. 4;
- blunt-ended needle.
Step-by-step description of production:
One skein of yarn is enough for a hat.
- Cast on 90 sts onto a knitting tool and join into a ring.
- Knit with a 1 x 1 rib pattern. Start with a knit stitch. Knit the next stitch as a spur stitch.
- In the next row, knit the stitches according to the pattern: knit over knit stitch and purl over ip. Continue working until the fabric reaches 28 cm in length.
- Form 2 lapels and try on the headdress. If it has reached the crown, start decreasing, if not, knit a few more rows.
- 1 row of decreases. Knit the first LP together with the next ip. Knit the next LP according to the LP pattern. Knit the ip following it together with the front ip. Continue knitting until the end of the row.
- After knitting a row of decreases, switch to the 2 x 2 elastic pattern. Knit 2 rows with it.
- Now you need to go back to the 1 x 1 elastic. To do this, knit 2 loops together. Knit according to the pattern. If there are 1 knit stitches, then knit them together knit stitches, if purl stitches, then knit ip.
- Knit 2 rows with a 1 x 1 elastic pattern.
- Knit the last row of decreases by knitting 2 sts together.
- Thread the remaining loops onto the thread, cut, tighten and hide inside the product. Hand wash the product, lay it out on a horizontal surface and dry.
Stocking cap
Knitted hat with knitting needles (fashionable model, which even a beginner knitter can knit), stylish and simple thing that will warm in the cold and emphasize the image. This description is calculated for a head circumference of 57 cm.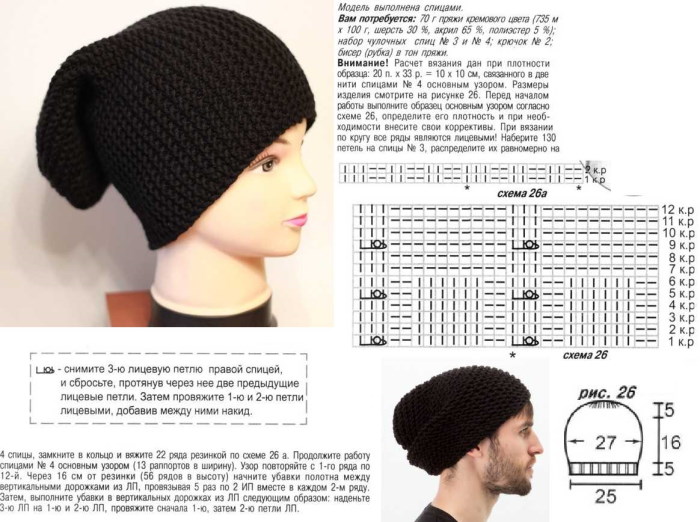
To work you will need:
- circular knitting needles No. 4.5;
- yarn – 60 g.
Step by step production:
- Cast on 77 sts on 1 needle. Join in a circle, casting 1 st on the last one. You will end up with 76 sts.
- Knit in a circle LP 48 rows.
- Distribute all the loops onto 4 double-pointed needles. 19 sts on each.
- Knit 49 rows *LP, slip 1 st, knit the next st and pull it through the slipped loop, 14 LP, 2 together LP*. Repeat until the end of the row.
- Rows 50-51 Knit LP.
- Row 52 *LP, slip 1 st, knit the next st and pull it through the slipped loop, 12 LP, 2 together LP*. Knit until the end of the circular row.
- 53-54 p. Knit LP.
- Row 55 *LP, slip 1 st, knit the next st and pull it through the slipped loop, 10 LP, 2 together LP*. Knit to the end of the row.
- 56 p. Knit lp.
- Row 57 *LP, slip 1 st, knit the next st and pull it through the slipped loop, 8 LP, 2 together LP*. Knit to the end of the row.
- 58 p. Knit LP.
- Row 59 *LP, slip 1 st, knit the next st and pull it through the slipped loop, 6 LP, 2 together LP*. Knit to the end of the row.
- 60 p. Knit LP.
- Row 61 *LP, slip 1 st, knit the next st and pull it through the slipped loop, 4 LP, 2 together LP*. Knit to the end of the row.
- 62 p. Knit LP.
- 63 rows *LP, slip 1 st, knit the next st and pull it through the slipped loop, 2 LP, 2 together LP*. Knit to the end of the circular row.
- Thread the remaining loops onto a thread and pull the crown together. Secure. Hand wash the finished product and dry it on a horizontal surface.
You can find many descriptions of knitted hats on the Internet. It is quite easy to knit a headdress with knitting needles, the main thing is to master the basic techniques. You can use any pattern you like. It is better to knit an openwork model for the off-season with thin yarn, and for a cold winter, give preference to dense knitting with thick threads. When choosing one style or another, it is worth remembering that the most fashionable hat is the one that suits a woman.
Video about knitted hat with knitting needles
Master class: knitted hat with a beautiful crown: