Folding a simple paper airplane takes 5 minutes. Complex models require more experience and a sufficient amount of free time. Having assembly diagrams significantly speeds up and simplifies the process.
What paper and materials will be needed?
To fold a paper airplane, you only need paper. The most common, office, A4 format paper will do. For large models that are planned to be launched outside, you can take an A3 sheet. It is not advisable to take a larger size, since launching and planning such an airplane is problematic.
The paper density depends on the aircraft.. For light, hovering models, classic printer paper or newsprint is suitable. For rigid, gliding aircraft, paper with a density of over 100 g/m is typical.2.
Due to the hardness of the material, it is possible to achieve the required flight characteristics.
In addition to paper, in rare cases, scissors or glue are additionally used to better secure the model. Beginners can use a long ruler, it helps to avoid curves and asymmetrical bends. If desired, the finished model can be painted in different colors or covered with stickers.
Classic paper airplane model
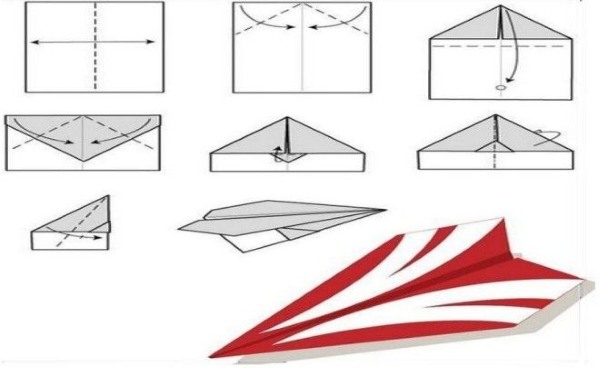
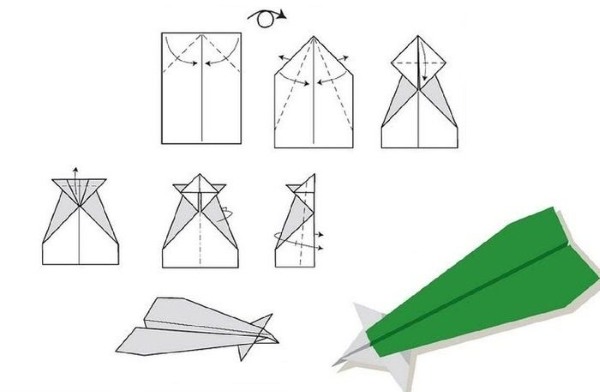
The classic version of the airplane model is assembled in 6 steps:
- An A4 sheet of paper or a regular notebook sheet is folded in half lengthwise. This is necessary to determine its central axis.
- The top corners are folded inward to the center line.
- The resulting "nose" of the plane is folded across, towards the middle of the sheet.
- The resulting corners are folded inward again towards the central axis, but 1-2 cm higher than the edge.
- The resulting lower small triangle is folded upwards, thereby fixing the previous folds.
- The resulting blank is folded in half with the folds facing outward, and each side is additionally folded in half. This is how the wings are obtained.
The model is universal and suitable for launching by both children and adults. This is due to the average flight characteristics - sufficient for moral satisfaction.
Jet fighter aircraft
It takes longer to make a fighter jet.
This involves a lot of action in the folding process, but the work itself is not difficult at all:
- Act 1. Fold the sheet in half lengthwise to create a center line.
- Act 2. Fold the top corners tightly to the central axis twice to obtain a long narrow nose.
- Act 3. Fold the workpiece crosswise so that 2-3 cm of the nose extends beyond the edge of the tail.
- Act 4. Turn the workpiece over and fold the corners back toward the center line.
- Act 5. Turn the fighter over again and put the "nose" back in its original position. The blank now looks like an airplane.
- Act 6. It is necessary to fold it along the axis inward. Press it well.
- Act 7. Form the wings by bending them in half parallel to the axis. For greater strength, the center can be glued.
A jet fighter can fly fast and far if launched correctly. The plane must be thrown hard and at a slight angle of up to 50 degrees to the ground.
Military paper airplane
This fighter flies smoothly and evenly. To do it, you need a sheet of paper and a few free minutes.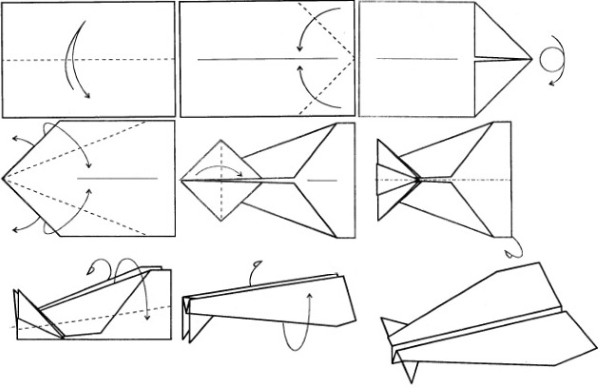
Execution:
- Fold the sheet in half lengthwise to determine the central axis.
- Fold the upper corners close to the axial fold.
- Turn the sheet over and fold the corners back to the center line. This will create a narrow and long "nose" of the plane.
- Straighten the folded top layer of paper from the back side to form a rhombus consisting of 2 halves. Fold it in half. Thus, the rhombus becomes a triangle with the base at the top.
- Fold the workpiece in half with the folded layers facing outward. Bend the wings at a distance of 2-3 cm from the axial fold.
The plane folds up quite quickly, the diagram is clear even to a child. It is better to take paper that is not very thick, since the nose of the model is already heavy. In flight, the military plane is characterized by smooth and long gliding with a smooth descent.
Paper airplane with propeller
To make a plane with a propeller, you will need an A4 sheet of paper and a 10x10 cm square of paper (for the propeller). The square is cut diagonally, leaving 1 cm from each corner before the center. Secure every second corner in the center with a needle. The resulting propeller will finally be attached to the nose of the plane.
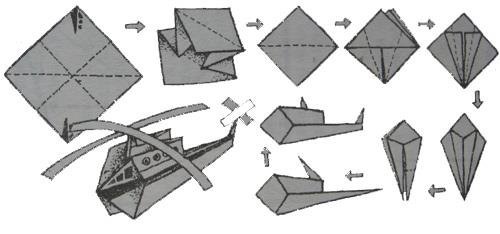
The paper airplane is folded according to the following scheme:
- Fold the sheet diagonally on both sides.
- Fold the top part along the resulting diagonals to create a triangular, two-layer nose.
- Turn the left corner over to the right side and bend it in half and up towards the axis. Return it to its place (to the right side) when folded.
- Turn and straighten the folded left side, move it to the right and bend the protruding triangle.
- Fold the left side half in half, turn it to the left and secure all the folds with the previously formed small triangle inward and back.
- Fold the right side corner in half towards the central axis. Turn it over to the left side and fold the free inner corner inwards. This fixes the previously folded folds together.
- Fold the workpiece with the resulting "nose" outward and form wings. To do this, the folds must be made 1-2 cm above the center line.
- The final step is to attach the propeller with a pin to the tip of the nose of the plane.
Children will love the plane because it is not like other models.
When starting, special skill is required, otherwise it will not fly. For reliability, the propeller can be glued with superglue after fixing, it is important not to get on the screw itself, otherwise it will stop rotating.
How to make an unusual airplane
Any model that is not outwardly similar to a classic aircraft looks extraordinary and attractive.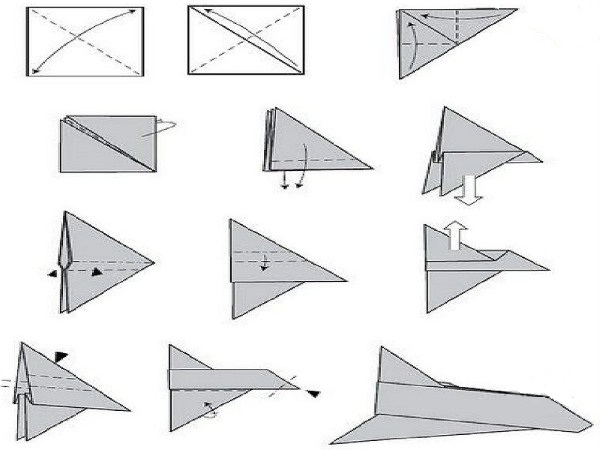
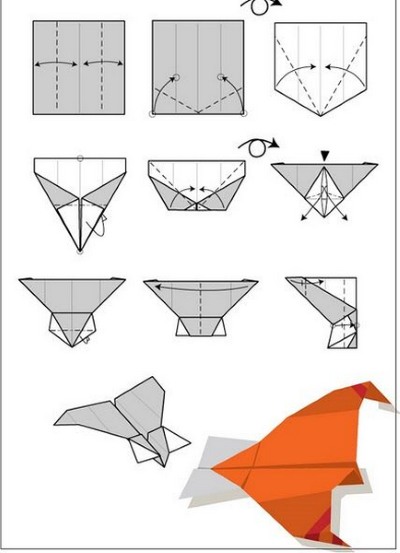
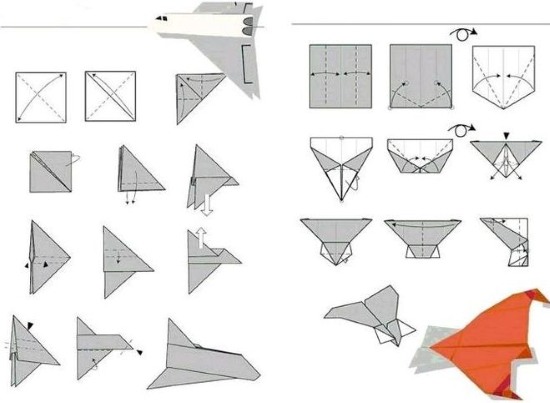
This original aircraft resembles a passenger airliner, the assembly diagram is as follows:
- You need to make a square from the album sheet, cutting off the excess width.
- Press two diagonal folds on the sheet. Fold in half to form a triangle.
- Fold the sharp corners to the center to form a rectangle, then fold in half along the fold. You should end up with a right triangle with a folded base at the bottom and 3 independent corners at the top.
- The two outer free corners are the wings. They need to be bent at a distance of 3 cm from the base of the plane.
- The tail is formed from the central corner. To do this, it is necessary to make a fold 3 cm wide, which is clamped between the base of the wings. For better fixation, the base is glued with PVA.
- The tip of the nose is cut from bottom to top at an angle of 30-40 degrees.
Scheme of how to make a boomerang airplane
The boomerang airplane is made from a sheet of paper.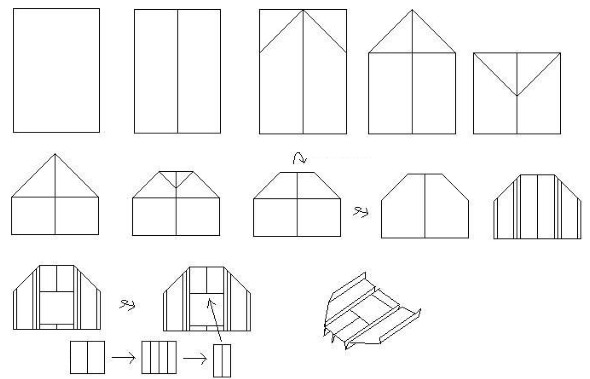
The scheme consists of the following steps:
- Fold the sheet in half crosswise.
- Fold one half in half again and leave it folded.
- Bend the workpiece in half lengthwise (with the folded section inside). Press well, open the workpiece.
- Bend the resulting corners towards the center line on both sides.
- Fold the resulting “nose” inward along the fold line located on the back side.
- Fold the blank in half inside, press hard. Open again.
- Form the wings. Bend the small corners parallel to the fold along the edges of the wings.
- Fold in half with the small wings folded inward.
- Bend the large wings at a distance of 2-3 cm parallel to the entire plane.
A model for the lazy, because with the right design no matter how you launch it, it will fly back. Children will really like this paper toy. It should be taken into account that the paper for the boomerang airplane must be thin and light - then various turns and maneuvers are possible during the flight.
Origami paper airplane
A paper airplane, the design of which involves multiple folds and creases, is also called origami. More precisely, aerogami.
One of the representatives of this type of creativity is the following plane:
- The album sheet is folded in half lengthwise to determine the central axis.
- The top corners are folded close to the central axis line on both sides.
- The resulting acute angle is bent crosswise inward. In this case, it is necessary to step back 2.5-3 cm further from the previously bent corners.
- The workpiece is turned over. The upper edge is folded half a centimeter.
- The workpiece is turned over again and the upper corners are folded towards the central fold.
- If everything is done correctly, there should be a small triangle left at the bottom, which needs to be folded upward for additional fixation.
- The almost finished plane is folded in half with the folds facing outward. All folds and bends are pressed well. It is better to do this with a ruler.
- The wings are formed in a special way. When they are laid aside, the middle of the rear plane of the wing and the corner of the lower, rear base of the aircraft must coincide.
- To improve the flying qualities, the wings can be bent back another half a centimeter along the edge.
Attention! This model is capable of flying for a decent distance, provided that it is folded correctly.
 The bends on the wings must be strictly at right angles, the aircraft itself must be symmetrical and proportional.
How to make a fast paper airplane
The paper fast plane is similar in appearance to a fighter, but has wider wings and, accordingly, a different layout.
It is built up in stages as follows:
- Fold an A4 sheet of paper lengthwise to determine the axis.
- Bend the upper corners tightly to the axial fold twice on each side. You should get a narrow "nose" of the future plane.
- Fold the resulting acute angle across so that the edge of the bottom and the tip of the “nose” match.
- The workpiece is folded in half along the central axial fold.
- On each side, small corners 2 cm wide are folded over.
- The blank is opened, while the folded corners are held by the fingers and at the same time the nose of the plane is bent upwards. It should press the bent corners.
- The plane is folded in half with the nose folded outward. The model is pressed firmly with a ruler.
- The wings are laid out in such a way that the width of the increasing wings and the base coincide approximately in the middle of the plane.
- The sides of the wings are bent to a width of 1.5-2 cm at an angle of no more than 10 degrees to the centerline of the aircraft.
This model flies faster than others due to its design: a narrow and long nose without weighting and wide, maneuverable wings. Such characteristics will allow the aircraft to stay in the air longer.
What is needed for a plane to fly far?
Paper airplanes are conventionally divided into long-flying and long-flying. Models that fly long distances are narrow and dense. Their main feature is the length and the center of gravity, which is located closer to the nose of the product.
The paper airplane diagram should be proportional, with a properly calibrated center. When folding narrow and long models, it is important that the wings are as symmetrical as possible. It is necessary to determine the fold locations in advance and make them even and clear.
Video: paper airplane, diagram
How to make a paper airplane that flies far, watch the video:
Let's make an origami airplane: