Various handicrafts made with their own hands are of particular importance for children, as in the vast majority of cases they are the result of joint creativity with parents. In order for the creation process not to be tedious, but to bring only positive emotions to both parties, the schemes used in the work should be simple and understandable.
What are the benefits of origami for children
Easy DIY crafts, namely the process of their creation, not only have a positive effect on strengthening the psycho-emotional connection between parents and their children, but also contribute to the comprehensive development of the child.
Easy paper and cardboard crafts for children can be made using the popular Japanese origami technique
By regularly doing origami, the little person:
develops attentiveness to the work process, which involves the presence of a large number of small details;
the nervous system is stabilized (paper crafts require children to concentrate, due to which excessive activity is leveled out);
a strong character is formed (thanks to the opportunity that arises for the child to feel like a winner in achieving the set result);
fine motor skills develop (which, in turn, influences the development of interhemispheric connections);
memory and logical thinking are trained;
ability to find non-standard solutions is demonstrated;
the ability to clearly follow a given instruction to achieve a result develops;
mathematical abilities, spatial thinking, and the ability to reason using logic are practiced;
a love for beauty, a desire to please loved ones, a feeling of gratitude (if origami is used as a gift, for example, to a grandmother) is instilled;
the quality of work of all hemispheres of the child's brain improves;
knowledge about the types of geometric shapes, colors, sizes, and so on appears.
It is advisable to start making paper crafts with your child from the time he is able to hear an adult. and follow its instructions, which form the correct direction of the work process for creating origami. In most cases, children are ready for the creative process already at 3-4 years old, less often at 2.
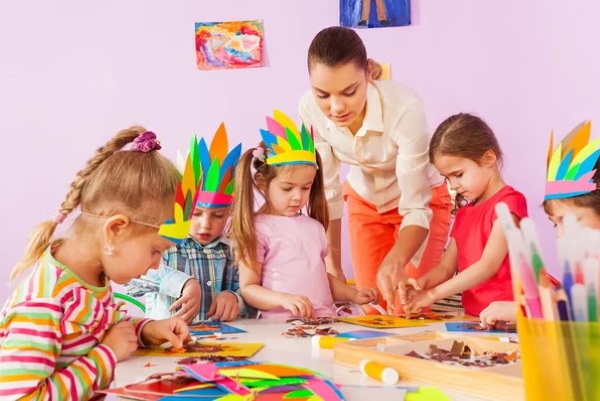
To make crafts a pleasant pastime for your child, An adult should properly organize the entire work process:
Clear the work surface of unnecessary objects that may distract the child.
Ensure that sufficient light reaches the table.
Prepare several types of paper of different colors, scissors, pencils and an eraser.
Print or place an electronic medium with the origami creation algorithm in a visible place in front of the child.
You should only work with paper if your child is in a good mood. It is not recommended to force him to make crafts. This can lead not only to aggression, but also to the formation of an internal protest against creative activities, especially together with parents.
Origami from paper for children
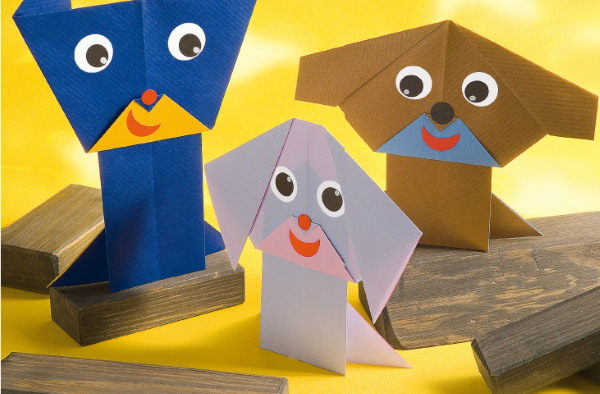
Easy DIY crafts will generate more interest and joy from the child if they look like animals or plants familiar to him.
It is recommended to choose a template together with the young creator, giving him the right to make the final decision.
Flowers
Flowers made by a child from paper themselves will be a good gift for grandma or mom for any holiday. To create such a craft, you will need multi-colored paper, scissors and glue (optional).
The simplest schemes for creating paper origami flowers are:
Paper flower variant
Scheme of creation
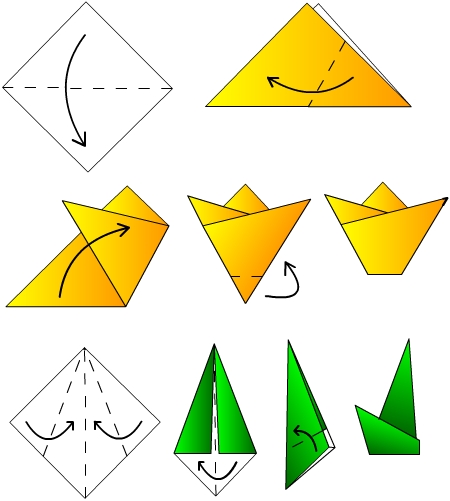
Fold a sheet of paper into a square.
Connect the straight sides of the figure so that when folded crosswise, diagonal lines are formed.
Straighten the figure.
Using the fold line as a guide, fold the square into a triangle.
Bend each sharp corner at the base of the workpiece to an obtuse angle.
Turn the figure over.
Bend the lower parts of the sides of the square towards each other.
Fix the moving parts with glue (it is best to use PVA glue for this purpose).
Through the small hole left at the base of the tulip bud, slightly “inflate” the flower.
Open the outer petals by slightly bending the edges of the triangles.
Insert a stem into the lower part of the flower, which can be pre-made from paper, or be a regular tube or small stick covered with green paper.
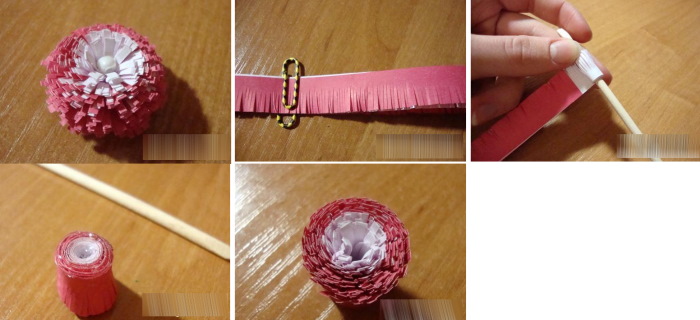
On a work sheet of paper, draw several stripes along the long edge, the width of which should not exceed 1.5 cm.
Cut the sheet into strips along the contours.
Glue 6 strips together using glue, placing them on top of each other.
Create a fringe by making numerous transverse cuts along the strips glued together.
Coat the top strip with glue along the long edge along the fringe.
Glue a strip of less contrasting color to it.
Repeat steps 5-6 the required number of times.
Roll the strips onto a wooden stick or skewer, securing them with glue or tape.
Allow the structure to dry.
Turn the flower over and carefully straighten the petals.
If desired, the flower can be decorated with beads or other materials at hand.
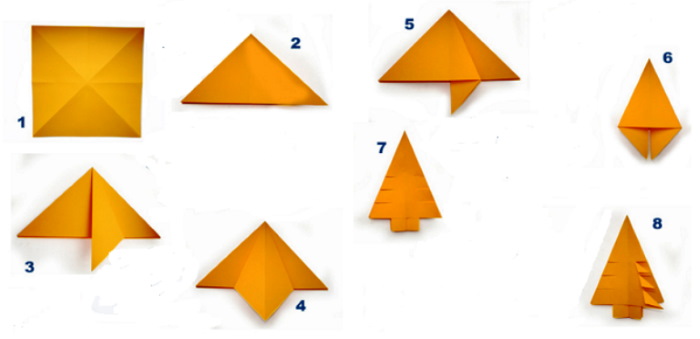
Place a square sheet of paper with its corner facing down (the sheet should look like a diamond on the outside).
Fold in half, connecting the top and bottom corners.
Place the resulting isosceles triangle with its main angle facing up.
Fold the right corner towards the left thigh of the workpiece.
Glue the right corner, overlapping, onto the bud, bending it in the opposite direction.
Step back 2-3 cm from the bottom corner of the workpiece and draw a horizontal line.
Bend the bud along the line and fix all its moving parts with glue.
Toys
Easy DIY crafts can not only become a tool for a child's development, but also a way to get a new toy. Despite the desire of a young origami artist to get a complex figure, it is recommended to convince him of the need to choose a less complex scheme.
This way, adults can maintain the child’s motivation to engage in creative activities, protecting him from reasonable failures and difficulties when creating complex origami.
Paper toy variant
Scheme of creation
Fold a square sheet of paper so that as a result of manipulation, 4 separate areas of the same size are formed on the working surface.
Turn the paper over so that it takes on the shape of a diamond.
Fold the right and left corners to the middle.
Make a small fold at the bottom of the figure.
Turn the workpiece over and fold the edges at the top of the fold.
Do the same with the lower edges of the fold.
Lift the corners of the fold and pull them up.
Fold the corner at the bottom of the workpiece.
Turn the resulting craft over and bend it slightly forward along the middle line.
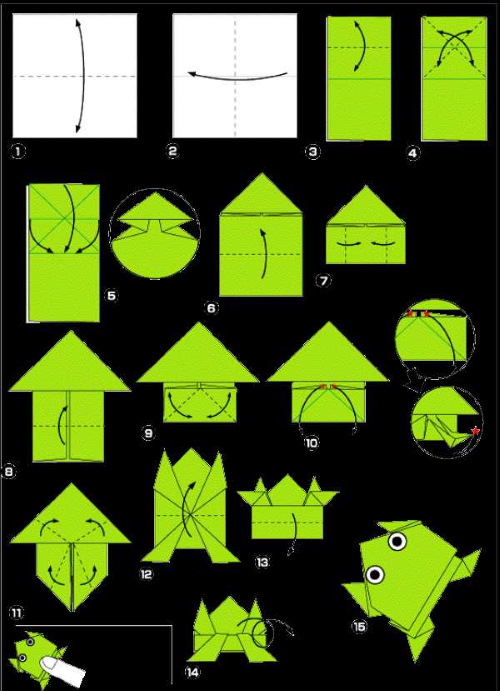
Take a square of paper and fold it in half.
Turn over and repeat step 1.
Visually divide the workpiece into 2 parts and fold the upper area in half.
Bend the top part to form 2 diagonal lines.
Turn the workpiece over with the corner facing up.
Fold the bottom part to the top along the midline.
Direct the sides of the figure towards the middle.
Fold the bottom and corners in the same area.
Take some paper from the lower corners, thus forming the paws of the future toy.
Bend all visible corners towards the top of the work surface.
Turn the workpiece over and make a fold at the bottom.
If origami is done according to the rules, then the frog resulting from the creative process will not only visually resemble an animal, but can also be used by a child in active games.
For example, when you press the bottom of the craft, it will move forward, simulating the jump of a real frog.
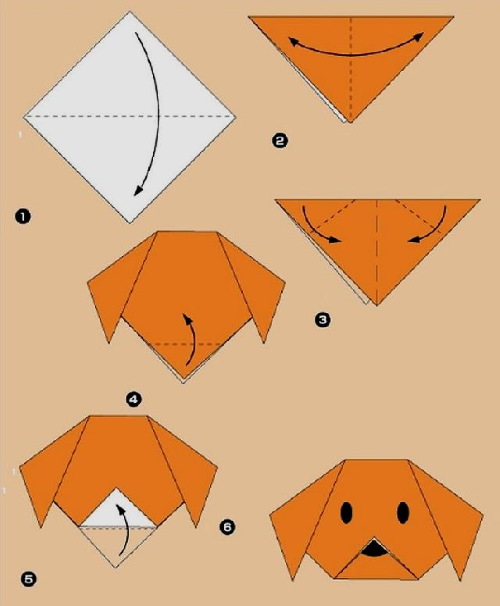
Place the paper square with the corner facing up so that it looks like a diamond on the outside.
Bend the figure in half.
Place the resulting triangle with the corner down and fold it in half.
Unbend. Bend the corners of the triangle towards the center (the ears of the future toy dog).
Bend the bottom corner of the workpiece.
From the bottom of the figure, bend one layer of paper down, and fix the top one in its original position with glue.
Finish drawing the eyes and nose of the resulting dog.
Animals
The most exciting process for a child will be the process of creating animals from paper. Such crafts can not only be used in games later, but also to study foreign languages, telling the young creator how to call the paws of an animal in a particular language or reproduce its characteristic sound.
Paper animal variant
Scheme of creation
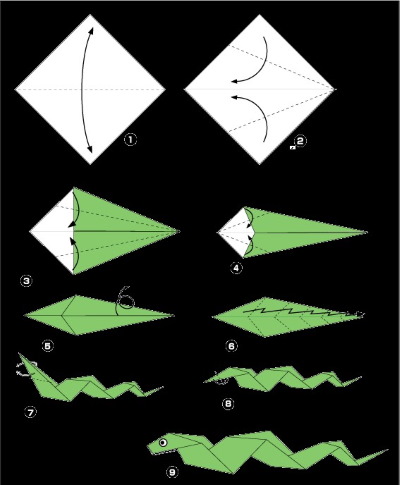
Place a paper diamond with equal sides on the work surface.
From the right corner, draw 2 straight lines and bend the workpiece along these lines from the top and bottom so that 2 identical triangles are formed.
Fold the resulting triangles in half.
Turn the workpiece over and bend it slightly upward.
It is necessary to draw lines that have the same direction and bend the workpiece so that its shape takes on the outlines of the bends of the snake's body.
Bend the end of the front part (head) inward. Finish drawing the animal's muzzle.
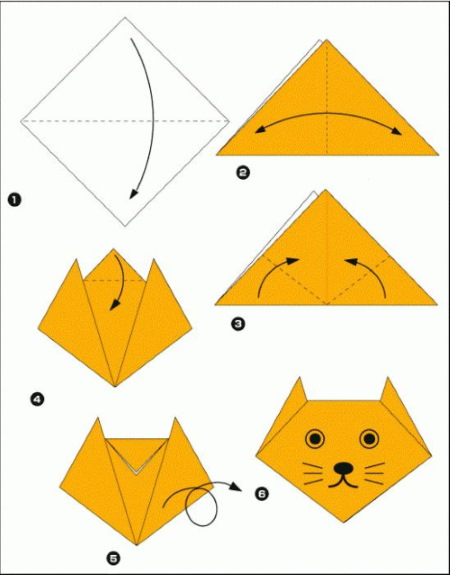
Fold a square sheet of paper in half to form a triangle.
Fold in half again to form a "fold".
Fix the corners of the workpiece by moving them towards the main upper corner of the figure.
Fold down the top corner of the future cat's head.
Glue all moving origami elements.
Turn it over and draw the eyes, nose, mouth and whiskers on the animal.
Fold a square sheet of paper in half so that a crease is formed later.
Unfold the workpiece and place it with the corner facing up (it should form a rhombus).
Fold the bottom corner of the figure up to the visually outlined middle line of the workpiece.
Unfold to form a fold.
Fold the bottom corner of the figure up to the first fold line formed as a result of the previous manipulations.
From the corners of the base of the figure, draw 2 straight lines and bend the figure along them so that 2 identical triangles are formed.
Fold the top corner along the main fold line.
Fold the bottom part of the top triangle upward.
Fold the side corners located near the upper triangle towards the corners of the main figure.
Fold the workpiece in half (along the vertical fold line).
Turn the craft over and draw the necessary details (eyes, nose, mouth).
To create paper animals, it is recommended to use colored paper.
This will make it easier for the child to perceive the final result, and will also save him from having to color the craft. To make the toy "come to life", it will be enough to draw eyes, a nose and a mouth, giving the animal its characteristic appearance.
Easy and quick crafts for kids
Easy DIY crafts should require a minimum amount of time to create. Otherwise, the child will get tired of the work process, lose interest in what is happening, and in the future will be unlikely to agree to do origami with their parents again.
Paper craft option
Scheme of creation
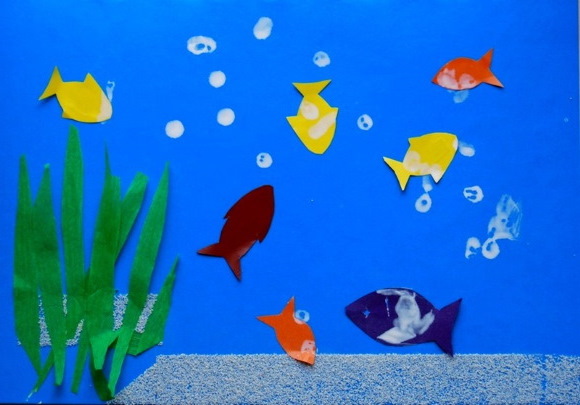
Draw the outlines of fish of different sizes on colored paper for your child (for older children, you can come up with an additional task - not only cut out the fish, but also draw them with your own hands beforehand).
Cut out the blanks.
Glue the fish in a random order onto a solid sheet of blue cardboard and draw bubbles near them.
Cut out elongated ovals from green paper – seaweed.
Glue the seaweed in a bunch on the left or distribute it evenly over the entire surface of the work surface.
If desired, draw additional secondary objects (for example, stones on the bottom, fish houses, etc.).
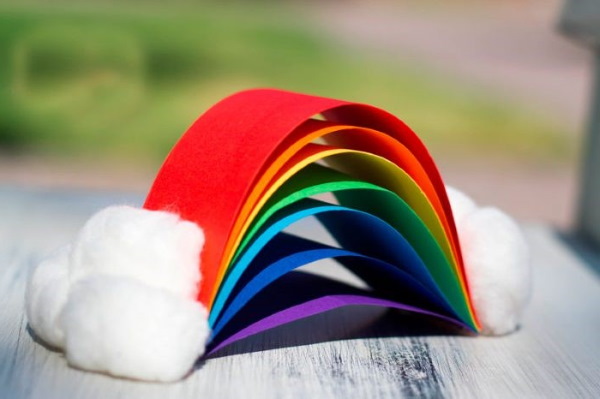
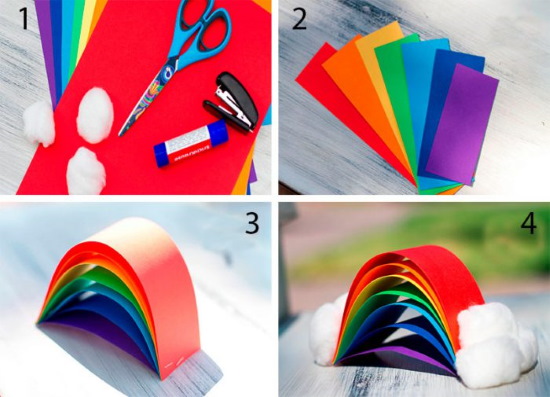
Cut out 7 strips of all the colors of the rainbow of the same length and width (at least 5 cm in length).
Place the multi-colored strips on top of each other and secure the edges with glue.
Bend the piece slightly, giving it a visual resemblance to a real rainbow.
It is recommended to mask the glued joints with cotton wool: generously coat the top of the craft with glue and place identical pieces of cotton wool on both sides (imitation of clouds).
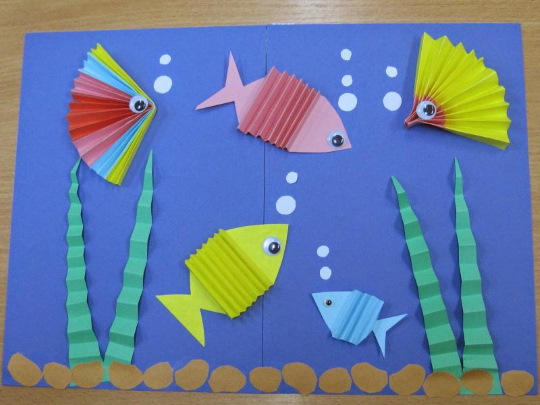
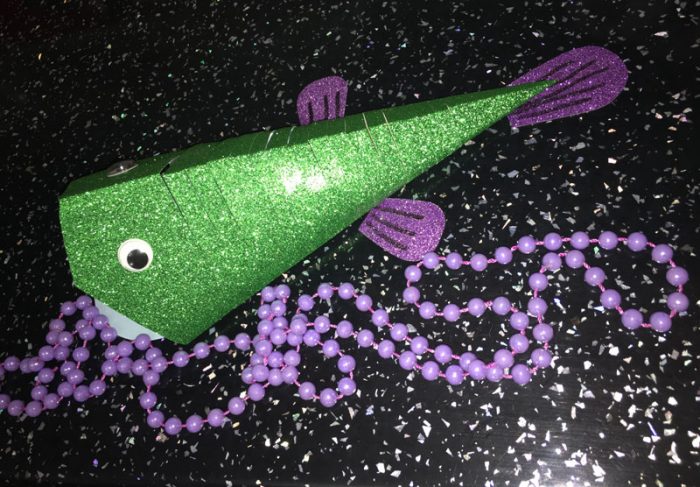
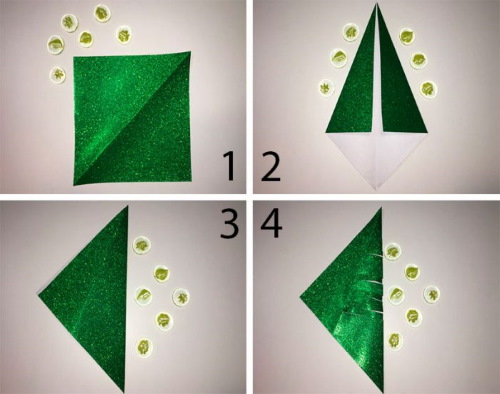
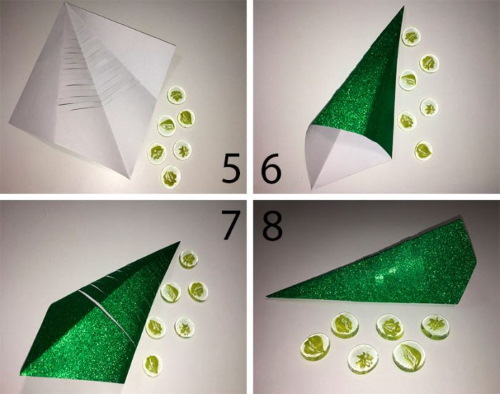
Fold the paper square in half and unfold it back to its original position.
Fold the sides to the middle fold, then open the square.
Bend the workpiece to form an isosceles triangle and turn the main corner to the left.
Make numerous short vertical cuts along the fold line.
Unfold the workpiece.
Glue the cut sections together with an overlap.
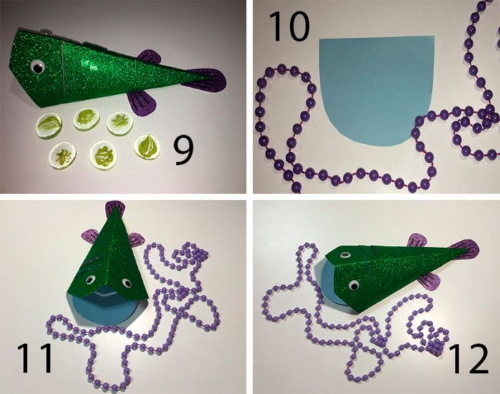
Cut off the front part of the craft, making it less sharp (the snout of the fish).
If desired, you can add details to the toy – eyes, mouth, fins, tail.
Bookmarks
Easy crafts that children make with their own hands can not only become a child's favorite toy, but also a useful attribute that is actively used in his daily life. From paper, without much effort, you can make beautiful bookmarks for books or textbooks.
The easiest way to create them is to follow the algorithm below:
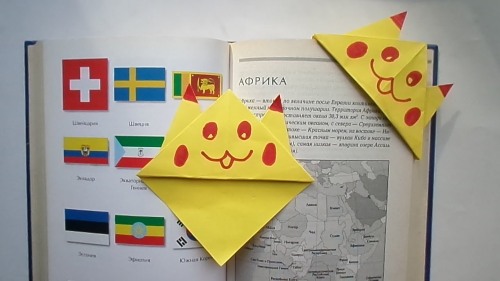
Fold a paper square diagonally (it is not recommended to use a large figure as a basis. The optimal size of the workpiece is considered to be a square of 10*10 cm or 15*15 cm).
Bend the corners of the resulting triangle upwards so that as a result of these manipulations a square is formed that is smaller in size in comparison with the original figure.
Unfold the square into a triangle.
Fold one layer of the top corner of the figure downwards.
Fix the triangles remaining on the sides in the resulting “pocket” of the workpiece.
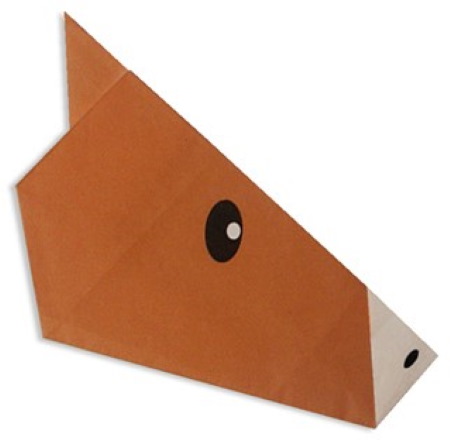
Color the bookmark as you wish. For example, brown paper origami can be turned into a dog, and black paper into a cat. Older children are encouraged to add secondary objects to the existing image. For example, glue ears or teeth on top.
The resulting bookmark is not only easy to make, but also convenient to use. The corner of the textbook fits into the origami "pocket", which minimizes the likelihood of losing the bookmark, as well as damage to the condition of the book pages.
Interesting crafts made from cardboard
Cardboard sheets are more convenient for use in creative processes involving small children.
Young creators (up to 4-5 years old), due to their inexperience, are not able to carefully cut, glue or fix origami parts. Paper blanks, due to careless use, tear and quickly lose their original appearance. Cardboard is a more durable material, which is why it is popular for origami as an alternative to paper sheets.
A cardboard craft option
Scheme of its creation
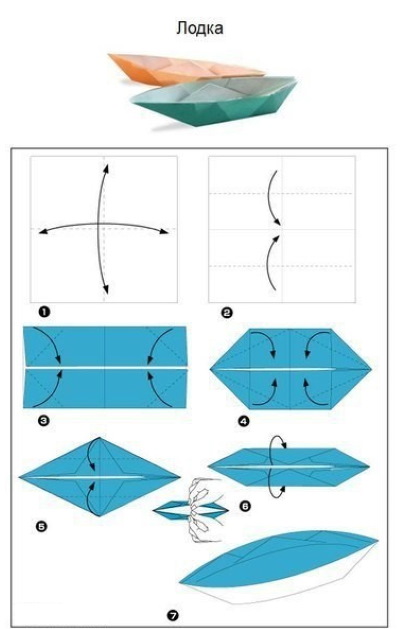
Fold a square sheet of cardboard in half several times so that three fold lines are formed inside the figure, dividing the workpiece into equal sectors.
Fold the outer edges at the top and bottom along the fold line towards the center.
Fold the top and bottom corners on each side towards the center to form a trapezoid with additional pointed corners.
Bend the lines coming out of the top line and the base along the closest fold line to the middle line.
Fold the top corners to the middle.
Turn the workpiece over and straighten the edges, making the cardboard origami look as much like a boat as possible.
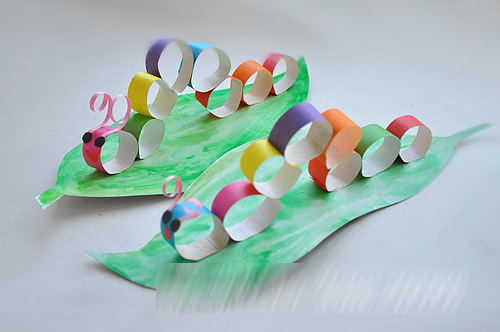
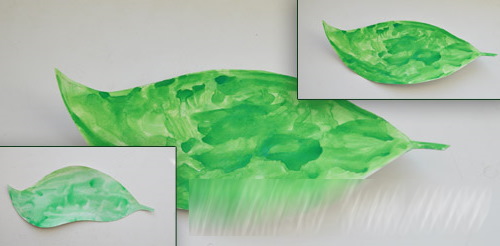
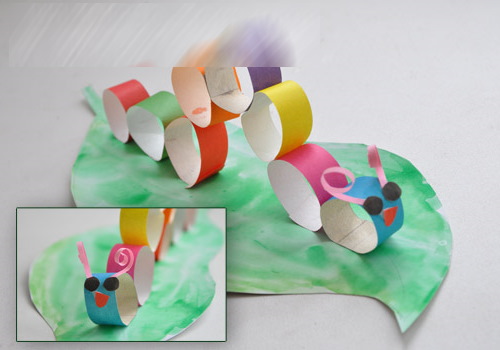
Cut out an oval (sheet) from green cardboard, leaving a small rectangle (tail) on one side.
If you don’t have colored cardboard or want to make the task more difficult for your child, it is recommended to cut out a sheet of white cardboard and invite the young creator to color the element of the future craft themselves.
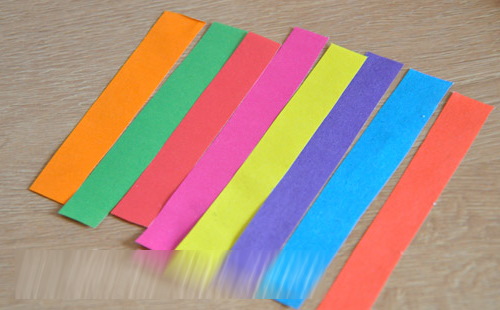
From multi-colored cardboard, cut out 8-9 identical strips, no more than 3 cm wide.
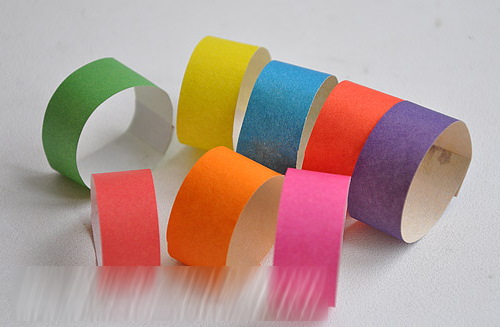
Twist the strips into rings and secure the outer edge with glue or tape.
Having carefully coated the side surface of the rings with glue, fix them sequentially on the sheet, imitating the outline of a caterpillar crawling forward (3 rings one after another at the bottom, 3 at the top, 2-3 at the bottom).
On the side edge of the outer ring, draw the missing details, for example, eyes, antennae, mouth.
Paper crafts created by children with their own hands can become an effective tool for parents to develop their child, as well as to become emotionally closer to him.
By setting simple, feasible tasks for the young creator, parents teach him to cope with difficulties, strictly following instructions, to be attentive and careful, and also clearly illustrate that adults are always ready to help.
A comfortable working environment during origami classes helps to relieve the child's nervous system, which has a beneficial effect not only on the development of his individual abilities, but also on his overall health.
Article formatting:Natalie Podolskaya
Video about making easy crafts from paper and cardboard
Easy paper and cardboard crafts for children - an example of making hares: