Learning to crochet is quite simple. There are many step-by-step instructions for beginners.
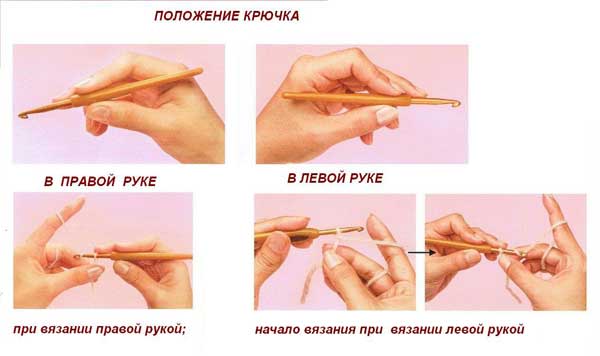
How to hold a hook
There are no strict rules regarding holding the hook in the hand and the correct placement of the thread. Each needlewoman chooses a convenient way to grip the working tool.
Methods:
- Like a pencil or pen with two working fingers. When pressing hard with the hook on the middle finger during long work, a callus is rubbed. The distance between the head of the hook and the place of capture is 1-2 cm, while the handle of the tool lies between the bases of the thumb and index finger.
- Hold the hook like a knife. The hook handle is held by the little finger, the place is held by the working fingers. The rest are adjacent to the hook, each on its own side, holding the tool. The middle finger holds the loops during work. With this method of holding, calluses do not form.
Each thread capture option is based on the following points:
- The knitted fabric is grasped with 2 comfortable fingers.
- Another convenient finger is lifted higher with the thread. This technique allows you to free up the working space. The finger is used as a tensioner for the working thread.
- Next, the thread is conveniently intertwined between the rest of the fingers of the hand, winding around the little finger for additional tension.
Choosing a hook
When buying a hook, pay attention to the material it is made of. Soft materials (plastic, bone) wear away over time on the thread and lose their original shape. An aluminum hook oxidizes, aluminum oxide settles on the skin of the hands, on the knitted product, leaving a dark mark. A wooden hook is brittle. Only large fabrics (rugs, scarves made of thick yarn) are knitted with this.
The hook number is determined by the diameter of the hook head. The approximate correspondence of the hook number to the yarn is given in the table.
| Hook No. | Yarn | Thread length, m/100 g | Application |
| 0.6-1 | "Snowflake" | 1600-2000 | Lace, napkins |
| 1-1.5 | "Iris" | 1600-2000 | Openwork fabric |
| 2-2.5 | "Narcissus" | 300-500 | Thick fabric |
| 2-3 | Any | 250-350 | Not a dense fabric |
| 3-4 | Any | 200 | Not a dense fabric |
| 4-6 | Any | 100 | Not a dense fabric |
The shape of the head is also important: a hook that is too sharp will prick your fingers, while a blunt hook will have difficulty entering the loops. The length of the handle is chosen to be comfortable. To rotate the hook at the moment of catching the thread, you need a tool with a "catch" (a small flat area in the middle of the tool), it usually has a number on it.
Knitting patterns
Once you learn how to crochet the basic elements, you can easily use them to create original patterns.
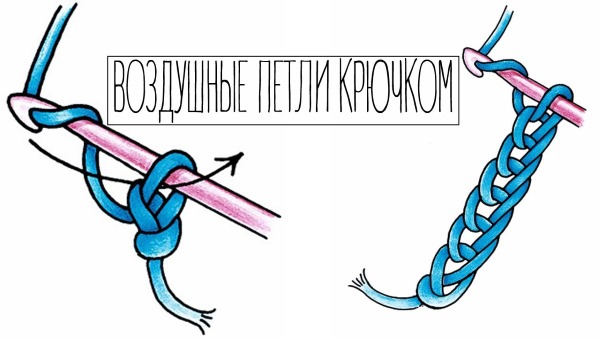
Air loops (AL)
Knitted fabric begins with a loop. It is called "air" because when knitted it is not connected to the fabric, but hangs in the air.
The first loop of any knitting pattern can be created in three ways:
- The thread is wrapped around any finger 2 full turns. It is removed from the finger. Then the hook is passed through the resulting ring, the head of the hook makes a turn from left to bottom counterclockwise, grabs the thread and pulls it through the ring towards itself. The free end of the thread is tightened. This is how the first, main fixed loop is obtained. It is called the working or leading loop.
- The thread takes the working position in the left hand. The hook is inserted from below the thread stretched between the thumb and index (or middle) finger, lifts it by 3 cm and rotates clockwise a full turn, without catching the working thread. An unfixed loop is obtained, thrown over the hook. Then, similar to the first method, the VP is pulled through this loop.
- The thread is folded in such a way that a loop is formed, about 5-7 cm long. Then this loop is thrown over 2 fingers, folded together (it is most convenient to use the thumb and index), from the bottom up. The fingers seem to hang on the loop.
Then both ends of the thread are passed between the fingers downwards. The thread is removed from the fingers. The pattern of the thread resembles the letter "F". One eye of the letter is pulled through the other, the free end of the thread is tightened. A working fixed loop is obtained.
Air loops are the basis of every knitted fabric. The air loops are knitted in the same way as the first, basic loop in the first two methods, constantly catching the thread and knitting it through the working loop. A chain of VP is formed.
Half columns (pSt)
The hook is inserted into the base loop, wrapped around the thread and both loops are knitted together: on the base and on the hook.
In the same way, the st is used to tie together individual parts, an arch of VP, lace elements, and folds of fabric. In this case, the st is called a slip stitch or slip loop.
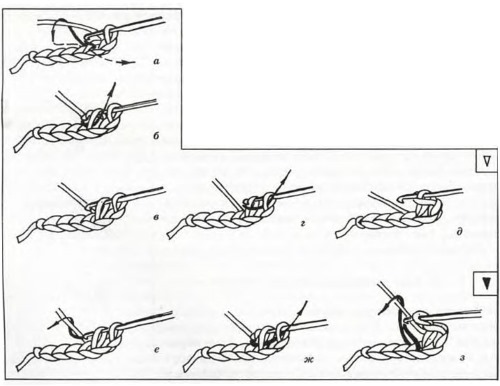
Single crochet (SC)
It is knitted a little more difficult than pSt. From the base loop, an air loop is knitted, which is called the main loop (not to be confused with the base loop), only then they are knitted together. In other words, to knit St, you need to grab the working thread 2 times.
There is a small nuance in using the base loop. Externally, the loop can be distinguished by the front thread and the back thread. Accordingly, loops can be knitted from the front thread (inner half-loop or wall), from the back (outer half-loop), from both.
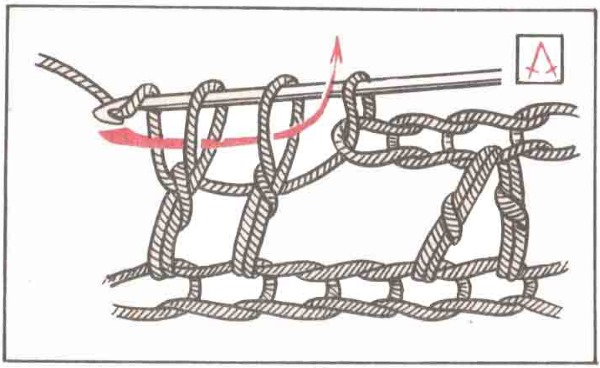
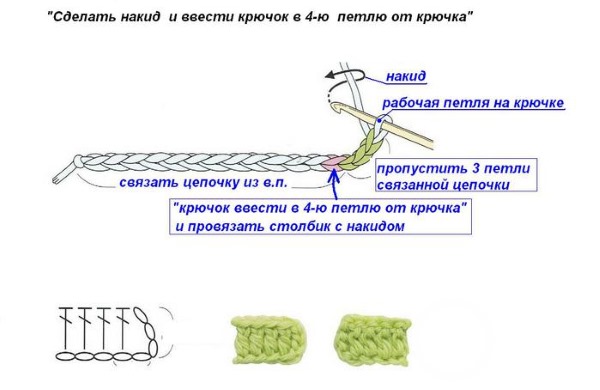
Double crochet (D/C)
This is the most common and frequently used knitting element. The fabric made of St/N is blown through, quite dense, but not as rigid as that knitted from St. Also, columns with multiple yarns are used as an arch onto which the remaining elements are tied.
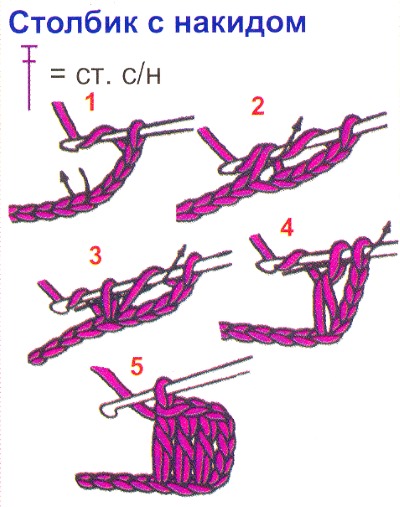
Essentially, double crochets are a chain of VPs, knitted from a base with a thread wound around itself. The number of twists is the number of yarns (St/N, St/2N, St/3N and so on).
To knit St/H you need to perform 4 crochet actions:
- yarn over the hook;
- knit a loop from the base;
- knit together the loop from the base and the yarn over;
- knit the remaining two stitches together.
Half double crochet (HDC)
Crochet (for beginners, follow the step-by-step diagram to understand the basics of knitting loops) a half double crochet as follows.
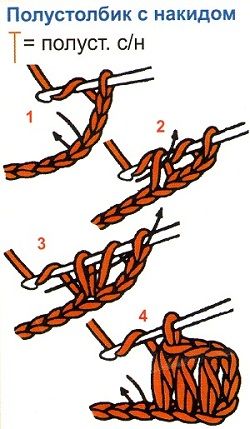
Simultaneously knit the working loop, yarn over and base loop.
Crossed dc
The first st/n is knitted into the second loop of the base. Then one VP and the second st/n, but into the first loop of the base that was skipped. Moreover, the second column is knitted behind the first one, without touching it.
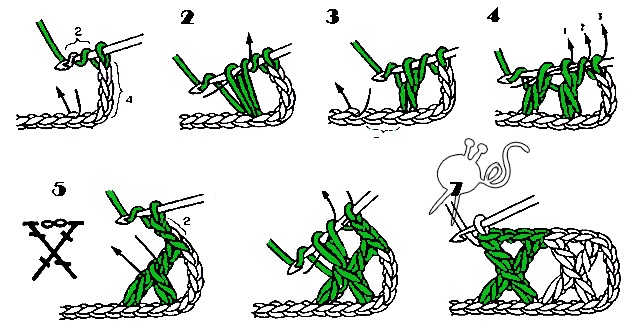
A relief pattern in the form of the letter X is formed. In subsequent rows of the pattern, St/H are knitted under the VP of the previous row, which is located in the middle of the cross.
Two double crochets worked together
The pattern begins as a regular St. Instead of knitting the foundation stitch and working stitch together, you knit the next foundation stitch from the next foundation stitch.
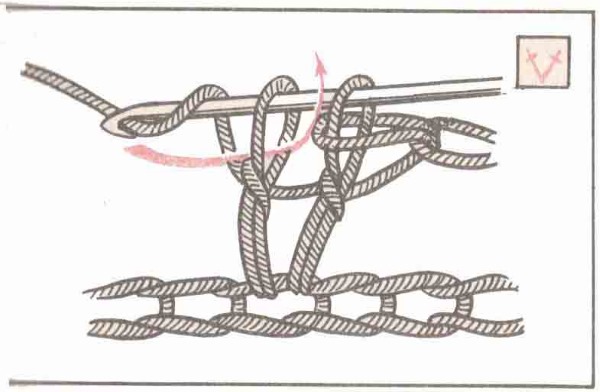
There will be 3 threads on the hook. And now you need to knit them all together. This technique is called "dropping a column".
Unfinished double crochet stitches
A yarn over and a base loop are made, they are knitted together. There are 2 unknitted loops left on the hook. Then again a yarn over and a base loop, they are knitted together. There are already 3 loops on the hook. And so as many times as required in the pattern.
The use of this technique is applied in the following cases:
- When many unfinished stitches are knitted simultaneously in one loop. For example, when closing the fabric, when knitting a circle from the edge to the center.
- If you close all the loops on the hook in pairs, the working loop will be in the middle of the row, not at the end. This technique is used when knitting complex patterns.
- There is a special knitting technique – Tunisian or knitting on a long hook. This is when the entire row is knitted with unfinished columns, and then all the loops are closed in a certain way. And so on row after row.
Lush column
This pattern is knitted in 2 ways:
- 3 unfinished st/h (for thin threads – 4) are knitted into the same base loop, then dropped.
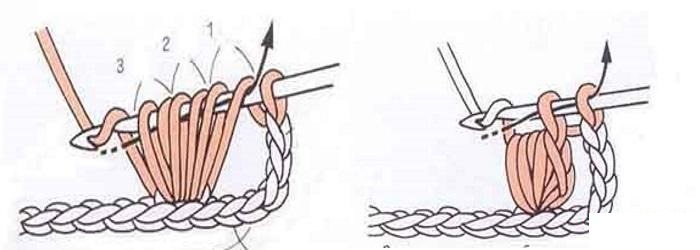
- The second method turns out more beautiful. Make a yarn over, a main loop, a yarn over, a loop, and so on 3-4 times. Then the column is dropped, then one tight VP is knitted to fix it. It is very important to knit the loops of a lush column of the same size, then it really becomes lush.
Pico
A picot is an arch of 3-5 chain stitches connected to the first loop of the arch or the first loop of the base with a slip stitch.
Gives the fabric airiness and openwork.
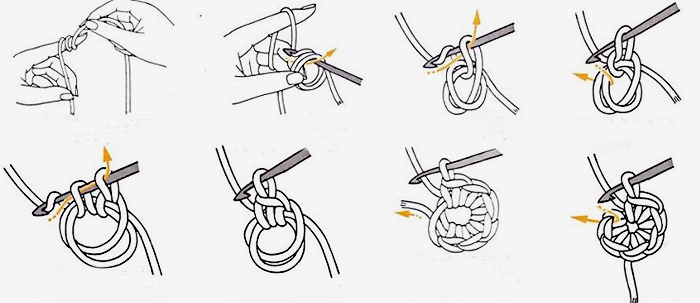
Knitting in the round
It starts with 3-5 VP, connected in a ring. You can also start a circle with a thread wound twice on your finger. In any case, a lifting loop is knitted into the resulting circle. Then the first row is knitted from single crochets, with 1 or 2 yarns.
In the case of a thread wound on a finger, the free end of the thread is tightened after knitting the first row, in this case the middle of the circle is dense. The row ends with a connecting loop and air loops for lifting. The second row can be knitted as you go, without changing the direction of knitting, or you can turn it to the opposite side and knit further.
The larger the diameter of the circle, the greater the circumference. That is, in each subsequent row there are more columns than in the previous one, approximately 5-7 columns, depending on the thickness of the thread.
It is done like this:
- The number of columns in the first row is divided by 6. Accordingly, 6 or 12 columns are knitted in the first row.
- In the second row, 1 more column is knitted into every 6th base loop, thereby increasing the number of working loops for the third row.
- In each subsequent row, 2 columns are knitted into the added column in the previous row. This is how the circumference increases.
For a more rounded knitting, the additional columns are not distributed strictly along the 6 sides of the circle, but are scattered in each row in a random order.
Crayfish step
A common technique for tying the edge of a finished product. It is called "rachiy" because the St are knitted, but in the opposite direction, without changing the position of the hands.
A loop is knitted from the first loop of the base on the right. Then, together with the working loop, both loops are knitted. Then similarly. The binding should be very tight, otherwise the relief of the pattern will not be visible.
Turning loops
Upon reaching the end of the row, knitting is turned in the opposite direction, 1, 2, 3 or more lifting air loops are knitted.
They are necessary to start the pattern of the next row from the required height, without lowering or tightening the edge of the fabric. The number of lifting loops is always shown on the pattern diagram.
If the next row begins with St, 1 lifting loop is knitted, St/N – 2, St/2N – 3 loops and so on.
Decreasing and increasing stitches
When knitting an even fabric, you need to strictly monitor the number of loops in a row - it should not change. Usually, at the end of a row, all the base loops are knitted with columns, and when lifting in the next row, the VPs play the role of the first column.
To reduce the number of loops over the course of one row, it is recommended to knit the pattern columns in pairs with one working loop. Thus, instead of 2 pattern columns, 1 will remain. Or skip 1 base loop, not using it in knitting the pattern. The decreases should be carried out evenly throughout the entire row.
How to decrease edge stitches:
- Do not knit the last few columns at the end of the row. In this case, the edge will look angular, like steps. At the beginning of the row, knit a connecting column on the same number of skipped columns, and then according to the pattern.
- At the end of the row, in the last 2 loops of the base, tie the connected posts together. At the beginning of the row, with this method, the lifting loops play the role of the first post, which must be connected to the second post. For an even decrease, it is recommended to reduce the number of air lifting loops by 1.
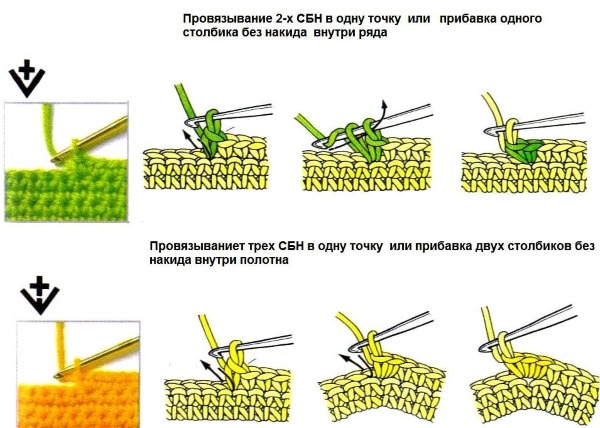
Adding stitches in the middle of a row is easier than decreasing them. 2-3 stitches are knitted into one base loop.
The addition of edge loops is carried out as follows:
- At the beginning of the row, several additional air loops are knitted, which serve as the basis for the knitted row. This method of adding looks like steps.
- You can add loops more smoothly at the beginning and end of the row by knitting 2-3 columns into the outer loop of the base.
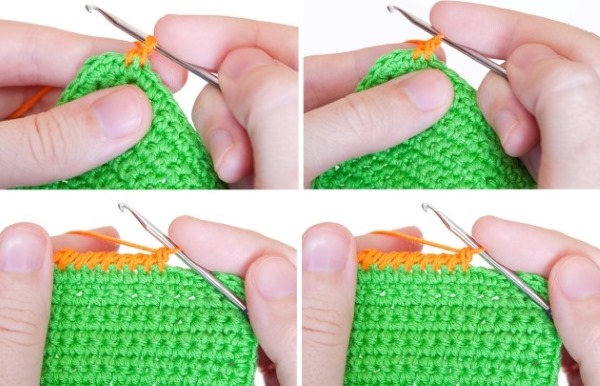
How to finish knitting
Knitting always ends the same way - one air loop is knitted from the last working loop, the thread is cut at a distance of about 5-7 cm from the fabric.
Then the end of the thread is pulled through the air loop with a hook and pulled tight. The tail is hidden between the interlacing of the threads in the knitting itself. The remaining end of the thread is also hidden in the knitting of the first row at the beginning of the knitting.
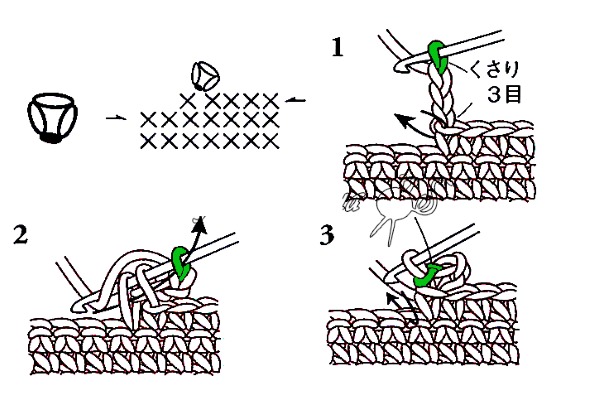
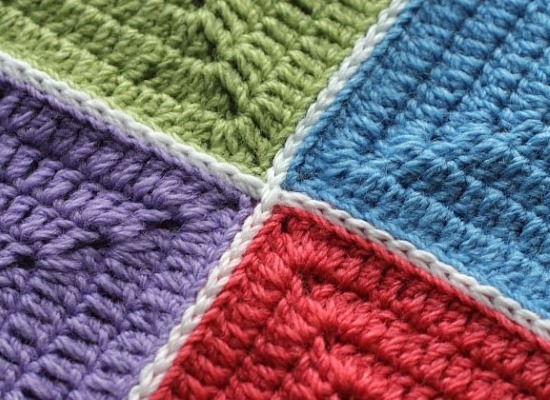
Granny square
Crocheting for beginners step by step is easy if you use simple patterns.
Such an element is the granny square:
- The square begins with a chain of air loops and the first row. The number of columns should be a multiple of 4 and 2 air loops are skipped in the marked corners between the columns.
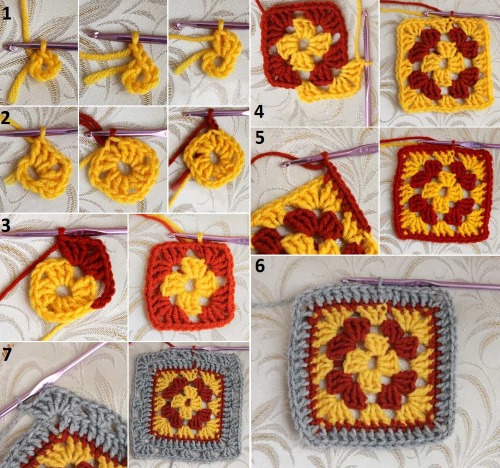
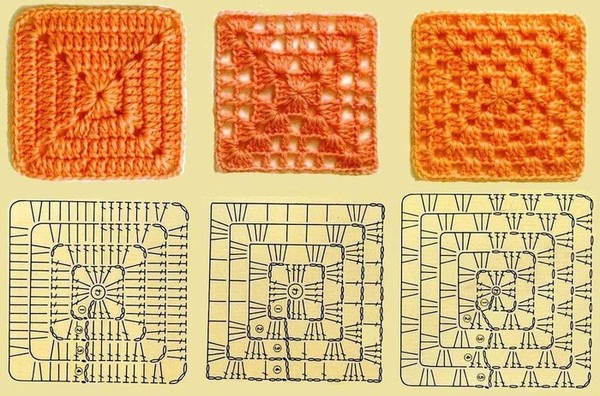
- Each row is knitted with the intended pattern: lush columns with one or two yarns, or by knitting 3 finished columns into one base loop, in the place between the same bunches of columns of the previous row.
- The main condition of this square is a frequent change of thread color.
- In the corner of the square, which is 1-2 air loops, a bunch of columns is knitted, an arch of VP, a bunch of columns of the next side. And so on, until the desired size of the square is reached.
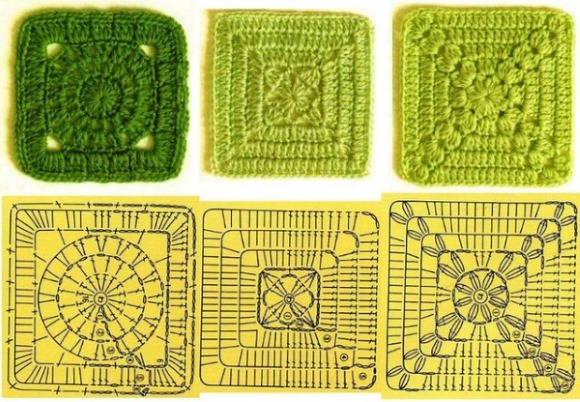
Simple crochet square from the center
A simple square is called "simple" because it is knitted as a continuous piece from the center to the edge in four directions. In the place of the supposed corner, starting from the 2nd row, an arch of two VP is knitted between the columns.
In each subsequent row, 2 columns, 2 air loops and 2 more columns are knitted into this mini arch. Thus, each side of the square in each row increases by 4 columns. This is enough to evenly increase the square fabric.
Square in Spanish
The modernized granny square, mastered by the Spanish, looks very impressive. Its knitting differs from the traditional granny square in one small detail: starting from the 3rd row, the middle column (no matter how many yarns) of the bundle is knitted not in the previous row, but in the pre-previous one, that is, between the bundles 2 rows earlier.
It is important to adjust the thread tension so that the fabric does not tighten. It is better to knit more freely. The choice of thread color is important. Usually several colors of the same range are selected with a transition from the lightest in the middle to the darkest at the edge of the square. Or vice versa.
Crochet Granny Squares Joining
A set of tied squares are connected to each other in the following ways:
- The edges of the squares are sewn together with a needle and thread of a similar color to the yarn that is used to tie the squares.
- The edges of 2 squares are applied to each other, loop to loop, knitted together with a slip stitch, or St. The disadvantage of this method is the relief seam.
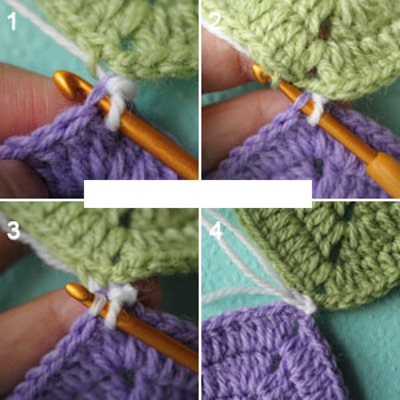
- The following connection looks more neat. The sides of the squares are folded end to end, loop to loop. The hook is inserted through both back threads of the loops, one from each square, pulls the thread through them and the working loop, forming the next loop. Externally, this seam looks like a chain of VP between the squares.
- The connecting posts are used to connect 2 sides of the square in a zigzag pattern, from one edge to the other. Between the connecting posts, 1 or more air loops are knitted. This depends on the width of the connecting seam.
- Experienced needlewomen make this connection: a bunch of columns in the last row of the first square, then a bunch of columns in the last row of the second square, the first, the second, and so on. Visually, the border between the two squares is not noticeable.
Non-square granny square
In addition to the square, elements in the form of triangles, pentagons, hexagons, rhombuses and other polygons are popular.
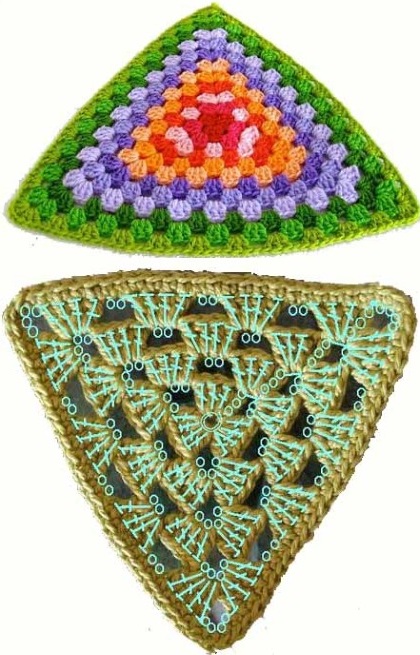
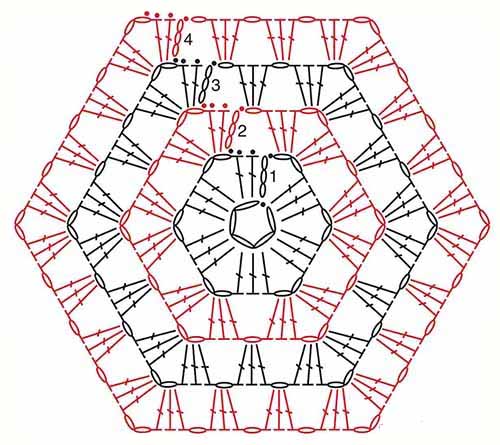
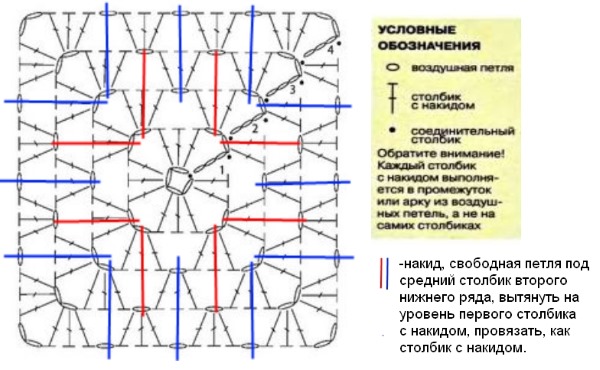
To crochet for beginners step by step an original square, crocheted with three colors in a spiral, you need to do the following:
- A ring made of thread or air loops, as for a circle.
- Using a thread of, say, red color, knit the first row of 12 double crochets, with arches of 2 loops every 3 columns. The 4th arch is not knitted. The hook is removed from the loop. It is better to pull the working loop longer, so as not to accidentally unravel the knitting.
- A hook is inserted into the working loop of the first column of the red row and a thread of a different color is pulled out, for example, green. 4 lifting loops are knitted and then according to the pattern 4 sides of the square, but the 4th arch is also not knitted. The hook is removed.
- From the first column of green color, lifting loops are knitted, for example, with a blue thread. Then similarly. At this stage, you should get a square of 3 colored rows and without one corner.
- The hook is inserted into the free red leading loop and continues knitting the side of the square to the corner, then the arch, the next side of the square and so on until the free working loop of blue. The hook is removed.
- The next row is knitted in the same way with green thread. The hook is removed, the blue free loop is picked up and so on.
- All color rows are finished at the same time, not reaching the nearest corner of the square by about 1 column. The last blue thread is tied around the end of the last rows so that the square is finished.
Granny square models
Squares, like mosaics, are used to create unique patterns for blankets, children's blankets, decorative pillows, rugs, chair and stool covers. Any clothing is made from them. These are shawls, sweaters, vests, skirts, dresses, summer tops, sundresses, house slippers, bags and purses. Hexagons are used to make fun soft toys.
Granny square blanket
For such a blanket, you need to choose a pattern of the square you like. Even 1 large square can be a ready-made blanket. There are no connecting seams in such a product, which is very convenient. If you do not close the initial chain of air loops into a circle, but continue it with a length of about 20-30 cm, and then start tying it in a circle, you will get a rectangular blanket.

From a large number of small squares, you can also knit square and rectangular blankets. It will be unusual if you arrange the squares not in a checkerboard pattern, but diagonally. For an even edge of such a blanket, you need to knit right-angled triangles that match the size of the squares.
Crochet booties for beginners
When choosing yarn, preference is given to soft, natural and hypoallergenic materials (100% cotton, acrylic, wool). You should not knit from very fluffy yarn, as the fluff will definitely get on the baby's hands, and then on the face. The hook number is selected according to the thickness of the thread. It is not difficult to crochet booties.
For beginners, here is a step-by-step description of the simplest bootie models:
- Place the child's foot on the paper and trace it. This will become a sample of the sole. Knit an oval using the finished sample. This is done as follows: a 3-5 cm chain of air loops, lifting loops, the first row of columns (or half columns) with a yarn over.
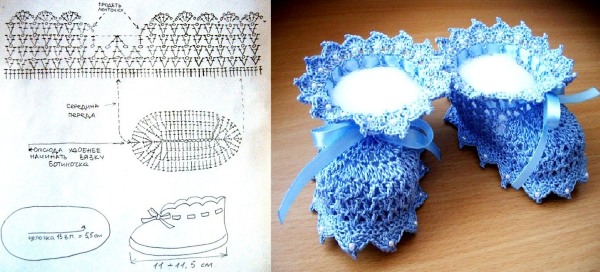
Additional columns are knitted along the edges of the oval to give the part a rounded shape. You can add a nylon or lavsan thread to the main thread, then the sole will become stronger. But this is for running kids.
- When the sole is ready, knitting of the booties' sides begins. Knitting of the fabric continues without adding about 1.5-2 cm.
- Then the fabric continues upwards 2-3 rows in the following way: from the side of the future heel, decrease the columns by 1 in each row; from the side of the toe, columns with 2 yarns are knitted, connected into 1 leading loop. Thus, the toe part of the bootie is closed.
- The main part of the booties is ready. It remains only to knit the leg part with lace. Beginners can choose a simple lace pattern, arches of 5-6 VP in several rows.
Booties-boots
Booties-boots are knitted similarly to booties with lace. The shaft is knitted in a solid fabric, slightly expanding at the top for more convenient putting on the child's foot.
Rugs
To knit rugs, select very thick yarn or knitted thread and a thick wooden hook. The knitting is dense, but not too tight. A classic rug is a dense circle or oval, knitted with double crochets. The rug is decorated with lace knitted with the same thread, relief patterns.
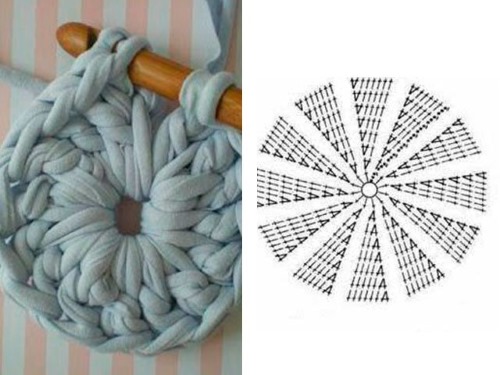
The shape of the rugs is varied. The arrangement of the rows can be straight, diagonal, circular, zigzag, or directly opposite. The fabric can be assembled from many small elements or one solid form.
Scarf
A simple scarf is a long knitted fabric of a given width. It is made with any favorite pattern, even the most delicate one. If you knit a long scarf and close it with connecting loops into a ring, you will get a scarf-collar. A tightly knitted wide cylinder can be used as a scarf-hood.
Hats
There are 2 ways to start knitting a hat:
- From the center of the hat in a circle. As soon as the desired diameter of the hat is reached, equal to the head circumference + 2 cm, additional columns are stopped in the row, thereby knitting a cylinder. Having reached the desired length of the hat, the edge is tied with a decorative crab step.
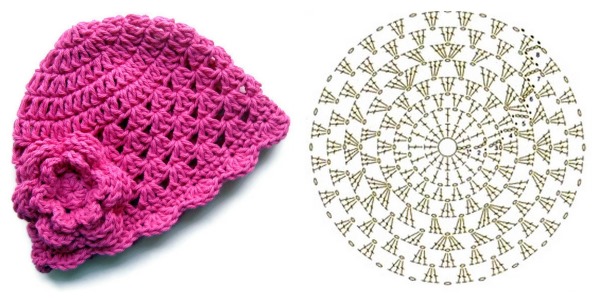
- From edge to center. Knit back to the first option. First, the cylinder is the desired length, and then the number of columns in each row is reduced until there are none left.
The hat is decorated with crocheted decorative elements (flowers, butterflies, anchors) or pom-poms.
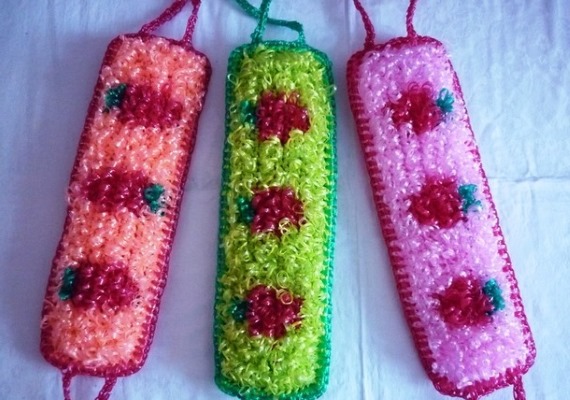
Crochet washcloth
To knit this product, use multi-colored polypropylene or nylon threads and a hook of the appropriate size. The simplest model of a crochet washcloth is a mitten. Knitting of a washcloth begins with a closed chain VP. In this model, you can do without lifting loops and closing rows.
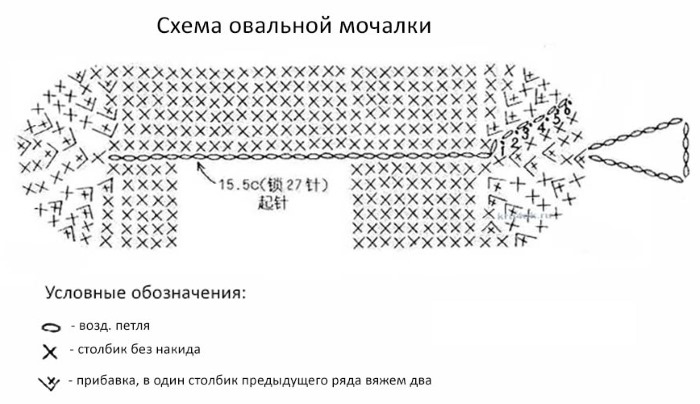
Next, in a circle, rows of St in a spiral about 10 cm long. In the place marked for the thumb, you need to knit an arch of 15 VP. The arch is connected to the previous row through 15 loops, then in a circle St another 10 cm long. In order to close the knitting, you need to pull out the connecting loop from the base loop, then one VP through which the knitting ends.
With loops extended
The classic washcloth is knitted with long loops that stick out from the knitting, creating terry cloth.
These loops are knitted like this:
- On the hook there is a working loop and a yarn over, the thread that will need to be pulled into the base loop is thrown over the middle finger, creating an elongated loop.
- A hook is inserted into the base loop and a double thread is pulled out from below, counterclockwise.
- The pulled loop is removed from the finger.
- Next, the st/h is knitted as usual.
Crocheting a washcloth with elongated loops step by step for beginners is simple.
Detailed description:
- Knitting a handle. A chain of 20-25 air loops, the first row of double crochets. The resulting braid will be the handle.
- Lower part. Without removing the hook from the loop, crochet 20 loops, several single crochets into the end part of the handle, the next 20 loops, everything is connected to the beginning of the handle. Then, in a spiral, 5 rows of double crochets.
- Medium terry part. Rows are knitted with extended loops in the quantity required for the desired length of the washcloth.
- Upper part. After the middle terry part of the washcloth is knitted, the next 5 rows are double crochet.
- Knitting a handle. A chain of loops is collected, connected to the opposite part of the washcloth. 3 lifting loops, a connecting loop and back a row of double crochets. The handle is completed.
Baby washcloth
This is a simple circle that is knitted with extended loops. Their direction by the end of the work is from the edge to the center. Washcloths with drawings of animal faces, stripes, zigzags are knitted from multi-colored threads.
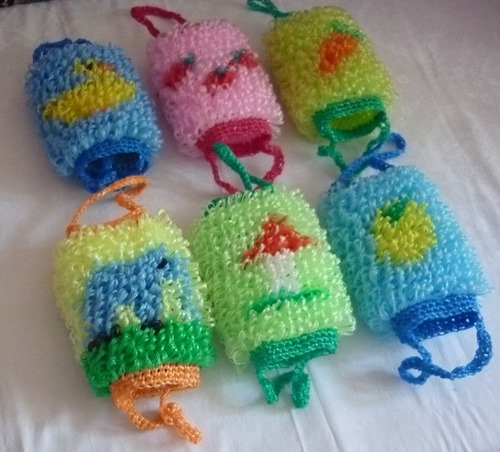
The washcloth is tied with a thread of a different color. The last detail is a loop of the same color. It is needed to comfortably hold the washcloth in your hand.
In the form of a ball
It is knitted according to the circle pattern, but in each base loop there is not 1 column, but 3. And so 5 rows. Due to the fact that the rows become very wavy, the washcloth takes the shape of a ball. The loop for the washcloth is knitted from the first row, at the very beginning of the work.
Simple method of knitting a shawl
The shawl is knitted in the shape of a right triangle. The classic granny square is used as a basis.
Knitting:
- Knitting begins with a closed chain of air loops in a circle.
- The 1st row consists of 8 double crochets.
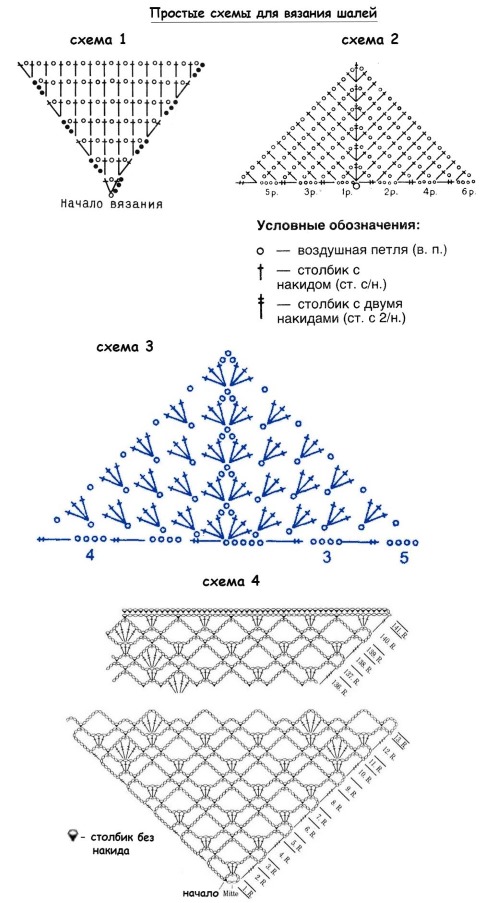
- From a granny square, two sides and a right angle between them are used.
- Next, follow the diagram of the selected pattern.
The shawl is tied with single crochet stitches. At equal distances from each other, tassels are created from the main thread.
Napkins
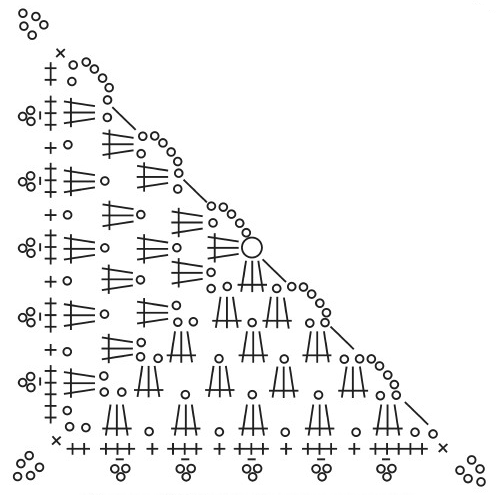
Napkins start from the center, then in a circle, closing each row with connecting loops and starting with lifting ones. The description of knitting is displayed in the napkin patterns, which you need to be able to read.
Napkins can be whole, round or square, made of connected identical elements, fillet (a kind of mesh with empty and connected cells), connected with Irish lace (various elements of flowers, leaves and other patterns).
Once you have mastered the basics of crocheting for beginners, it is worth taking up step-by-step analysis and creating more complex products, since skill comes with experience.
Article formatting:Natalie Podolskaya
Video about crochet
How to crochet for beginners - diagrams and description: