Draw a human face not easy, but anyone can learn it, this master class will analyze several options and styles of drawing a girl's face or a girl with long and medium hair. Pencil drawing techniques will be considered, both simple and colored. By strictly following the steps, you will be able to make an interesting drawing, learn the anatomy of the face and the features of drawing hair.
How to draw a girl's face - examples
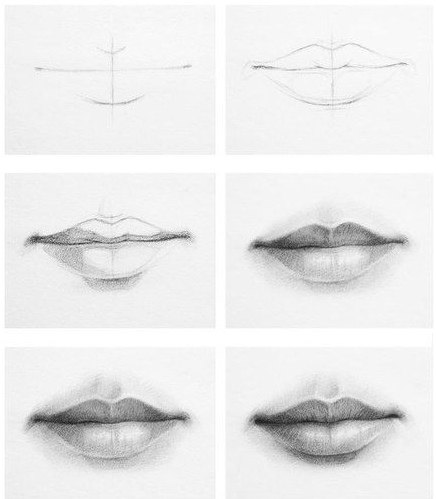
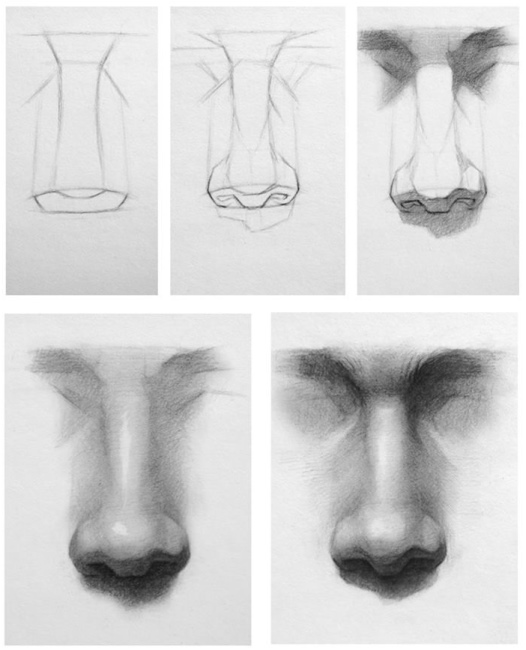
Elements of the face step by step

How to draw a girl with medium hair with a pencil
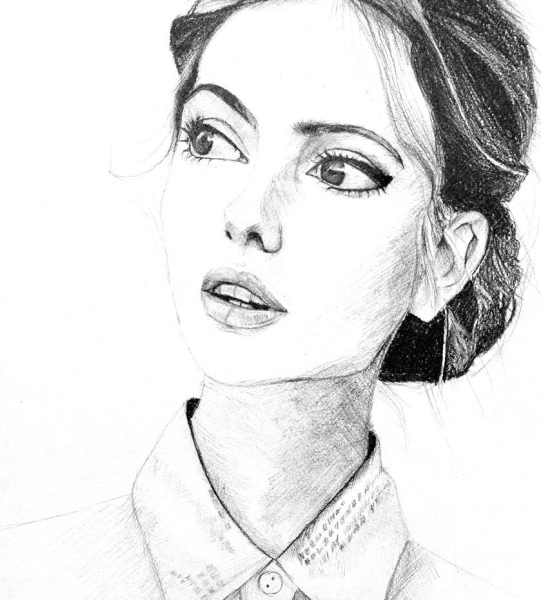
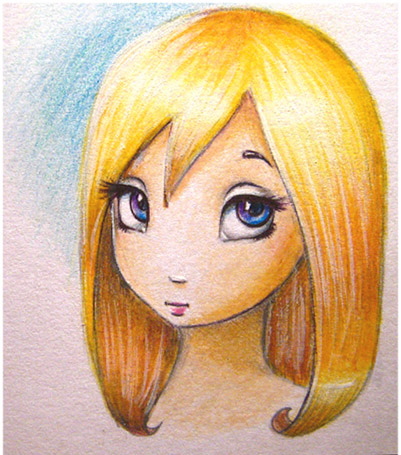
A beginner or a child will not be able to draw a complex portrait the first time, you should start with a simple drawing up to the shoulders. The selected option is not cluttered with facial lines, but only contains the main anatomical features, which is ideal for young children. As shown in the photo, you can limit yourself to drawing up to the neck, focusing on the eyes and hair, which so clearly frame the girl.
To complete the master class you will need:
- white sheet;
- a simple or black pencil;
- set of colored pencils;
- eraser.
It is worth explaining a little about the materials to achieve the best result. For a small child, it is best to use a regular album sheet or even those used in printers.
This is due to the fact that children may not succeed at something the first time, and an unsuccessful drawing will most likely upset them, so do not waste expensive thick sheets for drawing or even sheets of cardboard (which in principle should not be used due to their poor ability to take on the color of pencils).
For drawing contours, namely, before adding color, it is best to work with a simple pencil. This can be either Koh-i-Noor art pencils or free pencils from IKEA. The latter will be even more convenient for a child due to their small size.
What you shouldn't start your sketch with is black or colored pencil lead. The thing is that the first one will stain the sheet too much and will be difficult to erase, and the colored contours will either be barely noticeable or also difficult to erase.
The list of recommended materials with price will be given below:
| Material | Firm | Minimum price, RUB (04.2020) |
| Simple pencil | Koh-I-Noor | 12 (per piece) |
| Faber-Castell | 12 (per piece) | |
| Drawing sheets | Goznak | 105 (per pack, 24 pcs.) |
| Set of colored pencils | Koh-I-Noor | 70 (per pack, 6 pcs.) |
| Stabilo | 120 (per pack, 6 pcs.) | |
| Action | 43 (per pack, 6 pcs.) |
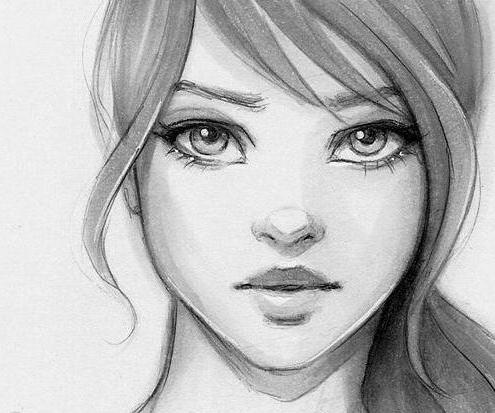
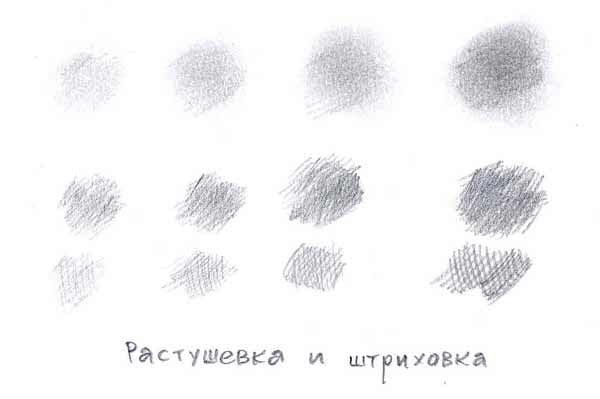
The girl with medium hair, the drawing of which is shown above, is made in a simple technique of "toning with shading". Also shown here are shadows, highlights on the hair and eyes, which make the character lively, real and voluminous.
This style involves softening the stroke or "shading", which makes the image softer and more pleasant to look at. It is recommended to do this shading with a special stationery item called a "klyachka" or "toner".
But for children's drawing, a biological alternative is also suitable, namely a finger, which also copes with this task perfectly, and it will be even more interesting for the baby.
For convenience, the master class will be divided into detailed steps, where all actions will be described:
- At the initial stage, it is worthwhile to outline the girl's features. It is best to place them in the middle of the sheet, so that there is enough space for everything. It is necessary to outline the oval of the head, the largest part, so do not make it smaller.
- On the oval, it is necessary to mark the bottom, chin, and central line of the face (in this case, the line goes at a slight angle in the form of an arc from the chin to the crown, because the girl turned her head slightly to the side).

- The shape of the head should be outlined, that is, the lower planes should be indicated so that it becomes more realistic. Here you need to pay attention to the anatomical features of the character (in this case, it is a sharp chin and a smooth transition to the cheekbones).
- The heroine has a small mouth and nose, which can be easily outlined and even drawn right away. But she compensates for this with expressive blue eyes, which can be made of absolutely any color, the main thing is to capture the shape. It is best to start drawing the eyes with the one that is closest to the viewer, namely, to the artist (in this case, this is the left eye, which is on the right side of the sheet). You need to outline a circle in place of the eye (if the line of the nose is marked correctly, then count two distances from the chin to the nose, this will be the lower line of the eye.
- No matter how animated this drawing looks, the anatomical proportions of the eyes are preserved here, namely, if you put the width of the first eye aside the second, then this will be its right edge. On this edge you can draw a second circle, the diameter of which can also be measured by the distance from the chin to the line of the nose.
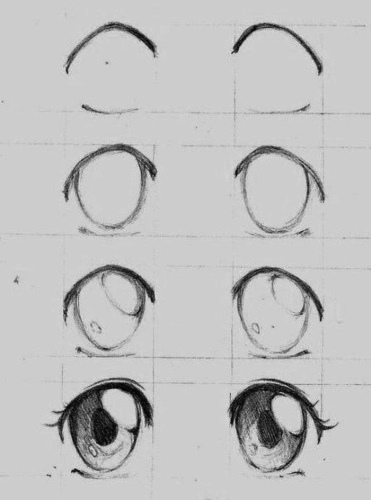
- Add lines to the outlined circles that will give shape to the eyes. You need to mark the lower and upper eyelids with eyelashes. Draw two more inside the circle, which will serve as the iris and pupil (there is an enlarged fragment of the face in the photo, where you can see the eyes and their structure in more detail).
- Now we need to move on to the hair, namely to a rough sketch of the shape of the head and the movement of the curls. In the picture you can see that the strands curl towards the end, which is much easier for a child than drawing the end of the hair. Carefully outline the boundaries of the bangs (do not make them too long so that they do not go over the eyes, this will make it easier for the child to add color to the details). Once the bangs are outlined, draw an eyebrow above the eye (only one is visible here).
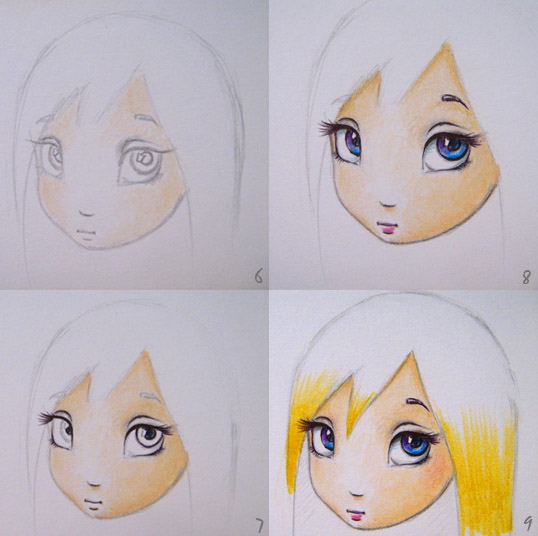
- Once the sketch is ready, you need to go over the lines that need to be left in the drawing with a simple pencil, and with an eraser over those that are no longer needed (auxiliary).
- And now you need to get out the colored pencils and make the drawing brighter. In the photo, the girl with long hair has light, even golden, hair, deep blue eyes and a light skin tone. There are no restrictions in choosing a color, the main thing is to have several tones of the chosen shade (especially for the hair), so that you can outline the light and dark areas. Once the color is chosen, you need to apply the first tone to the entire drawing (the face, eyes, lips and hair have their own color).
- You can use shading, or leave it as is, for shading you need to carefully rub the stroke with your finger. On small details you should do this with even greater caution, so that the lines do not rub together with the surface (it is best to avoid contact with the borders).
- Now you need to take the darkest shade of the chosen tone (for example, if yellow is chosen for the hair, then the first layer is applied with light yellow, and now with dark yellow) and go over the areas where the natural shadow falls. If suddenly there is no assortment of shades, then you just need to change the pressure on the pencil (light pressure during the first tinting, stronger pressure when marking the shadows). As for the face, this is the lower part, under the hair and neck, those places where there is the least light. Also, do not forget about the shadow on the eyes, this will help to make them voluminous.
- Once the shadows on the face are finished, it is time to move on to the hair (the first light tone should already be applied). First of all, it is worth outlining the dark areas behind the back of the head, you can even take a darker color, but similar in color scheme (for example, if yellow is chosen, then light brown). Also, the dark areas will be the ends of the hair (especially on the back side), the edge of the part of the hairstyle that is further from the light source (the right side of the drawing) and the very top of the head, namely, the part of the hair that goes to the back of the head.
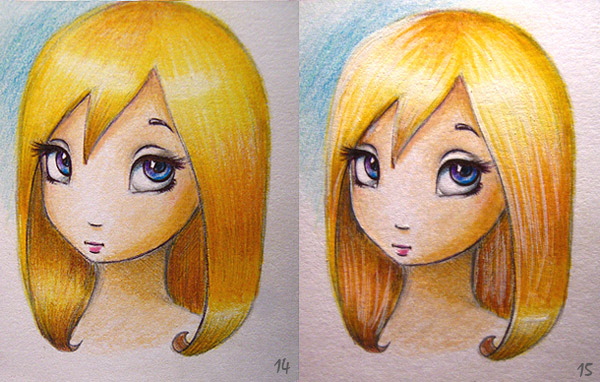
- Hair has volume, and it also has the property of reflecting light, this is also reflected by color. In the picture you can see that the most illuminated part of the hair is her forehead. This effect can be achieved in three ways: darken the area of the hair around this illuminated line (if the original tone is suitable), apply a lighter tone to the original color (for example, if yellow was chosen, then a lemon pencil or even white will do) and the third option is to erase this part with an eraser (the same can be done over the entire hair, as shown in the picture and on the eyes to bring the white to the desired shade and show the glare on the pupil).
Here is a drawing of a girl with long hair ready, all that remains is to correct the places at your discretion and add a background to immerse the resulting character in some world. And to make this portrait look more expressive, you can go over the borders with a black pencil or even a felt-tip pen, this will add quality.
Cartoon girl
After a simple children's drawing, you can move on to something more complex, but still remain in the cartoon genre. In this drawing, you can see that you will not need to draw the eyes, but here the anatomy of the face is more realistic and a lot of emphasis is placed on the hair.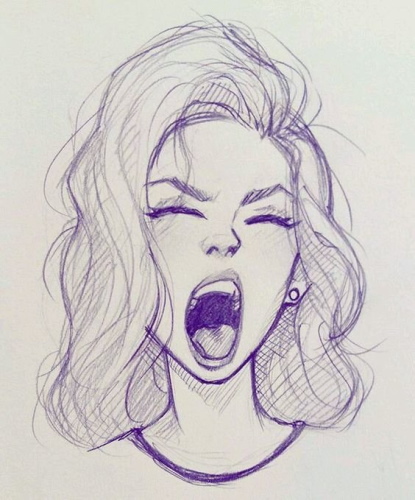
This work was done with a blue pencil, but if your drawing skills are not great, then you should do the work with a simple pencil and then add color.
This work will not describe the process of giving color to a fictional heroine, but will focus more on details and working with the volume of the hairstyle.
Since the set of necessary tools is the same (except for a set of colored pencils), you can now begin the work itself:
- Progress does not stand still, but in drawing people everything is the same, it is worth starting with the oval of the face. In this example, this oval is clearly visible, which means that you do not even have to correct anything and you can immediately draw the necessary shape of the head. The main thing is not to go small, because here all the elements take up a large area, unlike the previous one, so in order for everything to fit, the oval should be in the middle of the sheet and take up most of it (but you can't forget about the hairstyle, which requires space on top).
- For convenience and maximum accuracy, it is better to outline all the external features, and only then move on to the face. The neck is outlined (the girl has a thin neck) and the hair boundaries are outlined. It is necessary to pay attention to the fact that in some places the hair goes beyond the oval of the head, which also needs to be repeated, this will help in constructing the face. It is not worth doing the hair as accurately as possible now, it will be enough to just outline the boundaries from which you can push off.
- Next, you need to outline the boundaries of all parts on the oval. Even taking into account that this is a cartoon version, some anatomical rules are preserved here, but with their own nuances. First of all, you need to draw a vertical line in the center and divide it in half, this will be the line of the nose. If you divide the lower half into two equal parts, you will get the middle of the mouth, namely, the location of the corners of the cavity, where the lines of the upper and lower lips connect. By dividing the second part, you can get a line of eyebrows, but you should not draw the eyebrows right away.
- The lower part of the oval needs to be given a clearer shape of the chin (this heroine also has a sharp one, but not so much, this needs to be reflected). Next, you need to step back a little from the chin upwards and mark the outer line of the lower lip. On the line that was marked earlier (the middle of the mouth), you need to mark the oval of the tongue, which also runs along this middle. If you put off the distance from the upper border of the lower lip to the middle of the mouth (to the tongue), then this will be the distance to the inner line of the upper lip. This distance also fits the width of the mouth, so this can also be marked and connect the lines of the lips, which will already make up the entire cavity.
- The distance from the chin to the lip is also suitable for the distance from the upper lip to the bottom of the nose. From this line, the drawing of the nostrils will begin, and from the one that was placed earlier (the middle of the oval), a small ellipse is drawn, which will indicate the tip of the nose and the most protruding part. If you draw a line from this oval along the shape downwards, then this will be the left wing of the nose (from which the drawing of the nostrils and the bridge begins), and if you also draw a line upwards along the shape, you can stumble upon the line of the eyes. Now you need to change the slope of the line and connect it with the eyebrows (the middle of the upper half), from this you can begin drawing the left eyebrow, which should go into the previously outlined hairstyle.
- In this example, the eyes are not particularly complex, just a few thick lines along the shape of the eye, eyelashes, and subsequent work with shadows to add volume. The eyes are the same width, which will be easy to set aside from the middle of the face. It is only necessary to take into account that the heroine's head is slightly tilted, and this changes the position of the eye slightly (the right one is slightly higher than the left one).
- Before moving on to small details, it is worth checking the drawing several times and checking the correctness of the proportions of all elements so that their location is not disturbed. Then you need to move on to small details on the face, namely, to clarifying the shapes of the lips, tongue, nose, eyebrows, eye lines. In addition, the teeth and ears have not yet been drawn (here only one of the hair is visible). The teeth are drawn according to the shape of the upper lip, and the ear begins slightly above the middle of the mouth, and then it is hidden in the hair.
- To completely finish the face and move on to the hair, you need to add shadows to the shape of the eyes, nose, ear, lips and tongue. The oral cavity and nostrils can be shaded, because this is the darkest place in the drawing.
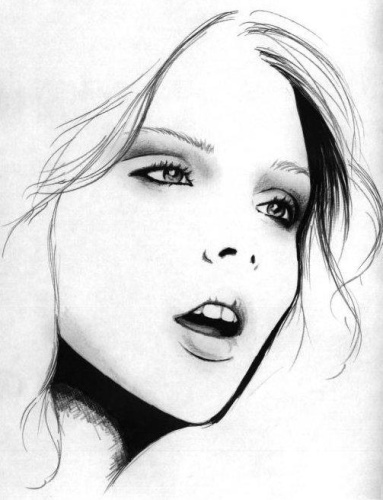
- The face is finished, we need to move on to the most important thing in this drawing, the hair. You can tell from the girl that she is yawning, and from her hairdo, it suggests that she has just woken up, which only makes her hairdo more interesting. In addition to the unevenness of the natural volume, there are such details as individual unruly strands and hairs that stick out in different directions, all of this needs to be displayed.
- The example clearly shows the shading of the dark areas of the hairstyle and the shading by volume, which is also duplicated. Some strands go onto the face (that's why the face was completed first), but if the shading goes onto the face or onto a light area of the hairstyle, then this needs to be corrected with an eraser.
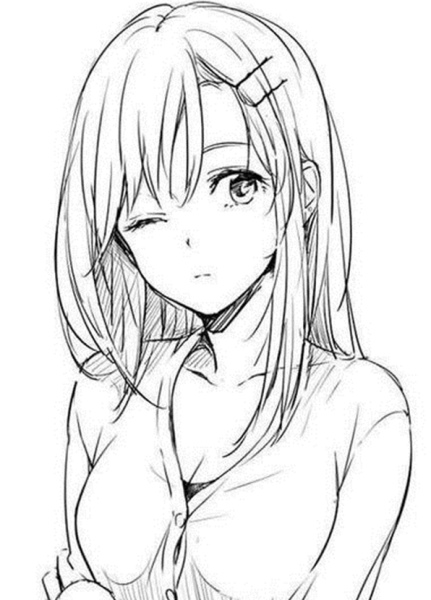
 The face of the girl with long hair (the drawing in the example) also has a transition from the neck to the collarbones and shoulders, there is even a designation of a T-shirt. This is all part of the outside world, which can be added at will, including background shading.
But before you put a dot on this drawing, you need to make sure that all the lines are correct and that shading has been done in the right places.. Afterwards, you can go over the lines with a dark pencil, felt-tip pen, or blue color, as shown above.
anime girl
A girl with long hair is a drawing that not only assumes anatomically correct proportions, because there are a huge number of styles, and anime is far from the last place. It cannot be said that it is easier to draw in this style, because it has its own rules and nuances that should be taken into account.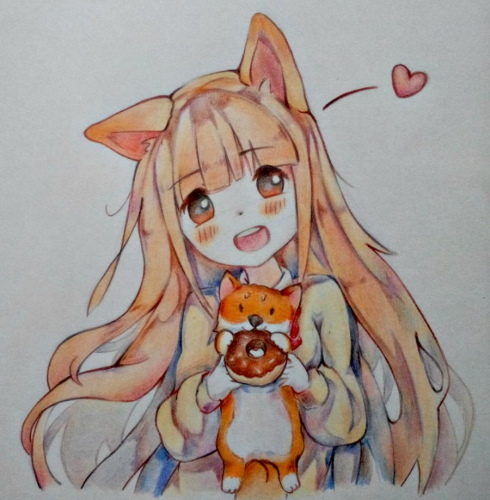
The set of materials here is the same as in the first case, so you can immediately get to work:
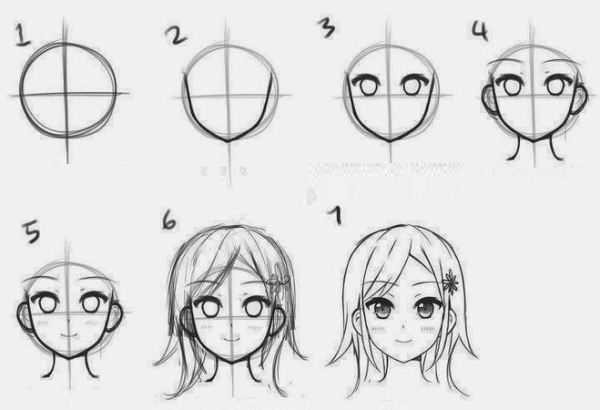
- The style is different, but the beginning is exactly the same, the oval of the head is outlined, which will be closer to a circle (elliptical shape). The oval is drawn taking into account the hair, which takes up most of the face. The center is outlined, it is necessary to take into account that the girl's head is tilted. It is necessary to divide the center in half, the line will indicate the end of the bangs and the beginning of the eyes.
- The first thing you need to do is draw the face, which means that the work will be done with the lower half of the oval. In the middle is the nose, which is drawn as a neat short line. Below is the mouth, which is open in the heroine. It is in the center, if you put aside the distance from the nose to the chin. To indicate the height of the mouth, just put aside the same small distance from the nose and from the chin. And the width consists of two heights. All the space is occupied by the tongue, the border of which must be drawn and the upper teeth added.
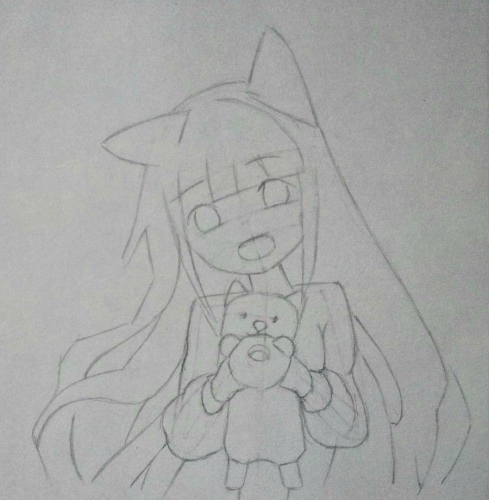
- To mark the position of the eye, you need to draw vertical lines from the corners of the mouth up. Step back a little to the sides, this will be the position of the eyes. Since they are a circle, their width and height will be the same, and they are equal to the width of the mouth. Next, you need to add a few details, this is a wide arc at the top and a thin line at the bottom, these are the eyelids. The eye itself is quite simple in structure in anime, there is no white, all the space is occupied by the iris, and often without a pupil, but only with a gradient (smooth transition of colors). But what is an obligatory part of the eye in this style is a large glare (reflection of light). The remaining details are added in color, but this is later, so you need to move on to the hair
- A girl with long hair, the drawing just screams about it, there are a lot of them, but they are drawn quite simply. The peculiarity of drawing hair in anime is that the entire hairstyle is divided into several whole parts, strands, on which the unevenness and volume are indicated by shadow. First of all, you need to finish drawing the bangs, namely, its parts, because it is divided into 4 fragments (in this case). By the end of the bangs, the crown is complemented, and from it the ears are drawn. Animal ears are drawn according to the shape of the head, so this must be taken into account. And then long curls are drawn from them.
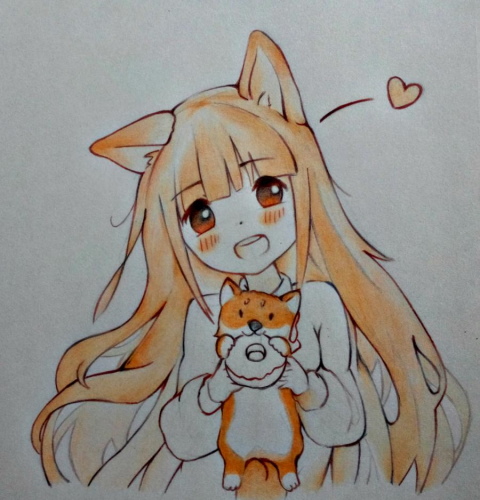
- After this, the color pencils are used to work on the drawing, as in the first picture, "toning with shading". The first light tone is applied, and then the dark shades are applied. Also, such details as the blush on the cheeks and eyebrows, which in anime are applied over the bangs, need to be marked with color.
The task of drawing a girl with long hair is completed. You can limit yourself to the neck and shoulders, as in the second option, or you can add a little bit of the surroundings, for example, this cute little animal with sweetness.
The face of a girl in anime style does not necessarily have to have the correct anatomical shape, because it is a cartoon style of fine art.
Coloring pages for copying
A great example of a simple coloring book that is suitable for preschoolers. There are a minimum of details, everything is large, so it will be easy to navigate and calculate proportions. The hairstyle is divided into separate curls, which will also simplify the work with color.
A more complicated work that can be offered to a child of primary school, the girl is shown in a three-quarter position (slightly turned), this will not add difficulties, but will only change the calculation of proportions. As for the hair, here they have a structure and guide lines that show the movement of the hair and its volume. Ideal for working with volume.
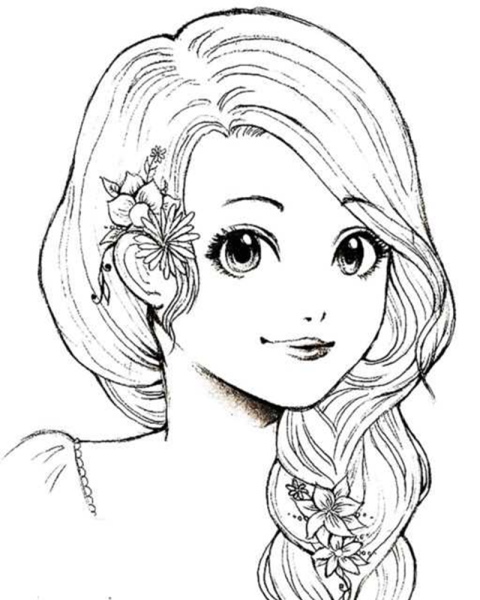
A similar option is suitable for children of middle school. Here the maximum emphasis is placed on the hair and its structure. Here the girl is shown from the back, which means there is no need to work on the face, but here is a multi-layered composition of individual curls.
And of course, an option for those who like to work in the anime genre, where all the necessary attributes are present, namely, large eyes with the same large highlights on them and hair that is clearly divided into parts.
The girl's face is not a simple drawing. This master class includes all the fundamental points that are necessary for successful practice in creating a high-quality image. It is worth considering all the described anatomical factors of the girl's head and face. All the plastic light lines, large expressive eyes and, of course, long hair.
Drawing a girl's face and similar works is not difficult, the main thing is to follow the rules and try hard.
Video about drawing a girl's face
How to draw an anime girl face in 10 minutes: