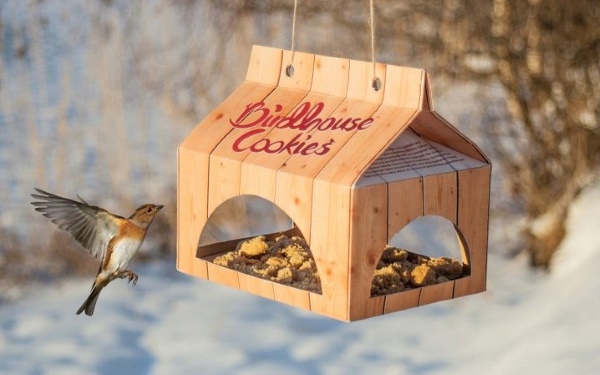
In winter, it is difficult for birds to find food. This is due to the cold and snow that covers everything around. In order for the ringing singing of birds to please the ear during cold periods of time, it is necessary to help them with food. The best way is to install a feeder where there will always be grain. Such a dining room can be made of cardboard.
Product characteristics
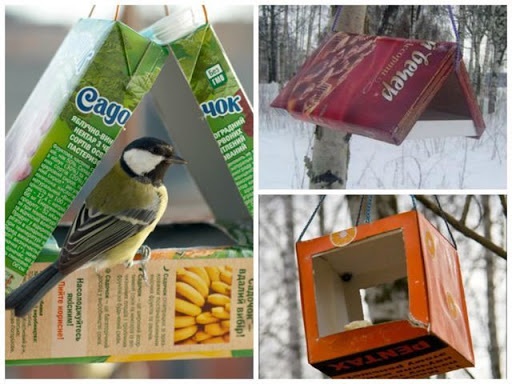
Cardboard is a good material for making a bird feeder yourself. For example, a juice box, milk box, candy box, or shoe box can serve as a base. The main thing is that it has enough space for the birds.
 The main elements of the feeder are:
| Element | Functionality |
| Bottom | Grain or other food that the birds wintering in our area will not refuse is poured here. For example, you can put bread crumbs or small pieces of lard in the feeder. Birds that are predators and are used to hunting will eat them with pleasure. |
| Roof | The main function of the roof is protection from snow and other precipitation. Moreover, it protects both the food and the birds themselves. In a box feeder, the roof is its upper part. |
| Sides | They protect the interior from the wind. They are absolutely necessary: without them, the food will be blown away by the air flow or the birds themselves may scatter it while eating. |
Additional elements may include:
- walls instead of sides;
- entry holes if there are walls;
- small holes for light penetration: the more of them there are, the more sunlight will penetrate into the structure.
It is also important to remember that a feeder is not a nesting place. It should not be a secluded place. Birds are afraid of being in dark places, so there should be many holes in the walls. Such a house will protect the birds well from bad weather.
 To prevent birds from injuring their paws, all edges of the holes must be made neat. Sharp ends, wire and nails are prohibited.
The design of the product is simple, so it will not take much time to make. A capacious cardboard box is practically a ready-made feeder: it already has the main elements.
To make a “bird restaurant” you can also use flat cardboard boxes, for example, from chocolate candies.
Advantages and disadvantages of the material
Regular cardboard, if left outdoors for a long time, will be destroyed by precipitation, so it is better to give preference to a box made of laminated material. Thanks to a special coating, they will resist precipitation longer.
Box
It is easy to make a feeder from a cardboard package: there is no need to draw complex diagrams and make precise calculations.
 One of the main advantages of cardboard is the cheapness of the material. Cardboard sheets are inexpensive, as is the glue that is needed to connect them. If a ready-made box is used, its production will be free. The process itself will take several hours.
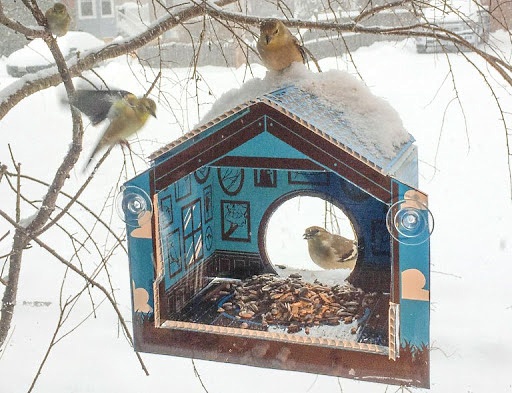
Instead of regular cardboard, you can use colored cardboard and then decorate it with bright stickers. You can do this with children.
Tetra Pak
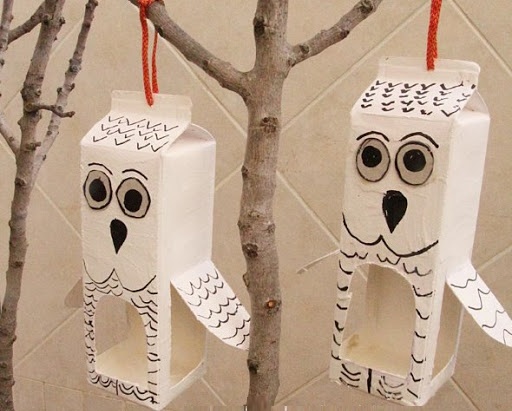
For the inexperienced, a suitable option is to make it from tetrapack with a plastic lid. As a rule, such boxes have good protection from moisture. All you need to do is cut 1 or more holes, and cover the cut areas with a plaster. This will protect the material from moisture penetration and the bird's feet from possible damage.
Cardboard sheets
If you are making a feeder from cardboard sheets, it is better to start with simple options. They are based on capacious boxes from under goods.
Tetra Pak Feeder
Juice boxes can be turned into good feeders. This design will be compact and easy to make. It will not take up much space on the balcony.
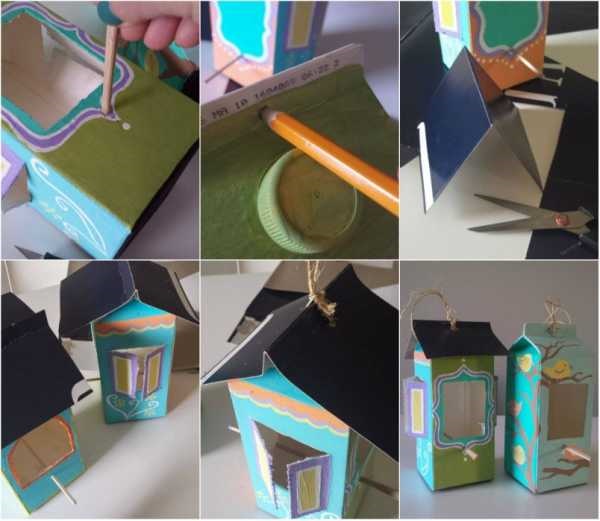
A cardboard feeder, which can be made from a box, is made in the following steps:
- Empty the box and wash it thoroughly to prevent excess odor.
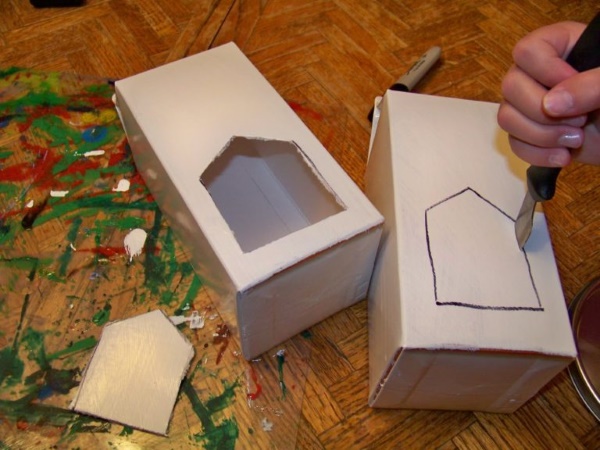
- Step back 2-3 cm from the bottom edge of one of the 4 walls and cut a hole. The width of the entrance should be at least 6 cm. You can make it wider. If the entrance is too narrow, the birds will not be able to get to the food. The height of the window should be at least 8 cm. The shape of the hole can be rectangular, pentagonal, round, oval. It is convenient to cut the entrance with a stationery knife. There should be no tears on the edges. Otherwise, the feeder will become unusable under the influence of atmospheric moisture.
- To prevent water from getting inside the cardboard, seal the edges of the opening with a waterproof material. Insulating tape works well for this purpose.
- For the comfort of the birds, install a small perch outside the feeder. It should be located next to the doorway. It can be made from a branch, a pencil or an unnecessary pen.
- Make a small hole in the roof. It should be located strictly in the center, so you need to use a ruler and pencil.
- Take a rope and tie one of its ends into a knot. Pass the other end through the hole made in the previous step.
- Hang the feeder on a tree branch, window or wall. You can hammer a nail into the balcony. The main thing is to make sure it is located high off the ground – where predators cannot reach.
- Decorate a cardboard box.

Multi-colored fabrics, films, and buttons will help improve the appearance of the feeder. This creative process will bring a lot of fun, especially for children.
If you want to paint the feeder with felt-tip pens or watercolors, it is better not to do this, because after the first contact with moisture on the surface, all the drawings will spread, and the feeder will cease to be beautiful. In addition, dyes diluted with water will penetrate into the bird food and cause them harm.
Birds also pay attention to the color of the homemade "dining room". It is worth trying to make it brighter, then they will fly here more often. It is not recommended to use a lot of rustling and shiny elements, otherwise the birds will be afraid to fly to the feeder.
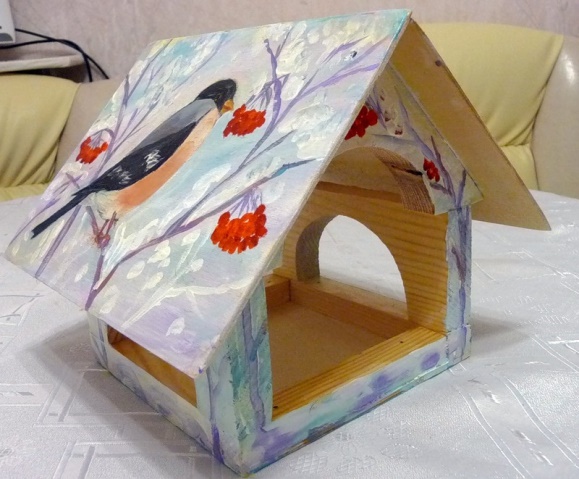
For painting, it is acceptable to use paint that remains after the apartment renovation. You can paint it in different colors, make the feeder monochromatic or draw pictures on its surface.
One of the best options is to create images that are thematically related to winter motifs. You can pre-purchase several interesting stencils that will make the decorating process much easier.
Small branches attached to the surface of the feeder will look very beautiful. They will add a natural charm to the "bird dining room".
You can use different figures and colored paper. However, you should not use many decorative elements. Before placing any of them, you need to make sure that it will not interfere with the birds taking food.
You can also make a feeder with a dispenser. This allows you to add food as needed and less spillage.
To work you will need:
- 2 liter box;
- plastic or thick cardboard;
- twig;
- wire;
- scissors or a stationery knife;
- nippers or pliers.
 The steps for creation are as follows:
- Cut off the top of the box.
- Cut out windows with canopies.
- Make a partition.
- Place some twigs at the top of the box to make it easy to attach the item.
The packaging in which milk is sold is practically no different from that of juice.
The manufacturing work is as follows:
- Empty and rinse the box from the inside to ensure there are no odors.
- Make a feeder for several people. To do this, put the box on its side and make a wide hole in 1 of the 4 walls. The width can be, for example, 15-20 cm. In this case, several birds will be able to "dine" at the same time without disturbing each other. Instead of one wide hole, cut out several small windows 7-8 cm wide.
- Attach a small perch in front of the opening.
- Make a small hole in the roof of the feeder and pass a rope through it, with one end tied in a knot. The hole should be exactly in the center of the roof so that the feeder does not overhang, otherwise the food will spill out.
- If desired, make 2 holes in the roof and pass the same rope through both.
- Hang the feeder on a branch, air conditioner or nailed to the wall.
If the wind often blows in the place where you plan to place the feeder, it is better not to hang it, but to attach it to a vertical surface. To do this, make a couple of holes in the wall opposite the entrance and pass a wire through them. - Use your creativity and imagination to make the bird feeder beautiful.
Shoe Box Bird Feeder
The box in which the shoes were brought home can be adapted as a bird feeder. However, preference should be given to thicker cardboard. It is better to choose a material with a laminated coating.
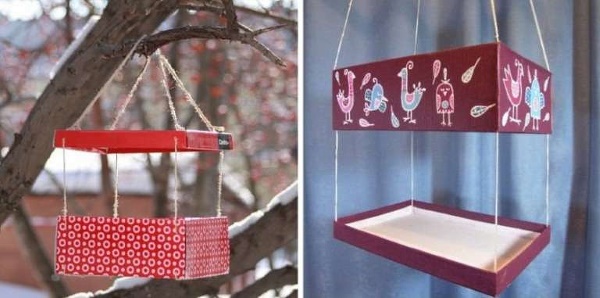 The essence of the work is similar to that in the previous examples and consists of the following steps:
- Make an entrance hole in the wall of the box.
- Cover the cut areas with electrical tape to prevent moisture from getting in.
- Make holes for the rope at the top.
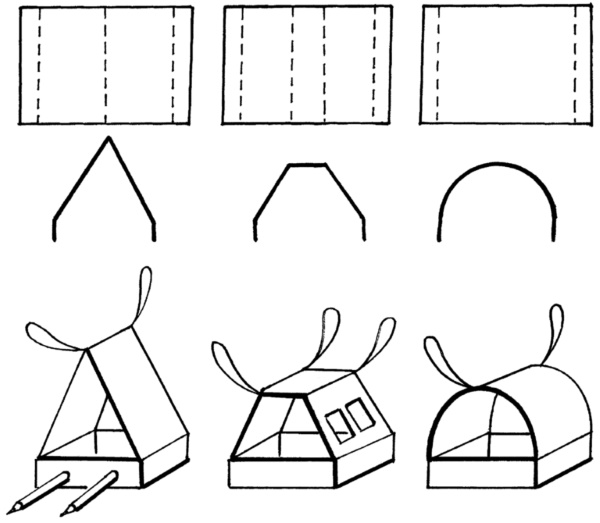
- Make the lid of the box flat and then fold it in half to make it look like a gable roof. This piece should be glued to the top of the box. Use frost-resistant glue.
- Thread a rope through the holes made earlier so that both ends can be tied in one knot above the feeder.
- Decorate the feeder. It is better to make it brighter so that it attracts more birds.
- Cover the entire surface of the cardboard with tape.
Bird feeder made from a candy box
A cardboard feeder, which can be made from various packages, is ready almost from the start. The packaging in which the candies are sold is too flat, so the task is more complicated. In addition to the box itself, rope and tape, you will need a stapler. It will help connect the cardboard sheets, giving the product the desired shape.
 The stages of making the feeder are as follows:
- Make cuts in the lid. There should be 2 cuts in total: 1 on one edge, and the 2nd on the other, opposite edge. Each cut should be in the center of the edge.
- Bend the lid at an angle of 90°. The bend should coincide with the axis line connecting both cuts. The edges should lie on top of each other. They should be fixed with a stapler. The resulting workpiece is the roof of the future feeder.
- Start making the floor. It should be cut out of the box. It should match the size of the roof. When marking, it is necessary to leave some reserve around the perimeter, because later the floor will have to be bent to form sides.
- When the top and bottom parts of the feeder are ready, start connecting them.
- Attach a rope to the top of the feeder for hanging.
- Take the form with cells that was inside the box. You should cut off a piece from it that matches the size of the feeder and place it inside. This will greatly simplify maintenance, because in order to remove everything unnecessary from the feeder - feathers, droppings and old food, it is enough to remove the form. After removing it, you can fill it with fresh food and place it inside again.
Feeder made from cardboard sheets
A cardboard bird feeder (it can be made from boxes or flat sheets) can be made from finely corrugated cardboard. The necessary material can be found in any office supply department. To make one bird feeder, it is enough to buy a couple of A4 cardboard sheets, each of which is 15 mm thick.
In addition to the sheets, you will also need:
- pencil with a ruler for measuring and marking;
- stationery knife for making holes;
- glue for joining materials;
- flat screwdriver for pressing out folds.
Once all the materials and tools are prepared, you can proceed directly to making the feeder.
The work takes place in the following several stages:
- Decide on the design. This is a bit more difficult than in the above-described cases with boxes. After all, the dimensions and shape of the feeder have already been determined in advance. If the box, for example, is 20 cm high, then the feeder will be the same. If the box is a parallelepiped, then the feeder made from it will have the same shape. In the case where flat sheets are used, the dimensions and shape will have to be determined independently. The easiest way is to find a ready-made diagram and draw the same one on sheets with a pencil.
- Proceed to cutting out the parts of the required shapes and sizes. For this, use a stationery knife.
- Carefully press the fold lines. To simplify the task, use a flat screwdriver, then the cardboard sheets will bend easier.
- Connect the prepared elements. Glue is used for this.
- Decorate the feeder. At this stage, it is necessary to protect the craft from water. Since one of the negative properties of cardboard is vulnerability to moisture, the feeder should be wrapped with tape or other moisture-proof material.
After hanging the feeder in the designated place, you should put some pebbles or other heavy objects on the bottom.. Thanks to this, the structure will not swing in the wind.
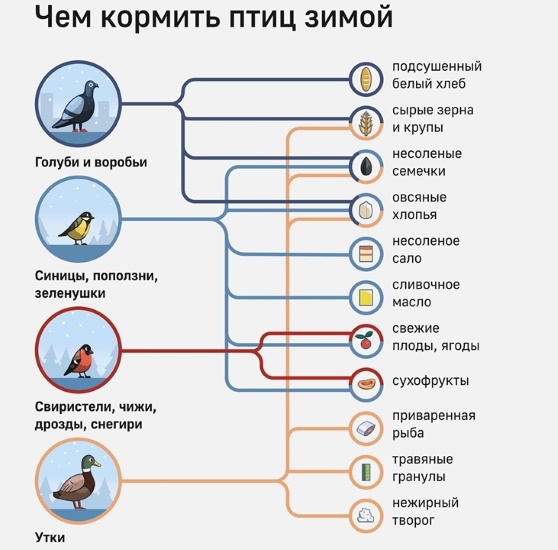
What to feed birds
Before hanging a ready-made feeder outside and filling it with food, you need to know what you can feed the birds and what is prohibited.
It is acceptable to feed:
- pigeons - barley, pearl barley, dried white bread;
- tits - raw seeds, cottage cheese, eggs, apples, watermelon, pumpkin or melon seeds, unsalted lard;
- woodpeckers and crossbills - with cones, nuts, acorns;
- crows - pieces of fruit, porridge, nuts, eggs, bread, meat;
- sparrows, goldfinches - millet, rice, millet, oats, sunflower, hemp;
- bullfinches - frozen or dried berries.
It is not allowed to feed birds:
- rye and black bread. It can lead to intestinal obstruction or volvulus;
- spoiled products;
- millet;
- oatmeal;
- citrus peel;
- cakes, pastries and sweet pastries;
- leftovers from the table;
- chips;
- fried seeds;
- salted nuts.
It is also necessary to remember that the most difficult period for birds is from November to March, therefore, both the feeder and the maximum feeding should be done at this time. Having tamed the birds, it is necessary to maintain this connection regularly, renewing the feed 3-4 times a week and constantly cleaning the feeder from droppings and food remains.
It is always pleasant to watch birds pecking grains in a cardboard feeder. This process is especially interesting for small children. However, it is necessary to make a feeder not only for admiration. The main goal is to help small birds to survive the winter safely.
Video on the topic: DIY bird feeder
How to make a bird feeder: