According to the apt statement of the incomparable Coco Chanel, things made with your own hands are luxury. Therefore, handmade soft toys allow even beginners to increase the positive when decorating the interior, preparing unique gifts for children, souvenirs for family and friends.
For such crafts you will need patterns and diagrams that correspond to the idea, improvised means and following a simple technology for their manufacture.
Materials and tools for creativity
For sewing needlework you need to prepare:
- pieces of fabric, ribbons, lace;
- thick paper/cardboard for creating patterns, and also carbon paper and a pen/pencil for transferring them onto fabric;
- environmentally friendly toy fillers;
- threads of various tones and strengths;
- ruler, scissors, awl, pliers, needles, thimbles;
- small details for face decoration, clothing fasteners and decor;
- iron;
- sewing machine (if necessary).
Choosing fabric for toys
Depending on the characteristics of a particular toy, the following fabrics can be used:
- Knitwear, having the property of easy stretching and suitable for making various crafts (animals, clowns, cubes, balls, etc.).
- Faux fur multi-colored with pile of different lengths (for pillows imitating cute animals).
- Natural silk, which is used in the production of clothing, appliques, trims, etc.
- Cotton, linen fabrics with bright geometric/fantasy patterns (chintz, satin, poplin, flannel, etc.).
- Wool any density, ornamental patterns, smooth/fleecy surface.
- Velour, velvet – to create a silky surface for animal toys.
- Plush, which is most relevant for the production of vintage products.
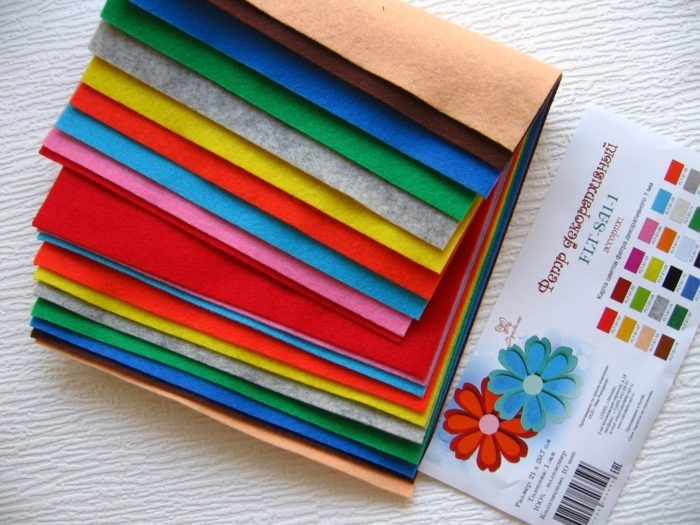
Decorative felt is the most popular fabric from which soft toys are made with your own hands - Felt, having high strength and no friability. It is especially popular when creating small parts (noses, beaks, tails, paws, etc.).
For beginners creating soft toys with their own hands, it is important to take these features into account so that when transferring the pattern and diagram, you can choose a fabric that matches the image.
Simple and Primitive Soft Toys: Patterns for Beginners
This group of toys, called "primitives", can be the first step to making more complex versions. They are cut on double-folded fabric and sewn from one piece with a head, paws and body. Separate sewing of the head, ears, paws and tail is also allowed here.
Most often, these are three-dimensional figures of various animals, fish, birds. Their simple creation requires accuracy, but does not require special efforts and skills, or large expenditures of time. Moreover, using one pattern, you can create larger items as decorative pillows. The finished handmade craft is suitable for children to play with, as pendants, keychains.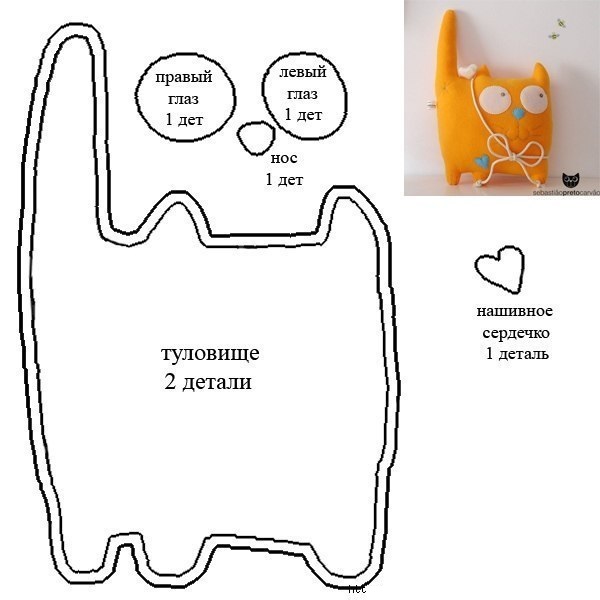
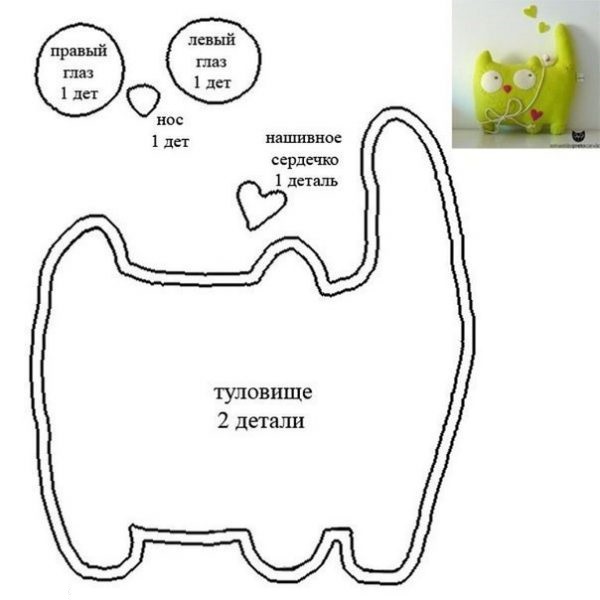
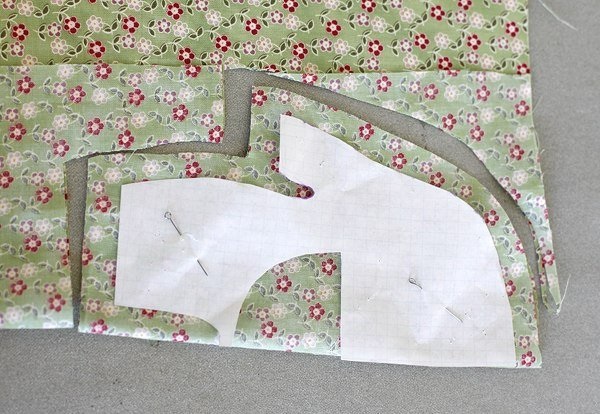
One of the popular options among beginners is a cat toy using ready-made pattern templates.
With the help of simple patterns, it is possible to create your favorite toy of a wise owl from colorful cotton or printed calico.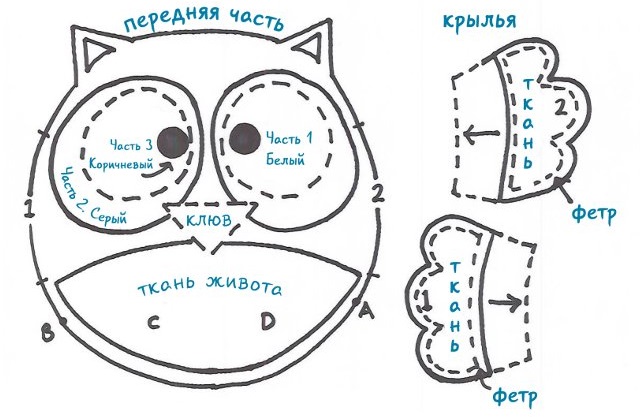
Using a selection of photos, it is easy to understand several steps of the work.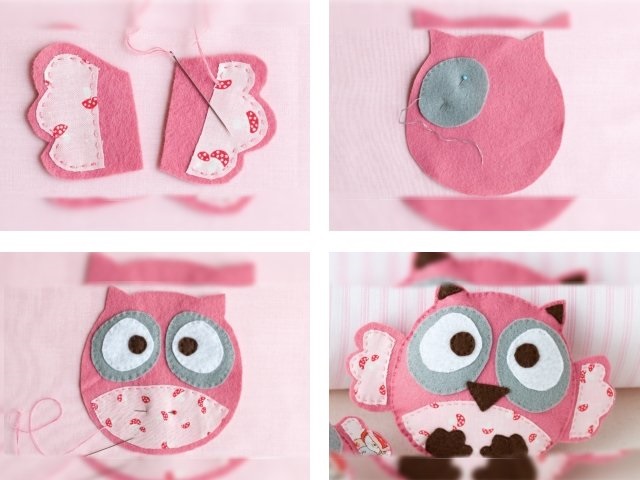
A soft toy made by hand, patterns and diagrams for beginners of these simple products allow you to use any fabrics with a minimum of decor. "Primitives" made in light colors can be turned into painted fragrant gifts.
To do this, they are soaked by boiling in strong tea, coffee with the addition of vanilla, cinnamon, and then dried in the sun or in the oven at + 120 ° C. After this, the fragrant souvenir toy can be painted and dressed up.
What to stuff soft toys with
Previously, cotton wool and small fabric scraps were used to fill soft toys. However, today these materials are replaced by lighter and more hygienic synthetic materials (synthetic fluff, holofiber, sintepon, foam rubber, etc.).
They do not come true, allowing the products to retain their original shape even with prolonged use and repeated washing. It is quite acceptable to use old sweaters made of light yarn in the form of finely cut strips.
It is also permissible to stuff toys with unpainted, cleaned and combed sheep wool (sliver). In this case, you need to be sure that the future owners of such crafts will not have an allergic reaction. The vulnerability of this material is its susceptibility to damage by moths and deformation when wet.
If it is necessary to make some toys heavier (balls, rattles, etc.), soft fillings can be combined with pre-heated cereals, seeds, husks, and pebbles.
Hand-made pillows in the form of various animals and birds can be stuffed with medicinal herbs (mint, sage, lavender, fennel, lemon balm, jasmine, etc.). In this case, individual tolerance of the components contained in them should be taken into account.
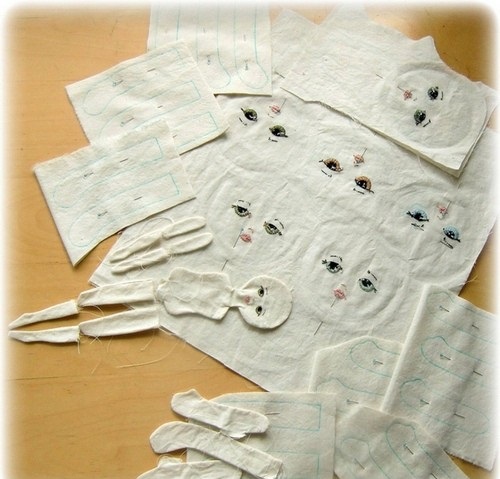
Step-by-step instructions: how to sew a doll from fabric
When making a soft toy with your own hands, patterns and diagrams for beginners are the first step to realizing your idea.
The next steps are as follows:
- Selecting the necessary fabrics, washing them, and ironing them.
- Transferring the pattern onto the fabric and cutting out all the pieces with allowance for seams and hemming (0.5 cm each).
- Sketching out the resulting parts of the future toy along pre-marked lines (starting with the head, and then the body and limbs).
- Sewing all the parts together according to these markings (by hand or using a sewing machine).
- Filling all elements with environmentally friendly materials.
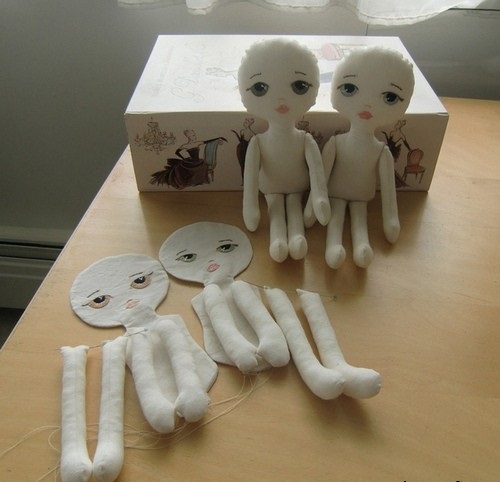
- Final attachment of each part to each other.
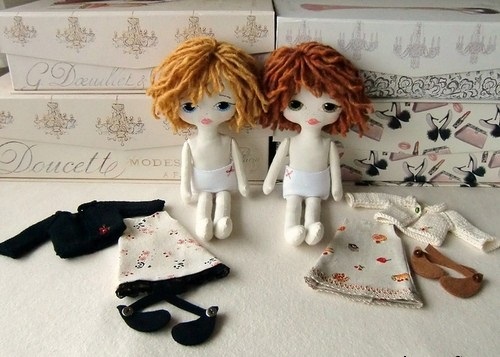
- Design of face and clothes.
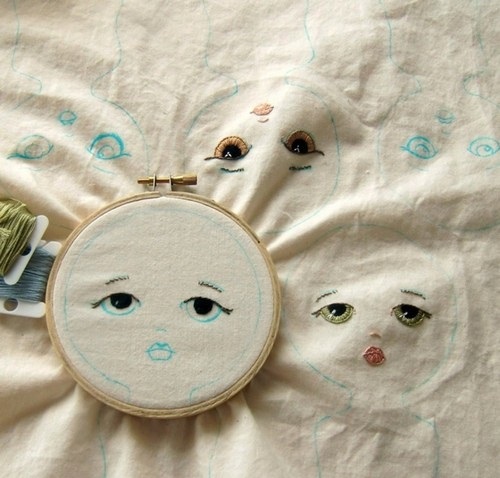
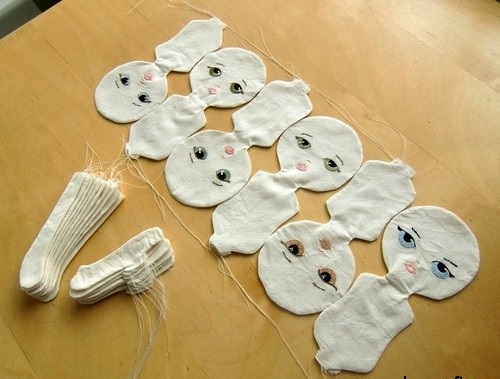
How to make a doll face and hair
For the outer shell of the head, you need to make a bag of the right size from cotton fabric. After filling it with the selected material to mark the neck, you should wrap the lower part 2-3 times with thick threads. Then wrap the head prototype with a piece of flesh-colored knitwear.
To do this, fold it with the right side inward and place the finished head on it, mark the lines of the back of the head and neck, then cut out the workpiece and then turn it right side up.
When forming the eyes, nose, and mouth on the doll's face, you can use special plastic blanks, buttons, beads, etc.
The second option is sewing/gluing self-made parts from colored fabric or embroidery. Along with this, you can draw the contours of the elements and then color them. The choice of any of the methods depends on what the handmade soft toy should be like.
Patterns and diagrams for beginners can also suggest which materials are best to use for hair, namely:
- wool yarn that should be sewn onto the head and then used to create the desired hairstyle;
- special wefts (hair fastened to fabric strips);
- felting yarn;
- felt for making ponytails/bangs, which are then sewn onto the head after the patterns have been transferred onto it.
In addition, hair is often imitated by painting it with safe paint of a suitable tone.
Tilda and its varieties
The peculiarity of Tilda dolls, created at the end of the 20th century by the Norwegian designer Tony Finnanger, is the simplicity and clarity of lines of all details, the use of only natural materials. These rosy-cheeked, unlike any other toys with long disproportionate limbs, small eyes are designed in delicate pastel colors.
During this time, tildomania has won sympathy in different countries of the world, enriched by different types, in particular:
- pumpkin head, got its name from the structure of the pumpkin-shaped head, sewn from fabric wedges. It can also be identified by the clear outline of the face and its expression, which seems to speak of its temperament, character.
- rags - These are natives of Japan, possessing a refined physique, painted faces with closed eyes and lush outfits;
- snowballs (big-footed dolls), created by Moscow designer Tatyana Konne. They are distinguished by the stability of their feet, shod in beautiful large-sized shoes. They have weakly drawn facial contours without a mouth, but with small eyes in the form of black dots;
- amulet dolls of Russian origin. Such simple toys have a cylindrical body without a neck or legs, and their heads are covered with a scarf;
- attic dwellers, the style of which was borrowed by Americans from the natives. These Tildas also have signs of primitivism stylized as old. They are characterized by the presence of simple forms, uneven lines, somewhat frayed edges of clothing;
- framed/ball jointed dolls – the most difficult toys to make. This is due to the need to use a wire base in the fabric body, which provides it with mobility and the ability to take any position. When making a voluminous nose, eyes with eyelids, and a contoured chin on the face, the technique of textile plasticity with a molding effect is used.
Textile Tilda Teddy Bear
Such a stylized toy, using quite accessible materials, has a more complex method of execution than the "little people" dolls. The simplest option for making a Tilda bear is to cut out 2 elements, sew them together and fill them. The fabric can be of different textures and colors.
Photo and pattern: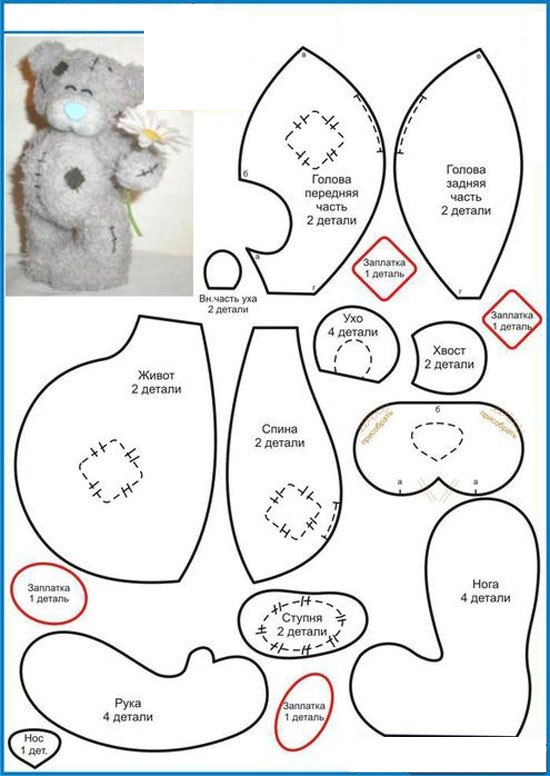
Tilda style toy. Hares
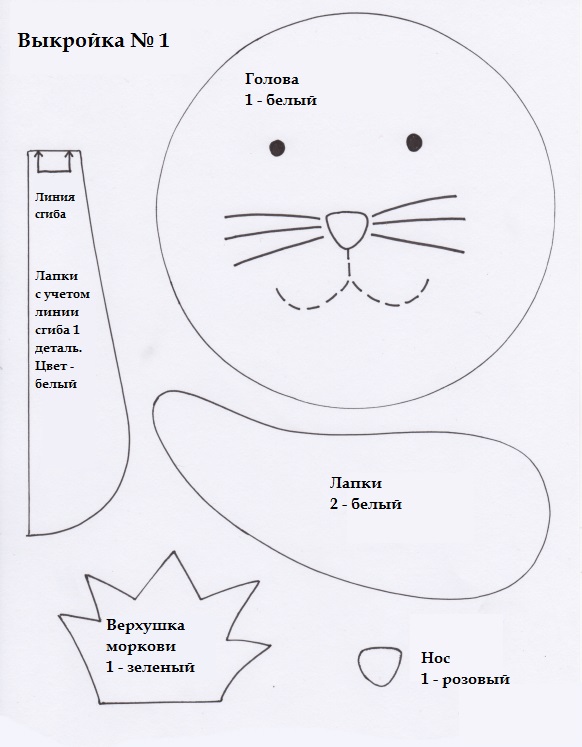
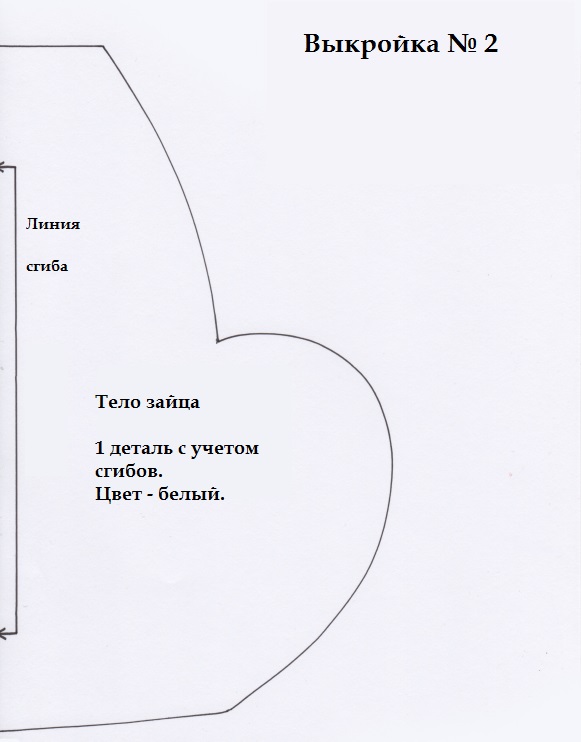
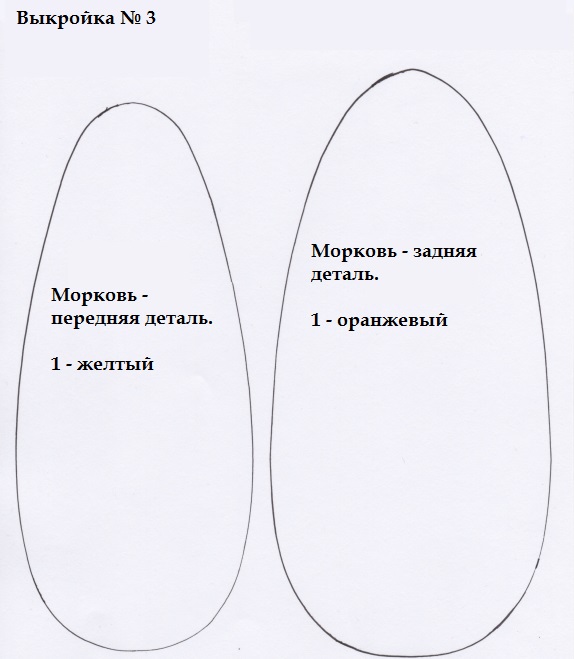
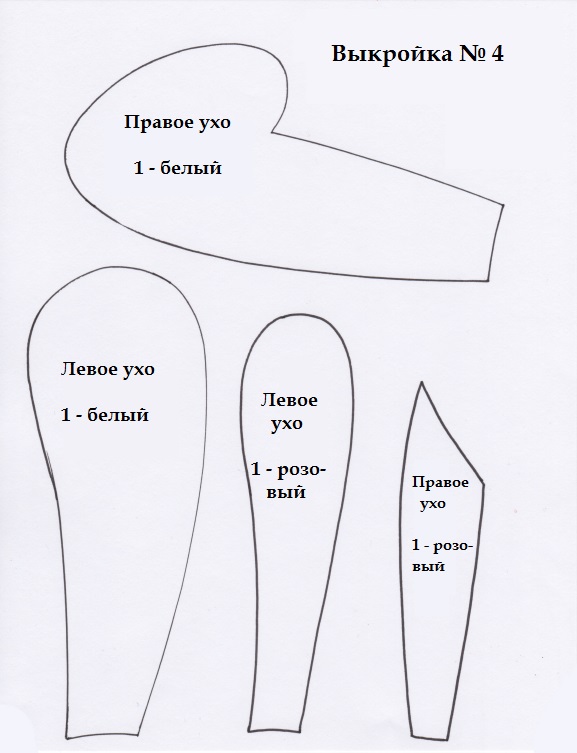
DIY soft toy: patterns and diagrams for beginners for making a Tilda Hare are not at all complicated.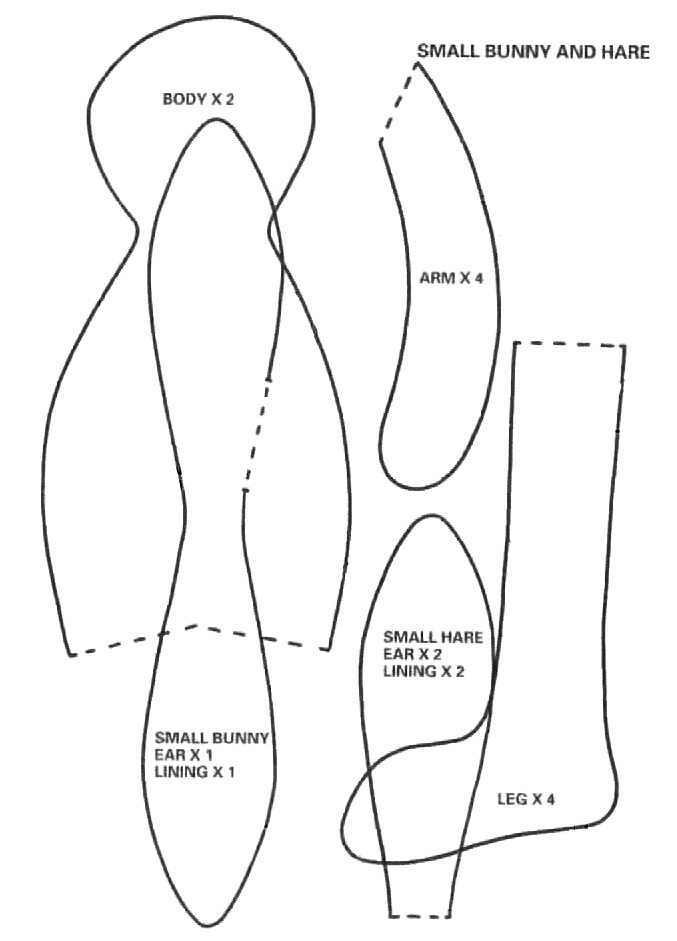
After cutting and sewing the cut pieces on flesh-colored fabrics, you must follow the execution algorithm:
- filling of body part blanks;
- sewing limbs and ears to the body with the head;
- making/drawing a nose, mouth, eyes;
- dressing the Bunny in pre-prepared pants, jacket, etc.
Step by step instructions: stuffed cat toy
Just a few simple steps need to be taken to create the charming cat Matroskin: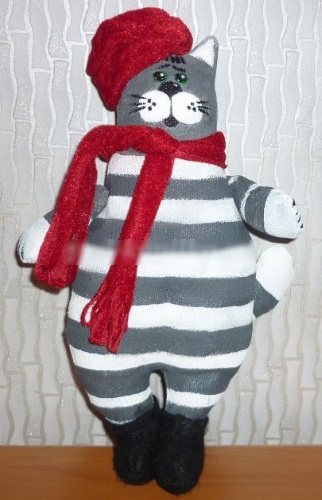
Making patterns:
- Cut out all the pieces on the fabric (2 pieces each) and sew them together, preserving the side opening for turning inside out, then fill them and sew up the cut.
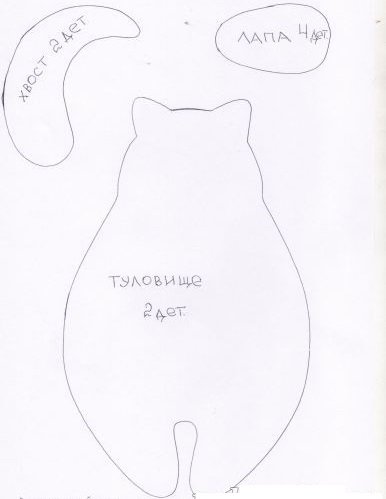
- Drawing the muzzle and stripes on the body, tail and paws, after the paint has dried – attaching the paws and tail.
- Cutting out felt boots, a hat and a scarf from velvet.
- Sewing the product.
- Dressing the cat.
DIY Toy Zoo
Using templates, ready-made patterns, and diagrams of different representatives of the fauna, you can create your own mini-zoo. These can be homemade bears, monkeys, dogs, cats, giraffes, elephants, deer, hippos, and other favorite animals.
Such a nice company will become a bright element of the interior of the children's room, a source of its psychological comfort. The creation of a toy zoo, according to teachers and psychologists, is also an important educational moment.
Animal from fur: instructions for beginners
To make such toys, you can use both natural and artificial fur. If the latter is easier to work with, then the other option produces a real exclusive. Therefore, it is advisable for beginners to start with small items made of artificial material. The first step is also to prepare a pattern and cut it out, taking into account the allowance for future seams.
It is important to remember this nuance: you should work with fur not with scissors, but with a sharp stationery knife or a special tailor's knife.
To avoid damaging the fur, short, shallow, sharp movements of the tools are made from the inside of the material. The cut out parts are folded with the right side inward and sewn from the inside. In this case, it is necessary to leave small openings for stuffing, which are then closed with a blind stitch.
The final steps are to attach all the elements of the face and add accessories that match the look.
Owl pattern from fabric: how to sew an owl
Beginners can make an owl from just 2 pieces of different colors using one of the simplest patterns.
The next step is to form a triangle from the cut out elements, joining the parts first by basting and then sewing (starting with the acute angle). After that, the future head is fixed by pinning this part and then bending the corner to form the beak.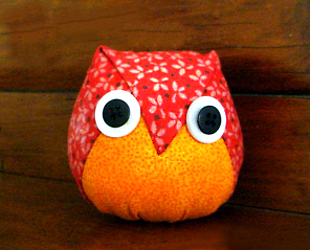
The formed body (the lower part after the pin) needs to be filled with the prepared material and sewn at the bottom. Then sew the beak corner to the tummy, and glue cut-out white circles-eyes with black pupils made of beads/buttons to the muzzle. Photo of the owl created in half an hour:
Master class felt dog
To prepare a puppy pattern, a beginner will need a template. The toy is made using pieces of white, brown and black felt, threads, a needle, scissors, blanks for the eyes, and a hot glue gun.
Algorithm for further actions:
- transfer the patterns of the parts onto felt;
- cut out all the parts outlined with a ballpoint pen, then sew them together and leave a small opening for filling;
- fill the blank using the rough end of a pencil/wooden stick;
- fastening of all parts and complete closing of the hole;
- decorating the face, attaching a colorful collar in the form of a ribbon/bow/butterfly, etc.).
To give the toy a more natural look, you can tint the felt with a colored pencil lead in several places (inside the ears, on the paws/face/tummy).
How to sew a bunny from felt
Step-by-step master class of felt bunny: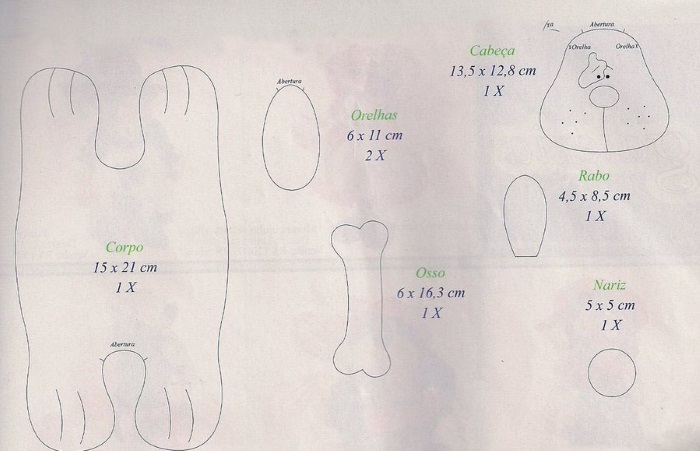
- Cut out the pieces using the available patterns.
- Sew from the inside out: first cut out the ears, then the front paws, then turn them inside out through the hole left for stuffing.
- Sew the body (from the inside), starting from the bottom of the paws towards the head and after attaching the ears, continue sewing. Then turn the workpiece right side out, stuff it with stuffing and sew it up completely, then attach the front paws (with a blind stitch).
- Dressing in an outfit with holes for "handles".
Soft toys from a sock
The basis for one of the easiest toys to make is 1 sock of an attractive color without scuffs or holes, which has lost its pair. If you want to make a “plump” toy, you need to shorten it by cutting off the part that covers the foot, and also move the elastic band on top of it. Here, unworn parts of children's tights that have become small and tight will also come in handy.
Beginners can use a felt-tip pen to mark the location of body parts (head, neck, paws, body) on the inside before starting work. This will help to minimize the error in proportions. The technique allows combining several colors from other socks to mark the "mask" on the animal's face, belly, paws, etc.
There are many options for creating "sock" toys with the initial production of patterns, measurements for the location of body parts. Many make cute toys "in a hurry" by initially filling the products and forming ears from the tied ends of the top of the socks, and then drawing the outlines of muzzles, waists, and various accessories on this figure.
Master class Hare from a sock
One of the quick options for making a sock bunny:
- Fill the sock with cotton wool or cereal (to make the product heavier and more stable).
- Measure the distance from the toe part of the sock to the intended neck and tie this place with an elastic band/thick thread.
- Measure out a smaller piece for the head and tie it tightly to prevent the filling from spilling out.
- Divide the remaining top edge of the sock into 2 parts, then cut out ears from them, giving them an upright/drooping position and sew them along the cut lines with small, dense stitches.
- Attach the pompom tail to the bottom of the back.
- Decorating the toy: gluing oval/semi-oval circles of a different color to the tummy; attaching bead-like eyes made of thicker fabric to the teeth and nose.
- Hare decoration (a bow on the head between the ears for girls, and on the neck for boys).
To create many soft toys using the proposed patterns and diagrams, beginners do not necessarily need to have sewing skills. The important thing here is independence, creativity and the desire to create something unique with your own hands. It is advisable to involve not only adult family members in this pleasant activity, but also children, while observing the safety rules for handling sharp objects.
Article formatting: Vladimir the Great
Video on the topic: DIY soft toy
How to sew a primitive cat:
Soft toys made from socks:
When I was a child, I used to make dolls like this in sewing classes. Now I teach my daughter on Tilda. A great experience for beginners! So to speak, the basics.