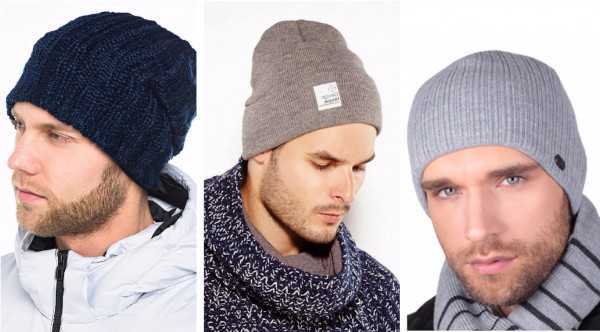
A hat is a stylish accessory, emphasizing the individuality and style of a man. Made with knitting needles from thick or medium-thick yarn, it is knitted according to simple patterns and allows you to correct the proportions of a round face, visually highlighting the features, sharpening the cheekbones and chin.
Necessary materials
A knitted hat not only protects from cold wind and snow, but also helps a man create a harmonious, complete image, correcting small flaws in appearance - visually lengthening the face due to voluminous knitting with an elongated crown, vertical patterns, and the presence of a pom-pom.
Stylists recommend the following models:
- beanies and stocking caps;
- berets and caps;
- choul hats;
- classic models of hats with turn-ups.
It is recommended to knit them from thick or medium-thick wool yarn. The use of vertical patterns, voluminous elements (for example, pompoms), and wide lapels is welcomed.
Materials used:
| Yarn | When choosing threads, it is recommended to pay attention to yarn made of merino wool or angora, with the obligatory inclusion of synthetic fiber or cotton. Suitable for work:
|
| Spokes | Knitting needles should be selected depending on the thickness of the thread (the thicker it is, the larger the size of the needles should be). You can use circular or shuttle needles with a cord length of 80-100 cm, made of wood or bamboo. |
| Additional materials: |
|
Taking measurements
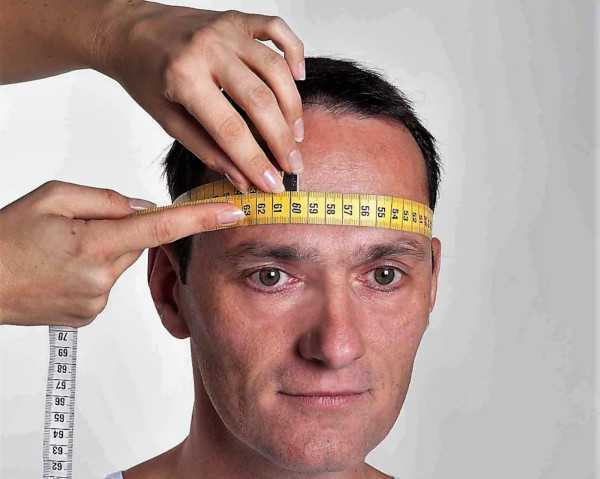
The knitting process is preceded by taking measurements, which determines:
- The circumference of a man's head, for which a tape measure (tailor's tape measure) is pulled around the head from the point on the forehead to the back of the head above the eyebrow line. From the resulting size, when calculating the number of loops, it will be necessary to subtract 2-3 cm. This is done in order to exclude possible stretching of the finished product.
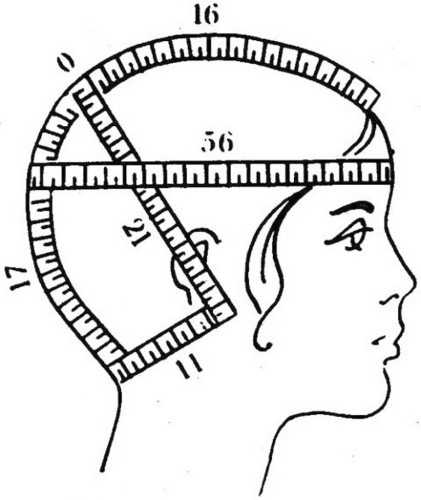
- The height (depth) of the headdress, determined by the length of a centimeter laid from the lobe of one ear to the other. The resulting measurement should be divided by 2 and add 2-3 cm to it when creating a classic, shallow hat, or from 5 cm (for a beanie-type headdress).
Calculation of loops
After taking measurements, the number of loops must be calculated, for which you should:
- Knit a control sample of 10-20 loops (including the selected pattern).
- Stretch it a little and, using a tailor's tape measure or ruler, determine the number of loops in 1 cm and the length of the sample.
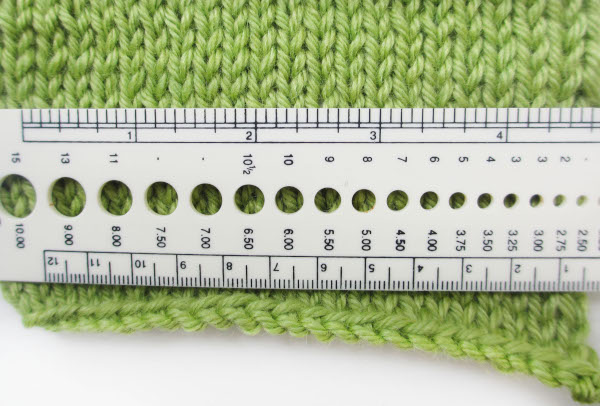
The obtained values must be substituted into the formula, where the number of loops (for example, 15) must be multiplied by the head circumference value (for example, 58) minus 2 cm. The resulting number must be divided by the length of the sample in cm (for example, 9).
The selected one is used tightly when creating a product without a rapport (repeating pattern), while for knitting with a 2*2 elastic band it is necessary, for convenience, to be rounded to a value multiple of 4.
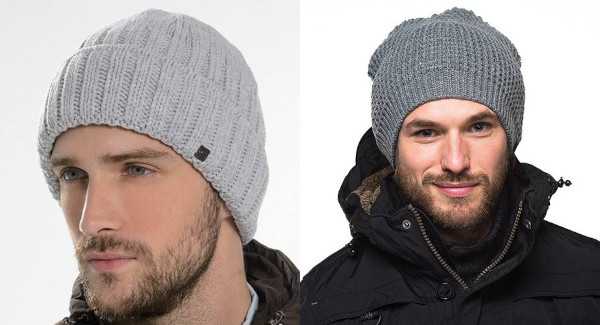
With lapels
A men's hat for a round face with turn-ups is knitted according to a simple pattern from medium-thick yarn (for example, Alize Lana Gold).

To work you will need:
- 1 skein of thread 240m/100g (composition: wool – 49% and acrylic – 51%);
- knitting needles No. 4.
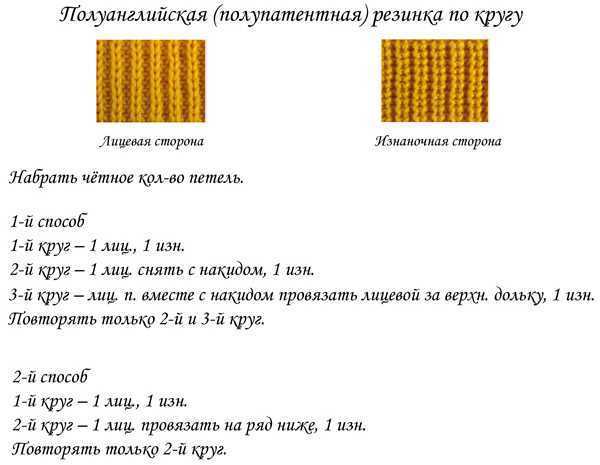
For knitting, you can choose a dense pattern called “semi-patent elastic”, which is ideal for a winter headdress.
Rapport scheme:
| 1st row | 1 knit + 1 purl stitch |
| 2nd row | Front loop captured from the previous row + back loop. |
| 3rd and all odd rows | Repeat the rapport of the 1st circle |
| 4th and all even rows | Knit exactly like the 2nd row |
The work process requires:
- Cast on 86 stitches on circular knitting needles and knit a 16 cm long section of fabric using a semi-patent rib pattern to create the cuff.
- Turn the product inside out and knit a full row alternating front and back stitches.
- Continuing knitting with the above-described “semi-patent elastic” pattern, make a piece of fabric 32-33 cm long, and then begin to close the loops, knitting them 2 together around the entire circle.
- Work one row entirely with knit stitches without decreasing, and on the next row, decrease by knitting 2 stitches together again.
- Close the knitting and form the crown, for which you should tighten the remaining loops and secure them, for which, using a needle, pull the ends of the thread through the loops from the back side and hide them inside.
- Make the lapels and try on the product.
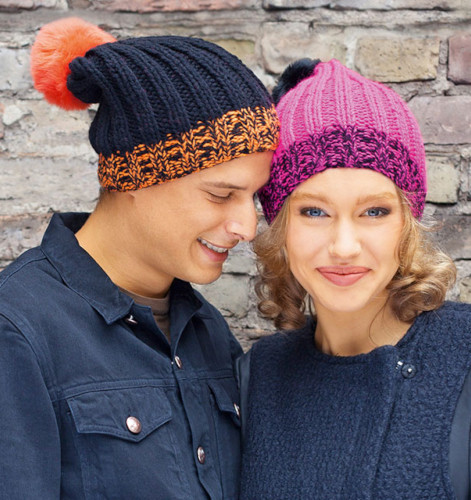
With a pompom
A semi-fitted hat for a round face with a pompom helps to visually lengthen the shape of the face, sharpening the cheekbones. You can knit it from wool yarn (for example, "Pekhorka") with an "elastic" pattern.

To work you will need:
- 3 skeins of thread (which contains 85% merino wool and 15% acrylic);
- circular knitting needles No. 4.5;
- needle and thread;
- marker.
During the work process you need to:
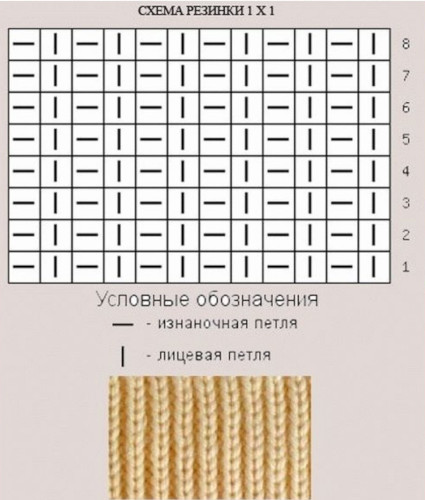
- Cast on a number of stitches on knitting needles that is a multiple of 4 (for example, 88-90) and knit a 3-5 cm piece of fabric using a 1*1 elastic band (alternating front and back stitches in a row) or 2*2 (2 back stitches + 2 front stitches).
- Proceeding in a similar manner and repeating the pattern in a circle, knit the product to a length of 37-38 cm.
- Proceed to close the product and form the crown, for which:
- in the first row, knit all 2 front loops;
- the next circle is performed without changes;
- on the 3rd row, knit all 2 front loops again.
- A similar decrease must be performed every subsequent row. The work is finished as soon as there are only 8-10 loops left on the needles.
- Close the crown by pulling and securing the loops, for which, using a needle, pull the ends of the thread through them in the opposite direction and hide them inside.
- Make a pompom out of threads by placing a glass or jar on a sheet of cardboard and tracing around it, then cutting out 2 identical circles.
- In the center of each, using a coin or any other round object, draw and cut out a smaller circle.
- Place the blanks on top of each other and separate a small section of cardboard with scissors.
- Without separating the cardboard completely, wrap it with threads (the more there are, the fluffier the pompom will be), and then cut the wound yarn with scissors along the fold line.
- Thread a thread between the cardboard pieces and tie the resulting bundle of yarn.
- Remove the template, straighten the pompom, and then use scissors to correct its shape, removing any protruding parts.
- The resulting pompom needs to be sewn to the top of the hat.
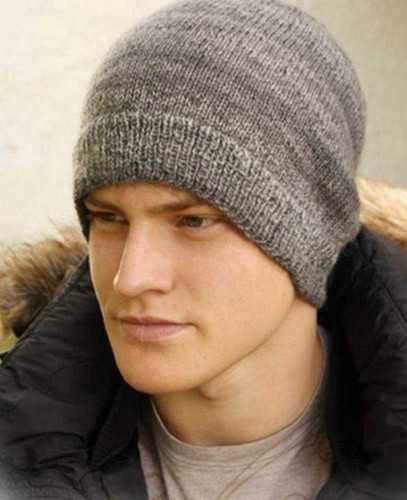
Beanie with pompom
A men's youth beanie hat with a pompom is a stylish and original accessory that helps to visually sharpen the features of a round face and stretch its oval.
It is made using:
- 200 g (approximately 4 skeins) of medium-thick wool yarn with 10-15% added acrylic (for example, Comfort New Bertagna Filati);
- circular knitting needles No. 5-6;
- marker;
- needles and thread;
- cardboard blank for forming a pompom.

In the process of working on the product you should:
- Cast on a multiple of 4 stitches (for example, 80, 84, 88) and knit 2 rows of fabric with a 2*2 elastic pattern (alternating 2 purl and 2 knit stitches).
- Proceed to knitting the pattern, for which:
- from the 3rd to the 11th rows (8 circles) the fabric must be completely knitted with front loops;
- From the 12th to the 20th row (8 circles) the pattern changes to purl stitches.
- Knit, repeating the pattern (alternating 8 front and back rows) the fabric to the desired length (about 20-22 cm of the product) and finish the work by completing the final rows with a 2*2 elastic band (2 front + 2 back loops).
- Remove the remaining loops from the knitting needle, tighten and secure them, sewing the top of the hat with a needle. Pull the remaining ends of the thread through the loops in the opposite order and hide them inside.
- To form a pompom, use a glass and a coin to cut out 2 round pieces of cardboard (with a small round hole in the center), place them on top of each other and cut off a small part with scissors.
- Wrap the blanks with yarn (the more yarn you use, the fluffier the pompom will be) and cut with scissors along the fold line.
- Pull the thread between the cardboard templates and pull the pompom together, then, after removing the cardboard templates, carefully straighten it out and remove the protruding parts of the threads with scissors.
- Sew the finished pompom to the top of the hat.
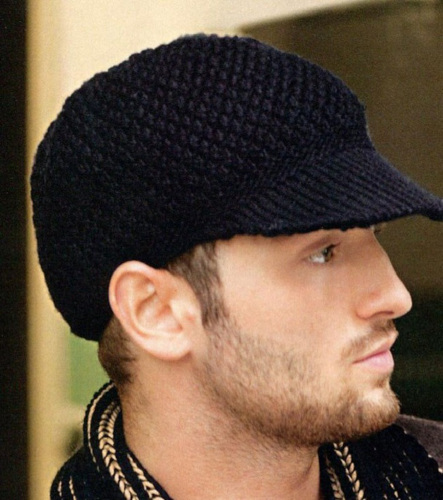
Cap with a visor
A hat for a round face for men in the form of a cap with a visor is knitted according to special patterns, and before starting work, it is necessary to additionally determine the number of loops needed to create protruding elements.
To do this you need to:
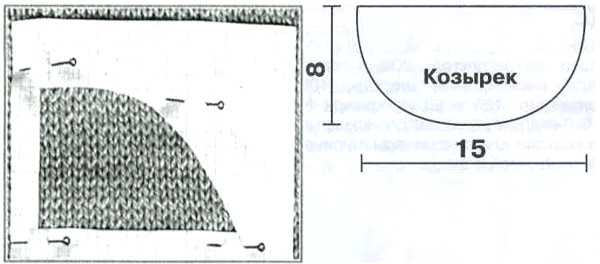
- On a piece of paper, draw 1/2 of the visor and cut it out so that a template remains.
- Knit a small control sample measuring 10*10 cm, attach it to the template and calculate how many rows and the number of loops you will need to knit.
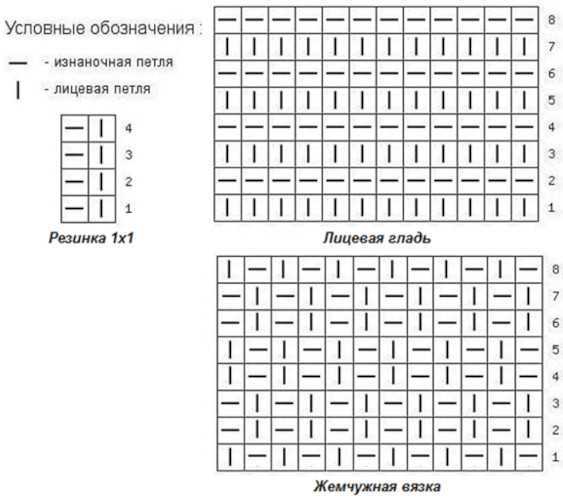
This manipulation will also allow you to determine the required number of decreases to achieve the desired shape. The headdress itself can be knitted with a pearl pattern, choose garter stitch for the elastic band and stockinette stitch for the visor.
Pearl pattern rapport diagram:
| 1st row | Alternating in a circle 1 front + 1 back loop. |
| 2nd and 3rd row | 1 purl + 1 knit stitch (pattern continues throughout the row) |
| 4th and 5th row | Repeat the rapport of the 1st row (1 front + 1 back loop) |
| 6th and 7th row | Knit exactly like the 2nd row (1 purl + 1 front loop) |
| 8th and 9th row | Rapport of 1 front and 1 back loop (as the first round) |
Knitting pattern for stocking stitch:
| 1st row | Consists entirely of purl stitches |
| 2nd row | Knit only with face loops |
| 3rd and all subsequent "odd rows" | Performed in the same way as the 1st round |
| 4th and subsequent "even rows" | Copy the rapport of the 2nd circle |
You will also need the following for your work:
- 200 m/100 g wool yarn (for example, ALIZE Superlana maxi);
- circular knitting needles No. 4 and 5;
- silicone or plastic insert for the visor.
During the work process you should:
- Using circular knitting needles No. 4, cast on 100-110 stitches and join them into a ring.
- Using the garter stitch pattern (alternating 1 front and 1 back stitch), knit a 3 cm piece of fabric in a circle.
- Transfer the loops to knitting needles No. 5 and continue working with pearl knitting. To do this, in the 1st row, you need to complete the pattern 1 front + 2 back loops, while adding one additional "air" loop every 18-20 loops. As a result, 120-122 loops should remain on the knitting needles, after which you can knit 16-18 cm of the product.
- After the hat reaches the required length, continue working with the pearl knitting pattern, but at the same time begin decreasing - 5 times in every 2nd row, knitting together 3 loops (every 17, 16, 15, 14 and 13 loops). As a result, only 60 loops should remain on the needles.
- In the penultimate row, you need to knit 3 loops together through 2 - the total number should be equal to 36.
- In the last round, knit all remaining loops together 3 at a time.
- Finish the work by cutting the working thread and pulling it in the opposite direction through the 12 remaining loops.
- The cap is ready and you can start working on the visor, for which you need:
- Taking knitting needles No. 4, moving from the cast-on row, cast on 36 loops and knit 2 cm of fabric with the front surface (alternating rows with front and back loops).
- Then continue knitting, making shortened rows - without finishing each row by 1 loop on both sides. This should be done until the fabric reaches a size of 7.5-8 cm.
- Complete 1 row on all loops, and then continue the pattern, adding 1 loop on each side of the row.
- Finish the work by first knitting the last 2 rows without adding, then remove the remaining loops and form a visor, insert a silicone (or plastic) insert inside its pocket. The remaining hole should be sewn up.
- The finished product needs to be tried on.
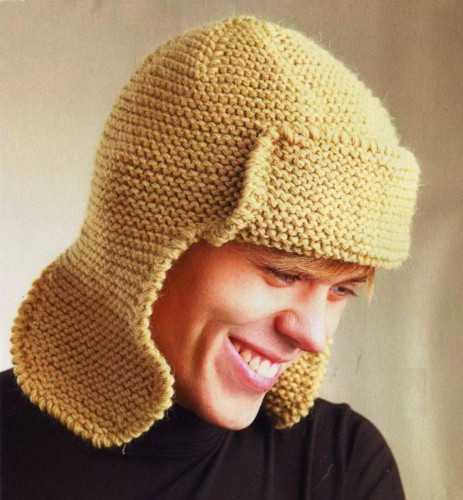
With ears or "helmet"
A hat for a round face, a men's "helmet" with ears, allows you to hide the protruding part of the cheeks.
To knit it you will need:
- 100-200 g wool yarn (for example, Sandnes Peer Gyn);
- circular knitting needles No. 4;
- hook number 3.
When knitting, you can use the garter stitch pattern, which consists only of knit stitches.
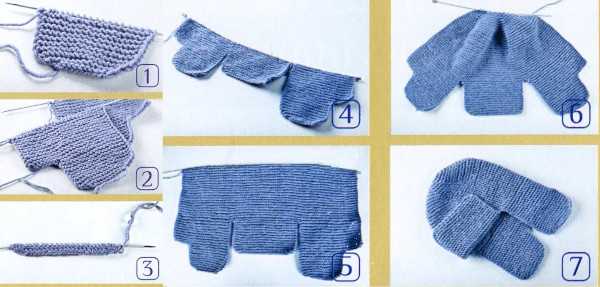
The process of working on the product begins with the creation of “ears”, and it is necessary to:
- Cast on 12-14 stitches for one of them and knit a section of 15-17 cm using only face stitches. In each row, you need to add one stitch additionally. This should be done until the number of stitches on the needles reaches 20-24.
- Cast on 8 stitches (for half of the back of the head) and knit 20 rows in garter stitch (only knit stitches are used in the work).
- Proceed in a similar manner to knit the second “ear”.
- Make a visor by placing 24-26 loops on the knitting needles and knitting 25-27 rows with the main pattern. For rounding, you need to add 2 loops at the beginning of each row 4 times (in total, there should be 30 loops on the knitting needles).
- Start connecting the parts of the knitting of the main part of the product, for which you should:
- Connect the parts by adding 9-13 loops to the loops of the first “ear” (for the back of the head), add the removed loops of the second “ear” + 19-27 loops (for the front part) and close the circle.
- Knit 36-38 rows in garter stitch and begin to round the crown, for which you need to consistently and evenly decrease 7 loops in each subsequent row.
- Once there are 20 stitches left on the needles, knit them together 2 at a time, and pull the remaining stitches together and secure.
- Sew the back seam of the hat and pull the thread back through the loops to hide its end.
- Using a crochet hook, work single crochet stitches along the edge of the product, and you need to:
- insert the hook into the second loop from the edge, grab the thread and pull it through the adjacent loop on the hook;
- after this, 2 loops will form on the hook and you need to grab the same thread again and pull it through 2 loops;
- proceeding in a similar manner, process the entire product along the edge, and then sew all parts of the product together. Fasten the visor in the forehead area.
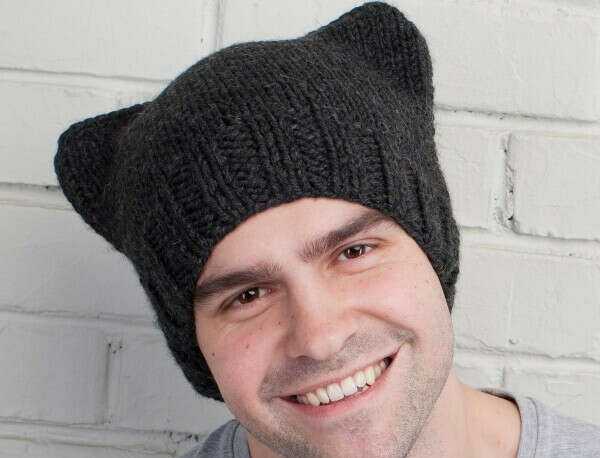
Cat hat with ears
A stylish and youthful model of a cat hat with additional volume at the back of the head helps to visually stretch the face, shifting the emphasis to the forehead and crown area.
Beginners can knit it using the front surface, and for this you will need:
- circular knitting needles No. 3;
- 200 g of medium thickness semi-woolen yarn (for example, Astra Premium Aphrodite).
When working on a product, you need to:
- Cast on 86-90 stitches onto knitting needles and knit 2-3 cm of fabric with a 1*1 elastic band (front + back loop) or 2*2 (2 front + 2 back loops).
- Continuing to work, eventually completing a canvas 38-40 cm long.
- Without decreasing, close all the loops on the knitting needles at the same time, and then, using a needle, make the top seam.
- Also, carefully sew the upper corners of the product diagonally with a needle, forming small ears.
- The finished hat needs to be tried on and, if desired, decorated in the center, for example, with a red star.
"Stocking"
The men's "stocking" hat for a round face is knitted in a circle, with a 1*1 elastic band, using circular knitting needles No. 2.5 and 3. It is recommended to use wool yarn (200 g) with 20-25% polyamide or acrylic content for the work.
During work you need to:
- Place 158-170 stitches on No. 2.5 knitting needles and knit 4-6 cm of fabric with a 1*1 elastic pattern.
- Reduce the number of loops, remove 30-34 loops at once in one row (in the end, 128-136 loops should remain).
- Transfer knitting to needle No. 3 and continue working with the stockinette stitch pattern (alternating rows with only knit stitches and only purl stitches). Continue knitting until the fabric reaches a length of 18-20 cm.
- Start decreasing by placing markers every 15-16 stitches (there should be 8 of them in total) and continue working with the stockinette stitch pattern, decreasing one stitch at each marker at the same time. This is done until there are only 16-24 stitches left on the needles.
- To complete the work in the penultimate circle, knit all remaining loops 2 at a time. In the final row of 8-12 loops, you need to cut the thread, pull it in the opposite direction, tighten and secure the product.
Useful tips
For beginners taking their first steps in knitting, professionals recommend:
- Be especially careful when choosing yarn, since for men's hats it is recommended to take thick or medium-thick wool thread with the addition of acrylic or nylon, which will allow the headdress to stretch well, but at the same time not to lose its original shape for a long time. It is best to take neutral shades of yarn (dark blue, gray, beige), which easily hide any errors in the work.
- Use circular needles 1 cm thicker than the size of the chosen thread, made of wood or bamboo. It is not recommended to use metal needles at first, since the cast-on stitches can simply slide down, interfering with the work.
- When working with patterns, it is necessary to use a marker, marking the end of the work with it, which will help to avoid possible confusion, and when calculating the knitting density, it is necessary to measure the number of loops for each pattern. If this rule is violated, some parts of the finished hat may be larger or smaller in size than others.
- At first, practice on simpler patterns - 1*1 or 2*2 elastic, garter stitch, stockinette stitch, gradually improving your skills, and only then move on to more complex rapports.
- Start a special notebook or notepad, writing down all knitted items, loop calculations, increases and decreases made for them. It is also recommended to stick labels removed from used skeins of yarn there.
- When stopping work, be sure to complete the row, which will avoid confusion and unraveling of loops from the already knitted fabric.
A hat for a man is a stylish, bright accessory that not only protects from cold wind and frost, but also complements the created image.
Knitted in the form of a youth model of a beanie, a "helmet" hat, a "stocking", a cap with a visor, according to simple patterns from high-quality woolen yarn, with the obligatory addition of synthetic fiber, it, if chosen correctly, helps to visually correct small defects in a man's appearance - slightly stretch his round face, hide voluminous cheeks and sharpen cheekbones.
Video about men's hats for round faces
Master class on knitting a men's hat with knitting needles: