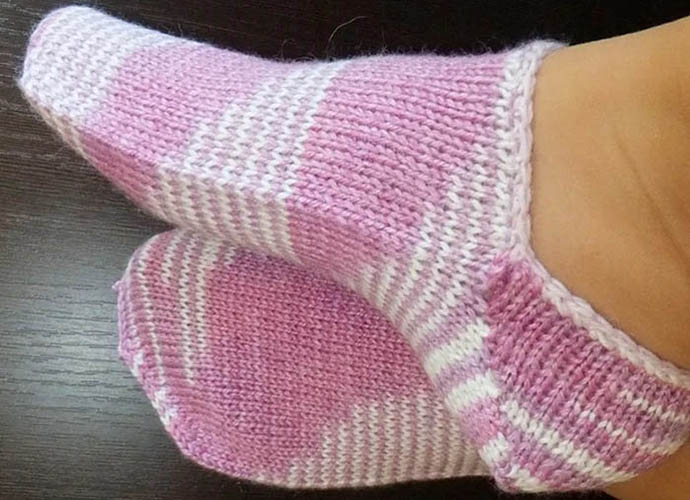
Knitting of footsies Even inexperienced craftswomen can master it. Such house slippers are made on 4 knitting needles, using different techniques of execution - smooth surface, raised pattern, with a pattern, from single-color yarn or melange.
Features of knitting socks on knitting needles, calculation of size for adults and children
Socks are practical, comfortable and functional wardrobe items. They are used as regular slippers or ballet shoes. They are knitted quite quickly even by an inexperienced craftswoman, and almost any thread is suitable for their production.
These cozy slippers are knitted using various techniques. Openwork is considered the most popular method, since the finished products look more interesting. However, experienced knitters believe that this method is not suitable for beginners, since it is quite complex.
Therefore, at first it is better to use the method with or without a seam. The needles may not only be circular. There are patterns designed for working with 2, 4 or 5 needles. And some craftswomen even use a crochet hook in the knitting process. However, this requires a certain skill.
Needlewomen who do not have experience prefer to knit socks with knitting needles. If you need to make slippers as quickly as possible, for example, to present them as a gift, it is better to give preference to regular satin stitch. This knitting method is considered the simplest. Such work will not take much time. Sewn seams are also not considered difficult to perform.
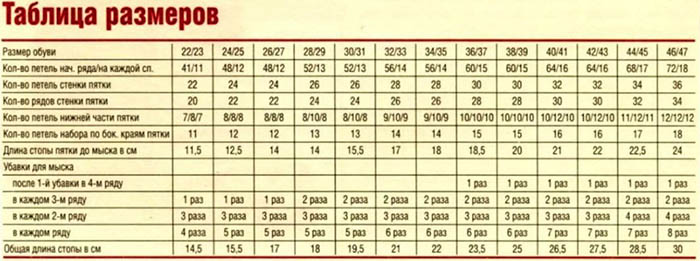
Calculation of the size of footprints for adults and children of any size
Before you start knitting, you need to take measurements and make calculations. The first time, this procedure will seem long. But then some details are already done automatically.
Ankle volume
First, measure the ankle circumference. Measurements are taken at the highest points, where the cuff is supposed to start. For example, 22 cm. As a basis, you can take an example of a model with a back height of 30 mm. Thus, 3 cm are subtracted from 22 cm. This means that the set of loops is made at 19 cm.
For example, 38 loops are cast on (their number is calculated taking into account the pattern) if the knitting density is 2 loops per 1 cm.
Cuff height
After this, determine the height of the cuff. Then 38 sts (19 cm) are divided into 3 parts. The result is 12 sts – 14 sts – 12 sts. Accordingly, 6 cm – 7 cm – 6 cm.
Wedges for lifting
Now knit small wedges for the rise. Add 1-2 cm on the sides. It depends on what kind of rise is needed - small or large. You can look up the knitting of the wedge on the Internet.
Middle part
Next, calculate the knitting of the middle part of the sock. The size of the foot serves as a guide. For example, it is necessary to knit 24 cm (the length of the slipper folded in half). Therefore, half the width of the back is subtracted from this number (3: 2 = 1.5 cm = 2 cm). The resulting number is usually rounded up to the nearest whole number. The elasticity of the yarn is also taken into account.
This is 22 cm (the length of the foot piece folded in half). From this, subtract 6 + 1 (wedge) – the width of the side. It turns out that the upper part must be knitted by 15 cm. If the length is increased, add 1 cm and 1 size. Since the upper part becomes larger, the length of the sole automatically increases.
Reducing the toe
The toe reduction starts in the area of the beginning of the little toe. For a woman's foot, the reduction is done 4-5 cm before finishing knitting the middle part. However, the shape of the foot and its size are usually taken into account. For example, a beautiful toe is 3 cm - 4 cm wide. Thus, the number of loops required to complete knitting the upper part of the toe is calculated.
Then the loops are picked up in a circle to knit the height of the sock. Usually it is 2 – 3 cm. Here you should not be too zealous, since the knitting is elastic. And too loose slippers will fall off the feet, and look unsightly. So, this volume of loops (in cm) should be divided by 2. You get the required size without taking into account the back.
Calculating the length of the sole
Procedure:
- Work begins on the loops with which the knitting of the top of the product was completed. Sometimes their number changes.
- Then increase to the width of the foot, subtracting 2 - 3 cm.
- For example, if it is 10 cm, the sole part is knitted 8 cm.
- Then it is divided into 2 parts – ½ – the distance between the toe and the beginning of the decrease of loops. For example, 80 mm.
- Then ½ is divided by 2. Then additions and subtractions are made in the middle zone.
- And ½ remains – this part is located just under the heel and up to the very back of the sock. In other words, it is reduced to 5 cm.
- Then they make an increase up to 7 cm.
- When you finish knitting the sole, decrease to 3 cm.
- The back is knitted 2/3.
- Then decrease by 1 cm.
- They continue knitting until the work is completed.
The back of the slipper is added, widened at the top if the cuff is high.
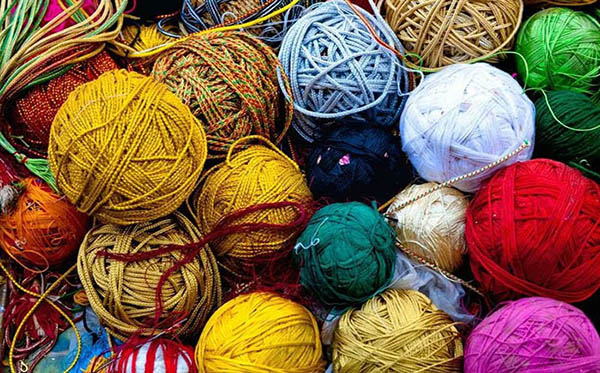
What yarn is suitable for knitting socks
Knitting of socks on 4 knitting needles is carried out using any type of yarn in terms of composition, thickness and shade.
A single-color twisted thread or multi-colored yarn made from natural or synthetic fibers will do, for example:
- regular wool;
- home-spun thread;
- mohair;
- melange yarn;
- cashmere;
- angora;
- "boucle";
- "flame".
When choosing yarn, it is necessary to pay attention to the structure and quality of the thread. It is advisable to use a breathable material with high thermal-water properties, but with a low degree of electrification.
Flax, acrylic or natural yarn with the addition of artificial thread in a ratio of 50X50 are suitable. You can take the remains of wool of different colors and density. They are easy to combine, and you will get modern, colorful socks.
The heel and sole can be reinforced by adding a nylon thread. Such a product will be more wear-resistant. The yarn is also chosen based on the seasons. Wool, semi-wool, and cashmere are best for winter. Cotton, acrylic, and bamboo are best for spring.
It is important that the material is soft to the touch, warms, and does not irritate the skin. When knitting children's products, it is advisable to choose special hypoallergenic yarn of various colors.
Conventional symbols in diagrams
Conventional symbols in circuit descriptions:
| Persons. | Face loop |
| Out. | Purl stitch |
| Kr. | Edge loop |
| P. | Loop |
| V. p. | Air loop |
Master class on knitting simple socks on 4 needles
Simple 4-needle socks can be knitted in an evening. The knitting technology is not complicated.
Heel of the footprint:
- Cast on 8 sts on 2 needles.
- One spoke is removed.
- Next, the height of the heel is knitted with the front surface.
- Knit the edge loops.
- This means that in each row, remove the first stitch and knit the final stitch purlwise.
- This model has 24 rows.
- The heel piece is finished by knitting a purl row.
- The product is turned over.
- The loops are closed in the usual order: the 1st loop is removed, the 2nd is knitted.
- Then the unknitted loop is transferred to the knitted one.
- Knit the 3rd st.
- The 2nd point is re-shot onto the 3rd and so on.
- At the end there remains 1 unknitted st.
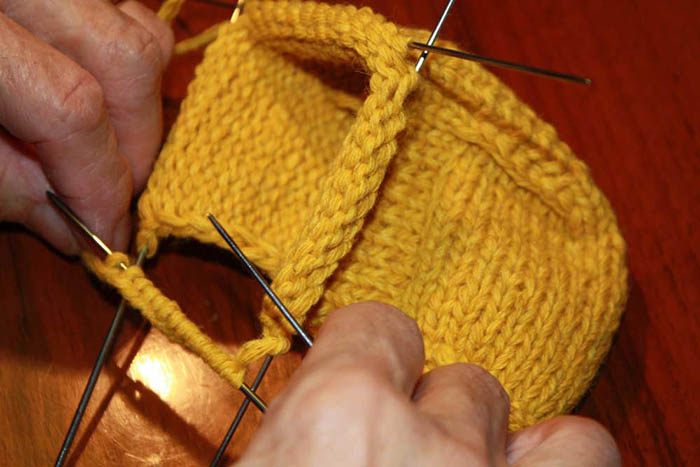
The main part of the slipper:
- Knitting is turned 45°.
- Now loops are cast on from each edge loop.
- They are hooked only behind the loop wall located closest to the inside of the heel.
- This makes 12 loops.
- They are knitted with the front stitches, trying to ensure that they do not end up crossed.
- Then the product is turned again by 45°.
- On the second knitting needle, also cast on 8 sts from the cast-on row. They are knitted as front loops.
- The knitting is turned again by 45°.
- Next, on the third knitting needle, loops are again cast on from the outer loops of the knitted fabric, repeating the technology.
- And also one additional loop is taken from the closed row.
- To do this, pick up the first loop that was removed without being knitted by both “legs” of the loop.
- The cast-on stitches must be knitted.
- Next, the work is turned over and the fabric is knitted with the front surface for approximately 9 cm.
- Knitting is finished with edge loops, having knitted the last row.
- Now count the loops on the knitting needles to find out how many air loops will be needed.
- In this example 34 sts.
- In total this will amount to 44 p.
- This means you need to dial another 10 ch.
- The required number of loops is cast on onto a separate knitting needle.
- Then knit the front loops only in a circle.
- The air loops are knitted by simply catching them on the front wall. This way the edge looks neater.
- Next, knit with face loops again only in a circle.
- Knitting is finished when the desired length of the slipper is knitted. The little finger should be completely covered.
- This model is 12.5 cm.
Toe:
- Divide all the air loops into 4 so that there are the same number of them.
- In this model, there are 11 sts, which are counted in each direction, transferring to a separate knitting needle.
- The remaining loops are divided equally.
Toe decrease:
- 1 row:
- Beginning of the 1st needle – 1 front; 2 front together knitted, tilted to the right side.
- Next, the facial ones
- From the 2nd needle – knit, but do not finish knitting 3 sts.
- Then 2 persons together with a tilt to the left side, 1 persons.
- Beginning of the 3rd needle – 1 knit; 2 knits together, tilting to the right side.
- Then come the facial ones.
- From the 4th needle – knit, 3 sts are not finished.
- Then 2 persons together with a tilt to the left, 1 persons.
- 2nd row:
- Only persons.
- Then knit another 6 rows.
- Rows with and without decreases alternate.
- Then knit only decreasing.
- There should be 8 sts left on the needles.
- Finally, the thread is cut. It is passed through the remaining loops and tightened.
- The second footstool is knitted in the same way.
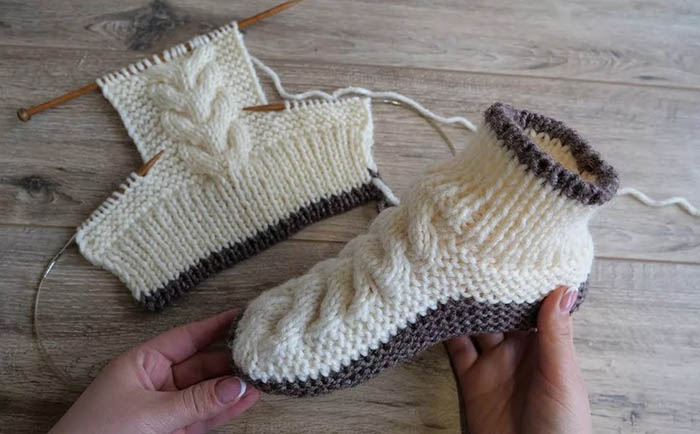
Step-by-step knitting of socks with the "Braid" pattern
Knitting slippers on 4 knitting needles with a "Braid" pattern without a seam is a fairly simple way to create them. Then the slippers do not need to be sewn together. They are knitted as a single piece.
Algorithm of actions:
- Cast on 48 sts.
- Knit a rib pattern - 2 front, 2 back.
- Distribute 12 sts onto the knitting needles.
- 7 rows are knitted with a rib pattern.
- Knit two rows with front loops.
- From the third row, they begin to knit a straight heel.
- To knit the heel, the loops from two knitting needles are moved to one knitting needle.
- Then knit the odd rows as front rows. Knit the even rows as back rows.
- This makes 22 rows.
Knitting the heel:
- The loops are divided into 3 parts (middle and 2 sides), 8 loops each, to knit the heel.
- Knit 8 side stitches, 7 middle stitches.
- The eighth and first loops of the second side are knitted together with the front loop, the work is turned.
- Next, knit the middle 8 loops.
- The first loop is removed without being knitted.
- The eighth loop of the middle is knitted together with the loop of the side of the heel until the side part is finished.
- There should be 8 loops of the side of the heel left on the knitting needle.
- Along the side of the resulting heel, cast on 11 loops onto a new knitting needle.
- They are knitted with a knitting needle on which 8 heel loops remained.
- There should be 19 loops on the knitting needle.
- Next, knit the loops on two knitting needles.
- Again, cast on 11 stitches along the side of the heel.
- They are knitted. And with the same knitting needle, 4 loops are knitted from the knitting needle on which there are 19 loops.
- The loops are distributed as follows: 12 loops remain on two knitting needles. On two knitting needles from the heel side – 15 loops.
From the next row, begin knitting a pattern on two knitting needles, where there are 12 loops.
Scheme:
| Second spoke | First spoke | Row |
| The pattern is knitted in mirror image. There will be 2 loops here with a left tilt. | 5 persons., 1 sl, 4 persons., 2 p. with a right tilt, 1 purl. | 6 |
| 4 persons., 1 sl, 4 persons., 2 p. with a right tilt, 2 purl. | 5 | |
| 3 persons., 1 sl, 4 persons., 2 p. with a right tilt, 3 purl. | 4 | |
| 2 persons., 1 sl, 4 persons., 2 p. with a right tilt, 4 purl. | 3 | |
| 1 front, 1 back, 4 front, 2 p. with a right tilt, 5 out. | 2 | |
| 6 knits, 6 purl. | 1 |
A "braid" is knitted along it. Each row begins with purl loops (right side), then the rest are picked up. The pattern is repeated in mirror image, also beginning with purl loops (left side).
When two pattern rapports are knitted, the loops begin to decrease from the heel side. On one knitting needle with 15 loops (3 times through the row), at the beginning of the knitting needle, 2 loops are knitted together. On the second one - at the end of the knitting needle. There should also be 12 loops left on them.
For sizes 38–39, knit 8 pattern repeats. It is better to try on the sock while knitting so that the product fits nicely on the foot.
Knitting the toe of the sock (count from the beginning of the pattern):
- 1st row of decrease: 2 together, 11 knits, 11 knits, 2 together, 2 together, 11 knits, 11 knits, 2 together.
- 2nd row: does not change.
- 3rd row: 2 together, 10 persons, 10 persons, 2 together, 2 together, 9 persons, 9 persons, 2 together.
- Row 4: no changes.
- Row 5: 2 together, 9 persons, 9 persons, 2 together, 2 together, 9 persons, 9 persons, 2 together.
- 6th and all subsequent rows: continue to decrease (knit two stitches together at the beginning or end of the row).
The last two loops are knitted into one. A thread is pulled through it. The thread is cut and secured inside the sock. The second slipper is knitted similarly.
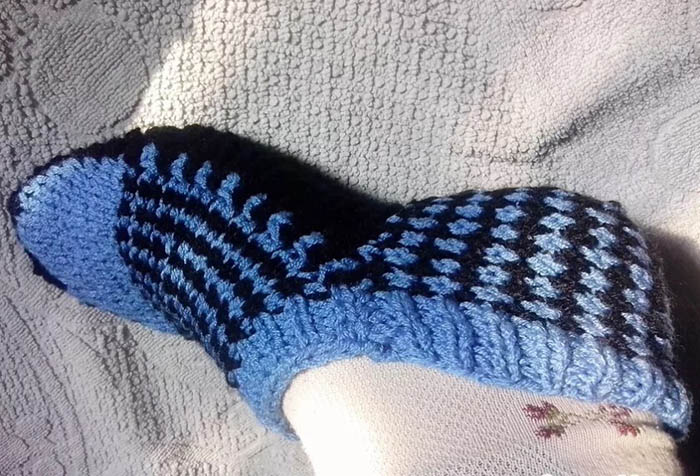
Honeycomb Pattern Footprints
Knitting socks on 4 knitting needles with the “Honeycomb” pattern does not require a complicated technique.
Heel:
- 42 sts are cast on using 2 needles in the usual way.
- The fabric is knitted with garter stitch to the required height.
- This means that all loops are knitted.
- In rows, remove every first loop, and knit the last one with purl stitch.
- This model gives 7 cm or 32 rows.
For these socks, the middle part of the heel fabric is 10 sts, and the side zones are 16 sts each.
Decreasing heel stitches:
- The central area of the heel piece is separated with markers.
- Knit with knit stitches until you reach the second plastic pin, leaving one stitch unfinished.
- The marker is removed and 2 sts are knitted together with a rightward tilt. They are knitted behind the front wall.
- The product is turned over and the fabric is knitted with face loops.
- The 1st loop is removed without knitting.
- Continue knitting to the first marker, leaving one stitch unfinished.
- The marker is removed and 2 sts are knitted together with a right-hand tilt.
- Next, the product is turned over again, and the fabric continues to be knitted using the front surface.
- There should be 10 sts left on the needles.
- At the end of all rows, decrease 1 st.
The main part of the slipper:
- Loops are collected from each outer loop of the piece.
- They are picked up by the wall closest to the front part of the slipper.
- Here, on 3 needles, you get 16 sts.
- That is 42 p. in total.
- This pattern requires 52 sts.
- Therefore, to calculate the required number of air loops, 42 sts are subtracted from this figure. The result is 10 sts.
Operating algorithm:
- The middle part of the heel is knitted with the front surface (1st knitting needle).
- The loops collected from the edge loops are also knitted as front loops, but so that they are not crossed (2nd knitting needle).
- Air loops are cast on to the 3rd knitting needle.
- After this, the loops taken from the edge loops are also knitted as front loops (4th knitting needle).
- Then the beginning of the row is marked with a marker.
- Now they count the rows and monitor the knitting of the pattern.
- Knit the 1st row.
- The front and back rows are alternated to maintain the garter stitch.
- The beginning of the row is marked with a marker.
Select 28 sts to knit a voluminous pattern.
- Pattern repeat: 8 sts + 4 purl sts.
- Empty cells – persons. p.
Scheme:
- The air loops are visually divided equally so that the relief pattern is located at the top and in the center of the slipper.
- Then count 14 sts of the “pattern” in both directions. Mark with markers.
- The 2nd row is knitted with a honeycomb pattern and garter stitch.
- For convenience, loops of the decorative pattern are transferred to a separate knitting needle.
- The purl stitches are distributed over adjacent knitting needles.
- Continue knitting, following the pattern.
- The work is finished when the intended length of the sock is knitted. That is, the little finger should be completely covered.
- In this model it is 15 cm or 57 rows.
Toe of the sock:
- Decreases are made next to the purl stitches that separate the pattern.
- The initial 8 rows decrease every other row.
- Then decreases are made in each one.
- Despite the decreases, the toe is knitted following the pattern.
1st row:
- The loops are knitted according to the pattern (1st knitting needle).
- 2 sts are knitted together purlwise according to the pattern (at the end of the 2nd knitting needle).
- 2 sts knit together 1 front st, tilting to the right (at the beginning of the 3rd knitting needle).
- 2 sts knit together 1 front st with a leftward tilt (at the end of the 3rd needle).
- 2 purl sts are knitted at the beginning of the 4th needle.
- Then knit 2 sts together.
- Next, knit according to the pattern.
The 2nd row is knitted following the pattern without decreasing.
- In the 3rd row, as in the 1st, decreases are made again.
- Thus, 8 rows are knitted.
- Alternate rows with and without decreases.
- Then knit all the rows where there are decreases.
- After this, there should be approximately 12 sts left on the needles.
- Then the thread is cut, hidden in the sock and tightened.
- The second slipper is knitted in the same way.
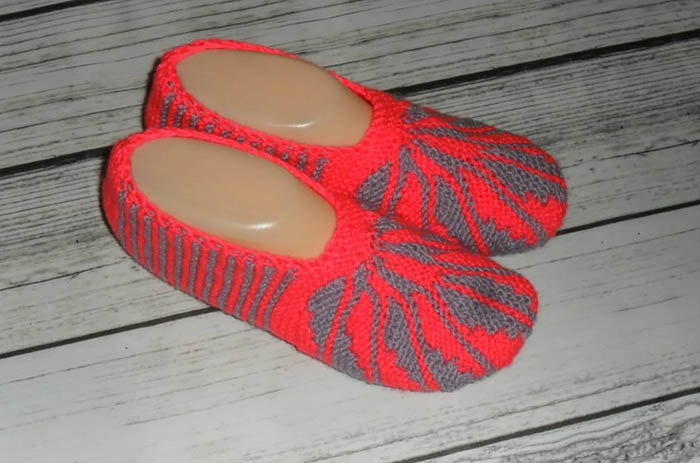
Multicolored footprints
Knitting socks on 4 knitting needles from threads of different shades allows you to get beautiful, original products. For example, you can knit bright slippers "Watermelons", which children will really like.
Execution technology:
- Cast on 30 sts using green thread on 2 knitting needles.
- 35 rows knit with stocking stitch.
- Next, cast on another 10 sts.
- All loops are distributed onto 4 knitting needles. 10 sts on each.
- Continue knitting in a circle.
- Knit 25 circular rows.
- Then they begin to decrease the loops to form the toe.
- In even circular rows, knit 2 sts together at the beginning of each needle until there are 2 sts left on each needle – 8 sts in total.
- The loops are pulled together. The thread is pulled inside the sock and secured.
- The exact same detail is knitted with red thread.
- It is placed in the green top of the slipper.
- The parts are sewn together, and the heel seam is also made.
- The free edge is tied with yellow thread using a hook.
- The inside of the sole is decorated with black yarn, imitating berry seeds.
On 4 knitting needles you can easily and quickly knit socks using various knitting techniques. Such methods are not particularly difficult.
Video about knitting footsies
Master class on knitting the simplest socks on 4 knitting needles: