Drawing is a skill that anyone can master with hard work. The easiest way for a beginner artist to master the technique of drawing is to learn how to draw simple images in parts, step by step with a pencil.
Rules and preparation of the workplace
When drawing with a pencil, beginning artists should follow certain rules that will gradually, step by step, help them develop the skill of beautiful drawing:
- To draw, you will need a drawing board on which a sheet of paper will be attached, or a spiral-bound notebook with drawing paper.
- The lighting of the work place should be arranged in such a way that when working with the right hand, the light comes from the left side, and its source is above shoulder level. Such lighting of the sheet allows to get rid of shadows falling on the drawing under improper lighting.
- To store pencils, crayons, erasers and other accessories, you need to use special containers with different compartments.
- When drawing from life, the easel or drawing board should be positioned vertically, with a slight tilt. The easel should not obscure the object whose image the artist transfers to paper. The distance from the sheet to the model should be 3 times greater than its size.
- When drawing, the artist should be at a distance of 30-40 cm from the easel.
- To correctly assess the accuracy of the construction of a drawing and its proportions, it is necessary for the artist's gaze to cover it completely; for this, it must be positioned at a right angle to the imaginary line connecting the plane of the drawing and the eyes of the artist.
- You need to study according to a plan, setting a goal and achieving it.
- You should start with simple images, each time moving on to more complex images, implementing the principle - from simple to complex.
- It is necessary to master the basic elements: determining angles, maintaining proportions and line sizes.
We draw step by step with a pencil (for beginners, you should initially depict simple geometric objects) any simple objects from life.
At the same time, the artist, sitting at the easel, should not change the position of his head; he should study the model only by raising and lowering his gaze, without changing the position of his body.
The most important moment in the first stage of mastering the art of drawing is training technique for correctly positioning the hand with a graphite pencil:
- When drawing on a sheet of paper fixed to the board, do not hold the pencil as you would a ballpoint pen when writing at the table. Otherwise, the side surface of the brush, touching the sheet of paper, will smear the lines of the drawing.
- The pencil should be held between the pads of the thumb, middle and index fingers. With this position of the pencil in the hand, the beginning artist can easily draw lines and will not smudge the drawing with the surface of the brush.
- In this technique, the entire hand is used to draw long lines, medium-length lines are drawn with the movement of the brush, and strokes are drawn using finger movements.
How to draw a cat
By combining simple geometric shapes, a novice artist can create an image of a cat on paper.
Drawing simple images helps a person learn to use a pencil and confidently apply the necessary lines and shapes to a sheet of paper.
The results obtained motivate further learning and give confidence in one’s abilities.
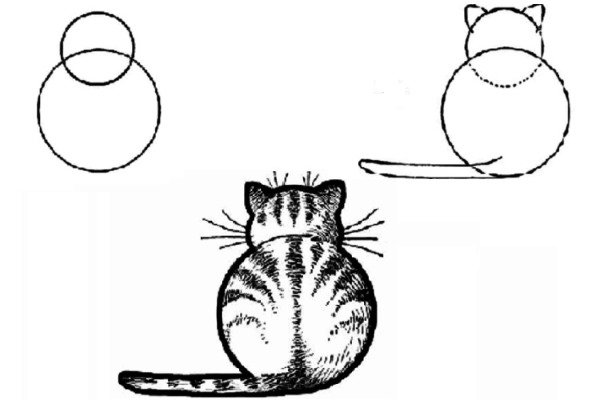
Cat of circles
To get an image of a cat on a piece of paper using circles, you should:
- At the top of the drawing paper, draw a circle with a diameter of about a third of the height of the sheet.
- Inside the circle, at the bottom, draw a circle whose size is 2 times smaller than the main ring. The circles touch each other at the bottom point of the image.
- On the small circle at the top, symmetrically relative to each other, it is necessary to depict 2 small triangles - these are the cat's ears.
- Inside the small circle, draw 2 symmetrical small circles that represent the animal's eyes. In them, draw large dots - these are the pupils.
- Just below the center of the small circle, you need to draw an inverted triangle – the nose.
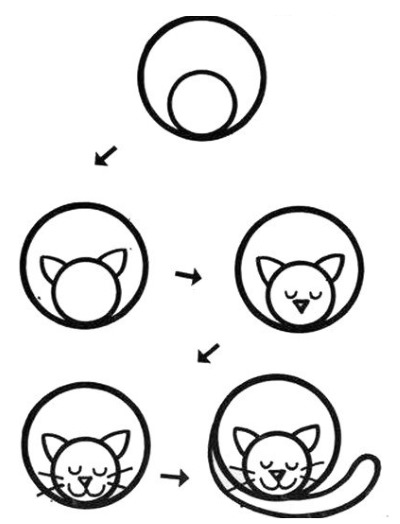
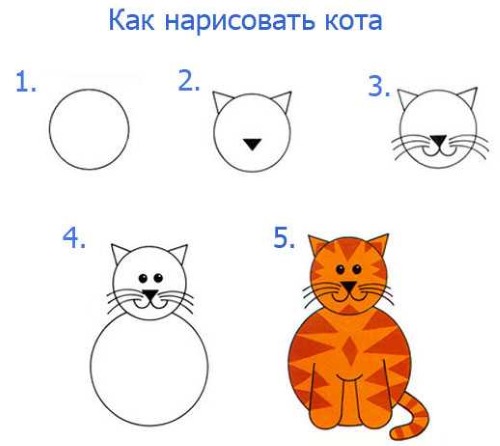
- Below it, you should draw two connecting semicircles – the mouth.
- At the bottom of the large circle, you need to draw an arched, elongated oval depicting the cat's tail.
Sits sideways and with his back
Let's draw a cat sitting sideways step by step with a pencil (for beginner artists):
- Under the image of the cat from circles, draw a circle with a thin line with a diameter of about a third of the height of the sheet, shifting its center to the left side of the sheet. This is the future body of the animal.
- On the right side of the drawn circle, draw a circle that is 2 times smaller, the center of which will be located at the intersection of the large circle and its horizontal axial line - the cat's head.
- Draw the outline of the animal - the small circle as a whole, the large one up to the intersection with the small one, the extra lines should be erased with an eraser.
- Draw symmetrical triangles on the head – ears.
- 2 small circles with dots inside – eyes.
- Draw an inverted triangle below – the nose.
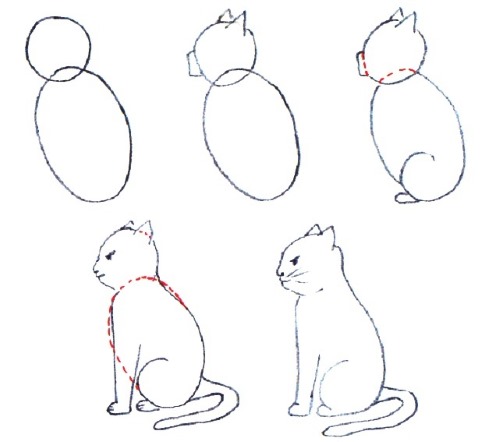
- Draw the mouth in the form of a semi-arc.
- Draw 3 lines diverging from the nose on each side of the head – the mustache.
- Below the large circle, in its right part, draw 2 semi-ovals, they depict the animal's paws. Draw 2 lines in them - claws.
- On the left, draw an elongated oval – the cat’s tail.
- We shade the body and tail to get 3 stripes – the color of the animal.
To depict a cat sitting from behind, it is necessary to connect the large and small circles at the top. The large circle is outlined completely, the small one before meeting the large one. On the head (small circle) draw the ears and whiskers that protrude from behind the head. Draw the tail in the form of an elongated oval and apply tiger shading to the body and head of the animal.
Sleeping
To get the image of a sleeping cat, you need to draw it from circles. When depicting the eyes, draw not circles, but lower half-arches, depicting closed eyes.
On the move
An animal in motion is a more complex drawing that should be drawn after practicing simple images of a cat obtained from elementary geometric figures.

This image already looks like an image of a real cat. It is necessary to find an image of a cat in motion that the beginning artist likes.
Next, you need to follow the following algorithm:
- The oval of the head and body is marked with thin lines. The neck, tail and legs are marked with lines. The horizontal line marks the plane on which the cat stands.
- Then auxiliary sections are applied, with the help of which portions of the image are checked.
- The contours of the image are specified and the skeleton of the mammal is schematically drawn. The main joints are designated and proportions are controlled by them.
- The outline of the animal's body is drawn.
- Next, use fine shading to create the volume of the cat's body and its color. Use darker shading along the contour of the body to depict the animal's fur.
- Compare the image with the original, make adjustments.
Wolf
To draw a walking wolf with its head turned towards the observer, you should find such an image, then follow the instructions:
- It is necessary to designate the proportions of the body and head of the animal with three circles. The middle circle, defining the size of the wolf at the withers, is made the largest. The size of the 2 outer circles is about 2/3 of the diameter of the body. The left circle marks the head of the predator, the right one - the pelvic area.

- The contours of the ears and mouth need to be drawn to the head. The circles are connected with smooth lines, and the animal's paws are marked with segments.
- Copy the details of the wolf's grinning muzzle from the picture. Mark the small eyes, sharp teeth, and the wrinkled skin of the animal's muzzle.
- Observing the proportions and anatomy of the animal's skeleton, create an outline of the body.
- Use fine shading to create volume in the image and draw fur along the contours of the body.
Dog
A dog can be drawn using the same scheme as a wolf, only when drawing the muzzle you need to make not the furious expression of a predator, but the kind muzzle of a “man’s best friend”.


| Actions of the artist | Result of work |
| Marking the proportions of the animal on a sheet of paper | 3 circles, the large one in the center is the animal's chest, the left one is the head, the right one is the pelvis |
| Drawing the mouth. Designation of the neck, body and paws of the animal | The outline of the mouth on the head is depicted on a sheet of paper, and the body of the dog is outlined in thin lines. |
| Draw the details of the dog's friendly face | Drawn: eyes, ears and mouth |
| Drawing an outline of an animal's body, respecting anatomy and proportions | The outline of the animal's body is drawn on paper |
| Applying shadows and creating volume in the painting | Painting with a dog |
Horse
Let's draw a horse from the side step by step with a pencil (for beginner painters):
- It is necessary to select an interesting picture with a side view of a horse.
- Depending on the animal's constitution, the outlines of the body can be formed by observing proportions, using: 3 circles, 2 ovals, or a circle and an oval.
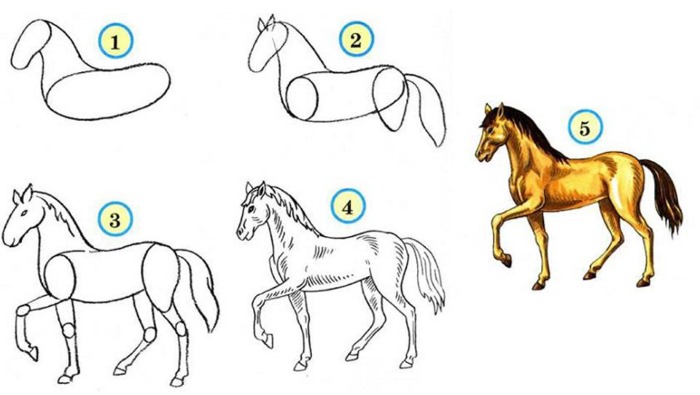
- Mark the location of the main joints and draw the outline of the horse's body.
- Shade the animal's body, creating volume and convexity of the image.
- Clarify small details.
Dragon
This is a mythical, very strong and muscular creature, capable of flying, and therefore its image must be imbued with a certain grace and lightness.
Algorithm for creating a dragon image:
- Schematically, trying to maintain proportions, the skeleton of the giant should be outlined in thin lines.
- Based on the diagram of the skeleton and nodal joints, draw the outlines of the body and limbs.
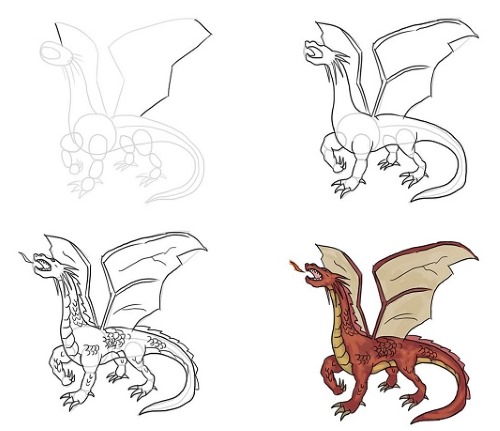
- Draw the head of a flying lizard, outline the outline of the neck.
- Draw scales on the neck of a flying monster.
- Outline the wings.
- Draw powerful legs and add volume to the wings.
- Remove all auxiliary lines and depict small scales on the giant's body.
Other animals
To depict any animal, it is necessary to study their anatomy, and based on it, schematically depict the skeleton in thin lines.
Observing the proportional sizes of the body parts, draw the outlines of the body using simple geometric figures, connect the figures with smooth lines, forming an image of the animal's body on a sheet of paper. Remove all unnecessary lines and create a three-dimensional figure of the animal using shading.
Flowers
To correctly depict a flower on paper, it is best to have it in front of you or a high-quality photograph of it.
Callas
The flower is a leaf gracefully twisted into a cone. In the center of it is a long pistil.
To draw an inflorescence of 3 calla flowers, you need to do the following:
- It is necessary to outline the upper contour of the central flower, observing the rule of perspective, and draw it.
- Draw its lower part and stem.
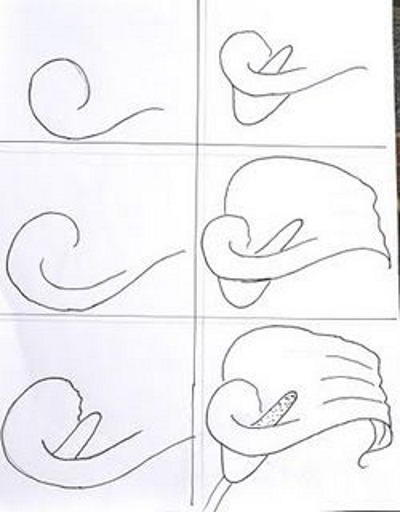
- Using the same pattern, depict the right and left flowers.
- The outlines of the calla lily image are ready, now we need to show the volume using shadows.
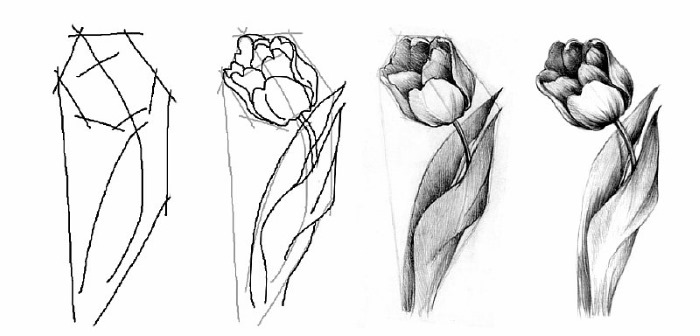
Tulip
Step-by-step instructions for drawing a tulip on paper:
- Using lines and simple geometric shapes, you should mark the contours of the flower on paper. When arranging, it is better to slightly bend the stem, so the flower will look more beautiful and graceful.
- Draw the outline of the upper view of the flower. The tulip has 6-7 petals, which are oval in shape. They are arranged in 2 rows, overlapping each other.
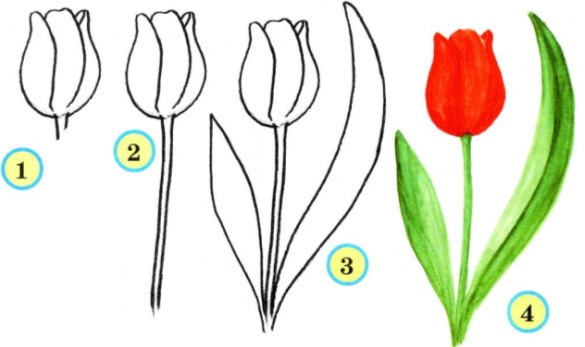
- Draw tulip petals along the entire height.
- Draw a stem that has the same thickness throughout its entire height.
- Draw the leaves that envelop the stem.
- Apply shadows, emphasizing the depth and shape of the leaves. Draw the stamens with light strokes.
Narcissus
This flower has a tubular, bell-shaped perianth inside and open outer petals.
To depict it on a piece of paper, you should:
- Make a layout and place the flower on the sheet.
- Use ovals and circles to outline the shape and size of the flower and its petals.
- Draw 6 petals and perianth.
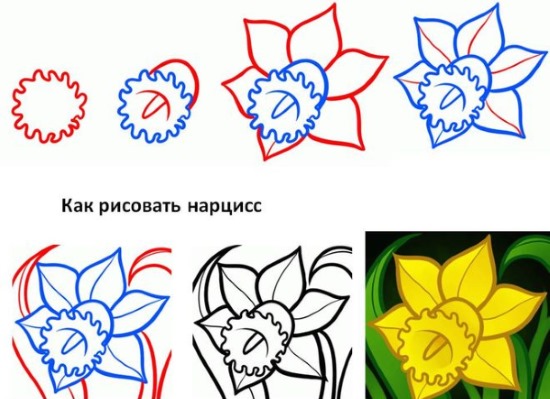
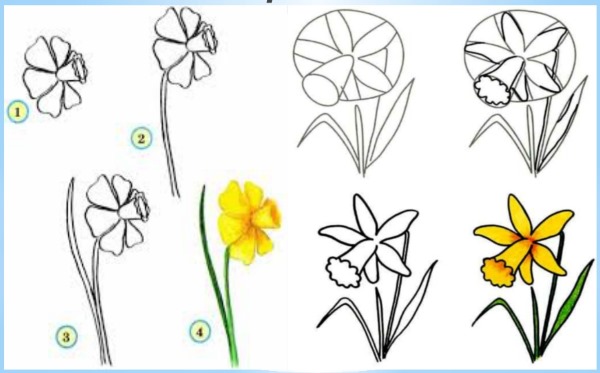
- Draw the leaves and stem. The stem bends strongly where the flower is attached, and is thicker at the base than the flower.
- Apply shading to show the volume of the leaves and flower.
Rose
The peculiarity of the image of a rose is the drawing of the flower bud and its stem with thorns.
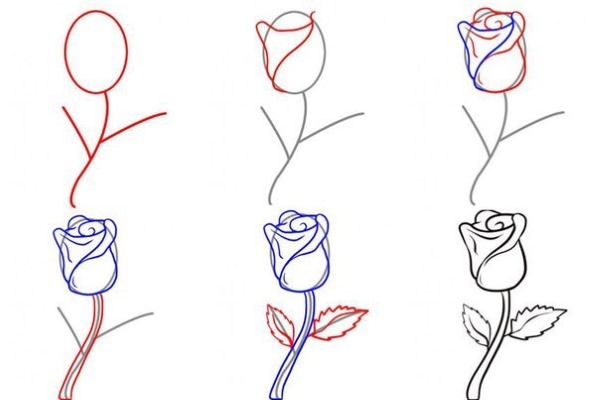
The scheme for obtaining the image is classical, the layout is proportional. Using simple geometric figures, drawing and shading to obtain volume and relief.
Lily
It has an elongated flower with long stamens and a pistil. To depict a lily on a sheet of paper, you need to place a real one or an image of it in front of you.
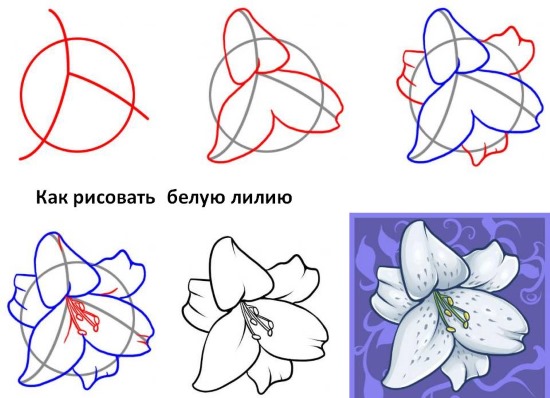
Using thin strokes, draw a circle where the open petals of the lily should be inscribed. Draw the contours of the petals and the center of the flower. Draw the trunk and leaves. Use hatching to show volume.
Lotus
Let's draw a lotus flower step by step with a pencil (for beginner illustrators):
- A circle is placed on a sheet of paper, which will serve as the basis for the image of a lotus.
- It is necessary to draw ovals around it – these will be the future leaves.
- Draw the center of the flower, consisting of small petals.
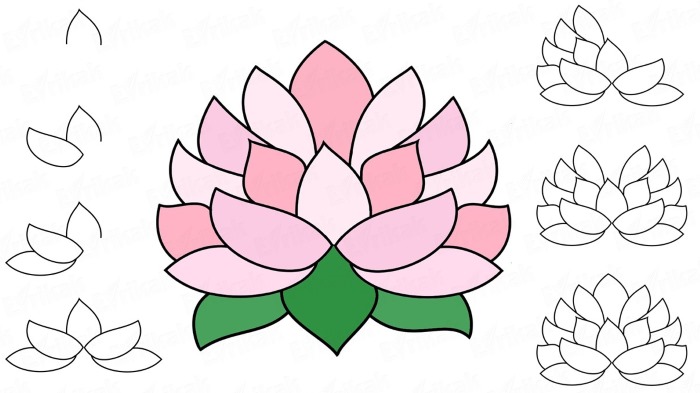
- Draw larger petals around it, increasing in size towards the edge of the flower.
- Draw large, fleshy leaves at the base of the flower.
- Apply shading to create volume.
How to draw a 3d drawing
When creating 3D drawings, an effect is used that distorts the image in projection; it is called anamorphosis. The secret of these drawings lies in the concepts of perspective, light and shadow and foreshortening.
Butterfly
The secret of this image lies in the drawing of the shadow cast by the butterfly on a piece of paper and the specially altered proportions of the picture.
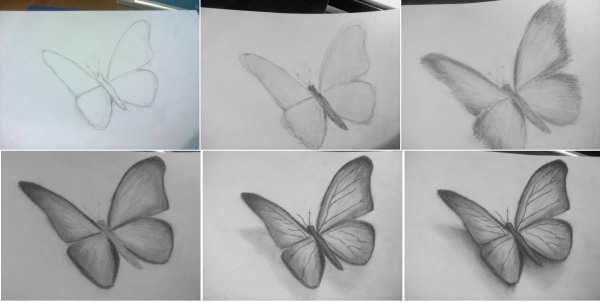
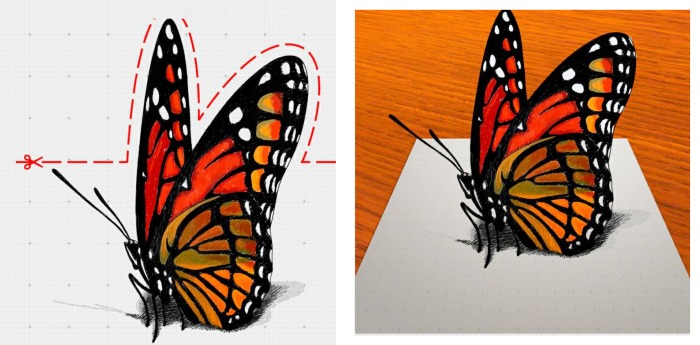
To get a 3D image of a butterfly:
- Make a proportional sketch of a flying insect on paper.
- When drawing further, it is necessary to stretch the image vertically. Using thin auxiliary lines, divide the picture vertically into equal parts.
- The bottom square does not change proportions, the second square is lengthened by a quarter, the third by 50%, the fourth by ¾.
- Draw the contours of the resulting image.
- Remove all auxiliary elements, draw small details and patterns.
- Draw the shadow diagonally from the bottom of the image.
- To enhance the 3D effect, cut off the top quarter of the sheet.
Bananas
The effect of three-dimensional bananas is achieved by lining up the image:
- A projection of bananas is drawn on paper.
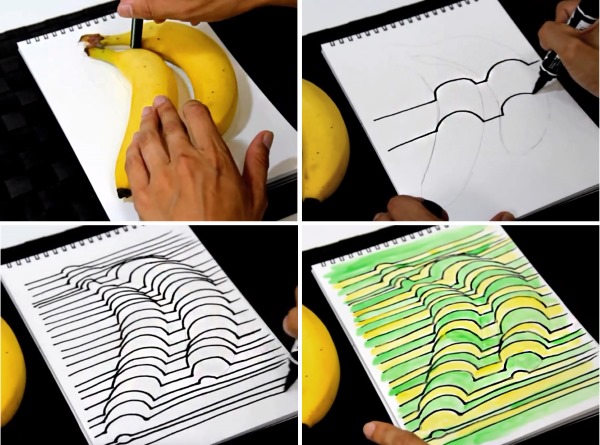
- Then the sheet is ruled with parallel lines.
- Arcs are drawn at the intersections of the fruit projection and lines.
- The resulting stripes are painted over with yellow every other one.
Funnel
Stages of drawing:
- On the sheet of paper you need to draw an oval with thin lines.
- Then the sheet is lined with parallel lines.
- Erase all the lines inside the oval, turn the sheet diagonally and draw a continuation of the broken lines inside the oval to its opposite border.
Ladder
To draw a staircase, you need to follow these steps:
- Draw a rectangle in the center of the sheet.
- Draw a diagonal line along it with a thin line.
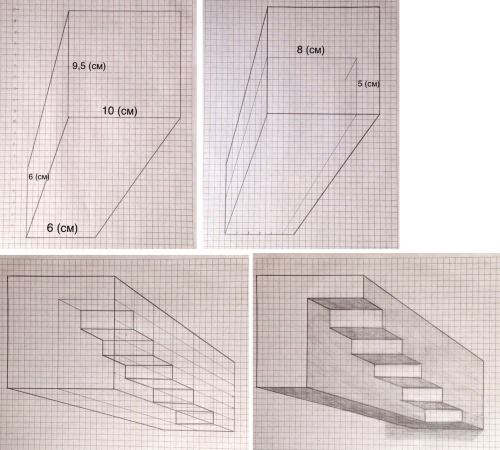
- On the left side of the rectangle, draw the first step, the length of which is equal to its width.
- The next step starts on the diagonal, runs parallel to the first, and ends at the bottom edge of the rectangle.
- The last step is barely visible in the lower right corner.
- The right side of the rectangle beyond the diagonal is painted dark.
Heart
Just like when drawing a 3D banana, in this image the lines play a fundamental role:
- A stylized outline of a heart is drawn on the sheet.
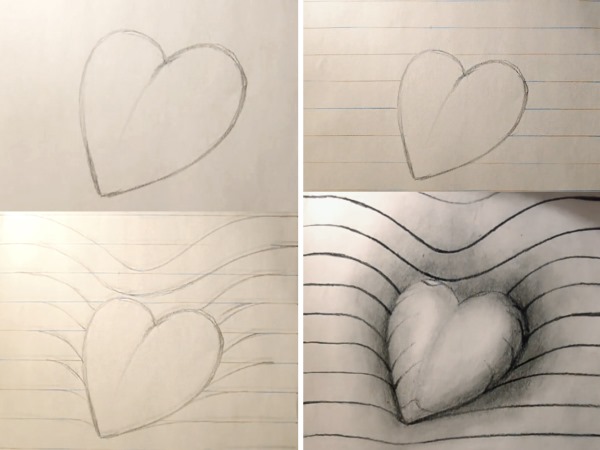
- The sheet is lined with parallel lines; in the area where the lines intersect with the projection of the heart, the lines are curved.
- Shadows are applied, and the observer gets the feeling that a three-dimensional heart is lying on a soft mat.
How to draw human eyes
A person's eyes are the mirror of his soul, so it is very important for an artist to learn how to correctly depict a person's eyes in his paintings.
Constructing eyes from two straight lines
In order to draw eyes correctly and symmetrically, you need to do the following:
- Draw a line, divide it into 3 equal sections. The distance between the eyes is equal to the length of the eye.
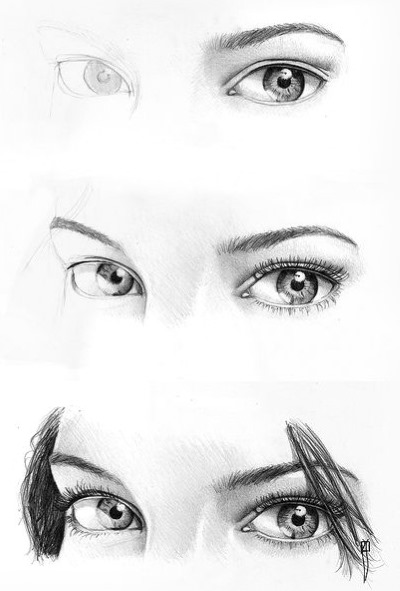
- On the extreme segments, find the centers and construct perpendicular segments to the height of the eye.
- Draw the top line parallel to the bottom one.
- Draw the outline of the upper and lower eyelids, focusing on the length of the extreme segments and the height limited by the second line.
- Draw the pupils and the iris in the center of the segments, which is round in shape but slightly covered by the eyelids.
- Finish drawing small details and start shading.
Hatching
Hatching rules:
- The highlight on the eyeball is not shaded; its borders can be carefully outlined with a pencil.
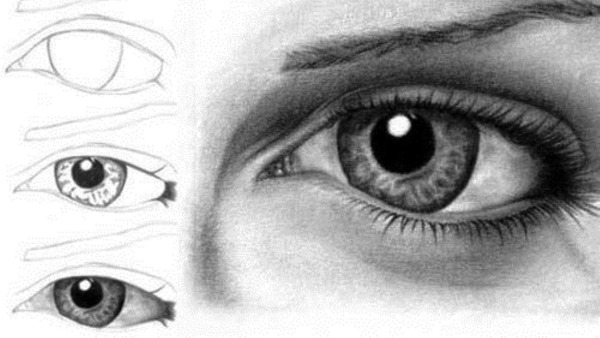
- The iris is shaded from the edge to the center and back.
- You should start shading from the darkest areas.
- The edges of the pupil should not be clear.
- Then you need to apply shadows above the eyelids, if necessary, erase the excess with an eraser. The final touch is drawing the eyelashes.
How to draw a portrait with a pencil
When depicting portraits, artists distinguish 4 types of angles:
- Full face – the person’s face is completely visible to the artist, the ears are symmetrical, the nose is in the center.
- Profile - only one half of the face is visible, the artist sees the face from the side.
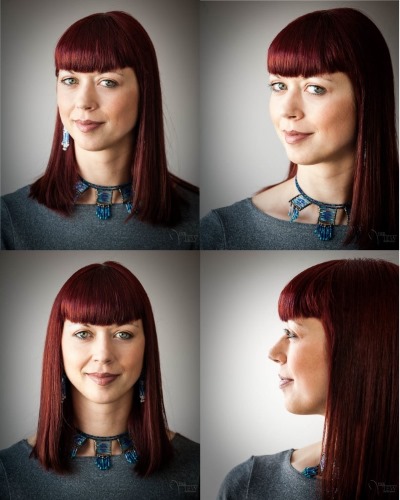
- Half turn ¾ — the person’s head is slightly turned, and on the side of the face farthest from the observer, only the ear is not visible.
- Half turn 2/3 – at this angle, the artist cannot see a large part of the cheek on the far side of the face.
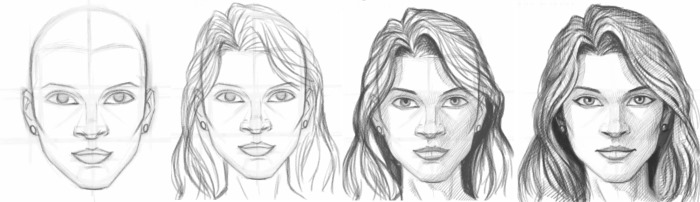
Construction of the face, general outline
In full face, the contour of the projection of the human face is an oval, reminiscent of a chicken egg, placed with the narrow end down. The contour of the face largely determines the similarity of the portrait to the original, so you need to try to depict it as accurately as possible.
Main parts of the face and their markings
The order of marking the main parts of the face:
- On the resulting contour of the face, you should find the middle and draw a thin horizontal line, step down to the height of the eye and draw a line parallel to the first.
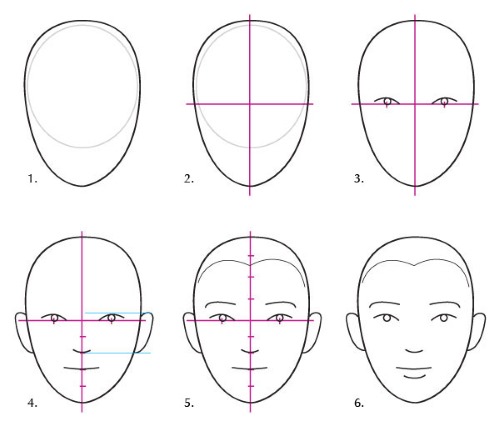
- From the center of the 2 horizontal lines, draw a vertical line down, divide the resulting segment into 3 parts and make a mark at 2/3 of the height. This will be the base of the nose.
- At 1/3 of the height, you should outline the mouth.
- The middle of the human ear contour is located at the intersection of the face outline and the 2nd horizontal line.
Detailing the face: drawing the eyes, eyebrow contours, nose, lips, ears
Step-by-step execution of the drawing:
- On 1 horizontal line you need to depict eyebrows, from the bottom of the ear contour draw the outline of the hair.
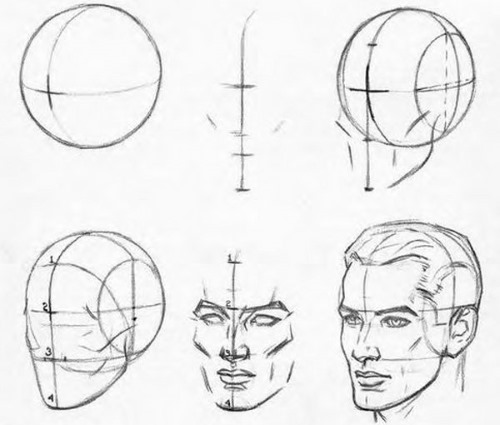
- Draw the lips - the lower lip is depicted as a smooth half-arc, and the upper lip as two half-arcs.
- The height of the upper and lower lips should be the same.
- Draw a tick at the base of the nose and 2 symmetrical arcs on either side of it.
- Use two converging lines to outline the nose.
- Remove auxiliary lines and draw the main ones.
Using hatching, create volume in the image, applying shadows and creating contrasts. Diligently, daily, copying pictures with a pencil onto paper, the beginning artist acquires the skill, the ability to draw beautifully and gradually becomes a master of his favorite craft.
Article formatting:Natalie Podolskaya
Video about pencil drawing
Drawing step by step with a pencil - for beginners, detailed video instructions on drawing a face: