Psychologists, pediatricians and teachers recommend modeling with children, as this is the best way to develop imagination, attention, memory and perseverance in a child. Moreover, you can offer plasticine to a child as early as 9-10 months, the main thing is not to allow him to eat it. But for the first modeling experiments, you can take salted dough, it will not harm if eaten.
At the age of 3-4 years, children experience more active development and enrichment of vocabulary, due to the development of fine motor skills of the hands. Modeling with plasticine is one of the best ways to strengthen the muscles of the child's hands, and therefore, the development of speech and thinking. Working with plasticine develops creativity in children, a sense of color and shape, and forms composition skills.
The benefits of modeling are enormous:
- development of creative imagination and imaginative thinking;
- formation of coordination in the movements of the right and left hands;
- development of sensory sensitivity: awareness of the size, shape, and mass of objects;
- development of the child’s strong-willed qualities, accuracy, and ability to plan their actions;
In the junior group of the kindergarten, children are introduced to several techniques of modeling with plasticine.
Techniques and methods of modeling from plasticine with a child
Kneading
This is the first and most basic technique of modeling with plasticine. Children should first be given a small piece to study and introduced to the properties of plasticine. The teacher shows children that soft plasticine easily changes shape, and different colors mix better.
Rolling out
This technique is used in two forms - direct and circular. Direct rolling is used to make columns, sausages, logs. Circular rolling is used to make round objects.
Flattening
This technique allows you to make flat parts of products. It is done by squeezing the part between your palms or by pressing the part onto the table. However, it is worth reminding children that you do not need to press the part too hard, so that it is easier to separate it from the table.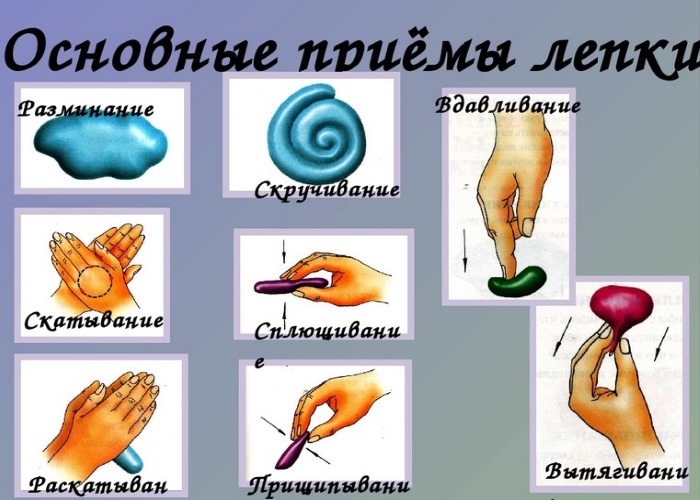
Modern stores have a huge variety of types of plasticine, but the classic plasticine from our childhood is still the most accessible and suitable material for modeling with children. It is important to remember that regular plasticine is quite hard and requires a lot of time to soften. Therefore, at first it is better to offer children wax plasticine, it is softer and therefore does not require long kneading.
Children love to work with this material, as it is easy to knead and has bright, saturated colors. Adults appreciate wax plasticine for its practicality: it does not stain clothes and is easy to wash off hands. But plasticine is almost impossible to clean off carpet, so you should think about the place for modeling.
What you need for modeling with children
For modeling you will need:
- plasticine 6-8 colors;
- stacks;
- modeling board;
- paper napkins;
- additional material (seeds, toothpicks, waste material);
- white or colored cardboard.
Modeling lessons for children aged 3-4
You should prepare in advance for modeling with children. Think over the plot of the craft, play it out, prepare the necessary equipment. It is better to start with something simple and gradually complicate the tasks. To begin with, it is better to make three-dimensional figures with children that are more reminiscent of real objects. Then, when the child's hand is strong enough, you can make pictures from plasticine, that is, flat plots.
How is modeling activity structured with children of this age group?
Introduction:
- organizational moment;
- statement of the problem.
Main part:
- preliminary acquaintance with the subject;
- modeling technology;
- independent work of children.
The final part:
- analysis of children's works;
- summing up.
Let's look at each part of the lesson in more detail. The introductory part helps to set the child up for the lesson, to interest him in modeling. This part is based on play, since play activity is the leading type of activity in preschool childhood. Everything is learned, everything is taught to children through play.
The main part of the lesson is the actual modeling activity. First, children are asked to examine the object to be modeled in detail. The shape, color, and parts of the object are specified. Then the adult shows the methods and techniques of modeling. After that, the children try to repeat the teacher's actions themselves.
Along the way, it is specified what color of plasticine to take, and in what quantity, and also the method by which the part or the whole product will be made is named. Then the children are given time for independent work. Each child decides for himself how to decorate his work, how to build the composition of the craft.
The final part of the lesson allows us to sum up: what we have learned, what new things we have learned. And the collective analysis of children's work allows children to compare their work with others, to identify what turned out better. The teacher should pay special attention to the analysis of children's work. It is necessary to emphasize what was especially successful, what came out easiest.
The teacher notes the shortcomings of children's work for himself. In the future, individual work on modeling from plasticine with the child is built on this. During the analysis, children learn to see positive features in each other's work, notice the design features.
This lesson structure is used in kindergartens, but when working with a child at home, you should also adhere to this plan. We offer several detailed instructions for making crafts from plasticine with gradual complication.
Step-by-step instructions for sculpting figure #1 "My cheerful ringing ball"
Target: teach how to roll a ball of plasticine using circular movements of the hands.
Demonstration material: balls of different sizes and design, pictures with images of balls.
Materials and equipment for work:
- backing board;
- plasticine;
- stack;
- table tennis balls;
- paper and wet wipes.
Progress of the lesson
Introduction. Invite the child to play ball. Take several balls of different sizes made of different materials for the game. Remember the poem by S. Marshak "Ball". Then give the child a ping-pong ball and invite him to roll it in his palms. The adult suggests giving the dolls a ball made of plasticine.
Main part. The child chooses the color of plasticine for work, decides on the size of the future ball. The adult shows a lump of plasticine and asks how to make a ball out of it. The child expresses his/her assumptions.
Let's start modeling. Knead the selected lump of plasticine, roll the ball with circular movements of the hands. At first, you can help the baby, using the "hand in hand" technique, but do not make the ball for the child.
Now you need to decorate the ball. You can make stripes, for this you need to roll out small sausages and attach them to the ball. We help the baby with advice: if the strip is short, you need to roll it out more, if it is long, shorten it, pinch it off or cut it off with a stack. You can decorate the ball with spots. To do this, pinch off small pieces and roll the balls between your fingers.
The final part. We analyze the resulting balls, align the shape, and refine the color schemes.
Summary of the lesson: what you learned, what was easy, what caused difficulties.
Step-by-step instructions for sculpting figure #2 "Colored Umbrellas"
Target: creating a colorful umbrella in volume from plasticine.
Demonstration material: a real big umbrella, a children's umbrella.
Materials and equipment for work:
- plasticine;
- backing board;
- stack;
- thin cocktail straw;
- wet or dry wipes.
Progress of the lesson
Introduction. An adult asks a child to guess a riddle about rain:
- If I cry, it’s not a problem,
- Instead of tears, water flows.
- I'm such a crybaby
- From behind the grey cloud...
Then you can look at the illustrations in books on the topic and talk about what people need in rainy weather. Suggest looking at umbrellas and describing them.
Main part. Before we start modeling, we look at the parts of the umbrella and their shape with the child. Now we suggest that the child choose the color of the future umbrella and decide on its size. The child takes a stack and cuts off the required amount of plasticine from a whole bar.
Let's start sculpting. First, an adult shows a sample of how to do it, then the children do it themselves. The umbrella dome is a disk, for which we first roll a ball of plasticine. Now we flatten the ball between our palms, and make the center of the resulting disk slightly convex - we press it with our thumbs.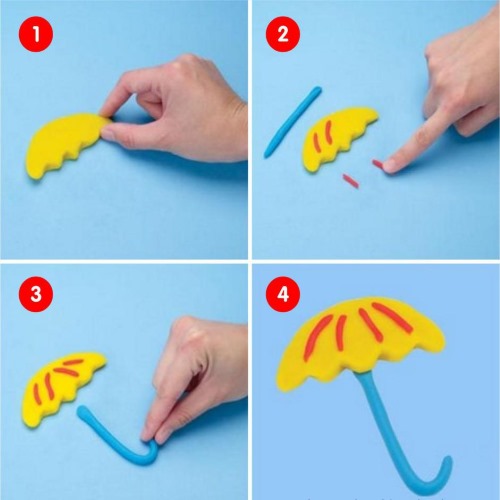
To make the rod that holds the dome, take a piece of a cocktail straw, about 1/3 of the length. Fix the cocktail straw in the center of the plasticine disk. Now make the umbrella handle. It can be in the form of a hook or a ball of plasticine.
For the hook handle, roll a small sausage out of plasticine, bend it and attach it to the tube. You have a handle. Now all that remains is to decorate the resulting umbrella. You can use plasticine for decoration, or you can add different materials: beads, small seeds, cereals.
The final part. At the end of the lesson, we play out the craft with the child. For example, we give an umbrella to a toy hedgehog. We also analyze with the child what he did especially well, what he needed help with. Taking this information into account, we select the next idea for modeling from plasticine.
Step-by-step instructions for sculpting composition #3 "Mushrooms on a stump"
Now we suggest creating a collective composition. It can be done with a group of children or, if the lesson is individual, an adult does it together with a child. For the basis of the composition, you can take a real stump or a suitable form, covered with plasticine.
Target: teach children to make mushrooms from 2-3 parts; teach them to work in a team.
Materials and equipment:
- plasticine;
- backing board;
- stack;
- stump layout;
- napkins.
The lesson is structured in the same way as the previous ones. For a surprise moment, offer the children a riddle about mushrooms:
- All of Antoshka –
- A hat and a leg.
- It's going to rain -
- He will grow up.
Next, you need to invite the child to look at the story picture.
The main part: the mushroom is the stem and the cap. The stem is a cylinder made of white or yellow plasticine. Take a small piece of plasticine, roll it into a column, smooth and long. The cap is a red, orange or brown disk. Take a piece of plasticine of a suitable color and roll it into a ball, using circular movements of your palms.
Now flatten it to make a disk, a pancake. Fix the cap on the stem. Then attach the mushroom to a stump or a clearing, then stick a small piece of green plasticine to the stem - green grass. Children mold 1-3 mushrooms, independently choosing the color and design option.
The final part. Even if the lesson is individual, you should not skip the stages of work analysis and summing up the lesson. The stage of playing out the craft is also mandatory.
Modeling New Year's toys
Target: introduce various shapes of Christmas tree decorations. Systematize the modeling techniques familiar to children.
Materials and equipment:
- plasticine;
- threads;
- modeling board;
- materials for decorating crafts (beads, seeds, cereals, beads).
Introduction. The adult suggests looking at toys made of plasticine with threads, asks to guess what they are for. Then suggests looking at factory toys, evaluating their shapes and design.
Main part. In the main part of the lesson, the teacher demonstrates plasticine blanks, finds out from the children what these forms look like. The teacher shows ways of molding toys of different shapes. Then the children begin to mold toys according to their own ideas.
Final part. At the end of the lesson, as usual, there is an analysis of the crafts and a summary. When evaluating children's work, it is necessary to note the unusual shape and originality of the design of the finished toy.
"Aquarium" (collective work)
This work can be offered to a group of children or an adult can be involved in modeling. It is not so much complicated as it is voluminous and includes several operations. Before this, we offered voluminous crafts, and "Aquarium" is a flat picture.

Materials and equipment:
- wax plasticine;
- stacks;
- small stones, shells;
- watercolor;
- brush;
- spill-proof cup;
- A3 sheet of drawing paper.
- napkins.
Progress of the lesson
Introductory part: looking at an aquarium or its image.
The main part includes several stages:
- You should tint an A3 sheet of paper blue in advance. This is the water in the aquarium.
- The next step is to apply yellow plasticine – this is the bottom of the aquarium. Attach shells and pebbles to the plasticine.
- Now let's decorate the aquarium with water plants: roll out the green plasticine into a column and stick it to the aquarium. Now stretch the plasticine over the sheet in the shape of branches.
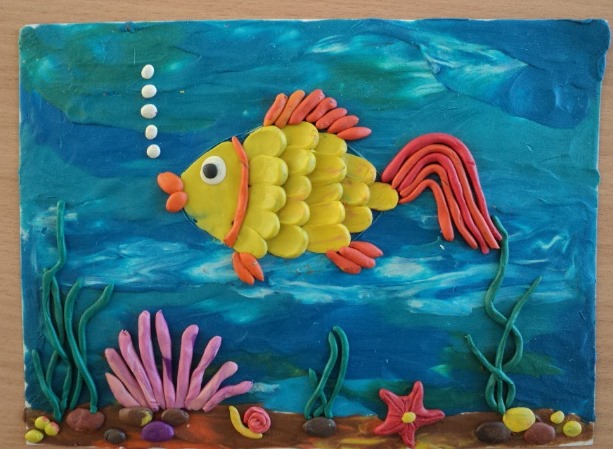
- All that's left is to populate the aquarium with fish and snails. We make the fish like this: roll a small ball of plasticine, flatten it on a sheet of paper, this is the head of the fish. And then pull it a little to the sides, making a tail for the fish.
- You can settle a snail on the bottom of the aquarium. To do this, roll the column with straight movements of your palms. Then twist it into a roll. On the snail's head, stretch out horns.
Note! To make the painting "Aquarium", you should take soft wax plasticine, it is easier to spread on the base. To extend the life of the painting, you can cover it with hairspray. To reduce the time of making the painting, it is better to distribute the stages of work between the children.
Final part. At the end of the lesson, there is an invariable analysis of the work and summing up: did it work out to work in a team, did you like this form of the lesson.
Interesting options for what to make with your child
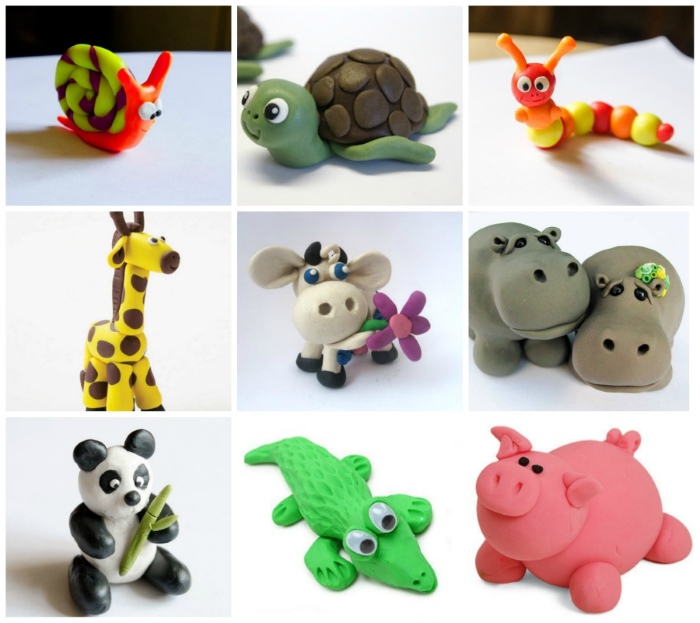
Step-by-step instructions for modeling three-dimensional figures with plasticine that a child might like should be colorful and unusual. For example, you can offer a child to mold such animals:
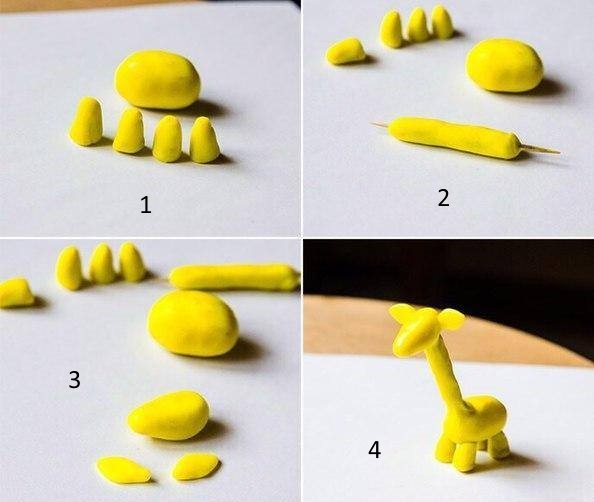
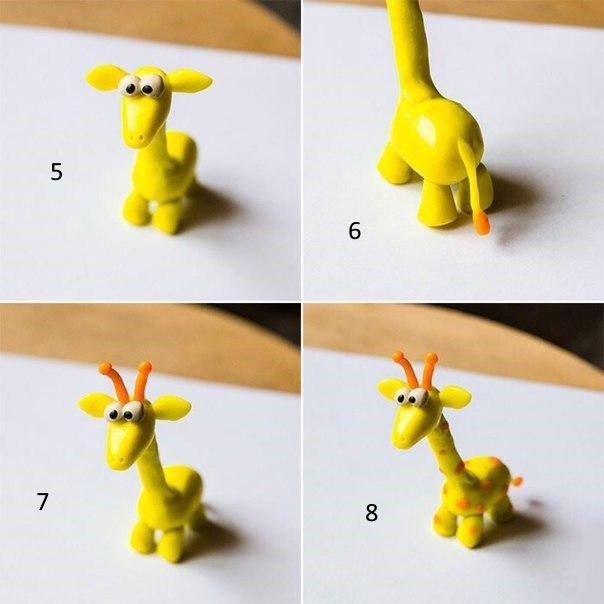
How to sculpt a giraffe. Step-by-step instructions with photos
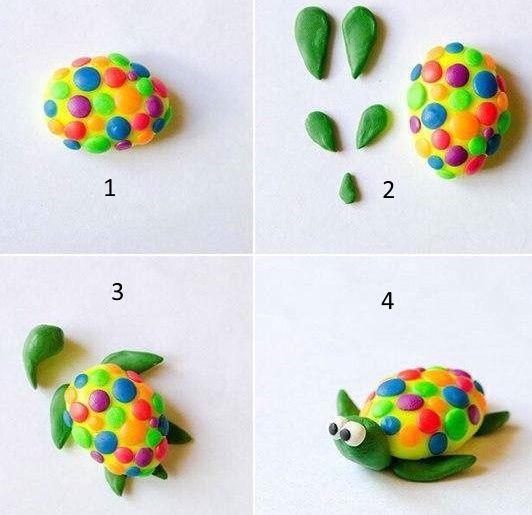
How to sculpt a turtle. Step-by-step instructions with photos
Land tortoise
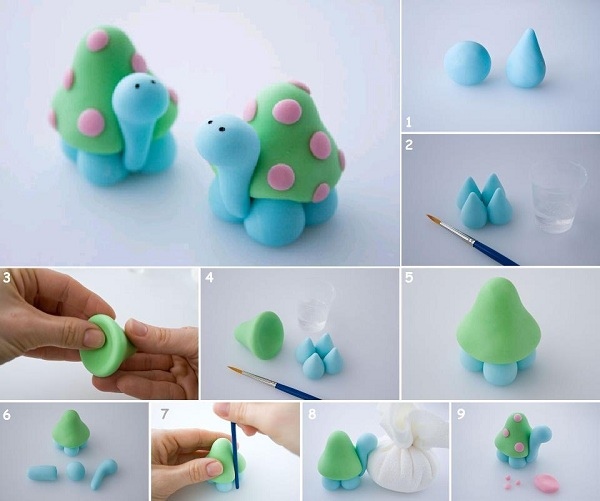
Sea turtle
Flowers from plasticine step by step
Useful tips for organizing modeling activities with children aged 3-4 years
Recommendations:
- The place for modeling with a child should be comfortable and well-lit. It is better to avoid carpeting so as not to spoil it.
- Modeling lessons with a 3-4 year old child can be organized at any time of the day, the main thing is that the child has an interest and desire to model.
- It is possible and necessary to use illustrations to explain or create interest in modeling. But do not offer too many of them, so as not to distract children from the main task.
- The quality of a child's craft depends on the development of the finger muscles, so before modeling, it is worth doing finger exercises.
- Attention and concentration on the activity of 3-4 year old children usually lasts for 15-20 minutes, which means that this is the amount of time that should be devoted to modeling. If the work is not finished during this time, it is better to put it off until tomorrow. As the child begins to get tired, the level of attention drops and interest in the activity decreases.
- Help your child only if he asks for it. But do not refuse help when something does not work out. Positive emotions are the key to success in doing anything with your child.
- The main task of analyzing children's work is to ensure that the methods and techniques of modeling are mastered and to find out what mistakes were made.
- You should point out shortcomings to your child very carefully and kindly, so as not to ruin their creative mood.
- When modeling with children aged 3-4, you should give them more independence. Choosing the color of plasticine, the modeling technique, the way to decorate the finished work - all this is available to a child of this age. This is what gives the opportunity to develop creative abilities.
- It is necessary to organize exhibitions of children's works, to store handicrafts. This has a positive effect on children's self-esteem and will strengthen the desire to create.
Modeling with plasticine is the best exercise for developing fine motor skills of a child's hands. Therefore, it is worth including it in the daily routine 1-2 times a week.
Often parents ignore modeling activities with their child, due to lack of time, or fear of a big mess after modeling. But this is completely in vain. The problem of mess is easily solved if the child has a specially equipped place for creative activities.
Joint activities of parents with their child not only allow them to spend time cheerfully and usefully, but also bring family relationships closer together and strengthen them. And this is also a huge contribution to further education at school.
In the article we looked at examples of modeling from plasticine, but you can also model from dough, clay and other plastic materials. We hope that the recommendations will be useful and will help to organize modeling classes in a fascinating, interesting and productive way.
Article formatting:Oksana Grivina
Video about modeling with plasticine for children
How to make a funny cat:
Play dough activities are very useful for developing fine motor skills and speech. Leti enjoys doing such things.