With the birth of a baby, joy and pleasant concerns about the health and mood of the little one enter the house. In the first months of life, knitted hats will become necessary attributes for the newborn, with the description and patterns of which all mothers-needlewomen are happy to get acquainted.
How to choose yarn and knitting needles, knitting density
To start knitting a hat for your beloved child, you need to decide on the choice of yarn. If the headdress is knitted for spring or summer, it is better to take a thin cotton thread, if for autumn or winter - semi-woolen or woolen thread.
It is important to remember that the knitting material must be hypoallergenic., wool with acrylic, pure acrylic are best suited for this requirement, and for light hats – soft cotton yarn.
The needles used are stocking needles No. 2-4, as well as straight needles No. 2.5-4 and circular needles. The density of the knitting depends on the thickness of the needles and yarn, and sometimes the pattern: the thinner the needles and the thicker the thread, the denser the fabric of the product.
What should be the material for decoration?
A knitted hat according to descriptions and patterns is half the battle; decorations and decorative details will add charm to the product. For small children, for safety reasons and the risk of injury, pompoms, ears, braids made of yarn or soft materials (for example, felt, leatherette), sometimes large round buttons are suitable.
It is not recommended to decorate children's hats with small objects, decorations with prickly edges or clasps.
Sizes of hats for newborns by month: table
On average, a baby's head increases in size by 1-1.3 cm per month until the age of one year, so knowing your child's parameters, it is easy to calculate the size of the hat, since both of these values are the same. And if you need to prepare a gift for a friend's baby, the table will serve as a guide.
| Age of the child (in months) | Head circumference (cm) | Height (cm) | |
| Average rate | Permissible deviations | ||
| 0 | 34-38 | 32-38 | 50-54 |
| 1 | 36-37 | 34-40 | 52-56 |
| 2 | 37-38 | 35-40 | 54-59 |
| 3 | 39-40 | 36-41 | 56-62 |
| 5 | 41-42 | 38-44 | 58-64 |
| 6 | 43-44 | 40-46 | 62-66 |
| 7 | 44-45 | 41-47 | 64-68 |
| 8 | 45 | 42-48 | 66-70 |
| 9 | 45-46 | 43-49 | 68-74 |
| 10 | 46-47 | 44-50 | 70-76 |
| 11 | 47 | 45-50 | 72-78 |
| 1 year | 47-48 | 46-51 | 74-80 |
The number of loops in knitting patterns varies depending on the size of the child's head. If the baby's dimensions differ greatly from the data in the table, then it makes sense to consult a pediatrician.
Classic model with ties: diagrams with step-by-step description
Of the many varieties of bonnets and other headwear for babies, the most practical are those that fit tightly on the child's head, are seamless and tie under the chin.
A classic hat for a newborn with knitting needles with a description and diagrams is a fairly frequent guest in publications for mothers-needlewomen. To make such a product with ties, 50 grams of yarn consisting of wool and fluff should be enough. You will also need knitting needles No. 3 for the main knitting and half a size smaller to form an elastic band.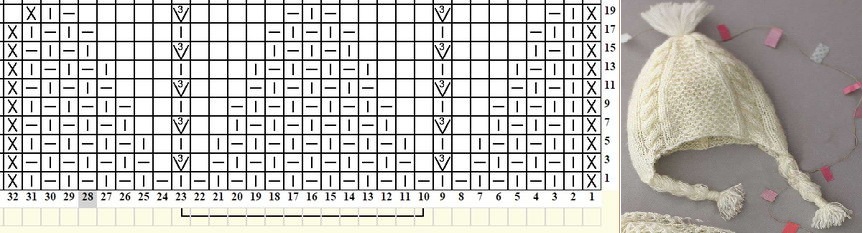
The number of loops is calculated during trial knitting of approximately 8-10 cm in 3, 4 rows (10 cm - about 28 loops). Based on the head circumference, the resulting length and density of the patch, it will become clear how many loops need to be cast on.
Instructions:
- Work begins with the formation of the elastic band. We knit along the entire length, alternating sides with purl and face loops 4 cm.
- Next, we continue knitting with alternating purl and knit stitches in rows for about 6 cm more.
- Mentally divide the resulting patch into 6 parts. Each row, collected with face loops, is reduced by 6 loops - 1 in each part.
- On each side, leave 3 loops to form ties of the desired length, but first knit the remaining approximately 6 loops.
Openwork cap for a girl
A cap with lace inclusions will add charm and touchingness to a tiny baby.
At first glance, the thing looks difficult to do, but step-by-step instructions will help you overcome everything:
- For the cap, use yarn for children's products, 100-gram skein 260 m. You will need circular knitting needles of size 3 and a suitable crochet hook (recommended No. 2.5) to make the ties.
- 78 sts are made, 2 of which will be edge sts.
- 6 rows are knitted with a rib pattern using the principle 1 front/1 back loop. The 7th row is knitted, the 8th row is purl.
- Let's start with the pattern. Remove the loop that forms the edge, then knit everything according to the pattern: 1 knit stitch, then knit 2 loops together with one knit stitch 3 times, make a yarn over, 1 knit stitch, you need to make 6 of them in total. After the last yarn over, the following loops are made knit stitches (each loop combines 2 other 3 times), then 1 knit stitch. These manipulations are repeated 4 more times until the end of the row.
- Purl rows are knitted with purl stitches.
- We make 10 rows and proceed to the occipital area of the cap. We divide the number of loops by 3, there should be 26 pcs.
- We are going to work with the central part. We throw over without knitting the edge loop. We knit the last loop together with the outer one from the side part.
- We close the remaining loops of the central zone when all the side loops are knitted.
- The final touch is the laces for the cap. To do this, 50 air loops are formed with a hook, and the resulting tie is attached to the corner of the cap with a single crochet. The lower edge of the product is tied in the same way, then 51 air loops are again collected on the other corner of the cap. Finally, the product is knitted along the entire length in the opposite direction with a single crochet. The thread at the end of the tie is torn off and carefully hidden.
Rectangular hat for a boy
Rectangular hats are among the easiest to make. Depending on the color of the yarn and decorative elements, the product will suit both a baby and a toddler.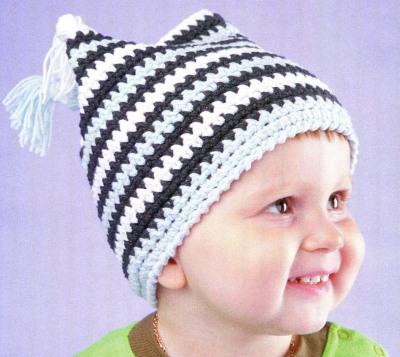
With descriptions and knitting patterns for a rectangular hat for a newborn 3-5 months, this thing can be made in a few hours. To start working, you will need 3.5 mm knitting needles, a gypsy needle for wool thread, a skein of acrylic or mixed (wool and acrylic) yarn.
Knitting:
- Cast on 43 stitches and knit a 17-18 cm high piece of fabric using the front surface – this is one half of the hat.
- We repeat exactly the same actions for the second half.
Embroidery or decoration:
On the half that will be used for the forehead, embroidery is done, for example, of a cat's muzzle: the muzzle itself can be embroidered with a loop stitch, and the whiskers - with a stalk stitch. You can construct something of your own from scraps of leatherette, buttons, lay out a pattern with a cord of air loops made with a crochet hook. The pattern will determine how the upper corners of the hat will be played up later.
Assembly:
- The two resulting pieces are folded face to face and sewn together at the sides and top.
- Two identical braids are woven from yarn, which are sewn onto the sides of the hat and later serve as ties.
- The upper corners of the product are transformed into two ears using a basting stitch if an animalistic pattern is chosen, or are simply pulled together with a thread or cord into a “bundle”.
Winter hat with ears
For a hat with ears, you will need 2 types of knitting needles - straight and circular No. 2, as well as a skein of yarn 50 g. The work does not begin with the main area, but with the formation of ears using garter stitch. 4 loops are cast on the knitting needles.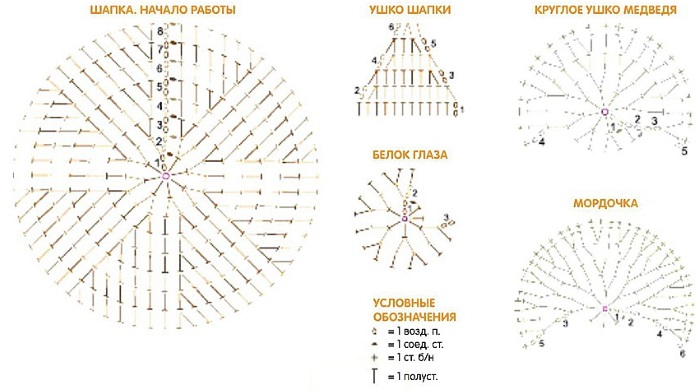
16 rows are made in the following sequence:
- 2nd and 4th – add 1 loop on each side;
- 6th – add 2 more loops in the same way;
- 8th – already 3 loops;
- 15th and 16th – 1 each.
Transfer the resulting 22 loops to circular knitting needles and add 11 loops. Form the second eyelet, connect it to the 11th loop of the first part, knit and add 25 loops. Knit the 25th loop with the wide part of the previous eyelet. Now the product is knitted in a circular surface, about 30 rows.
The crown is formed by decreasing loops in even-numbered rows.
From each such row, 8-10 loops are removed evenly. Knitting is carried out up to the last 15-18 loops remaining. Through them, tighten the thread from the wrong side, attach the ties. To decorate the hat, you can sew on a fur trim and a pompom made of the same material.
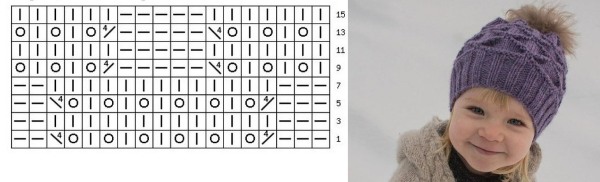
Hat with patterns
Any hat with patterns is a great addition to a baby's wardrobe. A headdress with diamonds can be easy to make and elegant to perceive. To make this item, you will need yarn made of soft cotton or a mixture of it with acrylic (50 g, 160 m), as well as knitting needles No. 3. The knitting pattern depends on the size.
Formation of the lapel
Cast on 57 stitches onto the knitting needles and begin knitting the boucle pattern:
- 1st row – 1 st. front, then 1 – purl;
- 2nd – according to the created drawing;
- 3rd - knit as purl, purl - knit;
- The 4th and further all even rows are knitted according to the principle of the 2nd row.
From the 5th row – repeat all previous actions. According to this pattern, 12 rows are knitted.
Formation of the main fabric
The number of loops when knitting diamonds must be divisible by 6 and have 2 edge loops.
According to the pattern, approximately 8-8.5 cm is knitted:
- 1 row – 4 purl sts (IP), then 1 front st (K) and 1 purl st – and so on until the end of the row;
- 2nd and 5th – 1 Ip, 2 Lp, 3 Ip;
- 3rd and 4th – 2 IP, 3 Lp, 1 IP;
- 6th – 4 IP, 1 Lp, 1 IP.
The fabric is divided equally into 2 side parts and one central part. The loops are reduced: the central part retains its previous pattern, but grabs 1 loop from each line of the side parts. Ultimately, the fabric will be reduced to the width of the central part.
To give the product the desired shape, the remaining amount is knitted according to the pattern: first - 1 edge, then 2 sts are knitted 1 front, then 2 sts - 1 purl. The actions are repeated until 8-10 loops remain.
Formation of ties
The previously knitted lapel is folded to the wrong side of the product and 55 loops are cast on, 15 from the 10th half of the fabric made with diamonds, 10 - along the bottom of the product, 15 - from the 2nd half of the fabric, 55 - for the second tie.
Mating:
- The resulting number is knitted with front stitches.
- The next 2 rows are with the initial boucle pattern.
- All loops are closed, the hat with patterns is ready.
Hat with a pattern
Hats with pictures are of great interest to kids, so the thing with a penguin should definitely appeal to the little one. To do this work in size 44, you will need 100 g of semi-woolen yarn of the main light color and a small amount of red, black and blue thread, as well as knitting needles No. 4. The hat uses a 2x2 elastic band and face knitting.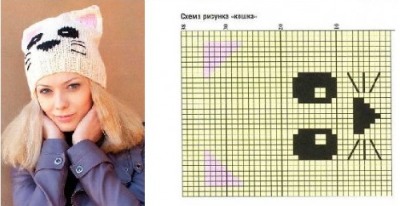
From the main color yarn, 114 loops are cast on, which are knitted with a rib pattern for about 4-5 cm. Then 16 cm of stocking stitch. The height of the product is sufficient, so the loops are sealed. A penguin is embroidered or knitted according to the pattern in the front center.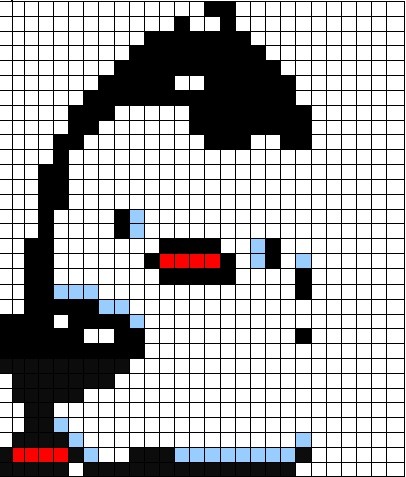
The seam connecting the sides should be at the back. The top of the hat is folded crosswise to form 4 corners and sewn.
To make the hat more fun, you can hang tassels on its corners.
To do this, a small rectangle is cut out of cardboard, onto which the yarn is wound. On one edge of the cardboard, the wound yarn is pulled tightly with a thread with a long end, on the second edge, the yarn is cut. A little higher than the pulled place, the yarn is gathered into a bundle and secured with a thread. The tassel is ready.
The second one is done in the same way. It remains to attach these parts with air loops to the headdress itself.
Hat "Basket"
The cute headdress "Basket" is knitted with autumn and spring weather in mind, so the best option for it would be acrylic + wool yarn, as well as knitting needles No. 3. Knitting begins with the base, equal to the head circumference, with a gradual decrease in loops as you approach the crown.
Knitting such a hat for a newborn with knitting needles is not difficult.
With the description and diagrams below, any mother will be able to complete the work in a few hours. The calculation is made for a circumference of 41 cm. The work requires 5 knitting needles. 80 loops are cast on, which are knitted in 10 rows in a circle with a 1x1 elastic band. When the number of loops is a multiple of 12, the knitting of the "basket" pattern begins. To begin, evenly add 4 more loops to the current row.
Mating:
- 1, 5th row – all loops are faces;
- 2, 3, 4th – first and last 2 — persons, step of 8 purl and 4 persons, repeat the whole row;
- 6th – from one and the other edge 4 – purl, step of 4 persons and 8 purl, repeat the whole row;
- 7th and 8th - like 6th.
The crown begins to form by decreasing the loops:
- 1st row - from one and the other edge 4 - front sts, step 2 loops are connected with a front st - 2 times, then 8 front sts. The pattern is repeated throughout the entire row;
- 2nd – 2 sts connect 1 front, step 6 purl, 2 one front 2 times – to the end, one front knit knits the last 2 loops;
- 3rd and 4th – the 1st and last loops of the row are made as front loops, then until the end alternate 6 purl and 2 front loops;
- 5th - the 1st and last loops are knitted, the pattern is 2 loops in one knit and 2 knit - to the end of the row;
- 6, 8th – repeat the action: 2 loops are connected with one front loop;
- 7, 9th – all knitted.
Tighten the remaining loops on the knitting needle from the inside with a thread and secure. The basket is ready. If desired, you can make ties for the thing.
"Helmet" with braids
A hat in the form of a helmet, decorated with braids - a pleasant variety in the collection. To complete the work for a baby 4-6 months with a head size of 35-37, you will need a skein of yarn 50 g, buttons, as well as circular and straight knitting needles (optimally No. 3.5). Fabric density: 10x10 cm = 28 rows of 22 loops in stocking stitch.
Knitting is done in the round: a line of front loops alternates with a line of back loops.
Forming the ears:
- 4 rows of 5 loops are knitted in garter stitch.
- 5th – forming an opening for buttoning a button: 2 knits, then yarn over, connect 2 knits with 1 loop, then 1 knit. The rest of the rows are knit.
- After receiving 12 cm of length, add 1 loop at each edge, then repeat a similar set 1 time in every 2nd row, and 2 times in every 4th row.
- If the ear width is 5 cm, knitting is temporarily postponed.
- The second eyelet is knitted according to the previous pattern, but without a button loop.
Knitting the visor:
- Cast on 31 stitches on circular knitting needles.
- The next row is knitted as follows: 1 front, then 2 front are combined into one. The pattern is repeated until there are 3 loops left on the needle, they are knitted in reverse order.
- Garter stitch continues until the fabric is 6 cm long.
This part is put aside for now.
Formation of the main zone:
Now 11 loops are cast on, 13 sts are knitted on the 1st ear, then it is the turn of the visor - 1 front st, then 2 front sts are combined into one, 23 loops, again 2 loops are combined into one and then 1 front st is made. The other ear is knitted. After this, 11 more loops are cast on. Circular knitting - 4 cm.
The next row is evenly replenished so that there are 95 loops. In order to start knitting braids, you need to increase the size of the knitting needles (No. 4).
Knitting braids:
- 1st row – step 4 persons and 3 purl – to the end;
- 2nd – knit stitches are knitted as knit stitches, purl stitches are purl stitches;
- 3rd - 2 loops are transferred below the main needle to the additional needle, 2 loops are knitted from the main needle, the loops on the additional needle are knitted in the same way, and then 3 purl. sts. - a similar pattern is repeated;
- 1-8, 10-12 rows – order of row No. 2;
- 9th — 2 loops are transferred to an additional knitting needle above the main one, 2 loops are knitted as front loops, as well as loops from the additional knitting needle, then 3 purl - the pattern is repeated until the end of the line.
The first 12 rows must be repeated as many times as necessary. When the height of the product is 11 cm, you can start to make loops. 2 purl. loops of the formed purl strip into one. The next row - take 2 front loops in the strip of front loops and knit into one. The work continues by knitting 3 front loops and 1 purl.
The loops of the face strips must be closed in each even row a couple more times. The next 2 rows are the combination of 2 faces into one. The remaining loops are secured with a thread.
Assembly of parts:
The peak is turned up and secured with suitable buttons. Another button is sewn onto one of the ears so that the cap can be fastened.
"Zephyr"
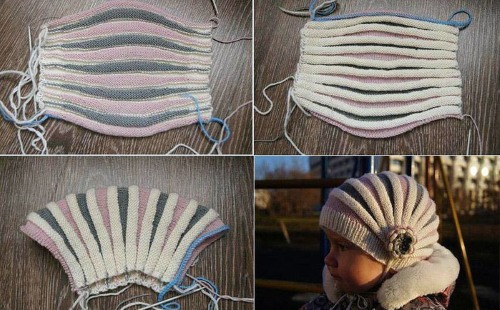
With descriptions and diagrams, the "marshmallow" hat for a newborn is knitted with knitting needles quickly and easily. To start working, you need wool or acrylic yarn (cream, pink and white), as well as circular knitting needles. The approximate size of the finished product is 40.
76 loops and 1 loop for joining are cast on from cream yarn. Then the row is joined - the 1st loop from the left needle is thrown to the other needle, and from it the 1st loop is passed through the removed one and remains where it was. Now knitting goes in a circle with face loops for 9 rows.
Mating:
- A row of face loops is formed from pink yarn. When knitting the second pink row, 1 loop is removed, then face loops are made again.
- We return to the cream thread and knit 2 more rows according to the previous pattern.
- Again the yarns change places. The row is knitted with pink face stitches, the next one - with purl stitches and the 1st loop is no longer skipped. Until the 15th row everything is knitted with face stitches.
- The knitted part is folded in half, the cream thread is moved to the right, the pink one to the left. A face loop is knitted through the 1st cream row. The connecting row is knitted with pink yarn in a circle.
- Next, the pink thread is changed to a cream one and knitting continues with front loops.
- Then there are 5 purl rows. Everywhere the initial loop is transferred to another knitting needle without being knitted.
- The yarn is changed again and a row of knit stitches is created using the pink thread. The 1st stitch is simply thrown over and 5 rows are knitted.
- It is time to introduce the white thread, tying it to the pink one. Knit a row of knit stitches. The first loop of the next row is removed and then the purl knitting follows. There should be 5 white stitches in total.
- Change to pink yarn and work 4 rows.
- All 4 color stripes are knitted as described earlier.
- After the last strip, knit 2 front rows with pink thread.
- The decrease of loops begins: 2 loops are knitted, then the next 2 are connected with one. This pattern is repeated until the end of the line. Knitting of this color should end with the next row of face loops without decreasing.
A similar pattern is repeated, but with a cream-colored purl stitch. The front row is knitted with pink thread, then a row with a decrease, then a line of front stitches. Rows 4 and 5 - half of the loops should be reduced. The thread is pulled through the remaining loops, the product is pulled together at the crown. The hat is ready.
Elf hat
The "Elf" is knitted with a 2x2 elastic band, a strap-shaped fastener is attached along the bottom. Based on the calculation for 3-7 months, you will need 155 g of medium-thick wool yarn, a button and knitting needles No. 3.25. The approximate density of the fabric is 36 loops and 36 rows make up about 10 cm.
The hat can be easily changed in size, for this it is enough to remove or add a number of loops, a multiple of 4. Knit according to the description, up to 2 loops in the middle of the hat.
Formation of the main fabric
You need to cast on 98 stitches, knit 4 rows with a 2x2 elastic band.
Next, the formation of the cap itself begins: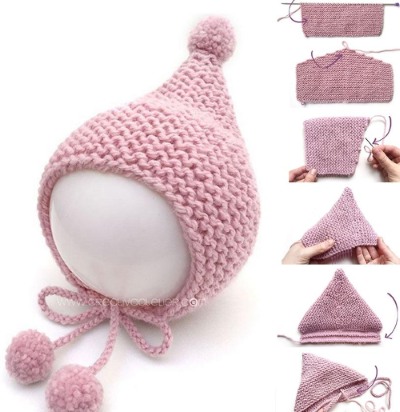
- 1st, 3 rows – 6 loops from opposite edges – front, middle elastic band similar to the previous one.
- 2nd, 5th, 8th, 11th, 14th, 17th rows – knit stitches are worked as knit stitches, purl stitches are worked as purl stitches.
- 4th, 6th rows – 8 loops from opposite edges – front, the middle is knitted with an elastic band.
- 7th, 9th rows – 10 loops from different edges – front loops, the rest is elastic.
- 10th, 12 – 12 loops from different edges are knit, the rest is elastic.
- Rows 13, 15 – 14 loops from different edges – front loops, the rest is elastic.
- 16th, 18th row - the first and last 16 loops are knit, the rest is elastic.
The pattern of the fabric looks like cross stripes of 3 rows of knitting alternating with 3 purl at the ends and a rib in the middle. Rows 19-64 - continue knitting until there are 2 loops left with a rib in the middle of the cap, adding 2 loops to the beginning and end of each row, but decreasing their number in the rib.
Place the first 49 stitches on an additional needle. Starting from the middle, sew the stitches together.
Neck strap
10 loops are cast on, which are knitted with a 1x1 elastic band until reaching 30.5 cm. A place for a buttonhole is formed: after 2 persons. st. a yarn is made, then 2 persons. st. together and 1 persons. Upon reaching 40 cm of the product the loops are closed.
Assembly: The side of the neck strap is sewn to the bottom edge of the cap. The button is attached so that the strap fits snugly around the neck, but does not choke.
Baby hat with pompoms
To make a pompom, you need 2 cardboard circles that are missing the middle. The size of the "fluff" depends on the diameters of the circles and the distance between their outer and inner parts.
The circles are wrapped through the middle with a sufficient amount of yarn, then the threads are carefully cut from the outer edge with a blade or sharp scissors, the circles are carefully moved apart a little. A thread is inserted into the resulting gap, which is firmly pulled and tied around the cut yarn.
It is recommended to leave the end of the thread long., so that it is convenient to attach the pompom to the hat, making, for example, a cord from air loops. The cardboard is removed, the resulting ball of yarn is fluffed up.
A hat knitted and crocheted at the same time
A bonnet made by combining knitting with knitting needles and a crochet hook can be described in two words: warm and stylish. First, you should decide what time of year such a thing is knitted for, and from here you will need to select the yarn. The threads should be of two bright colors. For work, you will need knitting needles No. 2 and a crochet hook.
To determine the size of the bonnet, the dimensions of the face oval and the depth of the product from the forehead to the crown are taken.
Forming the main fabric with knitting needles:
- Knit a 3 cm elastic band around the oval using the main color.
- Next, 6 rows are knitted in garter stitch with a thread of an additional color.
- Return to the main color. The fabric is knitted with face stitches until the detail becomes slightly longer than the depth of the cap. The last 6 rows are recommended to be made with garter stitch from a thread of an additional color, since ruffles will be formed in this place later.
- Now the loops need to be decreased using the principle of knitting the heel in the sock.
- The fabric is divided into 3 parts, the outer parts should have an equal number of loops. First the right side is knitted, then the center, the last loop of which is knitted behind the back wall together with the next front loop.
- The fabric is turned over. The first loop is not knitted, the remaining ones are made purlwise. In the center, the last loop and the next one are knitted purlwise. p.
- The reduction continues to 2-3 loops on each side, they are simply knitted.
- We close the central part at the bottom of the hood, restoring the number of loops that were lost when forming the crown.
- An elastic band is knitted along the bottom of the product. Ties are attached.
- Where the back stitches of the additional color were made, you need to make ruffles using a crochet hook.
Forming ruffles with crochet: In each loop, a simple double crochet is knitted and 5 more with a yarn over. In the next loop, a connecting loop is made, then one loop is skipped and again double crochets + yarn over. The pattern is repeated until the end of the row. Ruffles are formed in a similar way on the other strip of the additional color. The hat is ready.
With the help of the description and patterns, you can knit various hats for a newborn: for any time of year, with or without decorations. Each of these baby things will eventually turn into a family heirloom, preserving the memory of mother's hands, first steps, small but successes.
Video: knitted hat for newborn with description and diagrams
Find out how to knit an "Elf" hat in the video:
Knitted bonnet for a newborn baby, watch the video: