Oil pastel – paint for drawing, consisting of wax, oil and pigments. These substances are of natural origin, so they are safe to use. Both professional and novice artists can work with pastels.
Types of Pencils and Paper for Oil Pastels
Oil pastel drawings for beginners require the right choice of paper.
To do this, you need to pay attention to the following:
| Criterion | Description |
| Surface | It should be rough so that the paint sticks to it well. Also, the paper should be matte, as the paint will not stick well to glossy paper. |
| Density | To create airy designs, you should choose paper with a density of 90 g per square meter. For rich designs, you need to use a dense material - 160 g per square meter. |
| Size | It is necessary to have a drawing that corresponds to the future. There should not be much empty space if the drawing is small. A large drawing on a small sheet may not fit. |
| Compound | The composition should not contain acid, since its presence can change the color of the paint and contribute to the formation of cracks on the surface. |
| Color | It should match the tone of the drawing and help to achieve the correct combination of shades. For example, for:
|
The choice of oil pastels should also be taken seriously. They come in hard and soft varieties, and it is recommended to purchase both at once.
The work will require each of them:
- Hard pastels contain more binder and less pigment. They will help to depict small elements of the drawing;
- Soft paint works well on thick layers of hard pastel.
In addition to paper and paint, you will need special pastel pencils. You can buy a set of 12 pcs.
Basic techniques of pastel technique
The technique of drawing with pastels and the methods used are not difficult.
Gradients
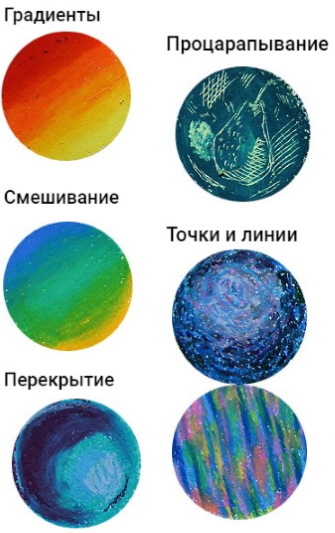
When using gradient fill, you need to apply different colors to the surface without pressing too hard on the chalk.
Then, having determined the approximate boundaries, move on to strong pressure, while you can go a little beyond the boundary.
Mixing
The “mixing” technique can be done like this: apply different colors to paper and then mix them, creating additional strokes.
It is important to observe the mixing and how certain colors affect the result.
You can use shading sticks when mixing. Many artists mix colors with their fingers.
Scratching
To perform the "scratching" technique, you will need 2 layers - the top (base) and the bottom. To create scratches on the surface, you will need a sharp tool that will be able to remove the top layer of paint.
This can be any handy object, such as a knife or a toothpick. The main thing is that it is convenient to work with. It is good if you can find an old fountain pen that has run out of ink.
Dots and lines
The "dots and lines" technique can only be done perfectly by those who have enough patience. Dots help create shine and enrich the color of the drawing. You can form entire lines from them.
Diluent
A thinner helps to improve the drawing.
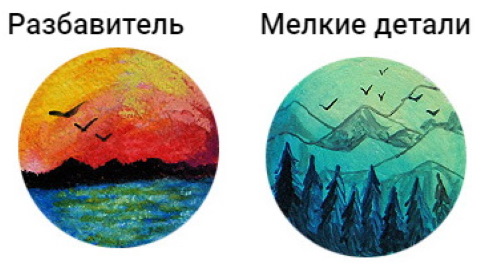
Turpentine or linseed oil can act as this. The technique is simple to perform: just take a brush soaked in the thinner and start moving it over the surface of the drawing. This technique is great for the background.
Small details
With the help of thinner, you can draw small dark details. This technique also helps to create elements that require clarity. To do this, you need to move a brush dipped in thinner over the surface of the chalk.
Fixing the drawing
Once the design is created, it is important to fix the paint to the surface. This can be done in different ways.
For example:
- A good transparent fixing layer forms a base on the paint made of alcohol and resin. Such a layer will protect the drawing not only from smudging, but also from dust;
- Several successive layers will increase the gloss, but it will take a long time to dry. Otherwise, the surface will remain sticky for a long time.
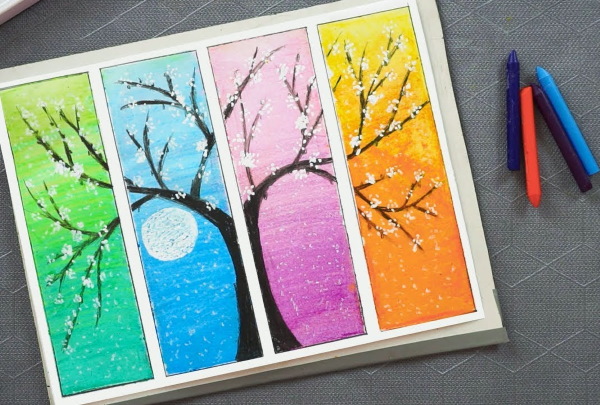
Beautiful and easy oil pastel drawings for children: step-by-step master class for beginners
Oil pastel drawings for beginners are distinguished by a great variety of themes and execution.
Parrot
To draw a parrot, you will need a simple HB pencil and some pastel crayons.

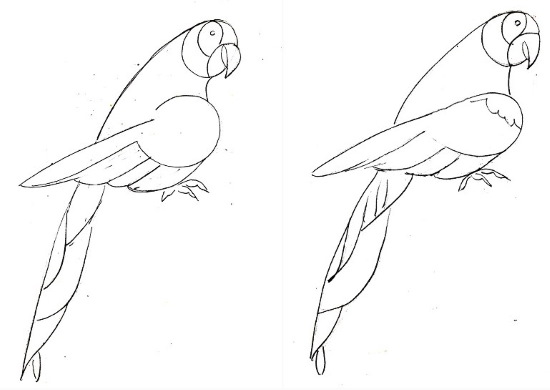
The stages of creation are as follows:
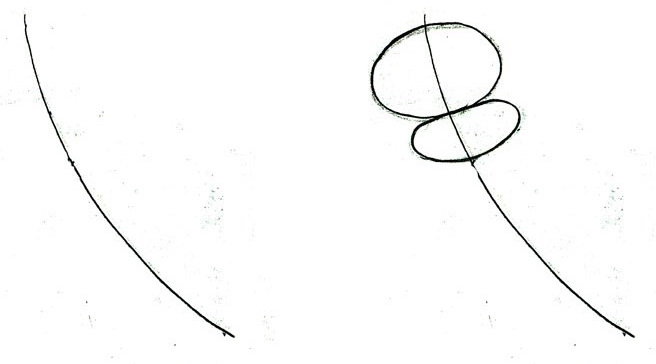
- You need to draw 2 ovals, their sizes should be different. The smaller one is the prototype of the head, it is located at the top. The second one is the body, it is located below.
- To the left of the upper oval, draw a smooth long line. It will become the parrot's back, turning into a tail.
- From the lower oval, draw a pair of semicircular lines. One of them will become the lower part of the wing, and the other will be the width of the tail.
- To the right of the top oval, draw an arc that will become the beak.
- From the lower oval draw a straight line for the wing.
- Mark the bends of the legs under the wing.
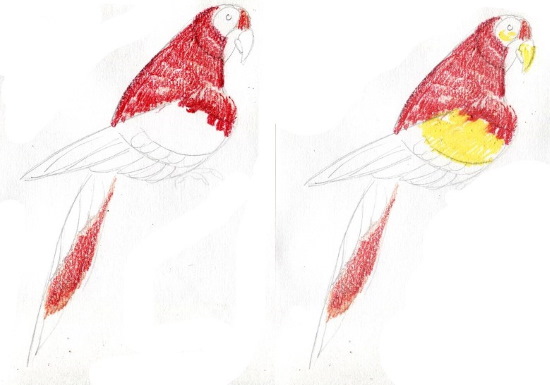
- Draw the beak with semicircles and change the color of the feathers on the head, and also outline a circle for the eye.
- Add feather color changes to the wing and tail. Make the claws thicker, and draw the tail and wings with smooth lines.
- Use red chalk to color the head, the middle of the tail and the top of the wing. The beak and the middle of the wing - yellow. Use the same color to color the cheek under the eye.
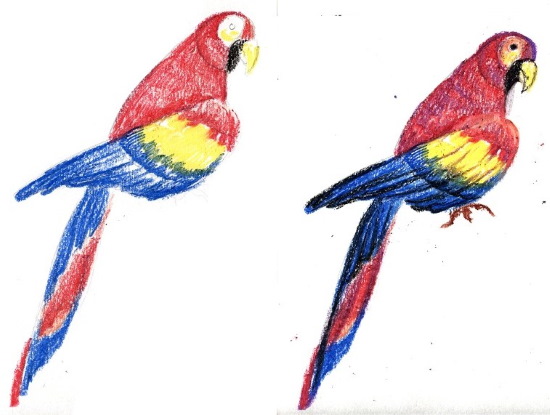
- Color the remaining feathers blue. When coloring, you can slightly go over the yellow areas.
- Draw a black oval around the beak. Apply small purple strokes along the contour of the feathers.
- Take black pastel and refine the plumage of the wing and tail.
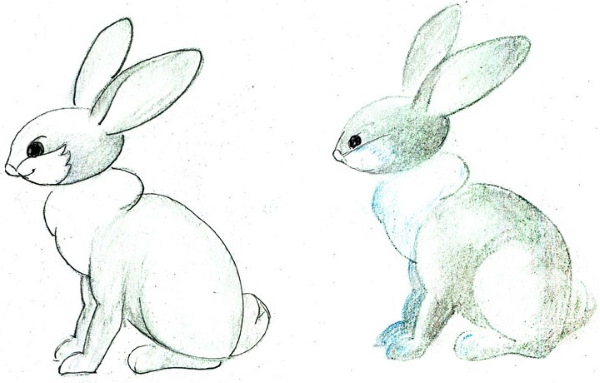
Hare
To draw a hare, you need to prepare the paint itself and tinted paper.
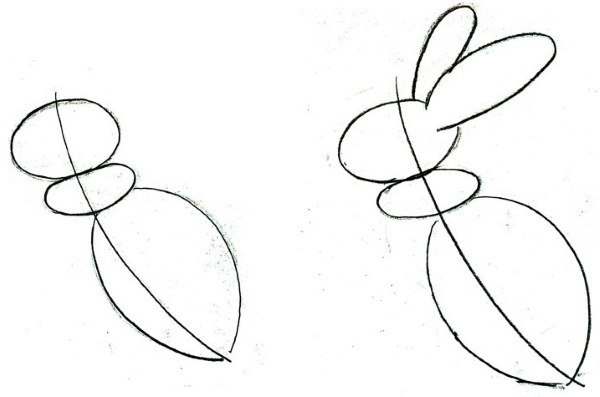

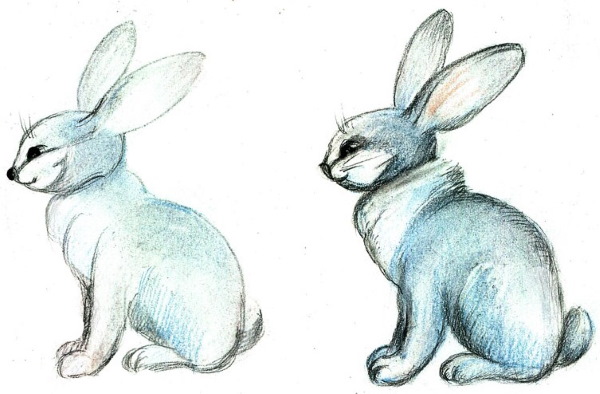
Then:
- Draw 3 ovals with white chalk. The largest of them should be on the left: it will become the body. A little to the right – a small oval, which will become the neck. To the right and a little higher – the third oval, this is the hare's head.
- Using the same chalk, draw ears above the oval of the head.
- Draw the front paw under the middle oval, draw the back paw in the large oval. Add another oval on the left, which will become the tail.
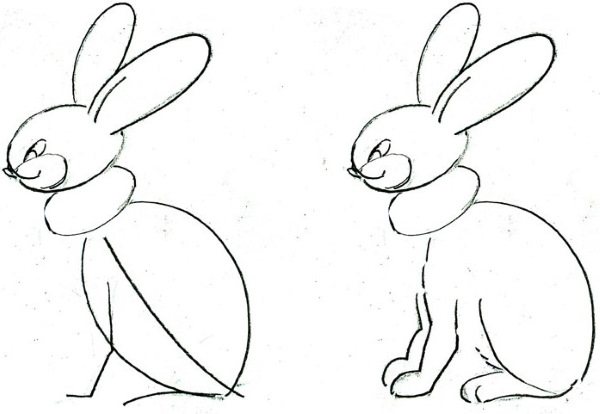
- Shade the resulting figure. This is done using white pastel.
- Take a grey chalk and draw along the outline of the ears, head, paws and tail.
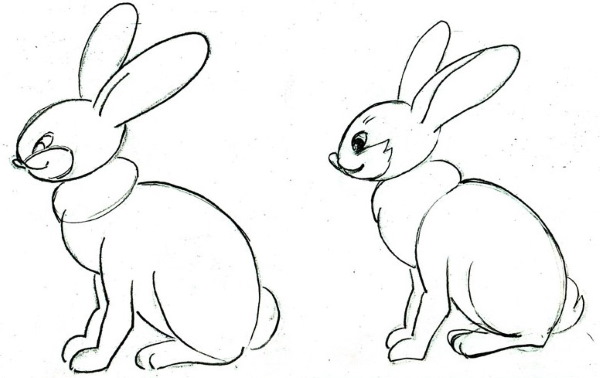
- Use black chalk to draw the eye, nose, moustache and eyebrows.
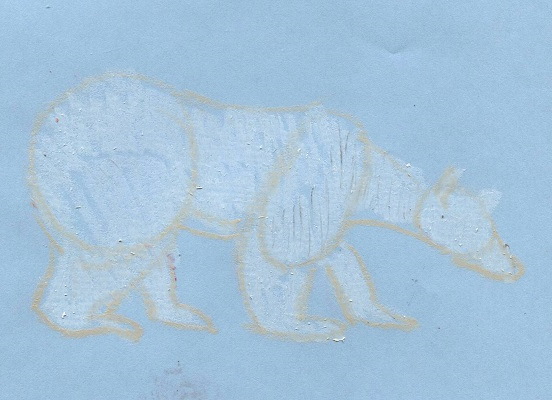
Bear
To draw a bear, you will need several oil pastels and tinted paper. The polar bear's fur is similar in color to a hare's, so you can use the same crayons as when drawing a hare - gray, black. Instead of white, use light beige.
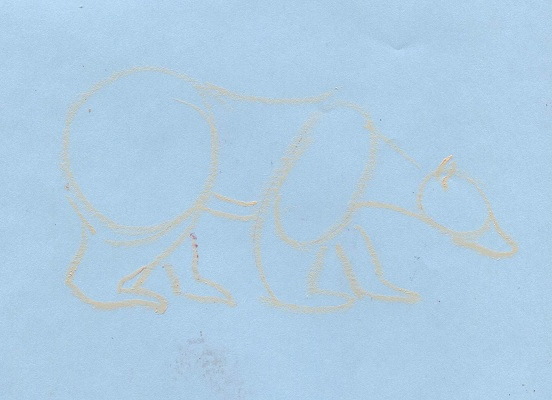
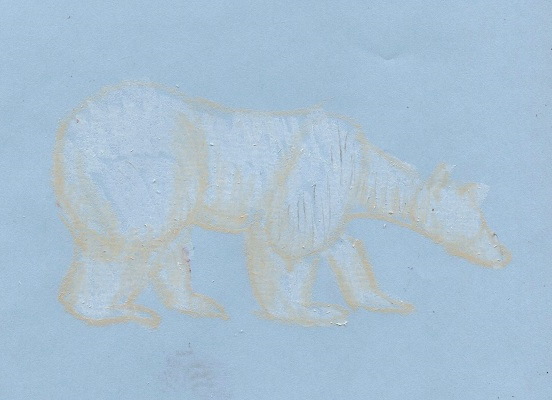
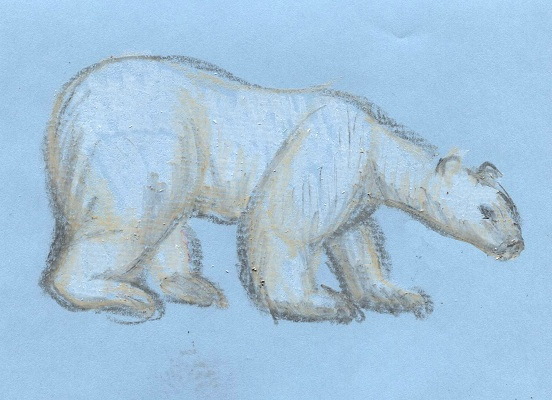
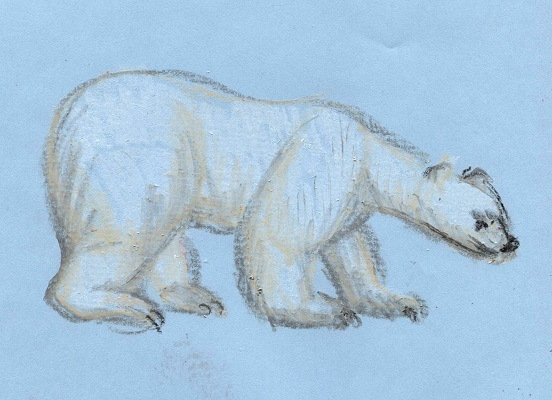
The stages of drawing are as follows:
- Draw 3 ovals with light beige chalk. The right side should have the largest oval. This will be the back of the body. At some distance from it should be the next oval. It is slightly smaller. This will be the front of the body. The third oval is the smallest, it is drawn to the left of the others.
- Draw the lines of the ears, muzzle, and limbs to the ovals. The ears are depicted as small semicircles. The muzzle should be elongated. Draw the front limbs under the middle oval, and the back limbs under the largest.
- Using white pastel, shade the figure completely.
- Draw the ears, muzzle, body and limbs with light beige chalk.
- Draw the fur. For this, use grey pastel: use chalk to draw small strokes along the contour of all parts.
- Use black chalk to mark the eyes and nose.
Aspen mushrooms
To work you will need orange, white, red-brown, gray crayons, as well as a simple pencil.
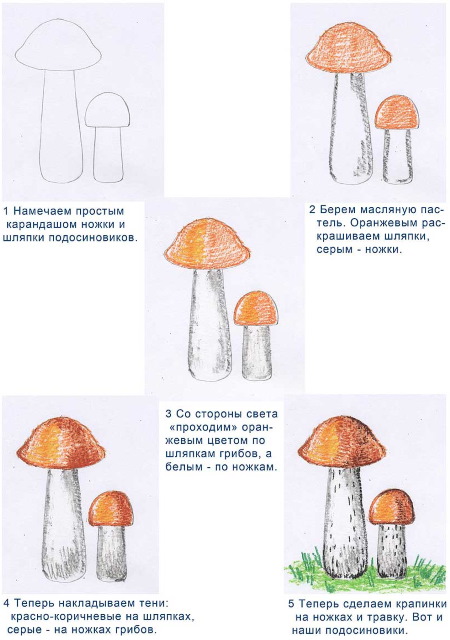
Then follows:
- Use a pencil to create contours and mark the stems and caps of the mushrooms.
- Apply shadows: on the caps they should be red-brown, and on the stems – gray.
- On the opposite side: the one where the light falls, go over it with orange and white chalk. The cap should be orange, and the stem should be white.
- Apply specks to the legs.
Animals
You can draw a pony by following these steps:
- It is necessary to sketch the main parts of the body. On the right there should be an elongated oval, which will become the body. To the left of it, draw a smaller oval, it will become the neck. To the left there should be a third oval - this is the head.
- Use small ovals to outline the legs and tail. Each of the front legs should be represented by 2 ovals. A pair of back legs is one large oval and 2 small ones under it. The tail is depicted by a small oval.
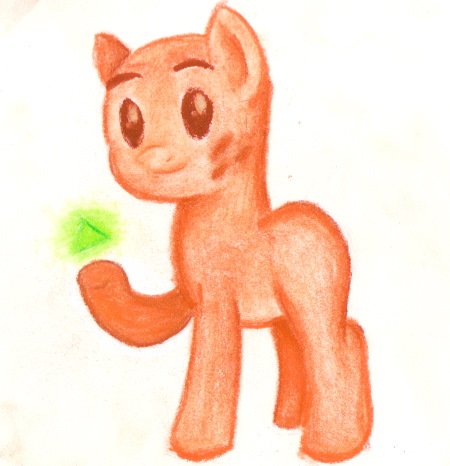
- Draw the elements of the head and neck. The head should be connected to the neck and body with smooth lines. Also draw the legs, mane, and tail.
- Paint with any colors, mixing them with each other.
To draw a cat you need:
- Draw several ovals. 1 of them will be the body: it should be larger. The 2nd oval will become the head: it should be smaller and located higher. These 2 ovals should be connected by the 2nd. It should go straight along the body and will later become its upper part.
- Another oval should be located at the bottom of the body: it will become the upper part of the hind legs. Under all these ovals there should be 5-1 - the most elongated one. This will be the tail.
- Use triangles to represent the ears.
- Having determined where the center of the upper oval is, outline the nose. This part of the muzzle should be located slightly below the center.
- Draw a triangle from the nose, drawing 2 lines up and connecting them. Draw eyes in the resulting triangle.
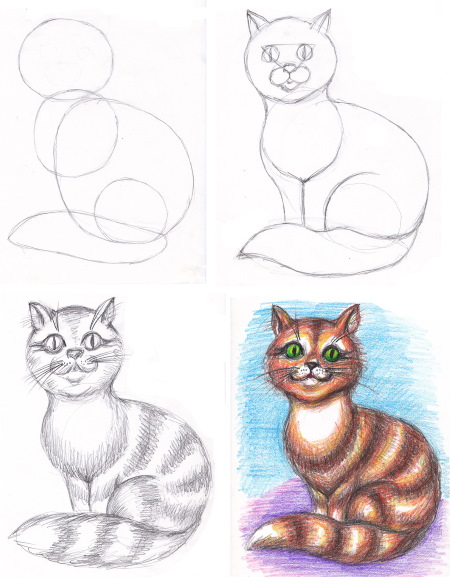
- Connect the body, outline the upper parts of the legs and tail.
- Choose any color for the fur. Stripes will help add volume to the body.
- Make the eyes green, orange, yellow or blue.
- Paint the nose black or pink.
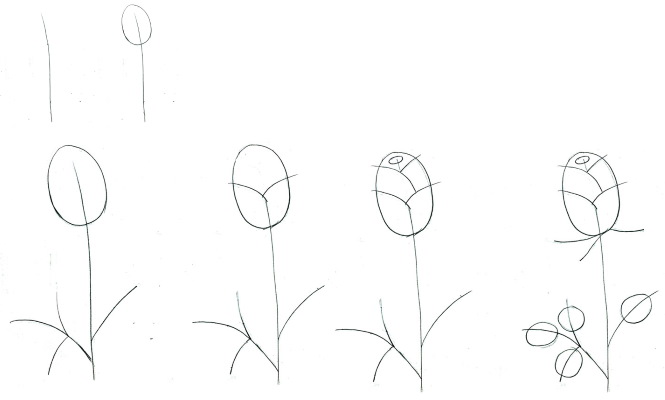
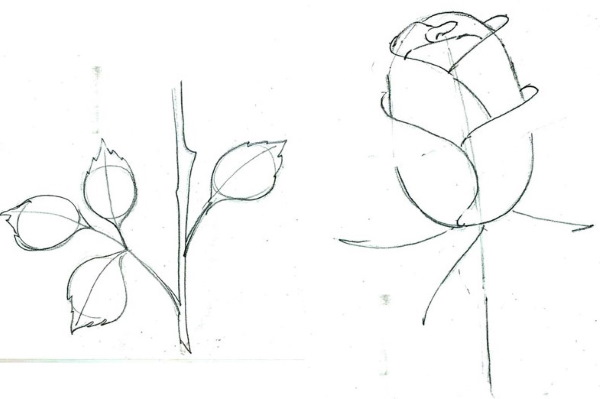
Floristics
Flower drawings are one of the popular subjects among professional and novice artists working with pastel oil paints.
These could be:
| Flower | Stages of drawing |
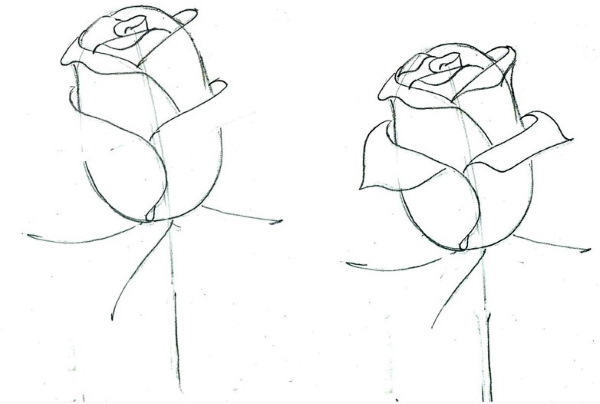
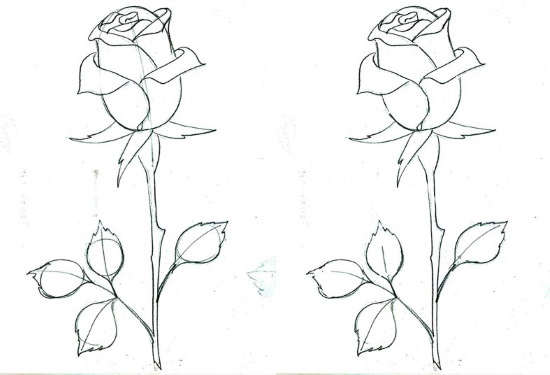
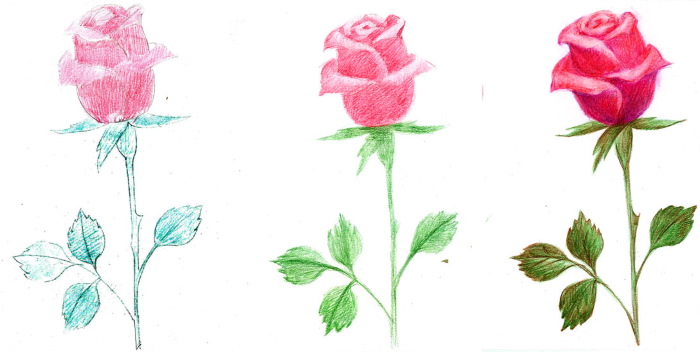
| Rose |
|
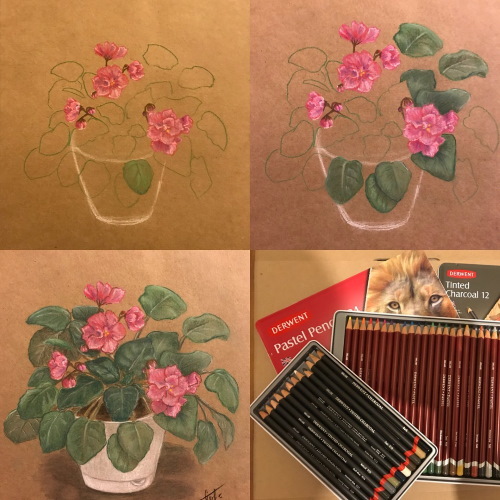
| Violet |
|
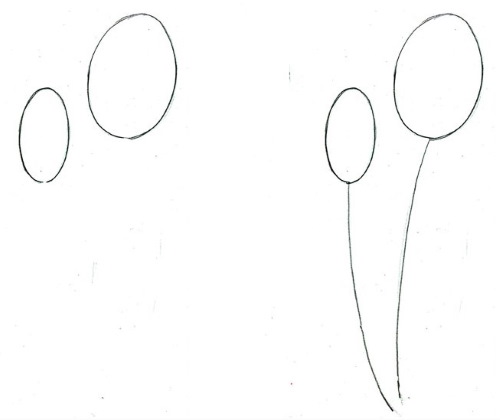
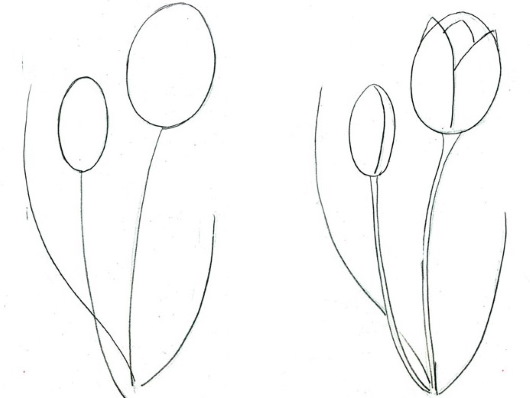
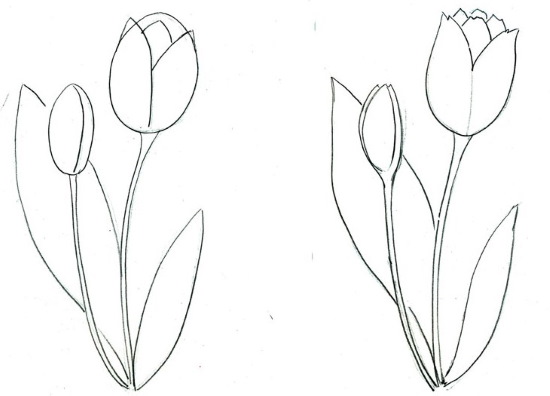
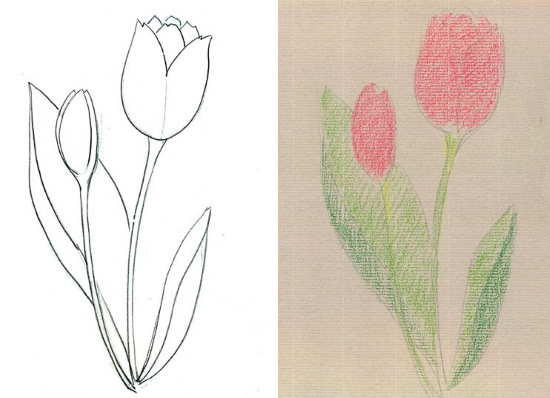
| Tulip |
|

The sea and its inhabitants
Of the aquatic inhabitants, beginning artists can try to depict a dolphin or an octopus.
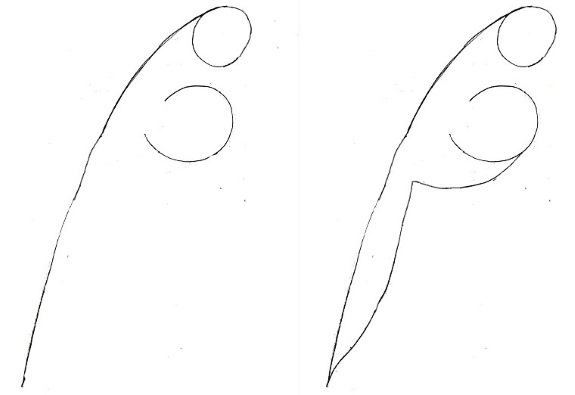
Dolphin
You need to take a sheet of paper, an HB pencil, an eraser and pastel crayons: light blue, dark blue.
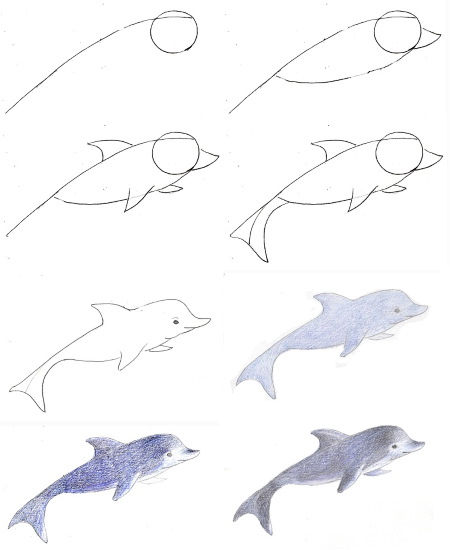
The stages of implementation are as follows:
- From bottom to top, from left to right, you need to draw an inclined line. This will be the back.
- To the right of the line you should draw a circle. This will be the head.
- Mark the body. For it, an arc-shaped line starts from the bottom of the circle. It goes to the left and connects with another arc-shaped line.
- Use a pair of short arcs to mark the nose – the elongated part of the head. These arcs, together with the section of the head itself, should form a semblance of a triangle.
- Draw several more of the same "triangles" formed by arced lines near the body. The one drawn at the top will become the upper fin, and the other two should be at the bottom: they will become the lower fins.
- On the left, draw a rounded "swallow" tail.
- Use the eraser to remove unnecessary lines.
- Draw the contours.
- Finish drawing the elements of the head – the eye and mouth.
- Shade the entire dolphin with light blue pastel. Use dark blue chalk to make the drawing more saturated.
- Carefully use an eraser to remove excess tone from the lower part of the body and tail.
Octopus
To draw an octopus you will need:
- Make a light outline with a pencil.
- Fill the background. There should be gaps after painting.
- Blend the colors using circular motions. Start with light spots.
- Apply a second coat.
- Smooth out the colors. You can use cotton fabric for this.
- Apply a few additional spots with white paint. It is also recommended to rub them with cotton wool.
- The work with the octopus itself is carried out according to the same principle: first the spots, then the elaboration. There should also be several layers.
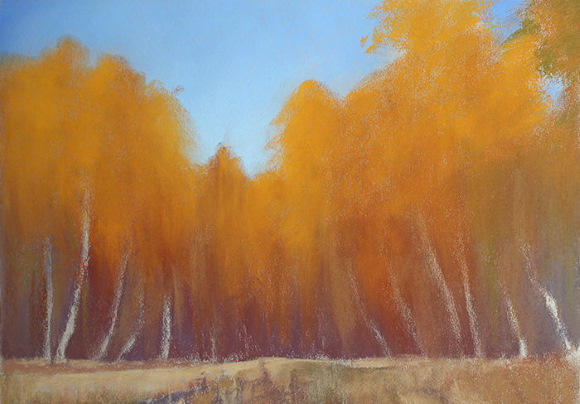
Landscape: autumn nature
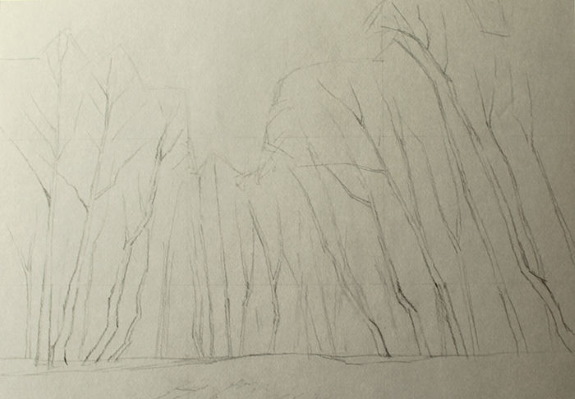
To draw an autumn landscape with pastels, you need:
- Create a sketch. It is done with a charcoal or pastel pencil. You need to try to give the trees different shapes.
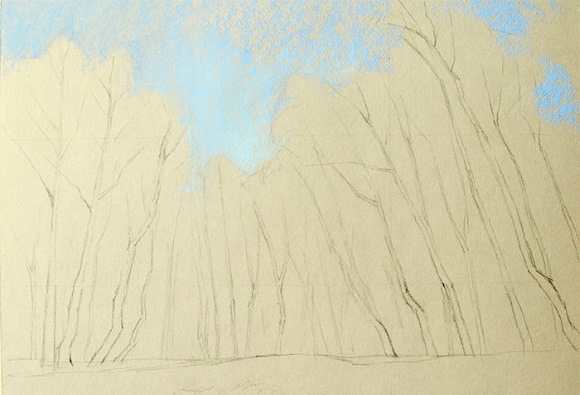
- Apply the first layer of sky with blue chalk. First apply a few strokes and then blend.
- Take a lighter blue pastel and go over the treetops.
- Start working with the trees. The bottom layer should be darker, and the top part should be lighter. It is better to shade vertically, because this is how trees grow.
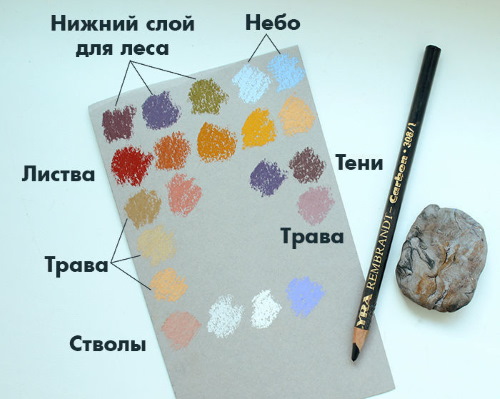

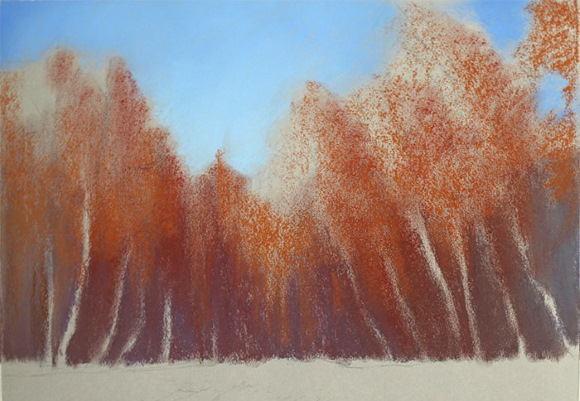
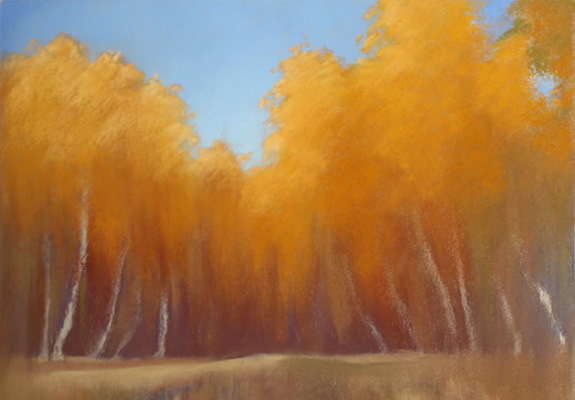

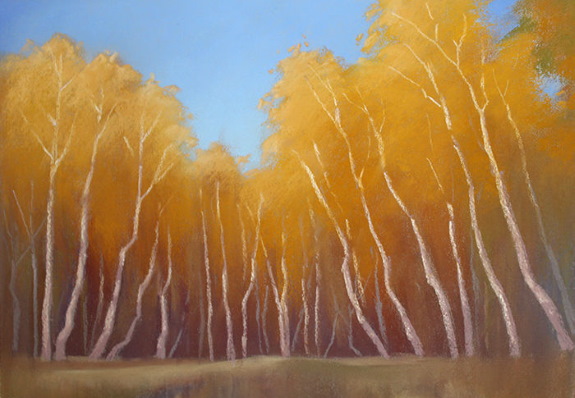
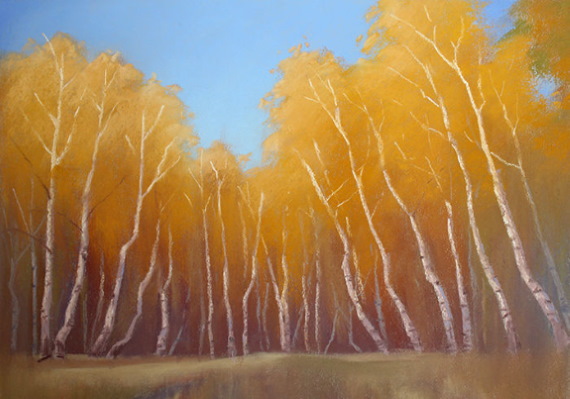

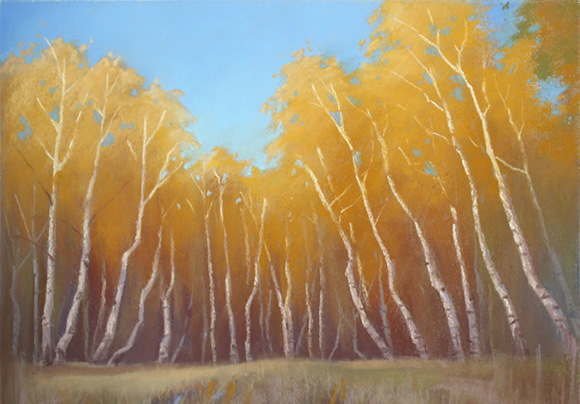
- Apply ochre color on top. At the bottom, near the trunks, add a small amount of gray-violet strokes. It is important not to forget about subsequent shading.
- Use green pastel to mark the tree on the right. A few strokes should also be applied on the left for support.
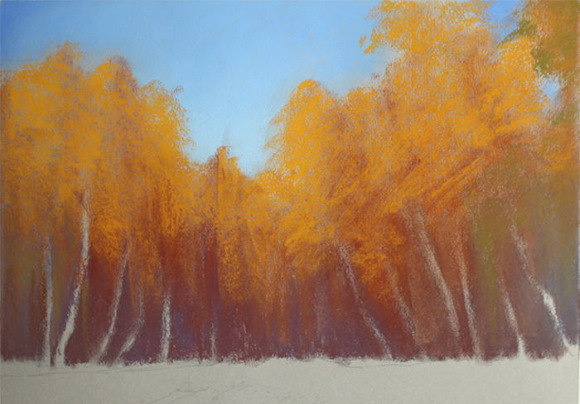
- Add some golden highlights with a deep yellow color.
- Move to the grass. The main colors will be red-brown and warm green. Gray-violet shadows from the trees fall on the grass.
- Green-brown should be added to the foreground. The area on the border with the forest, where the light falls, is marked with beige. Red-gray should be added to the falling shadows. Shading, as in the case of trees, is done vertically - from bottom to top.
- Start working with the trunks. Those closest to the viewer are marked with pink-gray. The distant trunks require a cooler color, such as gray-blue.
- Shade the parts of the trunks that are exposed to light gray. The thickness and pressure should be constantly changed: this will make the picture more alive. Dark blue paint is applied to the shaded side. The stripes on the trunks should be gray-brown.
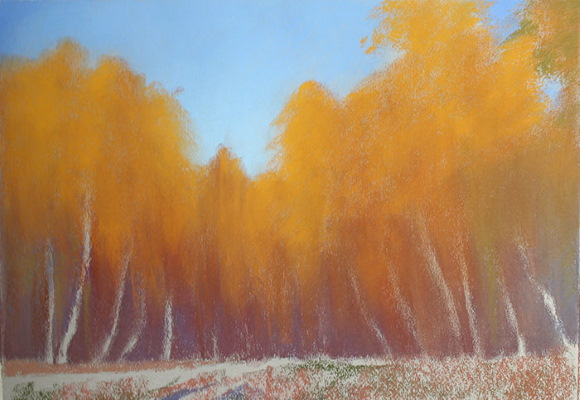
- Using blue paint of different shades, draw "windows" in the tree crowns. In the sky area, use yellow to make a few spots of foliage.
- Work on detailing the grass. Make a few vertical strokes with a grey-violet chalk. To support the color of the crown, draw some blades of grass in yellow.
- Add a few more blue strokes to the foreground and refine the grass.
Space
Oil pastel drawings for beginners on the topic of space require preparation.
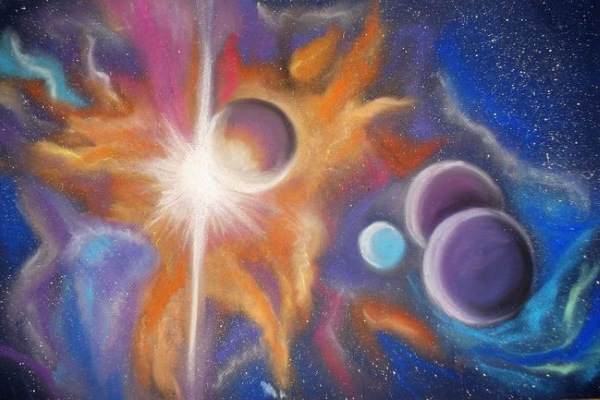
First, you need to buy grain paper and a large set of crayons. The more colors, the more realistic the image will be. The picture should be dark, which means it is better to take black or dark blue paper.
Then you need to:
- Apply color to the spots and blend the transitions a little.
- Once the first coat is complete, it needs to be sealed by applying a spray varnish.
- Go to the 2nd layer, where the image detailing is performed.
Cartoon characters
Kids will love drawing cartoon characters.
Mickey Mouse
To create this character you will need:
- Draw a circle at the top of the paper and draw 2 perpendicular lines inside it. The horizontal line should go slightly below the middle of the circle.
- Draw 2 more circles on top: these will be the ears.
- Imagine the body as an elongated droplet.
- Draw 2 sticks on each side of the upper body. These will be the arms. To make the drawing more natural, they should be slightly curved. Draw the palms on top.
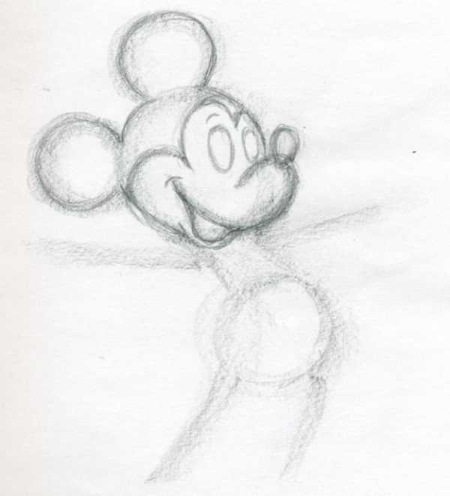
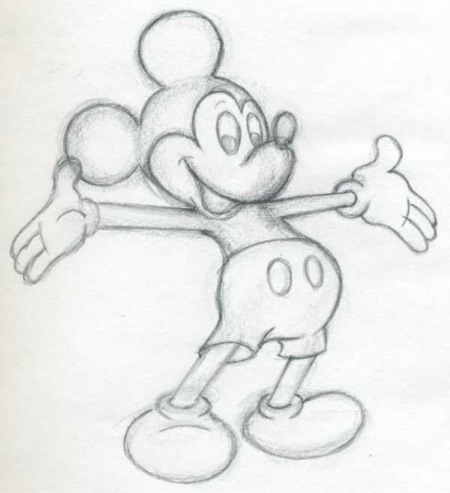

- Similarly, draw the legs, starting at the bottom of the body. Also draw 2 sticks, and then add the outline of the shoes.
- Move on to the details of the face. Draw 2 ovals symmetrically relative to the vertical line at the top of the head. These will be the eyes. The mouth and nose should also be located symmetrically relative to the vertical line. At this stage, it is necessary to use smooth lines to mark the areas that will remain white.
- Erase unnecessary lines on the head, draw the tongue and the fold above the nose.
- Detail the palms. It is necessary to mark the outlines of the fingers. It is important to remember the protrusion located on the inside of the palm.
- Finish drawing the tail and shorts.
- Use the eraser to remove unnecessary elements. Then clearly draw the contours of the character.
- Color the ears, top of the head, upper body and arms black.
- Add shadows to the palms, feet and shorts.
- Draw highlights on the eyes and nose.
- Paint the shoes yellow and the shorts red.
The wolf from "Well, Just You Wait!"
To create it you should:
- Create a sketch with a pencil. Draw 2 ovals at the top. One of them will be the main part of the head, the other will become an elongated nose.
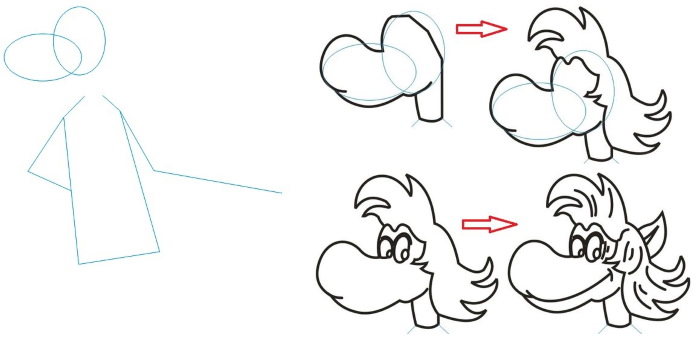

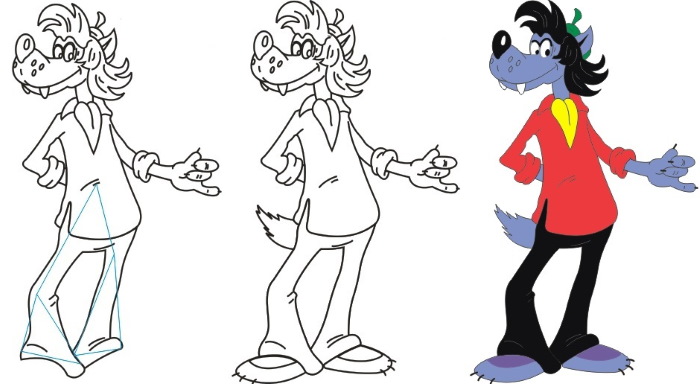
- Draw 2 vertical straight lines and connect them at the bottom. This will be the body. From them, on the left and right, extend lines that will become the arms.
- Draw the details of the head: make the contours of the nose and hair, then draw the eyes and ear. You need to make a few strokes on the hair. Then draw the nose, teeth.
- Draw the body and hand guides.
- Draw the guidelines for the legs, pants and jacket.
- Having created a pencil drawing, move on to coloring it and then fixing the colors. The wolf's skin is gray, the jacket is pink, the pants and hair are black.
Pastel oil painting is simple and therefore very popular among artists, especially beginners. It combines a variety of possibilities and accessibility for drawing.
Video about oil pastel painting
Oil Pastel Drawings for Beginners: