A hamster is a simple drawing for children, you only need a pencil and paper. You can draw it in different ways. It can be a regular animal, or a Djungarian, or from a cartoon. All actions are carried out in stages - the easiest way is to use squared paper. It is easier to maintain the necessary proportions. First, draw the contours of the hamster, then draw the details, and finally do the shading.
Drawing Supplies
A hamster is a simple drawing for children that can be easily drawn with one pencil. You will also need watercolor or album paper, simple black pencils of different fat content, and an eraser. You can prepare colored ones if you want to color the drawing later.
A black felt-tip pen will be needed to draw the contours of the body and small details. Then the drawing can be painted over with colored pencils and the black color will not smear. Print or prepare the drawings of the hamster in advance.
The easiest master class
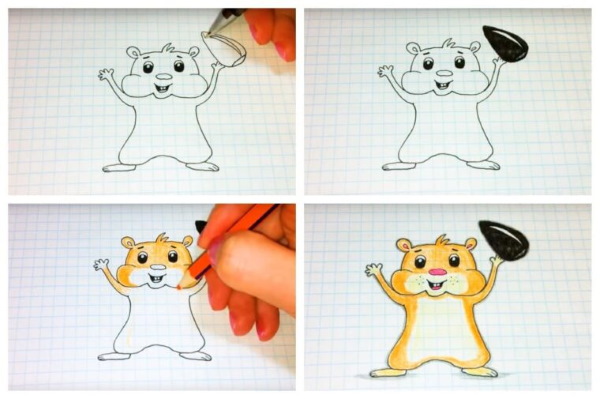
The easiest way to draw a hamster is to use a black pencil, a set of colored pencils, and a sheet of squared paper. First, draw an irregular oval - this will be the body (you can immediately highlight the large cheeks with circles on both sides).
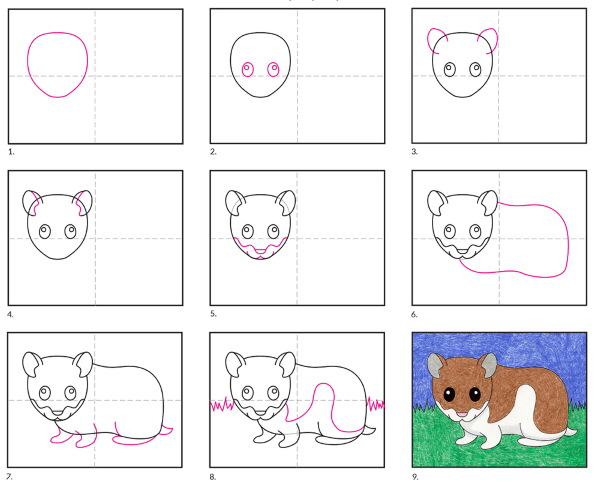
Then:
- draw ears, legs;
- add round eyes;
- draw the front paws as unfinished ovals, and the lower ones as complete geometric shapes;
- color the hamster by choosing the color of the animal in the book.
You can draw a cookie or a large seed between the paws. This will make the drawing look more fun and interesting.
How to draw a hamster step by step
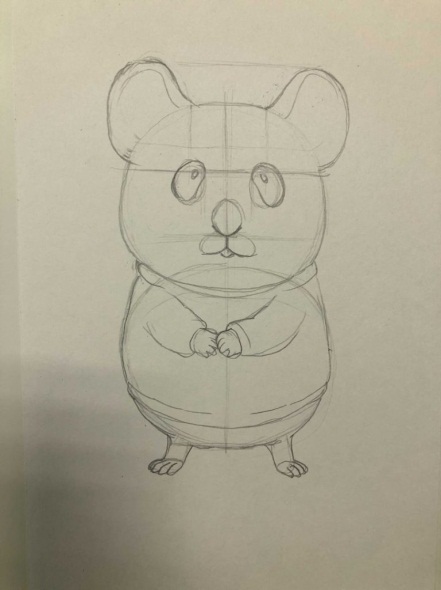
To make it easier to maintain proportions, you need to print out the drawing of the animal in A4 format (the size of an album sheet). First, draw the main large details - the body, limbs and muzzle. Then move on to smaller ones - using auxiliary ovals and axes.
What tools will be needed
To draw a simple hamster without coloring, you need to take a sheet of paper, simple black pencils and an eraser. Put the drawing of the animal on the table.
How to draw a hamster
First, you need to look at pictures of hamsters and remember their main features. Their bodies are always plump, with big cheeks. The eyes, nose and paws are small. They start drawing with basic shapes in the form of geometric figures. Then they draw small details, and at the end they shade the image. In the process, you can focus on step-by-step pictures.
Stages of drawing:
| Stages | Step by step description | Drawing |
| First (creating a form) |
|  |
| Second |
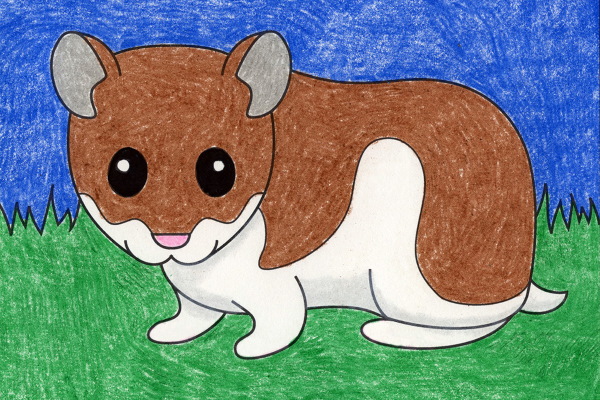
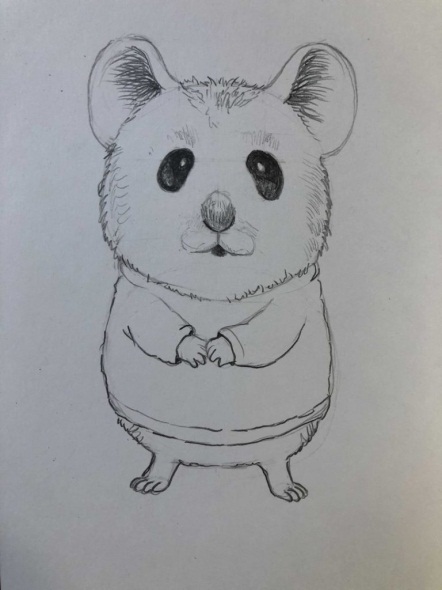
Dark spots should be on the ears, on top of the head, under the muzzle, along the edges of the body. The eyes are completely painted black. | 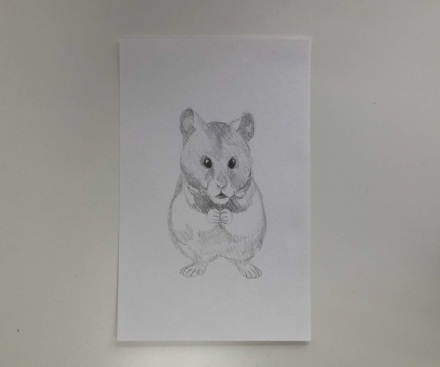 |
| Third | Add small details, fur. This is done with small strokes, with the flat side of the pencil. This is how tufts of fur are drawn on the head and body. Eyes are emphasized with a thick pencil. Ear lines, whiskers, and claws are drawn. | 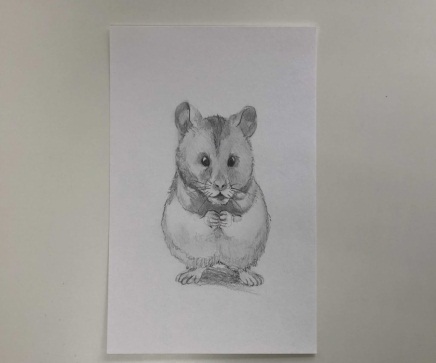 |
Shading is mandatory at each stage. This helps to create the necessary shadows and volume, the drawing turns out more realistic. All unnecessary is erased with an eraser.
How to complete a drawing
At the end of the drawing, draw the outline of the hamster again with a thick pencil. You can lightly paint the belly with gray so that it does not stand out as a white spot. But then it is shaded a little so that the color is uniform. Erase unnecessary details with an eraser.
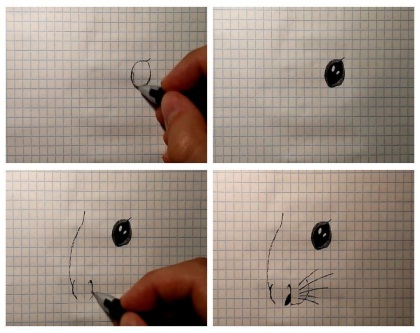
How to draw a funny hamster on a squared paper
Hamster is a drawing for children, which will be easiest for beginner artists to draw step by step, on squared paper. This way you can count the required number, focusing on the diagram. If something doesn’t work out, then focus on this particular moment. Not everyone can do shading right away – then you can practice on a separate sheet of paper.
What tools will be needed
To draw a simple hamster without coloring, you need to take a sheet of paper, simple black and colored pencils, an eraser. Put the drawing of the animal on the table or print out a step-by-step drawing diagram.
How to draw a hamster
Start drawing a hamster from the head. Then draw the body. Finally, you can color it. To do this, you need to see in advance what color hamsters come in.
Stages of drawing:
| Stages | Step by step description | Drawing |
| First |
| 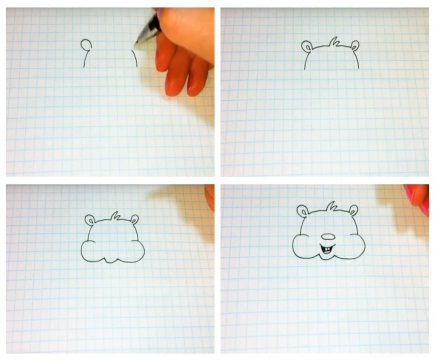 |
| Second |
| 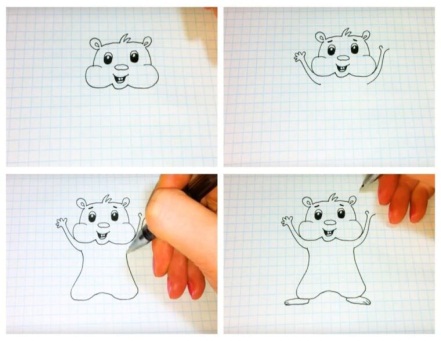 |
Once again, outline the main contours with a thick pencil. In the upper paw, you can draw a large seed and color it black.
How to complete a drawing
You can outline the contours and small details with a black pen. Color the hamster's body with an orange pencil, leaving only the belly and the mask on the muzzle white (color it yellow). Draw a shadow under the animal.
How to draw a hamster from a cartoon step by step
Hamster - a drawing for children, when you can fantasize, make the animal funny. Drawing a hamster from a cartoon is very similar to the first method. It is also based on simple geometric shapes.
This is a simple option for beginners, when it is not necessary to maintain exact proportions, you can “get the hang of it” by first making small different sketches.
What tools will be needed
To draw a cartoon black and white hamster without coloring, you need to take a sheet of paper, simple black pencils with different thicknesses of lead and an eraser. For clarity, you can pause the animal from the cartoon on the tablet.
How to draw a hamster
A hamster is a drawing for children, which is first drawn according to a standard pattern, but some details are specially made larger or smaller to make a funny animal.
Stages of drawing:
| Stages | Step by step description | Drawing |
| First (form construction) |
|  |
| Second (drawing details) |
|  |
| Third (drawing the fur) |
|
The shading is done on the nose. At first it is enough to learn how to draw a simple hamster, over time you can complicate it.
How to complete a drawing
At the end of the drawing, draw the main lines again. Using shading, add shadows and volume. If you have colored pencils, at the end of the drawing you can color the hamster yellow or orange, and the sweater - another color, for example, blue, green.
How to draw a live hamster
After the first simple drawing, you can move on to a more complex version. It is better to draw on a sheet of squared paper.
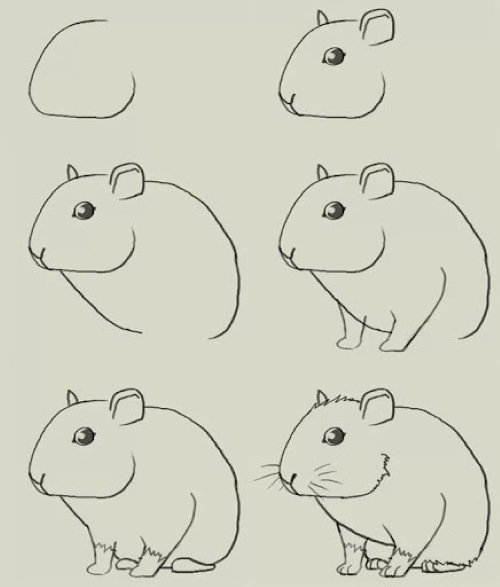
You can navigate them as shown in the diagram or choose free proportions.
What tools will be needed
You will need a sheet of paper in a grid, a gray and orange pencil, a black pen. An eraser to remove extra lines after highlighting the outline in bold. Beginners can count lines and arcs by cells, using the diagram as a guide. You will also need a black marker. It is needed to keep clear outlines and details, but at the same time not to smear the orange color when painting.
How to draw a hamster
First, draw the outline of the body in gray, lightly indicating the head, body and small details. Then highlight the main lines with a pen, black pencil, do the shading and color the drawing.
| Stages | Step by step description | Drawing |
| First |
|  |
| Second |
| 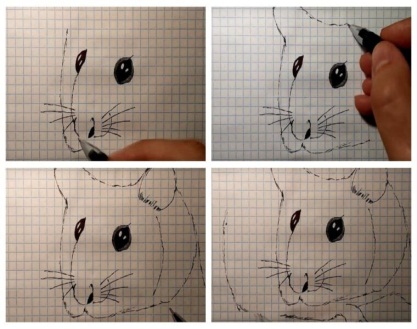 |
| Third |
| 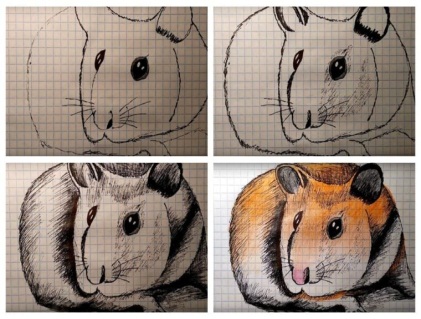 |
You can draw shadows under the hamster as shown in the diagram or choose a different background - for example, a rug, grass.
How to complete a drawing
Finish the drawing of the hamster by erasing the excess and coloring the upper part of the body with an orange pencil. To avoid a sharp transition to the white belly and half of the muzzle, do some light shading at the bottom. If you need to highlight the volume and shadows more clearly, you can outline them again with a black pen or felt-tip pen.
How to draw a hamster on the back
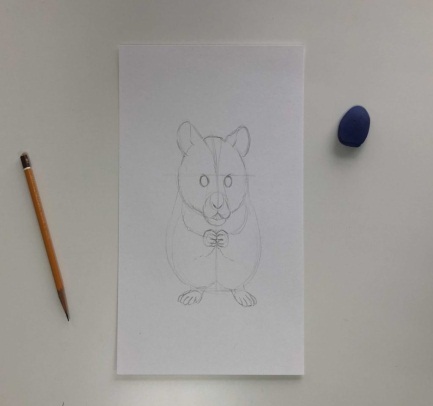
Hamster - a drawing for children that helps to instill an extraordinary vision in the child. For example, depict the animal on the back. And since hamsters always like to gnaw something, you can draw cookies in the paws. The animal is drawn simply, using simple geometric shapes and lines. But to complicate the task a little, you need to take a simple album sheet.
What tools will you need?
To work you will need a simple black pencil, a set of colored ones, a felt-tip pen and an eraser, which you will need to remove unnecessary details. Draw on an album sheet of paper.
How to draw a hamster step by step
This time we will get a funny hamster, its coloring will differ from real animals. Therefore, the set of colored pencils should have yellow, orange and red colors. The white ones will need to be given highlights so that the hamster looks more natural.
| Stages | Step by step description | Drawing |
| First |
| 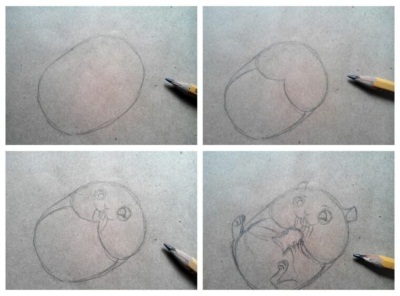 |
| Second |
| |
| The Third (coloring) | White pencil marks light areas on the body and muzzle. Black pencil marks eyes, mouth and ears. Yellow pencil marks fur. Paws are painted red, cookies are painted orange. | 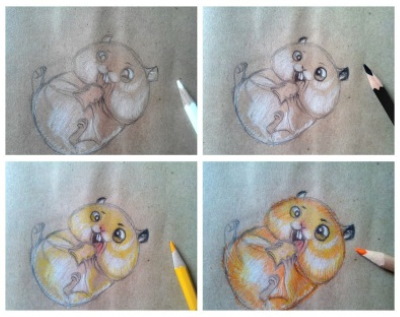 |
At the end, you can slightly shade the colors, and then draw the hairs with short strokes.
How to complete a drawing
To complete the drawing, you need to draw small details with a felt-tip pen (ears, eyes, nose and mouth). Use a black pencil to draw the contours of the paws and fingers. Once again, emphasize the white areas with a pencil, and color the highlights in the eyes. You need to draw shadows or green grass under the hamster.
Tips for Beginners
The pencil used to mark the initial contours should not be greasy, so that it can be easily erased with an eraser. For drawing, use a pencil with a soft lead, a pen, or a black felt-tip pen. White pencils help to draw highlights, whiten the necessary areas in the drawing. In order for the animal to be proportional, it is best to have a picture or photograph in front of your eyes.
A hamster is a drawing that children can draw even at preschool age. There are many options for simple patterns for kids. If you don’t have any experience yet, it’s easiest to draw on squared paper. This will help you maintain the right proportions. Then you can move on to drawing a hamster on a simple album sheet.
Video about drawing
Hamster drawing for kids: