Scheme and description of the collar-hood knitting needles will be interesting even for a beginner needlewoman. This headdress came to the world of modern fashion from ancient times, where it was called a cap.
The word "hood" has Latin roots and means "monk's cap". The headdress gained popularity in the 5th century during the reign of the Merovingian dynasty.
Necessary tools and materials
A knitted hooded collar, the pattern and description of which is popular among knitters, is a good solution for the cold season. It is knitted from warm yarn to protect the head, neck and shoulders from piercing wind and precipitation.
To knit a headdress, you will need yarn and knitting needles. As auxiliary tools, you will also need a tailor's meter, a needle and scissors. If you want to decorate the item with any decorations, you need to choose the appropriate fittings for this.
To choose the right yarn you need:
- Decide on the model of the item.
- Crush the skein in your palms.
- To study the structure of the fibers in the ball.
- Determine the electrostatic properties of yarn.
- Smell the material you like.
- Apply the ball to the exposed area of the face.
- Read the label for recommendations.
In order to choose the right yarn, experts recommend deciding on the model and what season it is designed for before going to the store. For example, for knitting summer clothes, you need a lightweight material that lets air through and does not heat the body. For winter or demi-season clothes, warm materials are selected that are resistant to any weather conditions.
After the model has been chosen, it is recommended to go to the store and carefully study the assortment. The skein you like should be taken in your hands and slightly crumpled in your palms. This will allow you to feel how elastic the material is and how your skin reacts to it.
You also need to consider the structure of the thread fibers, because it is best to knit a hood-collar from a homogeneous material. If the yarn consists of different-sized threads and has thinning and wide parts, then it is better not to take it, since the thing from it will not hold its shape well and will be blown by the wind.
Experienced craftsmen recommend testing the material for electrostatics. To do this, clamp the free end of the thread between your thumb and forefinger and rub. If the thread is very fluffy and its fibers are spread out in different directions, the material accumulates static, which is not very pleasant in the cold season, when a person gets an unpleasant discharge by touching something or someone.
You need to smell the yarn you like. This is done to determine whether it contains chemical impurities that could subsequently cause poor health or allergies when wearing the knitted product. If the skein emits a barely perceptible unpleasant smell, it is better to put it aside and choose another one.
Before buying yarn, experts recommend applying it to an open area of the face or neck. The test will show how pleasant the thread is and how sensitive skin reacts to it. When buying yarn for a winter headdress, you need to choose one that is not prickly and pleasant to the body. In addition, it should retain heat well.
Reading the information on the label or packaging of the yarn is also an important step in choosing the material. Here the manufacturer indicates not only the composition of the threads, but also their thickness, length and diameter of the knitting needles or hook that is suitable for working with it.
Schemes with description of works for beginners
A knitted hooded collar, the diagram and description of which will allow you to create a unique and fashionable item for the cold season of the year, suits fashionistas of different ages. This accessory is often confused with a bonnet. In order not to make such a mistake, you need to understand that a hooded collar covers the head, neck and shoulders, and a bonnet - only the head and a small part of the neck.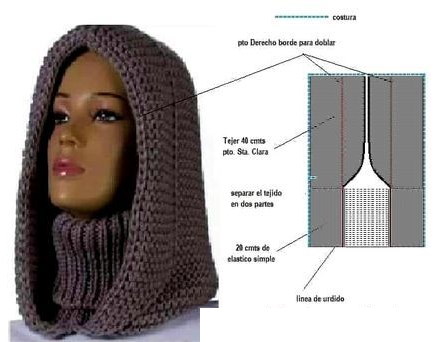
In addition, it has a tight-fitting neckline that fits tightly to the body, which the bonnet does not have. Also, the second type of headwear has ties, while the hood does not.
Before you start creating a fashionable headdress, you need to take the correct measurements.
| What is measured? | How to measure | For what |
| face oval | apply a tape measure so that it covers the face | to determine what kind of hood it will be: fitted or large |
| head circumference | Measure parallel to the shoulders, place the tape measure above the eyebrows and cover the head in the back of the head | allows you to understand the future size of the product |
| neck circumference | around the neck so that it starts and ends at the same point | helps to calculate the number of loops for a collar |
| neck height at the back | from the protruding bone of the spine to the dimple at the base of the head | to determine the height of the collar |
| hood depth | from the back of the head and as far forward as the hood should protrude | to calculate whether the hood will be pulled over the face or will classically reach the hairline and forehead |
| width of the back of the head | the meter is placed on the back of the head from one lateral bone of the skull to the other | so that the rounding of the hood is not above the ears |
In addition to measurements, a beginner will also need a minimum knowledge of the symbolism of loops and how they are knitted. In general practice, it is customary to designate different loops with certain symbols and abbreviations that are understandable to everyone.
For example, knit stitches are always designated as "X" or "I", and in abbreviations they can be indicated as "f." or "lp". The second most popular in knitting are purl stitches, which are designated as "-", and in abbreviations they are written as "izn." or "ip".
No knitting can be done without edge loops, which are always removed unknitted at the beginning of a row, and at the end they are made either purl or knit. This depends on the recommendations of the author of the pattern. Edge loops are always designated as "Ո" or "edge".
When knitting large hats, you always need to add or subtract stitches to get the desired shape. Yarn over looks like "O" or "nak" in the pattern.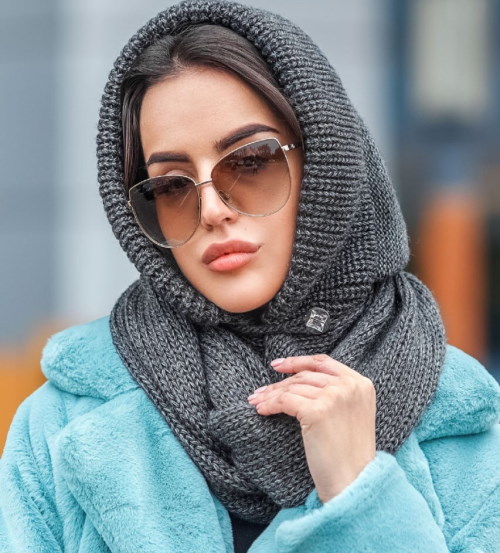
To decrease the number of loops, they usually knit several together. The description of the work usually states how many loops need to be knitted and for which wall.
The neck part of the hood collar is usually made with a rib with a given pitch. This technique allows the product to stretch and fit tightly to the desired area of the body. The rib is obtained by alternating front and back stitches.
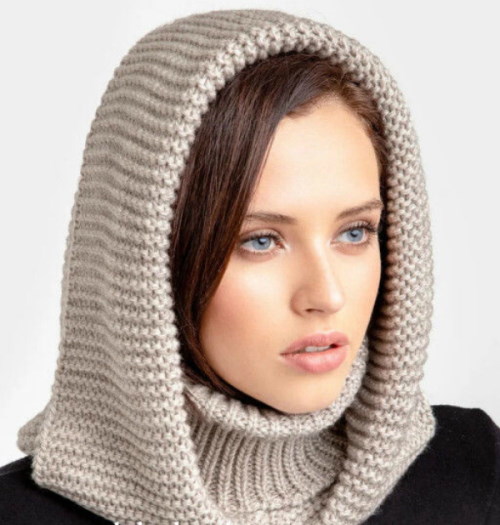
Beginners can make a hood using garter stitch. To do this, all rows are knitted only with the front ones. The fabric is dense and pleasant to the touch. There are many models of hooded collars.
The most popular ones include:
- "For Beginners";
- "Two-color";
- "Pearl";
- "With honeycombs";
- "With ears."
The listed models are easy to knit and, at the same time, they look spectacular on both an adult and a little fashionista.
For Beginners
The diagram and description of the collar-hood with knitting needles may contain recommendations for beginner needlewomen. If earlier this headdress was considered only an accessory of the nobility, now anyone can wear it. For work you will need yarn and knitting needles.
To knit a warm headdress with a lapel, you need:
- Cast on 70 stitches.
- Make row 1 with an elastic band with a step of 1 by 1, that is, alternate 1 front with 1 back.
- Knit 22 cm of fabric in this way.
- Form the next odd row with garter stitch, that is, only knit stitches.
- Knit the even row also with knit stitches.
- Divide the number of loops by 2 and work each part in turn.
- Transfer the half you are not working with to a spare needle or pin.
- Add 5 stitches at the beginning of the odd row.
- Add 5 stitches at the beginning of the even row and knit the stitches of the previous row according to the pattern.
- Knit the added loops of the even row also according to the pattern.
- Add 10 loops in each even row and do this until the desired width of the hood is formed.
- Knit the fabric to the desired height of the hood.
- At the end of the work, close all the loops of the finished half of the product.
- Start working with half #2 and knit in the same way as half #1.
- At the end of the work, all loops are closed.
Now the product can be assembled by sewing the hood parts together and starting to try it on.
Two-tone
The knitted hooded collar, the diagram and description of which are given for familiarization and practical use, can be made in several colors. The threads are selected as desired, contrasting or with a barely noticeable transition of shade.
To work you will need green and yellow yarn and separate knitting needles.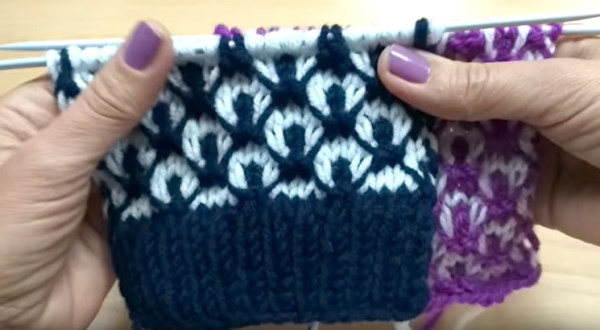
To knit a warm headdress, you need:
- Cast on 108 stitches using green yarn.
- Knit row 1 with a 2 by 2 rib pattern, where 2 front stitches alternate with 2 back stitches.
- Form row 2, alternating stitches according to the established pattern.
- Decorate the canvas with an 8 cm high elastic band with the chosen step.
- Knit row 1, alternating yarn over, 1 stitch not knitted and slipped, 1 purl. Repeat the pattern to the end of the row.
- Insert 2 yellow threads into row. Knit a strip, constantly repeating 1 purl, remove the yarn over loop of the previous row, leaving the thread in front of the work, do not knit.
- Knit row 3 with green thread, alternating yarn over, slip 1 stitch, knit 2 together. Repeat the pattern to the end of the line.
- Form row 4 with yellow thread, repeating the pattern where 2 knits and 1 slip without knitting.
- Knit row 5 with green thread, alternating yarn over, 1 slip and 2 together purlwise. Repeat the work process to the end of the row.
- Repeat patterns from rows 2 to 5 until the desired height of the hood is reached.
At the end, the working loops are closed and the assembly of the product begins. To do this, you need to sew the edges of the neck and connect the hood at the top.
Pearl
You can start knitting the hooded collar from its upper part. To decorate the flap, use the "Pearl" pattern.
To work you will need yarn, circular knitting needles and scissors.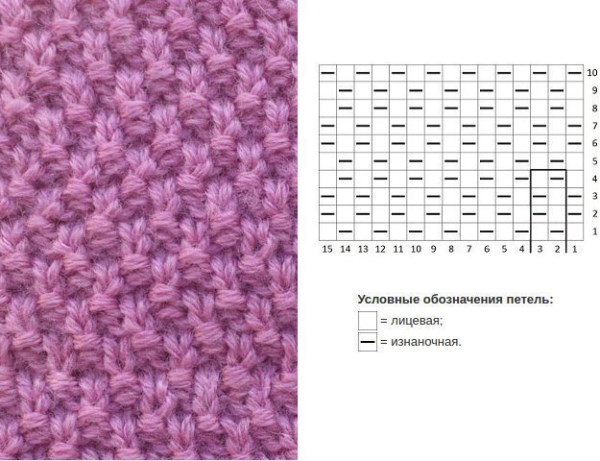
To knit a fashionable accessory, you need:
- Cast on 108 stitches.
- Knit row 1 with a 1 by 1 rib pattern, where the front and back stitches alternate throughout the entire row.
- Form rows 2, 4 and 6 following the pattern on the fabric.
- Knit rows 3 and 5, continuing to work with an elastic band.
- Form row 7 by shifting the loops. To do this, knit over the purl of the previous row, and knit over the purl.
- Knit rows 8, 9 and 10 following the pattern on the fabric.
- Repeat the pattern from rows 7 to 10 to a height of 23 cm.
- Close the loops at the end of the hood work.
- Start knitting the collar by casting on 80 stitches.
- Knit row 1 with a 1 by 1 rib pattern, where the front and back stitches alternate.
- Form a 10 cm high canvas in this way.
- Close the loops at the end of the work.
- Start assembling the product by sewing the hood to the collar.
Now the hooded collar can be tried on and prepared for everyday wear.
With honeycombs
The knitted hooded collar, the diagram and description of which contains recommendations for working on the "Honeycomb" pattern, looks beautiful from yarn of any color. Dark-skinned girls can choose lighter shades of threads, and fair-skinned girls can experiment with contrasting or dark shades.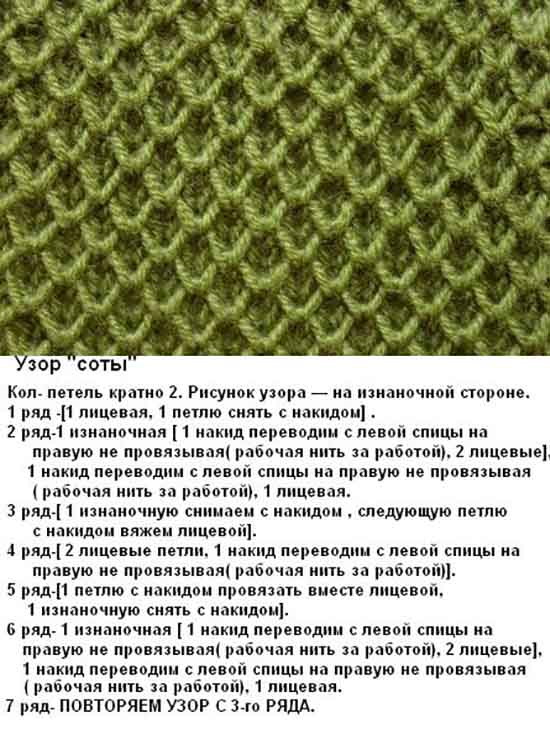
To work you will need warm yarn, knitting needles and scissors.
To knit a beautiful thing yourself, you need:
- Cast on the required number of stitches on the knitting needles, for example, 180.
- Knit row 1 with a 2 by 2 rib pattern, where 2 front loops alternate with 2 back loops. Repeat the pattern to the end of the row.
- Form row 2 following the pattern on the fabric.
- Knit 18 rows of fabric with an elastic band at the chosen pitch.
- Form an odd row (for example, 1), alternating yarn over, 1 loop do not knit and slip, 1 purl. Repeat the pattern to the end of the row.
- Knit an even strip (for example, 2), constantly repeating 1 purl, remove the yarn over loop of the previous row, leaving the thread in front of the work, do not knit.
- Form row 3, alternating yarn over, slip 1 stitch, knit 2 together. Repeat the pattern to the end of the line.
- Make row 4, repeating the pattern where 2 knits and 1 slip without knitting.
- Work in row 5, alternating yarn over, 1 slip and 2 together purlwise. Repeat the work process to the end of the row.
- Use the pattern repeat from rows 2 to 5 for the desired height of the hood.
At the end of the work, the loops are closed and they begin to create the neck.
To do this:
- Cast on 90 stitches using circular needles.
- Knit row 1 with the “Ribbon” pattern with a step of 2 by 2, alternately repeating the knitting of 2 front and 2 back loops to the end of the row.
- Form a 14 cm neckline using the chosen pattern.
At the end of the work, the loops are closed and the assembly of the product begins. To do this, sew the hood to the collar.
With ears
You can complement an adult or child's headdress with cheerful knitted ears. For work you will need 0.2 kg of yarn, buttons to make the collar fasten, knitting needles and padding polyester so that the ears hold their shape.
To knit a fashionable hooded collar, you need:
- Cast on 92 stitches.
- Knit row 1 with a 2 by 2 rib pattern.
- Design row 2 following the pattern on the fabric.
- Knit rows 3 and 5 the same as row 1.
- Form rows 4 and 6 in the same way as row 2.
- Start from row 7, knit the product with the front surface and knit 18 cm of fabric in this way.
- Close in an odd row on 2 sides 6 loops 4 times.
- Close in an even row on 2 sides 5 loops 3 times.
- Decrease 1 stitch every 5 cm until there are 14 stitches left on the needles.
- Place the remaining 10 stitches on a pin after 27 cm of knitting.
- Connect the middle pieces with the side pieces.
- Cast on 27 stitches along the bottom of the hood.
- Transfer the stitches from the pin to the cast-on stitches and cast on another 27 stitches.
- Knit row 1, alternating 6 stitches in garter stitch, stockinette stitch, 6 in garter stitch.
- Design row 1 repeat from rows 2 to 4.
- Continue knitting in stockinette stitch, making yarn overs every 10 stitches.
- Add loops in an even row so that the yarn over occurs through 9 and 1 loop, that is, after the yarn over, knit 1 loop in stockinette stitch, then yarn over again and 9 loops in stockinette stitch.
- Continue adding stitches on the odd row so that the yarn over is a step of 8 and 2.
- Increase the distance between the yarn over wedges until there are 17 stitches.
- Switch to the “Ribbon” pattern with a step of 2 by 2 and knit 6 rows in this way.
- Form holes for buttons in every 10th row. To do this, on the right bar, knit 2 loops together, 2 yarn overs, 2 together.
- Knit yarn overs in the next row through the back wall with 2 knit stitches.
- Start forming the ears. To do this, cast on 15 stitches on the knitting needles.
- Knit rows 1 through 12 in purl stitch.
- Decrease 1 stitch on each side to round out the pieces.
- Connect 4 parts in this way.
- Sew the pieces together in 2s to form ears.
- Place synthetic padding inside each one.
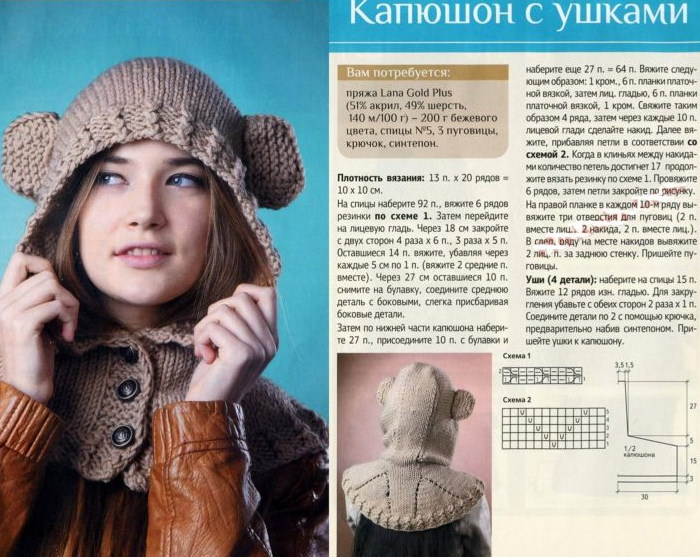
At the end of the work, they begin to assemble the product. To do this, the ears are sewn to the top of the hood. Buttons are attached to the left collar strip.
Secrets for Beginners
There is nothing complicated in knitting a hooded collar. Experienced craftsmen note that there are several tricks that will help make the item more practical in everyday life and make work easier in the creative process.
For example, any yarn needs to be tested for color fastness. To do this, the end of the thread is moistened with water and clamped between white rags. After some time, the result is checked, and if the material remains clean, then the selected yarn will not fade, and the product made from it will be worn well.
Before buying threads, you need to check them for how susceptible they are to deformation. To do this, stretch the free end in both directions and release it. How quickly it returns to its previous state will show how well the material holds its shape and whether it will deform with regular washing.
Experienced needlewomen recommend always keeping the yarn label. This will help you buy more threads if you run out during work and understand how to care for the product after it is made.
When choosing between regular yarn and the one marked "anti-pilling", it is better to give preference to the second option. A thing made of such material will pill minimally when worn.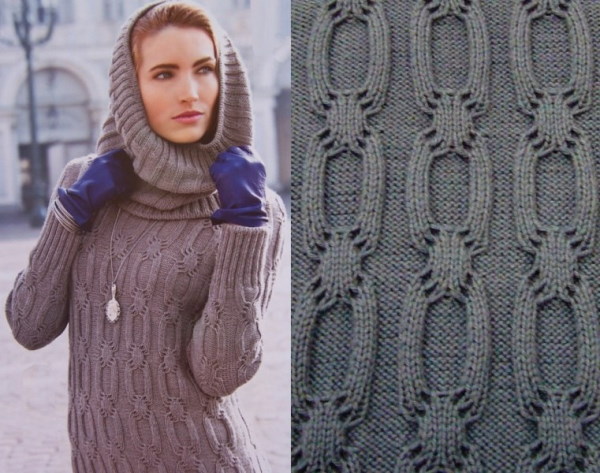
The diagram and description of the knitted hooded collar will help needlewomen create a warm and beautiful winter item for themselves or their loved ones. The product is universal, as it combines the functions of a headdress and a scarf, fastened together. When it gets warmer, for example, the hood can be removed by folding it back, which is very convenient in today's fast pace of life.
Video about knitting a hood collar with knitting needles
Knitting a bonnet: