Patterns created by cells, are often used by teachers for classes with preschoolers. Drawing such pictures not only develops fine motor skills, which directly affect the physical and mental development of a growing person, but also helps relieve nervous tension, as well as reveal the creative potential of the child.
Provided that the lessons are organized correctly, a young artist will be able to create complex images using cells after just 2-4 weeks of regular classes.
Patterns on cells as a method of developing fine motor skills
Patterns on cells (for preschoolers, lessons should be built on the same scheme as lessons for adults, but using simpler images), used to develop fine motor skills in young and middle-aged children, should consist of simple elements (straight, diagonal, and so on), present in the original in large quantities.
The task for young artists in this case is formulated as the need to accurately copy the original image with subsequent drawing of several copies in one row on the working surface. Despite the apparent simplicity of the task, children manage to create an exact copy of the picture by cells only after 1-2 lessons.
The simplest options for drawings designed to develop fine motor skills are:
| Drawing variant | Step-by-step method of its creation |
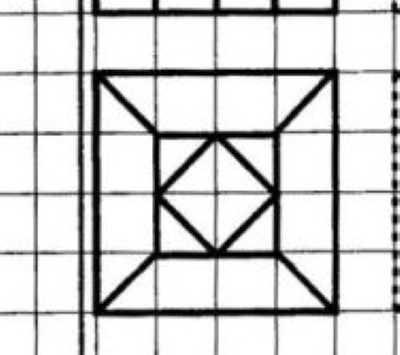 | 1. Draw a square by tracing an equal number of cells on four sides. 2. From each corner, draw a diagonal to the center. The diagonals should be equal in length to each other. 3. Connect the extreme points of the diagonals by drawing another square inside the main figure. 4. Use dots to mark the midpoints of the faces of each side of the inner square. 5. Connect the middles of the edges with straight lines, thus drawing a rhombus inside the square. 6. Re-draw the outline of the objects, making it more expressive. |
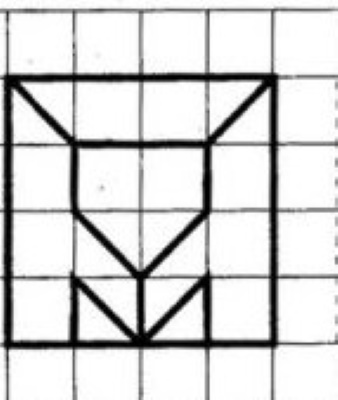 | 1. Draw a square by tracing an equal number of cells on four sides.
2. From the two upper corners, draw diagonals to the center. Connect the extreme points of the lines with a horizontal line. 3. From the extreme points of the horizontal, draw down identical verticals, then connect them with each other using diagonals directed towards each other. 4. From the point of intersection of the lines, draw a vertical line downwards so that its extreme point is located on the lower border of the main figure. 5. Draw a small triangle to the right and left of the point where the vertical line intersects the border of the square. |
At what age should children be taught to draw by cells?
There are no specific recommendations related to the most optimal age for teaching a child to draw on squares. Parents or teachers should focus on the interests of the young artist, the peculiarities of his development, as well as the state of the nervous system and psyche. In the absolute majority of cases, a child is ready to engage in this type of fine art at the age of 4-5 years.
Advancing drawing skills from simple to complex
Patterns by cells (for preschoolers, the optimal duration of one activity is considered to be 20-30 minutes), like other drawings, should be learned to create in stages, starting with the simplest images.
This approach will help the child master the basic skills of fine art, and, thanks to the first successes, strengthen their faith in their abilities and desire to improve in this area.
If you ignore the gradual progression of a child's drawing skills from simple to complex, you may not only encounter open resistance to the task from the young artist, but also provoke his removal from art classes in general.
You should organize drawing lessons on cells for preschoolers like this:
- Copying simple images – 2-3 lessons.
- Copying images while talking through the algorithm for creating a picture – 2-3 lessons.
- Creating simple images based on the algorithm’s dictation – 3-4 lessons.
- Creating complex images according to the dictation of an algorithm – 3-4 lessons.
- Independent development of an algorithm for drawing the selected image.
Tools and materials for creativity
To create a drawing using cells, a child will need:
- sheets of thick paper or cardboard, lined in a grid (if you don’t have such paper, you can draw a grid on the work surface yourself using stencils or a ruler with a simple pencil);

To draw patterns on squares for preschoolers, you need sheets of squared paper. - a set of pencils or a marker (pencils are convenient because they allow you to promptly correct erroneously drawn lines. It is recommended to use a marker if the work surface was drawn by hand using a simple pencil);
- the original image or the algorithm for creating the picture (if the child is working independently);
- minor office supplies (e.g. ruler, eraser, colored pencils, compass, sharpener, etc.).
What kind of cellular patterns can there be?
Patterns on cells (it will be interesting for preschoolers to draw pictures with images of recognizable objects) can be used in drawing:
- simple chains of geometric elements (usually used in the decoration of notebooks, workbooks or personal diaries);
- outlines of people;
- figures of living creatures (animals, birds);
- outlines of toys;
- drawings of cartoon characters.
Ideas for beautiful patterns to copy into a notebook, LD
Simple grid drawings used to decorate a personal diary or notebook are:
| Drawing variant | Step-by-step method of its creation |
 | 1. From the upper border of the working plane, draw 2 vertical lines, 3 cells long. 2. From the extreme points of the lines, draw diagonal lines of similar size, directing the lines to the lower right corner. 3. From the extreme points of the diagonals, draw 2 vertical lines downwards. The length of the verticals is 3 cells. 4. Continue the pattern by drawing 2 diagonal parallels directed to the lower left corner. The length of the lines is 3 cells. 5. Repeat steps 1-4 until the pattern reaches the required length. 6. If desired, color the image. |
 | 1. From the upper boundary of the working plane, draw 5 vertical lines, 1 cell long.
2. Extend the first 4 verticals by drawing diagonals to their extreme points (length – 1 cell), directing them to the lower right corner. 3. From the extreme point of the first vertical on the right, draw a diagonal of the same length, directing it to the lower left corner. 4. Continue the pattern by drawing a vertical line to each point, the length of which should be no more than 1 cell. 5. Repeat steps 2–4 until the pattern reaches the desired size. 6. Color the drawing so that it creates the illusion that the stripes are intertwined. |
Easy options for preschoolers with step-by-step descriptions
When teaching preschoolers to draw by cells, you should start with the simplest images:
| Drawing variant | Step-by-step method of its creation |
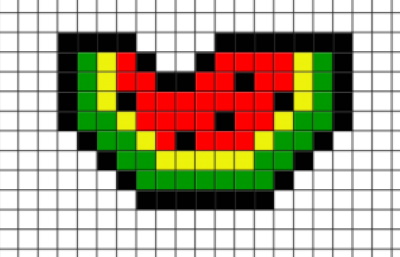 | 1. Find the starting point in the center of the sheet of paper you are using. 2. Draw a picture according to the instructions: 5 keys down, 1 key to the right, 1 key down, 1 key to the right, 1 key down, 1 key to the right, 1 key down, 1 key to the right, 1 key down, 1 key to the right, 1 key down, 7 keys to the right, 1 key up, 1 key to the right, 1 key up, 1 key to the right, 1 key up, 1 key to the right, 1 key up, 1 key to the right, 5 keys up, 7 keys to the left, 1 key down, 1 key to the left, 1 key down, 2 keys to the left, 1 key up, 1 key to the left, 1 key up, 4 keys to the left. 3. Step back from the outline of the figure by 1 cell, then duplicate the original lines. 4. Step back 1 cell from the inner contour, then draw an exact copy of it again. 5. Paint a piece of watermelon, making each of its layers multi-colored. |
 | 1. Determine the starting point at the top of the work plane.
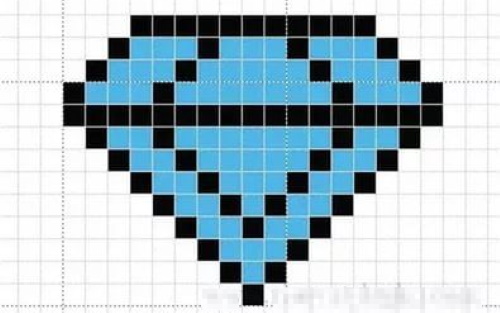
2. Draw a picture according to the instructions: 1 key down, 1 key left, 1 key down, 1 key left, 1 key down, 1 key left, 2 keys down, 1 key right, repeat the combination "1 key down and 1 key right" 9 times, repeat the combination "1 key up and 1 key right" 8 times, 2 keys up, 1 key left, 1 key up, 1 key left, 1 key up, 1 key left, 1 key up, 1 key left, 1 key up, 11 keys left. 3. By coloring several rows of cells inside the outline (edges of the depicted stone) of the main figure, create the illusion of volume of the drawn crystal. |
More complex and unusual patterns
Patterns on cells (for preschoolers, the lesson will be more interesting if you give children the chance to independently choose the images that they will work on creating during the lesson), which are distinguished by increased complexity, can be represented by images of people, toy animals, and so on.
Birds
You can draw birds in cells like this:
| Drawing variant | Step-by-step method of its creation |
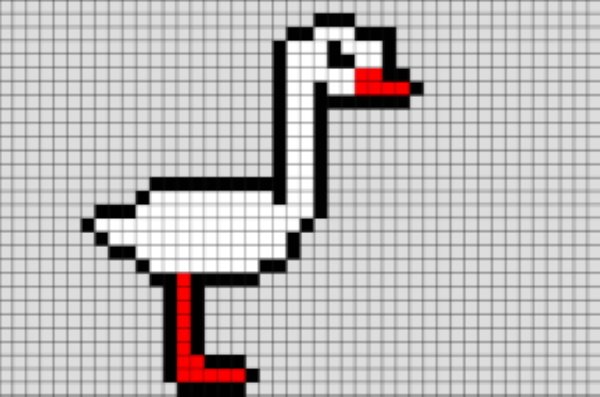 | 1. Determine the starting point at the top of the work plane in the center. 2. Create a picture according to the scheme: 10 cells down, 9 cells left, 1 cell down, 1 cell left, 1 cell up, 3 cells left, 1 cell down, 1 cell left, 1 cell down, 1 cell right, 1 cell down, 1 cell right, 1 cell down, 2 cells right, 1 cell down, 1 cell right, 1 cell down, 1 cell right, 7 cells down, 1 cell right, 1 cell down, 5 cells right, 1 cell up, 1 cell right, 1 cell up, 1 cell left, 1 cell up, 3 cells left, 5 cells up, 4 cells right, 1 cell up, 2 cells right, 1 cell up, 1 key to the right, 2 keys up, 1 key to the right, 1 key up, 1 key to the right, 8 keys up, 6 keys to the right, 1 key up, 1 key to the right, 1 key up, 1 key to the left, 1 key up, 1 key to the left, 3 keys up, 3 keys to the left, 1 key up, 3 keys to the left, 1 key down, 2 keys to the left, 1 key down, 1 key to the left. 3. Color the drawing, if necessary, adding more detail by drawing the outline of the goose’s beak, legs, and eyes. |
 | 1. Determine the starting point at the top of the work plane.
2. Draw a picture according to the scheme: 1 key down, 1 key to the left, 2 keys down, 2 keys to the left, 1 key down, 1 key to the right, 1 key down, 2 keys to the right, 1 key down, 2 keys to the left, 1 key down, 1 key to the left, 3 keys down, 1 key to the right, 1 key down, 1 key to the right, 1 key down, 8 keys to the right, 1 key up, 1 key to the right, 1 key up, 1 key to the right, 1 key up, 1 key to the right, 1 key up, 1 key to the right, 5 keys up, 1 key to the left, 1 key down, 1 key to the left, 1 key down, 4 keys to the left, 1 key up, 1 key. to the right, 4 keys up, 1 key to the right, 1 key up, 4 keys to the left. 3. Add detail to the image by drawing the duck’s beak and eye. |
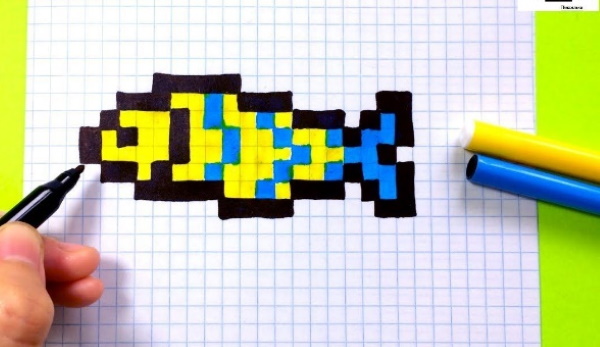
Fish
You can draw a fish using cells like this:
| Drawing variant | Step-by-step method of its creation |
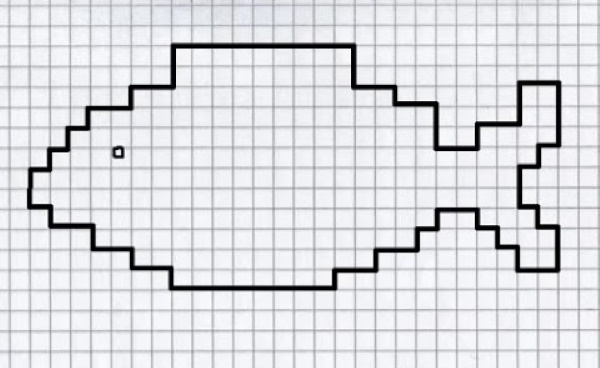 | 1. Determine the starting point at the top of the work plane. 2. Create a picture according to the following scheme: 2 keys down, 2 keys left, 1 key down, 2 keys left, repeat the combination “1 key down and 1 key left” 3 times, 2 keys down, 1 key right, 1 key down, 2 keys right, 1 key down, 2 keys right, 1 key down, 2 keys right, 1 key down, 8 keys right, 1 key up, 2 keys right, 1 key up, 2 keys right, 1 key up, 1 key right, 1 left up, 2 keys right, 1 key down, 1 key right, 1 key down, 1 key right, 1 key down, 2 keys right, 2 keys up, 1 key. left, 1 key up, 1 key left, 2 keys up, 1 key right, 1 key up, 1 key right, 3 keys up, 2 keys left, 2 keys down, 2 keys left, 1 key down, 2 keys left, 2 keys up, 2 keys left, 1 key up, 2 keys left, 1 key up, 2 keys left, 2 keys up, 9 keys left. 3. Add detail to the image by drawing the shark’s eye. |
 | 1. Determine the starting point in the middle of the work plane.
2. Draw a fish using the following pattern: 1 key down, 2 keys to the left, 1 key down, 1 key to the left, 1 key down, 1 key to the left, 2 keys down, 1 key to the right, 1 key down, 2 keys to the right, 1 key down, 5 keys to the right, 1 key down, 4 keys to the right, 1 key up, 3 keys to the right, 1 key up, 1 key to the right, 1 key down, 1 key to the right, 1 key down, 2 keys to the right, 3 keys up, 1 key to the left, 1 key up, 1 key to the right, 3 keys up, 2 keys to the right, 1 key down, 1 key to the left, 1 key down, 1 key to the left, 1 key up, 3 keys left, 1 key up, 3 keys left, 1 key up, 5 keys left. 3. Add detail to the drawing by adding scales, gills and eyes to the fish. |
Animals
The patterns created by the cells can be used by preschoolers as derivative details for drawing images of animals:
| Drawing variant | Step-by-step method of its creation |
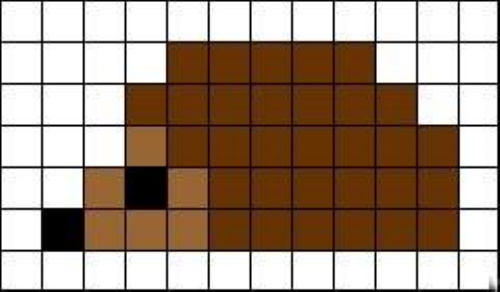 | 1. Find the starting point for further drawing of the image. 2. Draw a hedgehog according to the following diagram: 2 cells down, 2 cells left, 4 cells down, 2 cells left, 2 cells down, 2 cells left, 2 cells down, 20 cells right, 6 cells up, 2 cells left, 2 cells up, 2 cells left, 2 cells up, 10 cells left. 3. Add detail to the image by drawing the hedgehog’s eye, nose, and outlining the outline of the skin with needles. |
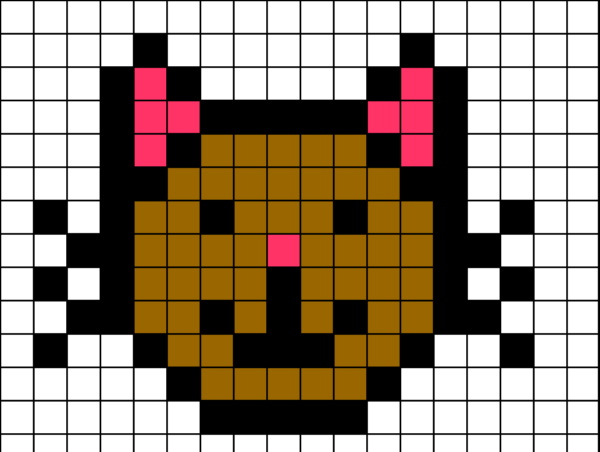 | 1. Mark the starting point at the top of the work plane.
2. Draw a cat using the following pattern: 1 key down, 1 key left, 5 keys down, 1 key left, 1 key up, 1 key left, 1 key down, 1 key right, 1 key down, 1 key left, 1 key down, 1 key right, 1 key down, 1 key left, 1 key down, 1 key right, 1 key down, 1 key left, 1 key down, 1 key right, 1 key right, 1 key up, 2 keys right, 1 key down, 1 key right, 1 key down, 1 key right, 1 key down, 5 keys right, 1 key up, 1 key right, 1 key up, 1 key right, 1 key up, 2 keys right, 1 key down, 1 key to the right, 1 key up, 1 key to the left, 1 key up, 1 key to the right, 1 key up, 1 key to the left, 1 key up, 1 key to the right, 1 key up, 1 key to the left, 1 key down, 1 key to the right, 5 keys up, 1 key to the left, 1 key up, 1 key to the left, 1 key down, 1 key to the left, 1 key down, 5 keys to the left, 1 key up, 1 key to the left, 1 key up, 1 key to the left. 3. Add detail to the picture by drawing the cat’s ears, nose, mouth and eyes. 4. Color the picture. |
Insects
You can draw insects in cells like this:
| Drawing variant | Step-by-step method of its creation |
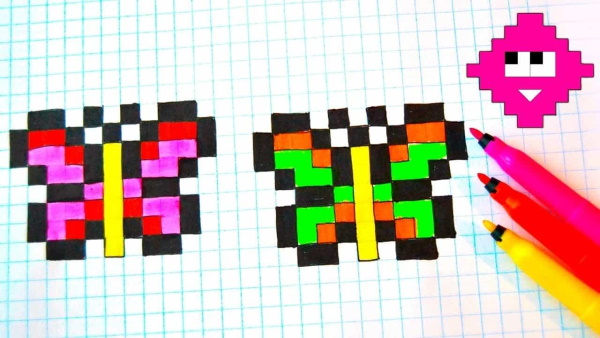 | 1. Mark the starting point in the middle of the working plane. 2. Draw a butterfly according to the following pattern: 1 key to the left, 1 key down, 1 key to the left, 1 key up, 2 keys to the left, 1 key down, 1 key to the left, 2 keys down, 1 key to the right, 1 key down, 1 key to the right, 1 key down, 1 key to the left, 2 keys down, 1 key to the right, 1 key down, 2 keys to the right, 1 key up, 1 key to the right, 1 key down, 1 key to the right, 1 key up, 1 key to the right, 1 key down, 2 keys to the right, 1 key up, 1 key to the right, 2 keys up, 1 key to the left, 1 key up, 1 key to the right, 1 key up, 1 key to the right, 2 keys up, 1 key to the left, 1 key up, 2 keys to the left, 1 key down, 1 key to the left, 1 key up, 1 key to the left, 1 key down, 1 key to the left, 1 key up. 3. Paint the butterfly in bright colors. |
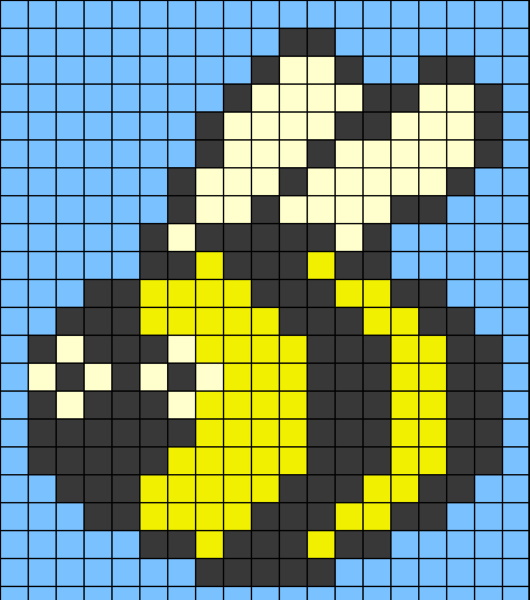 | 1. Find the starting point at the top of the sheet of paper you are using.
2. Draw a bee using the following diagram: 1 key down, 1 key to the left, 1 key down, 1 key to the left, 1 key down, 1 key to the left, 2 keys down, 1 key to the left, 2 keys down, 1 key to the left, 2 keys down, 1 key to the left, 2 keys down, 2 keys left, 1 key down, 1 key to the left, 1 key down, 1 key to the left, 5 keys down, 1 key to the right, 1 key down, 1 key to the right, 1 key down, 2 keys to the right, 1 key down, 5 keys to the right, 1 key up, 2 keys to the right, 1 key up, 2 keys to the right, 1 key up, 1 key to the right, 1 key up, 1 key to the right, 1 key up, 1 key to the right, 5 keys up, 1 key to the left, 1 key up, 1 key to the left, 1 key up, 2 keys to the left, 2 keys up, 2 keys to the right, 1 key up, 1 key to the right, 1 key up, 1 key to the right, 3 keys up, 1 key to the left, 1 key up, 2 keys to the left, 1 key down, 2 keys to the left, 1 key up, 1 key to the left, 1 key up, 2 keys to the left. 3. Add detail to the image by adding eyes and wings to the bee. 4. Color the picture. |
Floristics
You can draw flowers in cells like this:
| Drawing variant | Step-by-step method of its creation |
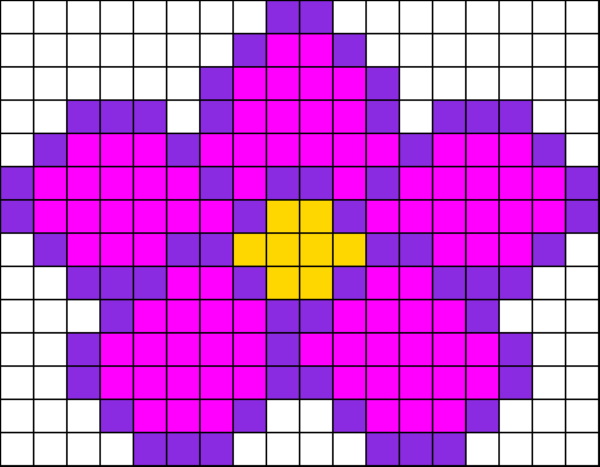 | 1. Determine the starting point located close to the upper boundary of the working plane. 2. Draw a flower according to the following pattern: 1 key down, 1 key left, 1 key down, 1 key left, 2 keys down, 1 key left, 1 key up, 3 keys left, 1 key down, 1 key left, 1 key down, 1 key left, 2 keys down, 1 key right, 1 key down, 1 key right, 1 key down, 1 key right, 1 key down, 1 key left, 2 keys down, 1 key right, 1 key down, 1 key right, 1 key down, 1 key left, 2 keys down, 1 key right, 1 key down, 1 key right, 1 key down, 3 keys right, 1 key up, 1 key right, 1 key up, 2 keys right, 1 key down, 1 key to the right, 1 key down, 3 keys to the right, 1 key up, 1 key to the right, 1 key up, 1 key to the right, 2 keys up, 1 key to the left, 1 key up, 1 key to the right, 1 key up, 1 key to the right, 1 key up, 1 key to the right, 1 key up, 1 key to the right, 2 keys up, 1 key to the left, 1 key up, 1 key to the left, 1 key up, 3 keys to the left, 1 key down, 1 key to the left, 2 keys up, 1 key to the left, 1 key up, 1 key to the left, 1 key up, 2 keys to the left. 3. Add detail to the drawing, then color it in with bright colors. |
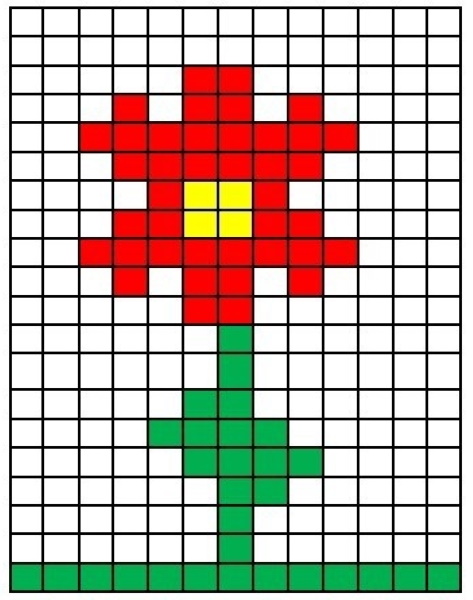 | 1. Find the starting point at the top of the work plane.
2. Draw a flower according to the following pattern: 2 keys down, 1 key to the left, 1 key up, 1 key to the left, 1 key down, 1 key to the left, 1 key down, 1 key to the right, 1 key down, 1 key to the right, 1 key down, 1 key to the left, 1 key down, 1 key to the left, 1 key down, 1 key to the right, 1 key down, 1 key to the right, 1 key up, 1 key to the right, 2 keys down, 2 keys to the right, 2 keys up, 1 key to the right, 1 key down, 1 key to the right, 1 key up, 1 key to the right, 1 key up, 1 key to the right, 1 key up, 1 key to the left, 1 key up, 1 key to the left, 1 key up, 1 key right, 1 key up, 1 key right, 1 key up, 1 key left, 1 key up, 1 key right, 1 key down, 1 key left, 2 keys up, 2 keys left. 3. Add detail to the image by drawing the stem and grass. 4. Color the picture. |
Toys
It is recommended to draw toys by cells as follows:
| Drawing variant | Step-by-step method of its creation |
 | 1. Find the starting point at the top point of the work plane. 2. Draw a picture according to the following scheme: 1 key down, 1 key left, 2 keys down, 1 key right, 1 key down, 1 key right, 5 keys down, 1 key right, 1 key down, 2 keys right, 1 key down, 7 keys left, 1 key down, 1 key right, 1 key down, 5 keys right, 1 key down, repeat the combination “1 key left and 1 key down” 4 times, 1 key right, 1 key down, 3 keys right, 4 keys down, 4 keys right, 4 keys up, 3 keys right, 1 key up, 1 key right, 1 key up, repeat the combination “1 key left and 1 key up”. up» 4 times, 5 keys to the right, 1 key up, 1 key to the right, 1 key up, 7 keys to the left, 1 key up, 2 keys to the right, 1 key up, 1 key to the right, 5 keys up, 1 key to the right, 1 key up, 1 key to the right, 2 keys up, 1 key to the left, 1 key up, 1 key to the left, 1 key down, 1 key to the left, 1 key down, 6 keys to the left, 1 key up, 1 key to the left, 1 key up, 1 key to the left. |
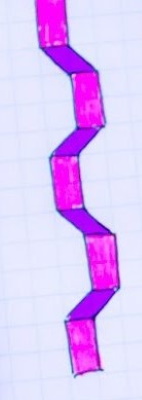
Patterned braids
The easiest way to draw a braid is considered to be:
- From the top edge of the sheet of paper used, draw 3 vertical lines, 1 class long.
- From lines 2 and 3, draw diagonals directed to the lower left corner, and from the right, a mirror diagonal.
- From lines 1 and 2, draw verticals, and from line 3, draw a diagonal directed to the lower right corner.
- Repeat the above steps until you have a patterned braid of the required length.
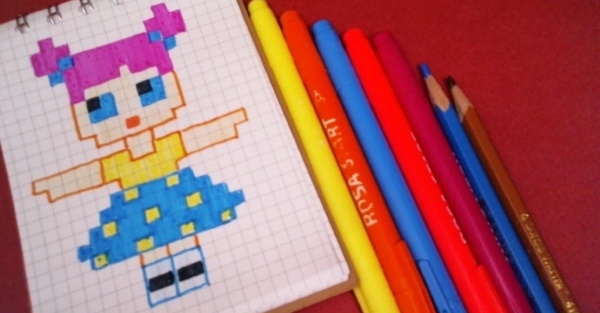
Human figures
Most often, when preschoolers are given the task of drawing a person in squares, they draw a portrait of a Viking:
- Define the starting point by placing it in the upper right corner of the work plane.
- Draw a picture according to the scheme: 1 key down, 1 key left, 7 keys down, 1 key right, 1 key down, 1 key right, 3 keys down, 1 key right, 2 keys down, 1 key left, 4 keys down, 1 key left, 1 key down, 1 key left, 6 keys down, 2 keys right, 1 key down, 2 keys right, 3 keys down, 1 key right, 1 key down (repeat the last 2 steps 3 times), 5 keys right, 1 key up, 3 keys right, 1 key down, 2 keys right, 1 key up, 1 key right, 1 key down, 2 keys right, 1 key up, repeat the combination "1 key to the right and 1 key to the up" 3 times, 1 key to the right, 2 keys up, 1 key to the right, 1 key up, 2 keys to the right, 2 keys up, 1 key to the right, 1 key up, 1 key to the right, 4 keys up, 1 key to the left, 1 key up, 1 key to the left, 4 keys up, 1 key to the left, 2 keys up, 1 key to the right, 3 keys up, 1 key to the right, 1 key up, 1 key to the right, 7 keys up, 1 key to the right, 1 key up, 2 keys to the left, repeat the combination "1 key down and 1 key to the left" 5 times, 1 key up, 14 keys to the left, 1 key down, 1 key to the left, 1 key up, repeat the combination “1 key to the left and 1 key up” 4 times, 2 keys to the left.
- Add detail to the drawing by adding the man's face and also marking the border of his beard and helmet.
Patterns drawn by preschoolers on squares can be used not only to decorate notebooks, notepads or personal diaries. If done well, children's work will look appropriate in the decor of a residential area (children's room) or a special commercial space with a narrow purpose (for example, in a game center).
Video about drawing by cells
How to draw a bunny using cells: