Beautiful flowers can be made from napkins, pre-dyed in bright colors, or decorated with various prints. Such decoration will help to set the table or decorate the interior of the apartment.
Inventory for work
The instructions will tell you how to make flowers from napkins.
To make this craft you will need the following tools and items:
- cellulose of varying structure, size and color shades;
- adhesive for paper, this can be a stationery “pencil” or PVA;
- colored narrow tape used in floristry;
- thin wire, preferably brown or green, regular material needs to be additionally decorated;
- scissors;
- stapler;
- thick needle;
- small pliers or tongs;
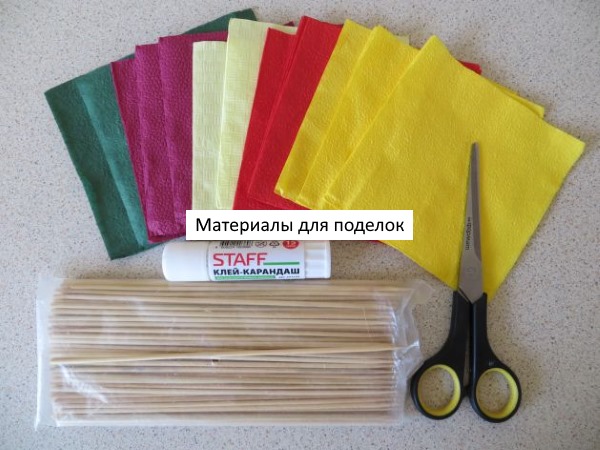
- compass;
- thin ribbons;
- ruler;
- thick cardboard;
- various decor;
- strong thread;
- pencil.
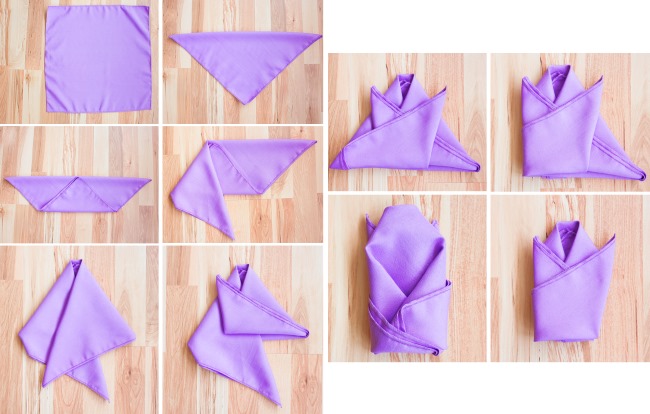
Lotus flower from napkins
The process of making a lotus involves the following steps:
- Take a regular small square paper tablecloth, preferably in a delicate natural shade.
- The source material should be unfolded into a large square.
- Fold all corners of the figure towards the center, then turn the workpiece over to the other side. It is advisable to ensure that the craft is folded correctly and evenly.
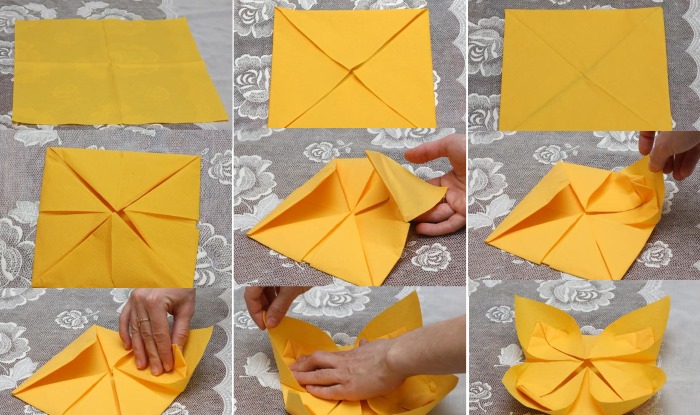
- Bend the corners to the central point again. Now you don't need to turn the craft, but you need to pick up the formed corner and lift it.
- After this, you need to slowly pull this corner up, while it is advisable to support the inner part of the workpiece so that it does not unfold.
- Unfold the remaining petals in a similar manner.
Poinsettia flower
How to make flowers from napkins for Christmas holidays with your own hands, will tell you the master class on making poinsettia:
- Select a bright red cellulose material and leave it folded. Then you need to bend the material diagonally.
- After this, fold the original fabric again to create a smaller triangle configuration.
- Finally, fold the piece in half again.
- On the resulting figure, you should mark the outlines of the future petals and cut out the folded product along the contours.
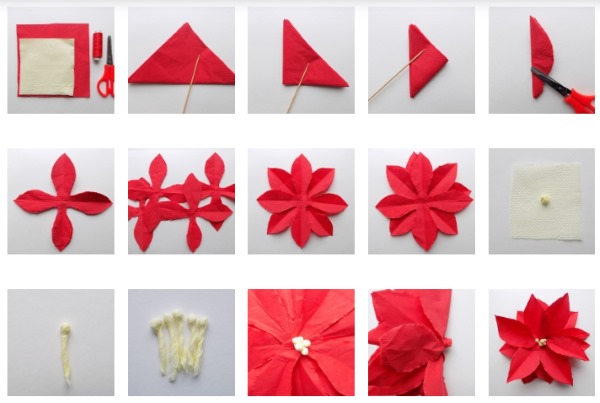
- Carefully straighten out all the tiers of the craft. As a result, you get 4 parts, each of them has 4 petals.
- Place the resulting blanks one on top of the other, shifting them slightly relative to each other.
- The core of the poinsettia should be made from a yellow napkin. To do this, use scissors to cut out a small square. In its central part, place a small pellet formed from the same source material.
- Fold the pieces together to create a stamen. Make 5 of these cores.
- In the middle of the red inflorescence, use scissors to cut a small hole into which you need to insert the stamens.
- On the back side, tie the poinsettia with a thick thread and cut off the excess.
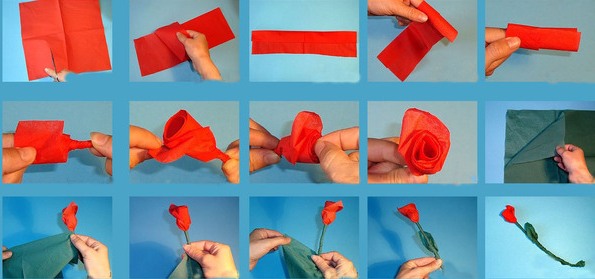
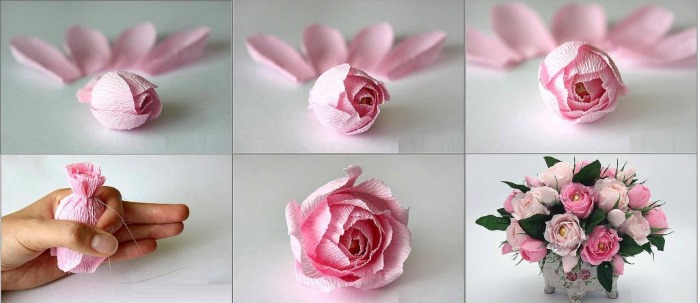
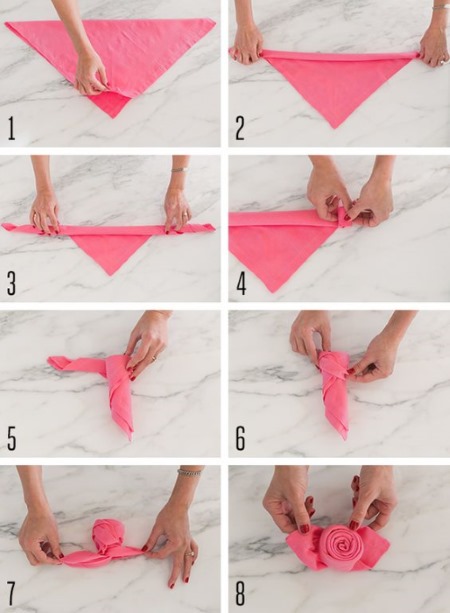
Roses
Roses can be made from colored paper towels.
Step-by-step master class on making inflorescences:
- Unfold a multi-layer square napkin entirely and cut 4-5 cm off one side to form a rectangular shape.
- The resulting workpiece should be folded lengthwise so that one half does not completely cover the other part.
- Then you need to wrap the original material around your finger to form a rosebud.
- The main task is to twist the flower so that a narrowed, dense edge remains, because later it is necessary to attach the inflorescence to the stem, also made from napkins.
- Straighten the finished bud and leaves.
To make a rose from commercially available round lace blanks, follow these steps:
- On each circle make a small cut and form an aesthetically beautiful bud.
- The lower segment needs to be twisted thoroughly in order to continue making the stem from another paper piece.
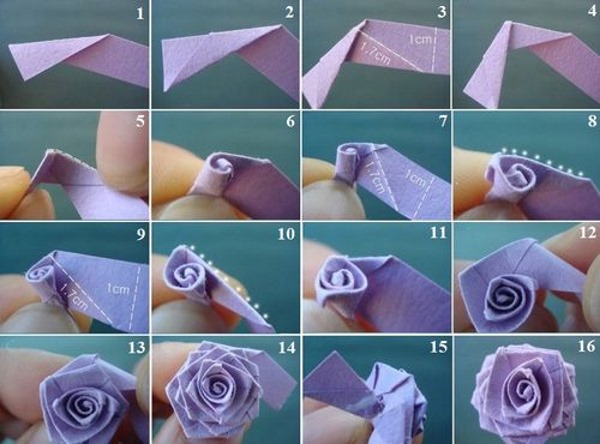
Royal Rose
Few people know how to make flowers from napkins.
For example, to design a royal rose, you need to follow these steps:
- Take one thin pink napkin and cut it into 4 equal parts.
- One of the blanks should be folded in half and rolled into a cylinder (not tightly) along the short edge.
- On one side, tighten the figure with a thread; this will be the flower core.
- The remaining squares need to be cut diagonally. In the resulting triangle, you need to bend the right angle. The remaining ends should be loosely wrapped around the core, while fixing the formed petal with a thread. Their number can be arbitrary, this is determined during the work process.
- If you are making a stem, it is better to take a thick copper wire and wrap it with a paper strip of the desired shade. It is advisable to attach a paper leaf during wrapping.
To form a blooming royal rose, you need to follow these instructions:
- Cut the paper blank along the folds into 4 square shapes.
- Wrap each part around a pencil approximately to the middle.
- Squeeze the created tube towards the center and pull out the pencil.
- Form another 5-6 petals in a similar manner.
- Twist the napkins into a bud in a spiral and secure at the base with a ribbon or thread.
- If desired, attach a wire stem and decorate with green paper leaves.
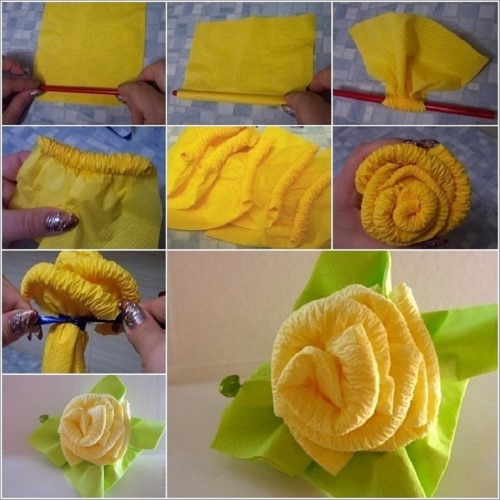
Peony
To create a peony, you will need to follow these steps:
- Fold a regular yellow napkin in half twice to form a square.
- Fold the piece in half diagonally again, and tuck one of the corners toward the longest side of the resulting triangular figure.
- After this, cut the corner into a semicircle and completely unfold the workpiece.
- Using a similar method, cut out inflorescences from 4 napkins (in addition to yellow, you can use pink).
- Carefully separate all the petals and then fold them again.
- Place all the cut out pieces one by one in assembled form towards the center, as if forming a lush peony inflorescence.
- After folding, carefully straighten the petals and secure them with a stapler so that they do not fall apart.
- Next, it is advisable to make a leaf from green colored paper (½ A4 format). To do this, the original material must be folded diagonally in the form of an accordion, then cut the blank in half, fasten the wide segment with glue and attach it to the peony you have made.
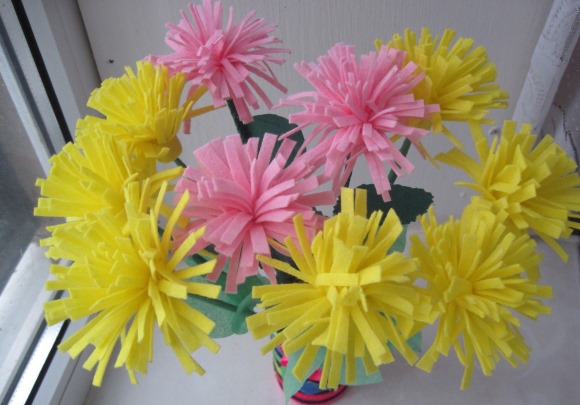
Dandelion
Step-by-step master class on how to make a dandelion from cellulose material:
- Prepare a three-layer yellow table napkin. Separate each layer.
- Take 2 thin blanks and fold them 4 times, then fold the pieces the same number of times.
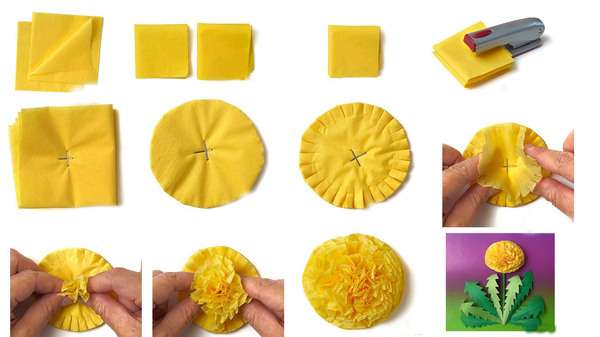
- Place all the tiers one on top of the other and staple them in the center. For strength, fix them again by placing the staples crosswise.
- Cut a circle out of the yellow stapled stack.
- On the edges of the created round figure, make cuts 10 mm long at the same distance from each other.
- Lift the top layer up and squeeze it with your fingers in the center.
- The same manipulations must be done with the following tiers. Several layers can be lifted at the same time.
- A tube rolled from a thin strip of paper can be used as a stem.
- The leaves can be cut out of a 4x12 sheet of paper. It needs to be folded in half and cut diagonally with denticles. Glue them to the bottom of the stem.
Carnation
Masters who create various paper crafts know how to make flowers from napkins in the shape of carnations.
They share the secrets of making the inflorescence:
- You need to take several pieces of the original cellulose material. It is better to choose bright saturated red or pink shades. Fasten the parts in the center with a stapler. The more napkins you use, the fluffier the carnation will be.
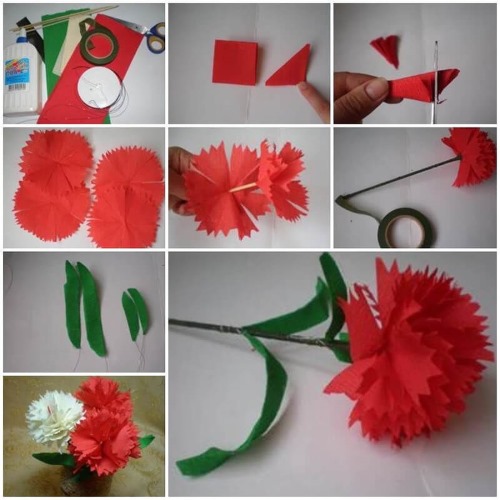
- On the prepared blanks, draw a circle with a radius of 4 cm using a compass.
- Cut out the circle along the contours.
- The tips of the resulting figures must be colored with a marker.
- Use an awl or compass to make a hole in the round piece for the stem.
- Insert a dark green paper or cocktail straw rolled into a tube into the hole.
- Fix the stem with a small piece of plasticine.
- Then the top cellulose layer should be separated and lifted towards the center.
- Repeat the same process with the remaining tiers. All the paper mass should be straightened and formed into a carnation.
Chrysanthemums
To decorate the chrysanthemum you will need multi-colored napkins:
| Color of the original raw material | Quantity, pcs. |
| Green | 4 |
| Pink | 30 |
Step-by-step master class on making a flower from cellulose:
- Fold a regular green napkin in half.
- Bend the edges of the workpiece into small triangles towards the center.
- Fold the piece towards the center along the long line, then fold it in half again.
- Repeat the same steps with the remaining paper towels.
- Fold the pink napkin in the middle to form a triangle.
- Bend the craft again into a smaller triangular shape.
- Fold the edges towards the center.
- Turn the product over to the back side and bend the corners.
- Fold the piece in half. Decorate the rest of the cellulose material in a similar manner.
- Place the finished green blanks one on top of the other and tie them together in the middle with wire.
- Spread the pulled napkins around the circle.
- String the pink pieces onto the green ones, row by row, while grabbing the adjacent petals.
Napkin Flowers in Pots
Flowers from napkins can be made in pots both in the form of bouquets and as single specimens.
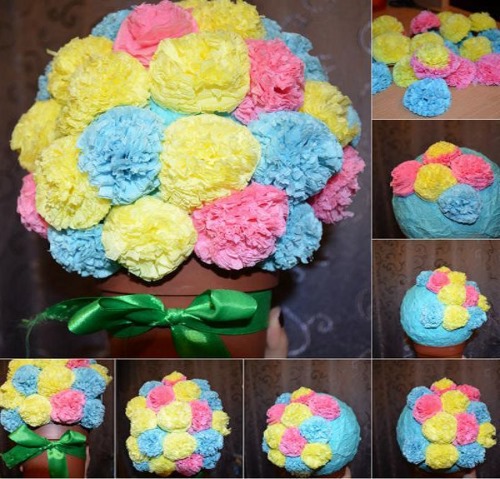
Step-by-step technology for creating a flower arrangement:
- Form a ball from an old newspaper and wrap it with threads. It will serve as the basis of the craft.
- Take a flower pot and fix the created configuration inside with glue.
- Lay out napkins of different colors and cut each of them into 4 equal squares.
- Place the cut shapes on top of each other.
- Cut circles from square blanks.
- Take 6-8 circles and staple them in the center. The more circles you use, the more lush the inflorescence will be. The layers of napkins can be made multi-colored.
- The first tier of the original material must be crumpled, pressing it lightly towards the center.
- Repeat these manipulations with the remaining layers, you will get a flower.
- Make enough inflorescences to cover the entire area of the created sphere.
- Finally, glue the colored pieces to the base.
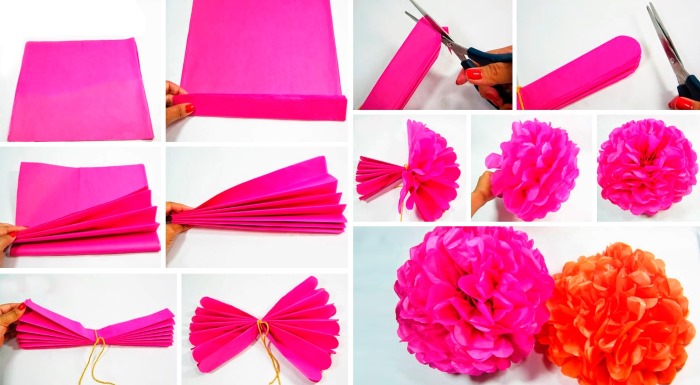
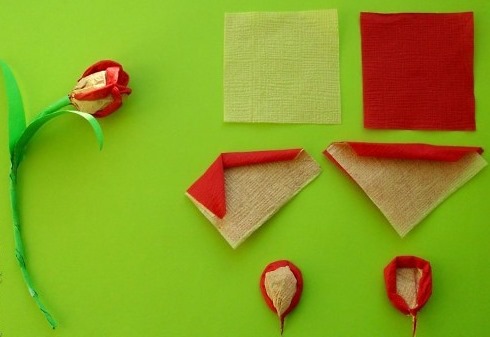
Flowers from candies and napkins with your own hands
A hand-made bouquet of colored napkins and candies can be given for any occasion.
Master class on composition formation:
- Wrap a small piece of file around the candy and attach it to the blunt end of the skewer with tape or thread.
- Take 2 napkins and fold them in 2 rows, draw the outline of the future flower on the outer surface and then cut out along the contour.
- Open the resulting inflorescence and fasten it in the center with a stapler.
- For strength, it is better to tape the confection to the stick. After that, put the cut out flower to the base of the candy. Fix it with sticky tape.
- Then you need to lift each paper tier in turn to give the craft some splendor. From 2 napkins you should get 8 layers.
- Cut an elongated strip of green corrugated paper, the width of which is 1 cm and a square measuring 5x5.
- You need to cut a quatrefoil from a square blank.
- Wrap the prepared strip around the skewer using glue.
- Pierce the leaf and place it at the base of the inflorescence. Glue it to the product.
- Make several flower stems in a similar manner and make a bouquet out of them.
How to make a volumetric number from napkins
For a children's party, you can make a number from cellulose material as decoration.
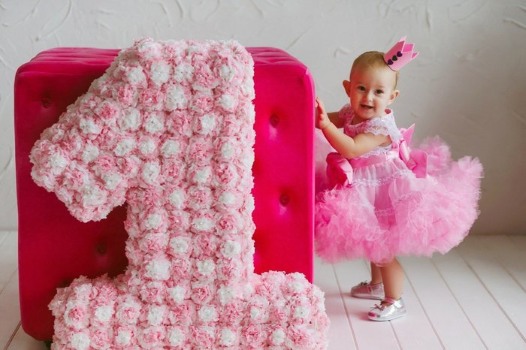
Step-by-step master class on decorating a craft:
- First, you need to decide on the size of the future product and draw a template of the number on cardboard.
- It is recommended to use foam plastic for thermal insulation as a base.
- Transfer the digital layout onto the foam blanks and connect them together with double-sided tape.
- Fold the napkins in half and cut to form a square of 2 layers. Fold this figure 2 more times and fix it in the middle with another similar piece.
- Use scissors to transform the created multilayer square blanks into circles. Make notches along the circumference and make them fluffy.
- Attach the resulting inflorescences to the foam with a glue gun. If you use PVA glue, you should cover the surface of the figure with it in advance and spread it on each flower detail.
- When decorating a foam template, you need to attach flowers even at the back. It is advisable not to leave wide gaps and glue the blanks closer together.
- For a digital layout 1 m high you will need about 5 packs of napkins.
Decorations in individual glasses
Napkins are placed in the glass individually for each guest.
Linen or cotton multi-colored scarves are used as the source material, sometimes decorated with cellulose material. The main condition is that the decoration should be multi-tiered and dense. Individual decor looks good both in ordinary glasses and in expensive goblets.
Options for creating jewelry:
- Bouquet:
- You need to take 2 napkins, then place them perpendicularly one on top of the other and lift them up, holding them by the middle.
- After this, you should shake them, while the ends should hang gracefully and evenly.
- Then twist the center slightly and carefully, without crushing them, place the “bouquet” into the glass.
- Tulip:
- Fold the original square material in half and fold the corners towards the center.
- Turn the resulting triangle over onto its reverse side and bend its sides toward the middle.
- After this, fold the formed figure in such a way as to connect the corners located at the bottom and top.
- Twist the workpiece into a circle and place it in a glass.
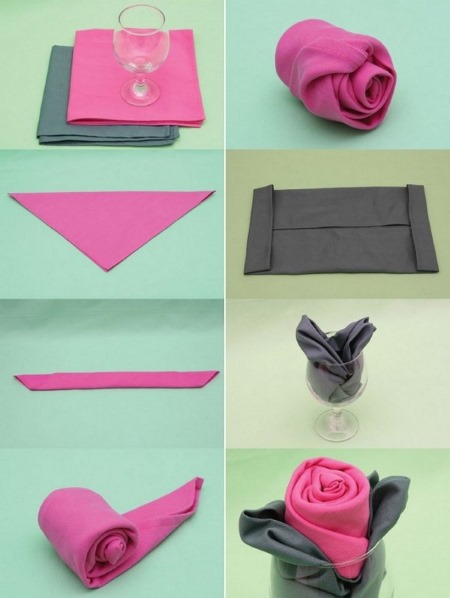
- Rose:
- To decorate it you will need a light green and scarlet napkin.
- The first thing to do is to create the leaves. To do this, bend the green-colored blank 2 rows diagonally.
- Then you need to make the inflorescence. Fold the red part diagonally in half. Bend the resulting triangle in half, while combining its base and top. You should get a flattened trapezoid.
- After this, wrap the resulting figure into a tube; it will resemble a bud.
- Place leaves in the inflorescence, then stick the craft into the glass.
- Calla:

- Fold the linen napkin diagonally.
- From the resulting triangular figure, make a cone, starting from the top point, turning it inside out by 2/3.
- Place the resulting calla-shaped configuration into a glass.
- Evening inflorescence:
- Fold the original material 2 times and lay it out on a flat surface so that the open ends are directed upward.
- Fold the lower segment towards the horizontal diagonal line of the figure.
- Fold the resulting configuration in the form of an accordion from right to left or in reverse order.
- Place the structure into the glass, then carefully shape the corners into petals.
Both adults and children can quickly make flowers from napkins. You just need to study the pictures and patterns and use them to create unique floral products that will decorate any holiday.
Article formatting:Natalie Podolskaya
Video about making flowers from napkins
How to make flowers from napkins: