It is worth starting to learn knitting with simple patterns, small items. This will help you understand the types of loops, choose a convenient hook. A good option for beginners is knitting openwork napkinsThis activity will not be difficult if you study the master classes with step-by-step descriptions.
Simple napkin for beginners
Crochet napkins (for beginners, it will be easier to cope with the step-by-step description) can be made in different techniques. For example, the simplest products can be knitted on the basis of basic loops. But first, it is worth learning how to knit these loops and in what cases they should be used.
To understand the master classes faster, it is important to know the structure of the crochet hook:
- the rod is the part by which you hold the hook;
- notch for the thumb - located after the rod;
- head – the upper convex part of the instrument;
- barb – the bending part of the hook.
It should be noted that not all hooks have a recess for the support pin. The rod can be equipped with a comfortable rubberized handle, or it can be solid.
| Yarn for crochet napkins | ||
| Troitskaya Worsted Factory (Russia) | From 600 rub. | The best combination of price and quality. It is most profitable to purchase yarn through the manufacturer's website in large quantities. Wide range, excellent characteristics of finished products from this manufacturer's yarn. |
| Color City (China) | From 200-300 rub. | Despite the Chinese production, the yarn of this company is close in quality to German analogues. A wide choice of original colors, materials and forms of release. |
| Pekhorka (Russia) | From 300-400 rub. | One of the most affordable yarn options for purchase in Russia. 100% high-quality materials, wide range of colors. |
| Semenovskaya yarn (Russia) | From 1000 rubles per large skein. | A large assortment of threads not only from natural but also from synthetic materials. Some types of yarn from this company are suitable for allergy sufferers. A good combination of price and quality. |
| Alize (Türkiye) | From 400-500 rub. | The most famous Turkish yarn company. In addition to the classic options, the range includes giant yarn, yarn for finger knitting. The products of this company can be found in all specialized stores. |
| Schachenmayr (Germany) | From 250-400 rub. | The same German quality leaves no doubt in the case of yarn from this manufacturer. The threads are highly wear-resistant, elastic, and soft. |
| Kartopu (Türkiye) | From 600 rub. | The high price of this company's yarn is justified by the same high quality. When buying threads from this brand, you can be 100% sure of the quality of the materials and their safety for making clothes even for babies. |
The price of yarn depends on several factors - the size of the ball, the material from which the threads are made, the country of production. Russian yarn can be purchased cheaper, especially if the craftsmen plan to establish the production of knitted products in medium and large volumes.
Basic types of crochet loops
Basic loops can be called 3 - air, double crochet and single crochet. Other types of loops are knitted on their basis or in their likeness. Patterns in the schemes are made up of combinations of different loops.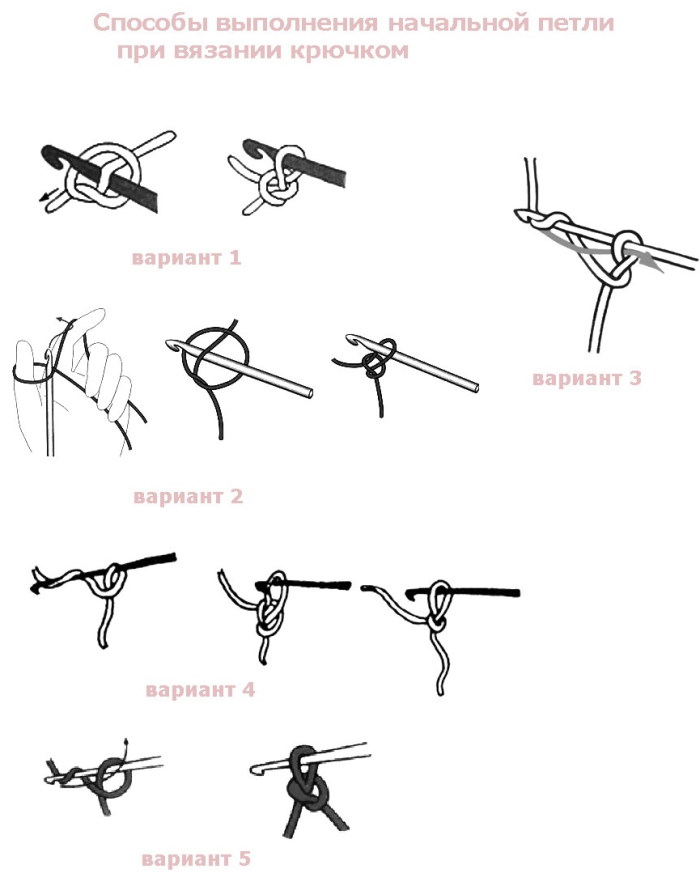
Air loops are knitted like this:
- The first loop is formed in this way: the hook barb turns to the left, is positioned under the thread in the direction away from you.
- The hook with this thread is turned clockwise, forming a loop on the main thread. At the place of twisting, the thread should be held with your fingers (big and medium fingers are most convenient).
- In the same way, the hook again grabs the thread and pulls it through the resulting loop.
- The end of the thread is held, and a knot is tightened at the place where the thread twists.
- The second loop is made in the same way - the hook is turned with the barb to the left, the thread is grabbed, pulled through the loop, then the knot is tightened.
A chain of air loops is formed from many such elements. It often becomes the initial row in different knitting patterns. In the chain of air loops, 2 half loops are distinguished - external and internal. According to the pattern, the hook can be inserted into one of them or into both at once.
Yarn over is the placement of a thread on a hook with a loop, thus forming another loop. The technique is used to lengthen crocheted columns, each yarn over increases the column by one loop. Thus, you can knit columns with or without a yarn over. This is always indicated in the diagrams. You also need to be able to knit connecting columns (they are also called half columns).
They are made like this:
- The hook is inserted into the loop of the chain or into the loop of the previous row;
- The working thread is threaded simultaneously through the desired loop and the loop on the hook.
Such half-columns are needed to shift the beginning of a row when knitting circular elements, and are used at the end of a row.
Crochet napkins for beginners with both step-by-step descriptions and videos are quite easy to knit after practicing the basic loops and other elements. The main thing in this matter is attentiveness, unhurriedness, patience. With experience, all the necessary loops will be obtained "automatically".
Simple crochet napkin made from thick yarn
Napkins crocheted from thick yarn are not only beautiful, but also functional. For example, they can be used as a coaster for hot dishes or glassware. Simple napkins can be crocheted using single crochet stitches.
Knitting pattern for such a napkin:
- The beginning of knitting is a sliding loop. It is made by turning the thread around the index finger so that the two threads cross. Then the working thread is clamped between the index and ring fingers and pulled. The hook is inserted under the thread on the finger, grabs the working thread and pulls out the loop. One air thread is knitted into this loop, then the ring is removed from the finger.
- Then knitting goes along the ring formed from the finger. The hook is inserted under both threads of the ring, grabs the working thread, and is threaded through two loops. 5 such loops are knitted, together with the first air loop there should be 6 of them.
- The ring is pulled together using the short end of the thread. The knitted element must be held in place.
- To connect the first ring, insert the hook behind the first chain stitch in the direction away from you and knit a connecting post.
- To avoid hiding the short tail at the end of knitting, it should be knitted into the product immediately.
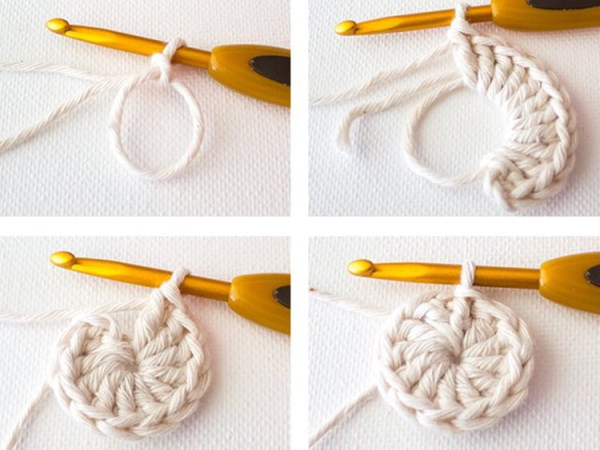
- With each subsequent row, the number of columns doubles, that is, if there were 6 loops in the first row, then in the second there will be 12.
- The loop with a slip stitch is the first loop of the previous row. From it, 1 air loop is knitted, then from it - 1 single crochet.
- Next, insert the hook under the next loop, and also insert it under the short thread, knitting two single crochet stitches together with it. All 12 stitches are knitted in this way.
- You can connect the end and the beginning of a row like this: find the first air loop, insert the hook behind it, and knit a connecting post.
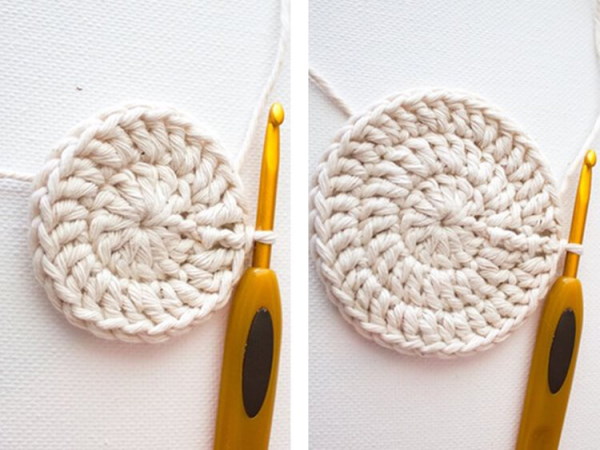
- In the next row, 6 increases are made again, here 2 single crochet stitches are knitted not in each loop, but through one (1 loop - 1 stitch, the next loop - 2 stitches). The beginning of the row is also an air loop.
- Don't forget to tie in the short tail until it runs out.
- If the row began with an increase (with a double column), then it should end with a single loop.
- In the next row, the increase loops need to be shifted, that is, in this case, the fourth row begins with a loop without an increase, and the second loop will be with an increase (otherwise, you will get not a circle, but a hexagon).
- In the fourth row, the loops alternate as follows: 1 single crochet, 1 double crochet, 2 single crochets, 1 double crochet, and so on until the end of the row.
- In the next row, you need to shift the additional loops again, between them, 3 single columns are knitted. Single columns are added 1 in each row.
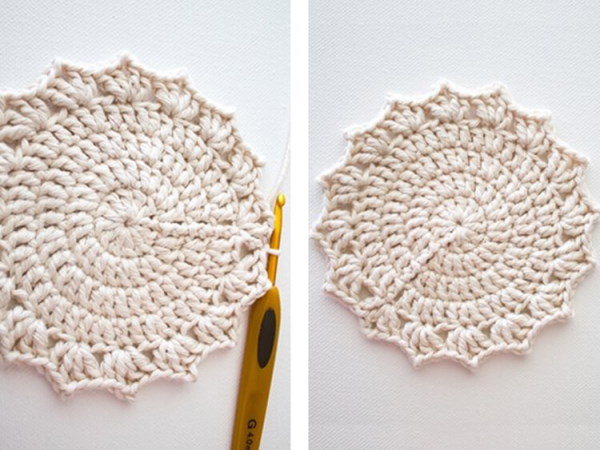
- Next, the napkin is knitted according to this principle until a circle of the desired diameter is obtained.

For those who are just beginning to learn crochet, the step-by-step description of knitting a napkin may seem complicated, but after a short practice, each craftswoman begins to “feel” her knitting and easily adjust the patterns to suit herself. Depending on the density of the knitting, the thickness of the thread, the number of increases in each row may differ. For example, if, based on the description, the product turns out to be convex, you need to increase the number of increases (instead of 6, try 7 or even 8).
Crochet napkins for beginners, with step-by-step descriptions of knitting and patterns, can be found not only in a round shape. Square napkins for hot are also popular.
One of the options for such a napkin:
- The first air loop is knitted at the intersection of the working thread. From it - 4 more loops.
- The resulting chain is connected into a ring. To do this, the last loop is connected to the first with a slip stitch.
- Next, knit 3 air loops.
- Yarn over the hook and knit through the entire ring. Three loops remain on the hook.
- Then the first 2 loops from the hook are knitted, then the remaining 2 loops.
- The next column is knitted in the same way - yarn over through the ring, 2 loops, 2 more loops.
- Next, 2 air loops are knitted, from which 3 of the same double crochets are knitted as in the previous steps.
- The short tail of the working thread can now be woven into the pattern to hide it.
- In total, you should get 4 elements of double crochets, connected at the top loop.
- The next row should start from the third double crochet - to do this, you need to knit connecting loops in three loops of the element.
- The beginning of the row is 3 air loops. According to the same pattern as in points 4-6, 2 double crochets are knitted, knitting goes into the resulting arches in the first row.
- Next – 2 air loops and 3 more double crochets in the same arch.
- In the remaining 3 arches, 2 elements of double crochets are knitted in exactly the same way.
- The elements are connected from above, on the third loop of the first column, using a connecting loop.
- For the next row, you need to move back to the beginning of the arch using connecting loops, as in step 10.
- At this stage, 4 corners of the future napkin are already visible. The pattern for the arches in the corners is the same - 2 elements of 3 double crochets.
- In the arches between the corners, you need to knit one such element, consisting of 3 double crochets.
- In this way, a napkin of the desired size is knitted.
- In the last row, you can tie all the loops with a slip stitch.
In this simple pattern, it is important not to forget to knit 2 chain stitches between the elements in the corners, and also to return to the beginning of the arch in each new row.
Openwork napkin
Crochet napkins for beginners, with step-by-step descriptions and diagrams, can be not only of a single-color pattern and simple knitting. A beginner in this business will be able to create an openwork version of a crocheted napkin after practicing the basic loops.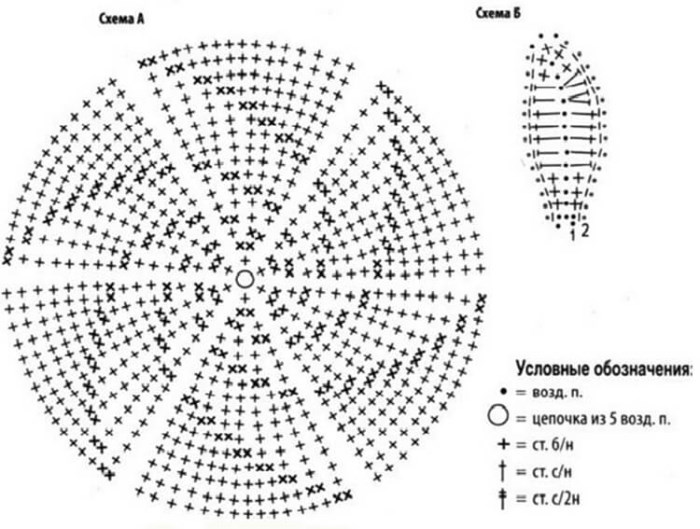
How to knit a plain openwork napkin:
- The first ring is formed in the same way as in the previous lesson. But instead of two rings wound on the finger, 7 are taken, then classic loops without a yarn are knitted.
- The ring of threads is completely tied with single crochets. The result should be a thickened ring with loops along the outer edge. The first and last loops are tied with a slip stitch.
- Next, a chain stitch is knitted to start the next row. In the second row, the craftswoman's task is to hide the short tail, bringing the hook out under it and leaving it inside each column.
- The second row is knitted in exactly the same way - with single crochets. The first and last loops are knitted together with a slip stitch.
- The next row begins with a chain of 5 air loops.
- Next, a double crochet is knitted. The order of actions is as follows: yarn over, the hook is inserted under the adjacent loop, the loop of the working thread is pulled out, the yarn over and two loops are knitted together, then two air loops.
- The row is knitted according to this principle until the end. Two air loops at the end of the row are connected to the third loop from the bottom of the first chain. As a result, you should get elongated arches.
- The next row begins with a chain stitch. In each arch, 2 single crochet stitches are knitted, until the end of the row. Again, the first and last stitches are connected with a slip stitch.
- The next row begins with a chain of 4 air loops.
- Next, a yarn over is made on the rod, the hook is inserted into the base of the chain, and the yarn over is knitted. The next loop remains open. The yarn over is knitted through the base of this chain 2 more times, the loop remains open (there should be 4 free loops left on the rod).
- The free loops are knitted with one loop without a yarn over, the resulting “petal” is secured with an air loop.
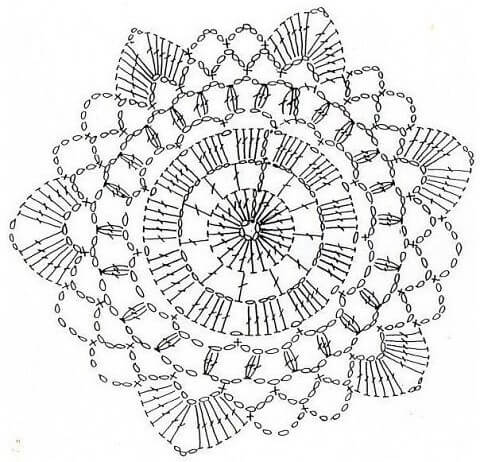
- Next comes a chain of 6 air loops. An arch is created - a yarn over is made, 2 loops are skipped at the base, the hook is inserted into the third and the loop is pulled out. Then a yarn over is knitted, the loop remains on the hook. Such loops are knitted three more times.
- The free loops are knitted in the same way as on the first petal. Then again a chain of 6 air loops, skipping two loops of the base of the row, another arch and a petal.
- These arches with wide petals between them will make up the entire row. The last chain of 6 loops is connected to the top of the first petal.
- In the next row, each arch is tied with simple single crochet stitches (there should be 9 stitches on each arch).
- Each loop of the next row is also knitted with single crochets. You can skip one loop between the arches so that the knitting lies more evenly.
- The end of the knitting is 2 air loops. The tail of the working thread is cut and hidden from the wrong side using a sewing needle with a wide eye.
It is important not to forget to start the row with a chain stitch and finish it with a slip stitch. The number of stitches in the chain stitches may vary depending on the density of the knitting and the thickness of the thread.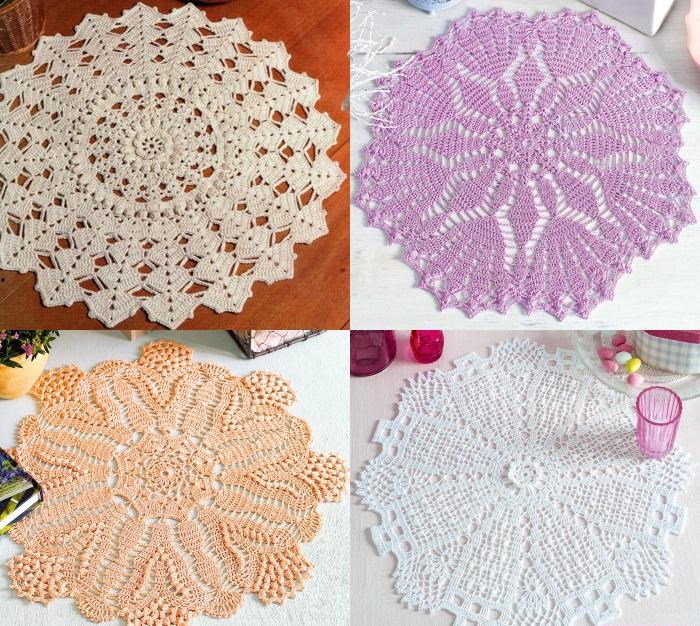
Crochet napkins are quite easy to knit. It is easiest for beginners to use not only patterns, but also step-by-step descriptions to visualize the process. It is important not to forget about choosing high-quality yarn suitable for knitting small elements, and also to take care of comfortable hooks of the right size. With the recommendations of experienced knitters and detailed master classes, you can learn how to create real openwork masterpieces.
Video about crochet napkins
MK. Crochet napkin for beginners: