Interesting drawings for children They should be simple, so as not to discourage the child from engaging in creativity, but at the same time beautiful, so that the result of the work process evokes only positive emotions in the young creator.
Drawing can be done not only within the walls of a preschool or school institution, but even at home. Joint creative activities will not only comprehensively develop the child, but also strengthen the emotional connection with parents.
Easy Drawings to Copy with Pencil for Kids
Drawings (not complicated, but beautiful) for copying or creating from scratch are recommended to be selected for children based on the age-specific developmental features of their psyche. A correctly selected source image increases the likelihood that the child's involvement will be sufficient for the entire creative process.
Otherwise, realizing that the task is too difficult, the young creator, who is not accustomed to struggling with life’s difficulties due to his age, will refuse to complete the task.
It is not recommended to force children to draw.
For preschoolers
For children aged 5-6 it will be interesting to learn how to draw:
| Image variant | Algorithm of the creative process |
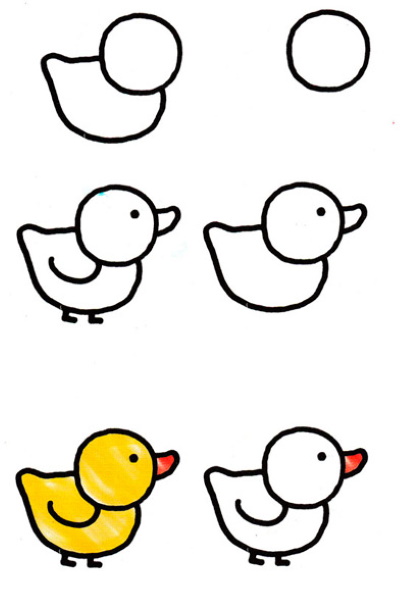 | 1. Draw a small circle with a soft pencil. 2. Draw a rounded oval to the left, the edges of which will touch the side and bottom surfaces of the previously drawn circle (body). 3. Adjust the oval so that its shape resembles the body of a duck with its tail extended upward. 4. From the right edge of the original circle, draw a small triangle (beak). 5. In the inner part of the circle, near the right edge, place a thick dot (the duck’s eye). 6. In the inner part of the oval, draw a semicircle that repeats the shape of the lower edge of the drawn body (wing). 7. From the lower edge of the oval (body), draw 2 straight lines, no more than 0.5-2 cm long (depending on the scale of the image). Transform the end of the vertical lines into horizontal lines, half as long (duck legs). 8. Color the resulting image in colors that are as close as possible to the color of the real bird. |
 | 1. Draw a vertical oval in the center of the work surface.
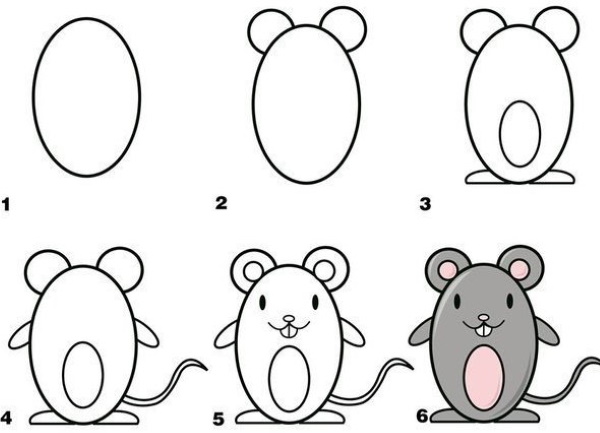
2. From the top edge of the figure, draw 2 small semicircles (ears). 3. Inside the small semicircles, draw 1 additional semicircle of a smaller size. 4. In the inner part of the oval, closer to the bottom edge, draw a smaller oval that exactly repeats the larger figure (the belly of the mouse). 5. From the bottom edge of the main figure, draw 2 small elongated ovals to the right and left (the mouse’s legs). 6. From the side edges of the main figure, draw 2 small elongated ovals pointing downwards. 7. Finish drawing the mouse’s tail and face (eyes, nose, mouth, whiskers, teeth). 8. Color the mouse using colors that are as close as possible to the animal’s actual color. |
For 7-9 years old
The drawings are not complicated, but beautiful, intended for children aged 7-9, and should, in the process of their creation, imply the development of attention to small details in the young creators.
| Image variant | Algorithm of the creative process |
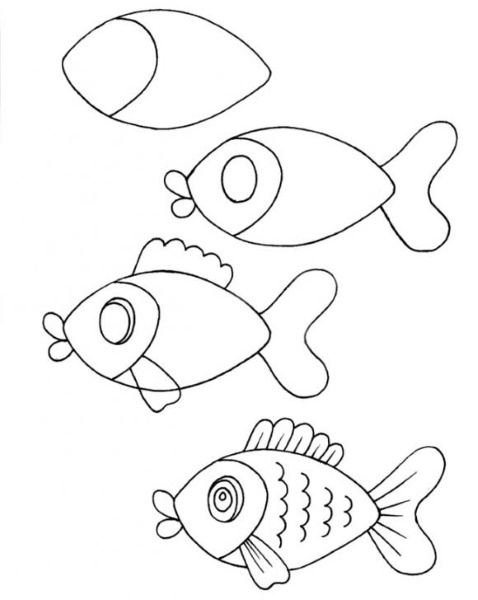 | 1. Draw an oval, elongated and pointed at the sides. 2. Inside the oval, closer to the left edge, draw a semicircle curved to the right. 3. From the left surface, draw 2 straight lines diagonally, directed to the upper right and lower right corners. The lines must be equal in length. 4. Connect the straight lines with a wavy line (tail). 5. In the inner part of the main figure, to the left of the semicircle, draw a small circle (eye). Outline the eye, making it double. 6. From the left edge of the main oval, draw 2 small elongated semicircles (mouth) from one point. 7. From the lower edge of the inner semicircle, draw a rectangle (fin). 8. On the upper edge of the main oval, draw a wavy line of medium length (fin). 9. Finish drawing the characteristic features of the fish’s appearance (scales, eyes, bends of the tail, etc.). |
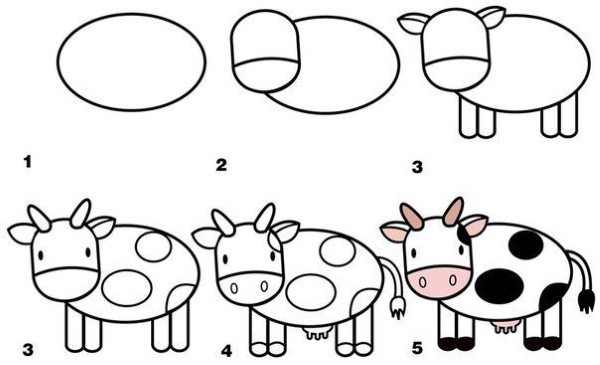 | 1. Draw an oval in the center of the sheet. Outline its contour.
2. Inside the main figure, at the left edge, draw a semicircle curved to the right. Going beyond the main figure, draw the second part of the semicircle, which should result in the head of the animal. 3. At the bottom of the head, draw a line that is slightly curved upwards. 4. On the sides of the upper surface of the head, draw 2 identical small ovals with pointed ends (ears). 5. From the lower surface of the main figure, draw 6 straight lines so that their lower borders are at the same level. The vertical lines must be grouped by 3 (1 group on the right side, 2 group on the left) (legs). 6. Finish drawing the horns and characteristic features of the cow’s appearance (eyes, nostrils, udder, spots, tail). 7. Color the animal, asking the child to choose the most realistic colors. |
For 10-12
When choosing pictures for children aged 10-12, it is necessary to take into account their interests. Otherwise, a small person with an already formed opinion may refuse to perform the assigned task, switching his attention to a more interesting activity.
The selected images should be similar in complexity to the options below:
| Image variant | Algorithm of the creative process |
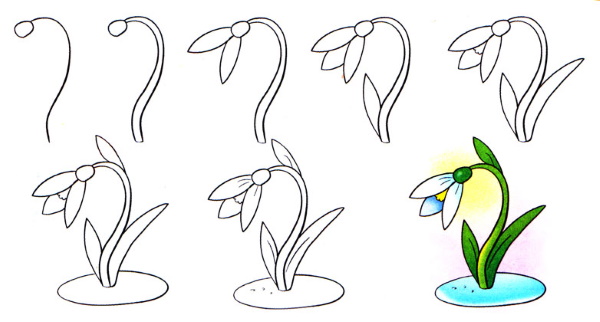 | 1. Draw a vertical line, smoothly curved to the right at the top (stem). 2. Draw a small oval at the top end of the line. 3. Duplicate the curved line, making the stem of the future flower thicker. 4. From the small figure at the end of the line, draw 2 maximally elongated ovals, the lower part of which should touch each other. 5. Between the ovals, draw another one, smaller in size, but filling the gap between the previously drawn figures. 6. From the base of the stem on both sides, draw 2 pointed ovals pointing upwards. 7. Draw a small semicircle at the bottom of the middle petal. 8. Draw an oval at the base of the flower. 9. Finish drawing the characteristic features of the snowdrop’s appearance. 10. Color the flower using the most realistic shades of paint or colored pencils. |
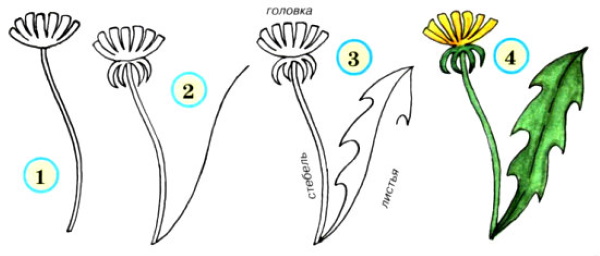 | 1. Draw a curved line at the base of the working surface.
2. Duplicate the line outline, making it more expressive (stem). 3. At the top of the line, draw a semicircle curved downwards so that the stem divides it in half. 4. Connect the edges of the semicircle with multiple elongated rectangles located as close to each other as possible (dandelion flower). 5. From the base of the flower, draw down several small double pointed ovals. 6. From the bottom point of the stem, draw a line with slight bends (the skeleton of the leaf). 7. Connect the top point of the line to the bottom using curves running on both sides of the leaf skeleton. 8. Color the final image using green and yellow as the primary colors. |
Animals
The drawings are not complicated, but beautiful, which are suitable for working with children of all ages, usually represent images of animals. You can diversify the creative process for a child by offering to color the drawing in the most realistic shades or to add objects from the surrounding environment.
| Image variant | Algorithm of the creative process |
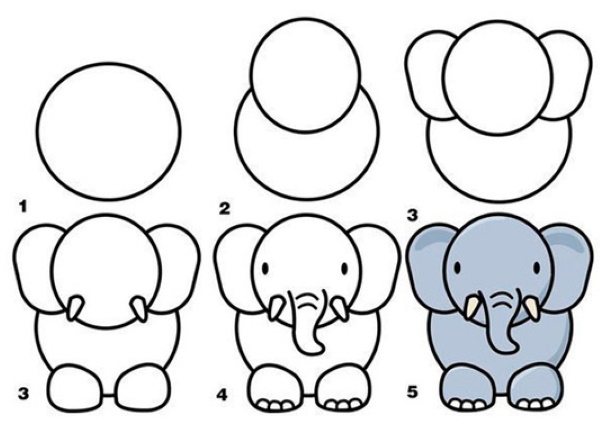 | 1. Draw a circle in the center of the work surface. 2. Taking up about half of the original figure, draw a semicircle curved downwards in its inner part. 3. Going beyond the circle, draw the second semicircle, placing it in mirror image in relation to the first (head). 4. On the sides of the small circle, draw 2 elongated semicircles of the same size (ears). 5. At the bottom of the main figure, draw 2 imperfectly even circles that are identical to each other so that their upper part is inside the large circle, and the lower part is outside (legs). 6. Along the bottom edge of the elephant's legs, draw several small semicircles connected to each other (fingers). 7. Finish drawing the characteristic features of the elephant’s appearance. 8. Color the picture. |
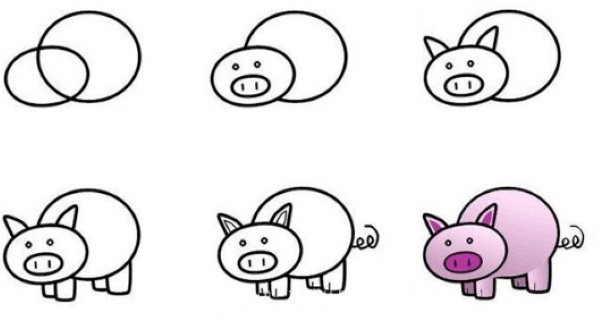 | 1. Draw a circle in the center of a sheet of paper.
2. From its middle, draw an oval, smaller in size, so that part of the completed figure extends beyond the main one. 3. Draw eyes (2 dots) at the top of the oval. 4. At the bottom of the oval, draw a small oval with 2 dots inside (the pig’s snout). 5. From the upper edge of the oval, draw 2 identical small triangles (ears). 6. From the bottom of the main circle, draw 3 straight lines in front and back so that their bottom points are at the same level. 7. Finish drawing the characteristic features of the appearance (tail, fingers) and distribute the shadows and penumbras. 8. Color the resulting image, maintaining a smooth color transition. |
Cool
Simple but beautiful images intended for children's creativity should be unusual and memorable, even if in the course of their creation it is supposed to draw an object or a living creature familiar to the young creator.
Examples of such drawings include:
| Image variant | Algorithm of the creative process |
 | 1. Draw an oval, placing it vertically. 2. Under the bottom edge of the main figure, draw a triangle with a smoothed upper corner, stepping back 1-2 cm from the oval. 3. In the inner upper part of the oval, draw 2 identical circles (eyes). 4. Outline the right circle, stepping back from its border by 2–10 cm (depending on the scale of the image). 5. At the bottom of the oval, draw a small oval, placing it horizontally. 6. From the lower right corner of the triangle, draw an elongated oval, sharpening its upper part (tail). 7. Connect the oval and triangle with a small thin rectangle. 8. From the bottom of the oval, draw a smaller one so that part of the new figure extends beyond the old one (tongue). 9. Color the image. |
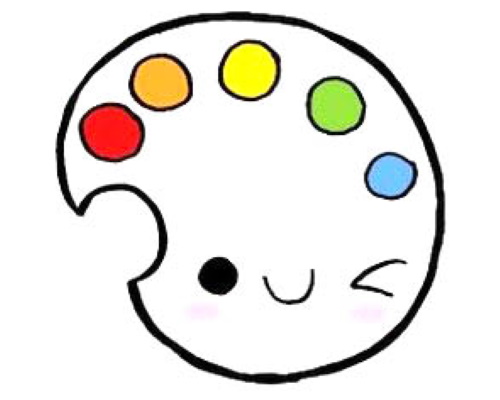 | 1. Draw a circle in the center of the work surface.
2. On the left side of the circle, draw a semicircle curved inward into the main figure. 3. Erase the original outline with an eraser. 4. Along the top edge of the circle, on the inner surface, draw 5 small circles. 5. At the bottom of the main figure, draw a black circle, a semicircle curved downwards, and a triangle without a base, the corner of which is directed to the left. |
Cartoons
Cartoon images are suitable for children over 5 years old. Creating such drawings requires great concentration and understanding of what the picture should look like.
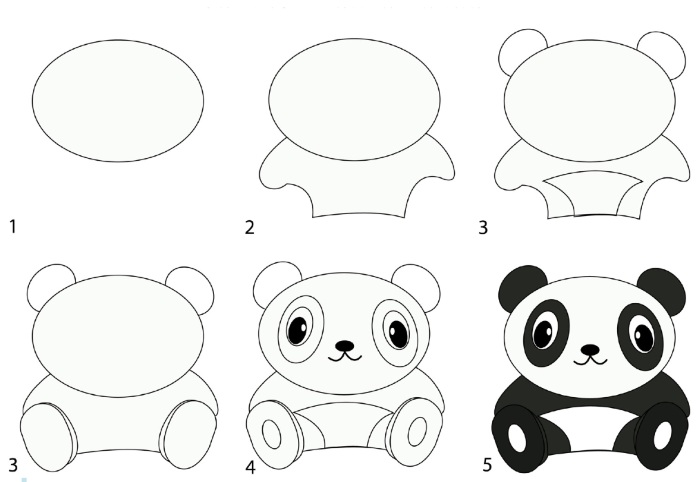
| Image variant | Algorithm of the creative process |
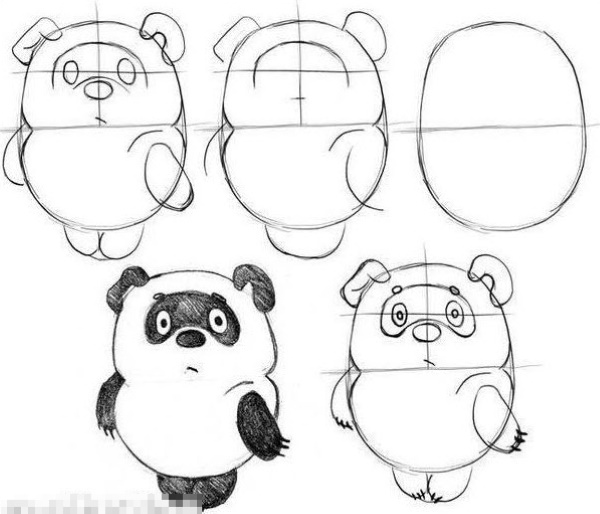 | 1. Draw a rounded oval in the center of the working surface. 2. Visually divide it into 2 equal parts with a horizontal line. 3. At the top, inside the main figure, draw a semicircle that exactly follows the curve of the already drawn outline. 4. On the upper border of the main oval, draw 2 identical semicircles (ears). 5. Adjust the main oval, giving it the outline of Winnie the Pooh’s body. 6. Under the semicircle drawn at the top of the oval, draw the bear’s face (eyes, nose and mouth). 7. Place 2 small ovals under the dividing line, the edges of which will extend beyond the main figure (front paws). 8. From the bottom edge of the oval, draw 2 small semicircles (hind legs). 9. Erase minor lines. 10. Color the cartoon character and, if desired, add claws and fur. |
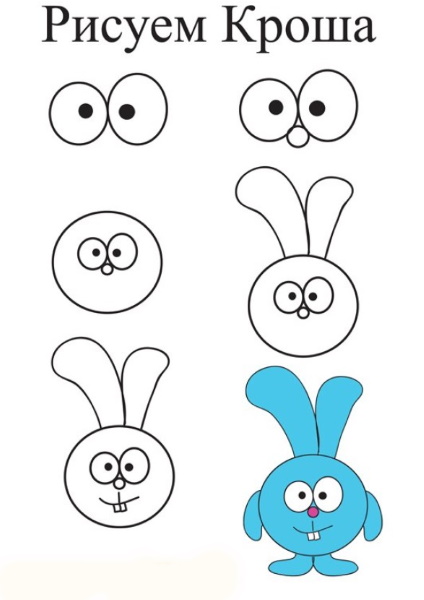 | 1. Draw 2 circles, different in size, but touching each other at one point.
2. Inside each circle, closer to the common edge, put 2 thick dots (eyes). 3. Draw a small circle (nose) at the bottom between the two main shapes. 4. Outline the already drawn elements in a large circle (body). 5. From the upper edge of the body, draw 2 elongated ovals, the lower parts of which touch each other (ears). 6. From the side and lower edges of the body, draw ovals of similar shapes in different directions to form the arms and legs of the character from the cartoon "Smeshariki". 7. Draw the missing facial features (mouth, teeth). 8. Color Krosh blue. |
How to draw beautiful and easy pictures on the cells
You can decorate your child’s workbook or personal diary with beautiful grid drawings:
| Image variant | Algorithm of the creative process |
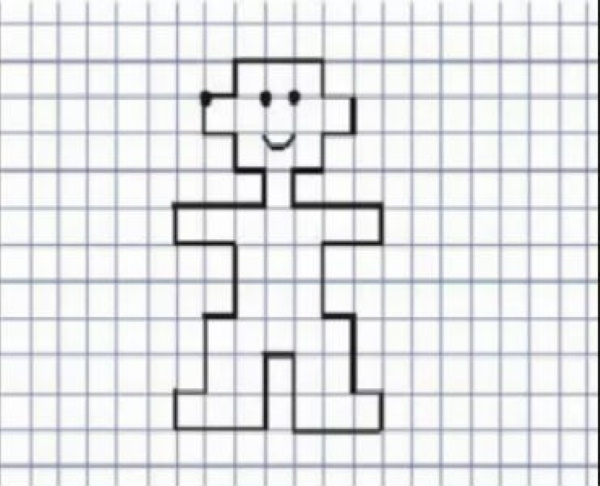 | 1. Determine the starting point, placing it closer to the left edge of the working surface. 2. Create an image by following the instructions: 1 key to the right, 1 key up, 3 keys to the right, 1 key down, 1 key to the right, 1 key down, 1 key to the left, 1 key down, 1 key to the left, 1 key down, 1 key to the left, 1 key down, 3 keys to the right, 1 key down, 2 keys to the left, 2 keys down, 1 key to the right, 2 keys down, 1 key to the right, 1 key down, 3 keys to the left, 2 keys up, 1 key to the left, 2 keys down, 3 keys to the left, 1 key up, 1 key to the right, 2 keys up, 1 key to the right, 2 keys up, 2 keys left, 1 key up, 3 keys to the right, 1 key up, 1 key right, 1 key up. 3. Finish drawing the face of the resulting person. |
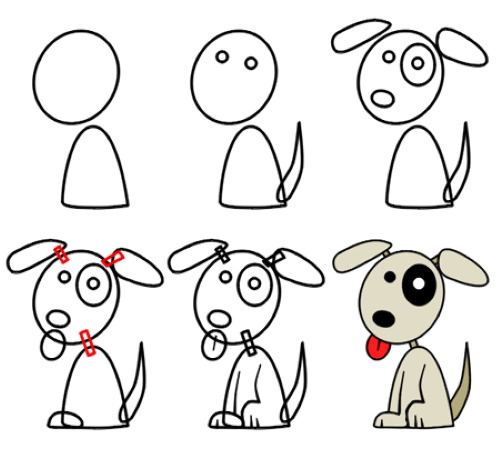
 | 1. Determine the starting point, placing it closer to the upper left edge of the working surface.
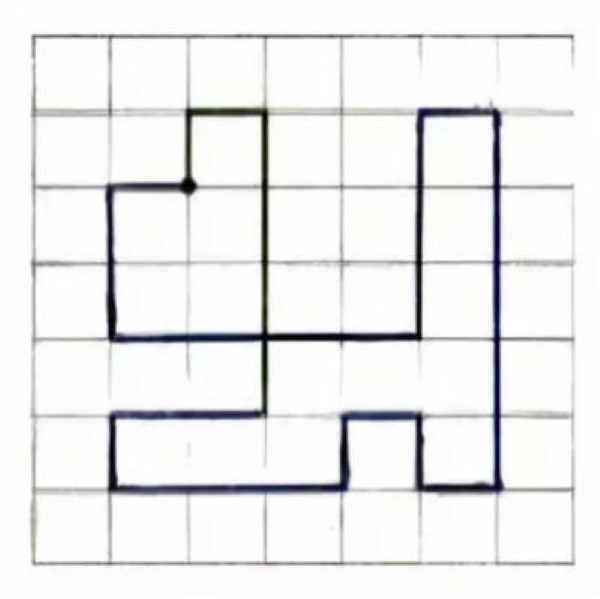
2. Create an image following the instructions: 1 key up, 1 key right, 3 keys down, 2 keys right, 3 keys up, 1 key right, 5 keys down, 1 key right, 1 key up, 1 key right, 1 key down, 3 keys left, 1 key up, 2 keys right, 1 key up, 2 keys left, 2 keys up, 1 key right. 3. Finish drawing the features of the resulting dog (eyes, nose, whiskers, mouth, claws). |
Other beautiful drawings
Both color and black and white versions can be used as drawings for joint creativity with children (depending on what working tools the young creator currently has).
| Image variant | Algorithm of the creative process |
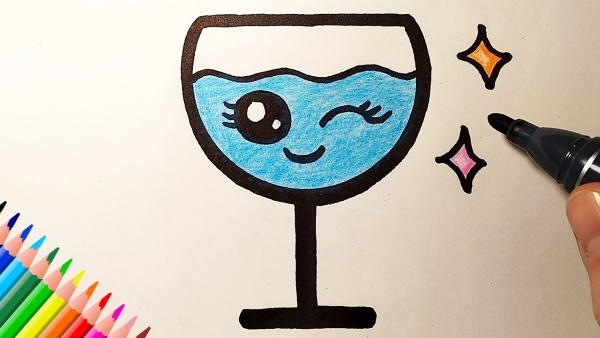 | 1. Draw a semicircle with a soft pencil, convex downwards. 2. Connect the top points of the semicircle with a straight line. 3. From the lower edge of the semicircle, draw a vertical line 3-10 cm long (depending on the scale of the image). 4. From the end of the vertical line, draw horizontal lines to the right and left, smaller in size than the main line, but equal to each other. 5. Inside the semicircle, stepping back about 5 cm from the top edge, draw a wavy line imitating the water level in a glass. 6. If desired, add eyes and a mouth to the glass, making the drawing more creative. 7. Trace the outline of the drawing. 8. Color the picture in any colors the child chooses. |
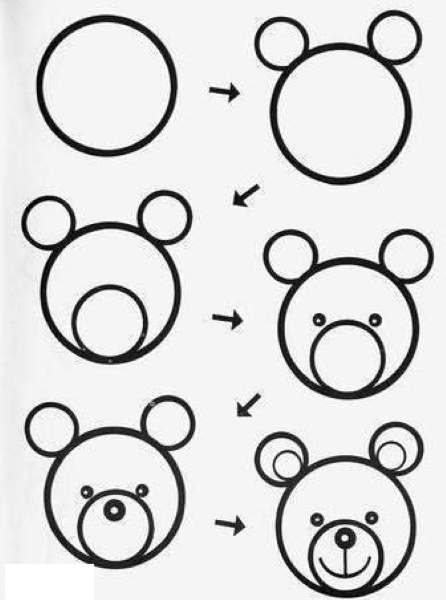 | 1. Draw a circle in the center of the work surface. Trace the outline.
2. From the upper surface of the main circle, draw 2 identical semicircles (ears). Inside these circles, draw 2 circles that are smaller in size. 3. Inside the main figure, at the bottom edge of the circle, draw a circle that is smaller in size. 4. At the upper edge of the inner circle, outside of it, place 2 thick dots (eyes). 5. Draw a small circle inside the inner circle at the top edge. Draw a circle inside it that is smaller in size. Color the space between the main border and the edge of the inner circle (nose). 6. From the resulting nose, draw a vertical line downwards. Finish drawing a semicircle curved downwards so that this line divides it in half. |
Drawn by children with a pencil or felt-tip pen, simple but beautiful images develop creative thinking and also teach the growing person perseverance and accuracy.
By asking a child to create a drawing using an existing scheme, an adult instills in him the ability to clearly follow instructions and painstakingly work to achieve the set goal. Such skills not only contribute to the overall development of the young creator, but will also be useful to him in the further learning process.
Video about drawing beautiful pictures
How to draw ice cream panda:
A rose is probably the most beautiful flower in the world. In any case, a bouquet of roses is a nice gift for any girl, and even just a beautiful picture of a rose, painted with paints, can cheer you up. How to draw a rose, and even more so a bouquet of roses, if you have never drawn flowers? How to convey the beautiful shape of the petals in a pencil drawing of a rose? Rose petals really have a complex shape, and drawing an open rosebud is not easy. But if you draw a rose step by step, adding new details to the original outline step by step, then the drawing of the rose will turn out like a real one. Let's check if this is so, and draw a rose step by step together. If you are going to draw a rose on a stem, and even more so a bouquet of flowers, then it is also advisable to draw a vase at the end of the drawing.