A soft toy made with your own hands can be a good gift for a child, since you can take into account the child's preferences when making it. Making it yourself is not as difficult as it may seem. The main thing is to follow the step-by-step instructions for making, the rules, and prepare the materials that will be needed for this.
Necessary materials
To create a children's toy, you must use only safe materials. For children under 5 years old, it is better to choose whole natural fabrics, without lint or added synthetics. It is also recommended to do without accessories in the form of buttons, glitter, etc. If a toy is made for an older child, then the imagination is limitless, as is the choice of material.
Fabrics for soft toys
Knitwear is ideal for sewing toys for the little ones. It is an elastic and practical material, from which it is very easy to make a toy, it is safe. It is easy to wash and does not lose its shape, does not require additional processing, and due to the variety of colors, the toy will turn out very impressive.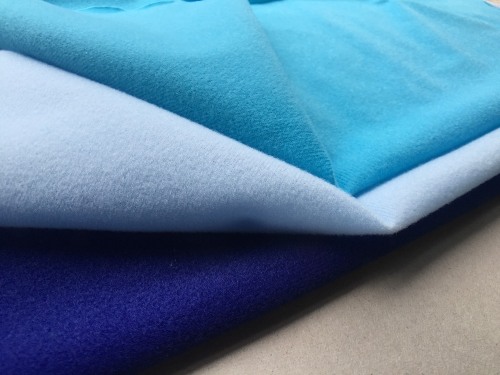
Another fabric that is often used for sewing is silk.. This is a capricious material, when working with it you will need patience and accuracy. But products made of silk are very beautiful and durable. It is also used for decoration, but can also be used as a whole fabric. Requires delicate washing and gentle drying.
And the most popular material for sewing soft toys for the little ones is cotton fabric.
It is very versatile, inexpensive and widely used. It is very easy to work with, has increased durability and strength, and is safe, and stains and dirt are removed quickly.
For older children, you can use other fabrics, such as artificial fur, wool, for sewing bears is an ideal option, it will give the toy realism, and with careful handling will last a long time. Other fabrics are also suitable, for example, velvet, velour, felt.
Other materials
To make a soft toy with your own hands, you will need not only fabric, but also other materials, such as:
- A pattern and template according to which the toy parts will be created;
- Soft filler, you can use cotton wool, but it is recommended to take pieces of foam rubber, it will help to keep the shape longer;
- Thread and needle, scissors;
- Thick paper;
- If you plan to decorate (when making a toy for children over 5 years old), you can use buttons, glitter, ribbons.
Important nuances
To sew a soft toy, you need to accurately make a pattern from fabric using a template. This is an exact copy of the details of the future product, depicted on paper, which is then transferred to the material. Each toy has its own set of templates, but you can also draw them yourself. Then you should cut them out and attach them to the fabric using tailor's needles.
Before making a toy, you should wet the selected fabric and dry it. This will help you check whether it will shrink during the first wash and whether the toy will lose its shape. If this happens, it is recommended to wash the material before sewing, dry it, and only then start working.
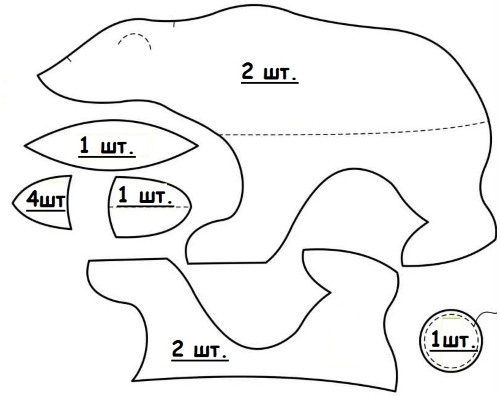
Pattern of a toy Bear
Making a soft toy teddy bear is quite simple and can be done independently. 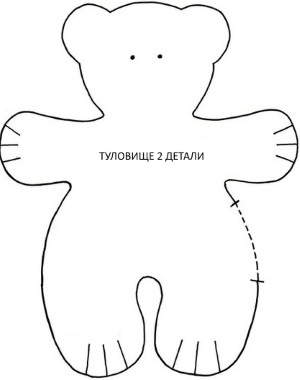 it is enough to use any popular pattern.
Some tips on how to choose it:
- All patterns can be divided into simple (with a minimum number of details) and complex (where additional design is required in the form of accessories and decor, these are dresses, ribbons, seam finishing).
- Beginners should start with easier ones, such as: Barney the Bear (or a simple fabric bear), a sock bear, a Tilda-style bear.
- Other popular but complex sewing patterns are: Teddy bear, ballerina bear, polar bear, mother bear with cubs.
Master classes on making soft toys
Teddy bear made of fabric
One of the simplest patterns is Barney the Bear, transferred directly onto the fabric, without using templates.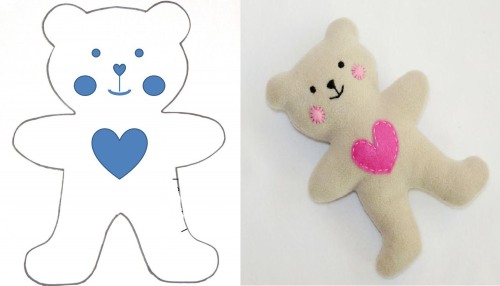
How to make a soft toy with your own hands without a template:
- Take a small piece of fabric and fold it in half exactly in the middle with the right side facing inward;
- Using a pencil, draw several curved lines;
- You should start with the head - describe a small semicircle, then the ear, a rounded cheek, a slightly elongated paw, a slightly rounded belly and one elongated leg;
- Cut strictly along the contour;
- Unfold the material - the bear pattern is ready without using a template;
- Repeat all manipulations exactly, thus preparing its back part;
- Sew the two halves together from the wrong side;
- Leave a small gap, turn the product inside out and stuff it with filling.
There are also other interesting patterns for soft toy bears.
Felt Teddy Bear
To make a felt toy you will need:
- multi-colored felt;
- floss threads;
- pattern paper;
- tracing paper;
- scissors and needles.
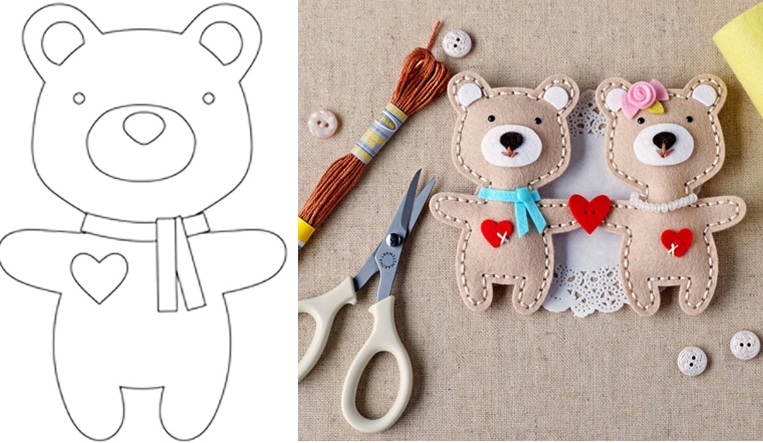
Execution:
- Select and transfer to tracing paper the template of the bear's felt parts, the scale must be observed and be 1:1. Also, anyone who wants to can show their imagination and draw the bear's body parts themselves.
- After the drawing has been transferred to tracing paper, it is transferred to thick paper, precisely observing the scale and every detail. Thus, the template is ready.
- Then all the components are cut out from a thick sheet and fixed to the fabric using tailor's pins. Carefully trace with a simple pencil or chalk, remove the template and cut out - the pattern is ready. Advice! Perform all manipulations on the back side.
- Next, 2 identical parts are placed one on top of the other and sewn together, leaving a small gap for the filler. They are turned to the front side, the toy is evenly filled with foam rubber, cotton wool, synthetic padding (optional) and sewn to the end with neat stitches.
- After all the parts of the bear's body are made, they are sewn together, and depending on your imagination, the eyes, nose, and mouth are made.
One option for creating a face is to use buttons or sew on store-bought sequins. Many craftswomen embroider them from multi-colored floss threads using satin stitches. You can also cut out a nose, eyes, and mouth from felt of a different color and sew them on with threads; for this, a tambour stitch is most often used.
The final touch in making a felt bear is decorating the product. You can sew on several multi-colored ribbons, bows, glitter, and a very bright and beautiful toy is ready.
Teddy bear from a sock
Making a soft bear from a sock is very easy.
You don't need a pattern for this, you just need to have the materials:
- new sock;
- filler;
- needle, thread;
- scissors;
- marker.

Operating algorithm:
- turn the sock inside out, place it with the heel facing up;
- head - this is the nose part, draw them with a marker;
- cut along the outline and sew;
- leave a small hole and fill the product with filler;
- we form the toe of the sock into a ball;
- distribute evenly and sew to the end, tightening the edges with threads;
- the result is a round head;
- then the heel and the part of the toe up to the elastic band - this is the body and paws;
- the heel is the future hind legs, it must be cut strictly in half and form two limbs, sewn together, stuffing with filler;
- The front legs are made from elastic, simply cut out, sewn together and sewn to the body.
- then the ears are created, they can be made from the remainder of the sock or take a new one.
- They can be made from elastic - just draw two semicircles and cut them out, stuff them with stuffing and simply sew them to the head.
- For decoration you can use ribbons, buttons, glitter, thus creating eyes, mouth, nose.
- You can make a coloring for the bear from another sock; to do this, you need to cut out small round fragments and sew them onto the paws, muzzle, and even the belly - thus getting an unusual coloring.
Teddy Bear Pillow
To create such a bear you will need cotton fabric, soft filler, a sewing machine, scissors. To get a more realistic product, it is recommended to take fabric of different colors.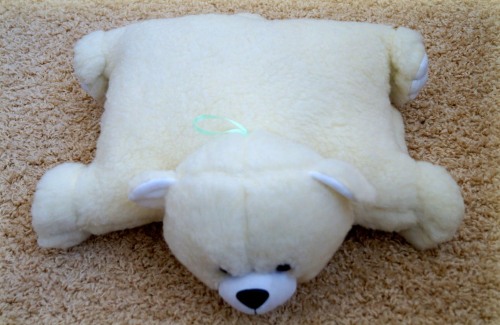
The first thing you need to do is create a pattern, it should be large enough, rounded. The head and ears are depicted, then cut out, the seam is stitched on a machine, the product is turned inside out and stuffed with soft filler, sewn up to the end. The material acts as a decor, it will be comfortable to sleep on it and so on 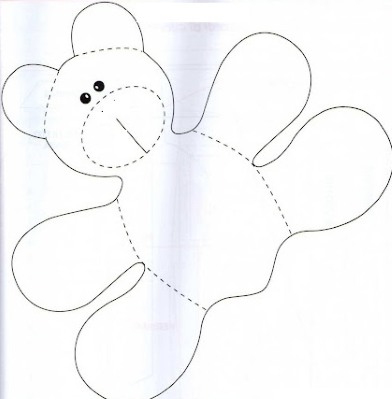 This will create the effect of a bear's face.
Two round appliques are cut out of dark color - these are the eyes. They are sewn to the pillow with blind stitches or sewn on by machine.
It is better to make the muzzle bright, any color of your choice, in the form of a large oval-shaped piece of fabric. A small round mouth is sewn to it.
For realism, you can sew on small front paws. They are made from the same color fabric as the pillow itself and are sewn to its bottom, having been previously stuffed with filler.
Teddy bear in Tilda style
This bear is distinguished by its elongated body proportions and paws, and has recently gained a lot of fans. To make a Tilda-style bear, you need to take fabric made of bright cotton sprint, a template for creating a pattern, scissors, threads, a needle, and ribbons and bows often serve as decoration.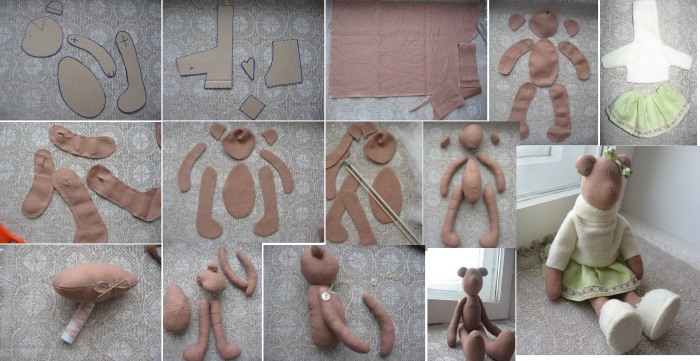
Transfer the template onto the fabric folded in half, leaving a small seam allowance. Sew together and turn right side out, then sew with a blind stitch.
The peculiarity of this soft toy is that the paws are attached to the body with buttons, this allows them to move, creating different positions of the bear's body. The ears are sewn to the head, and the nose, eyes and mouth are made of threads, without the use of any decor. The obligatory decoration of a Tilda-style bear is ribbons or bows, you can also make original embroidery by hand.
Teddy Bear
Making a soft teddy bear toy with your own hands is a difficult task, so before you start working, you should carefully study the algorithm.
How and where to start:
- Choice of material – this bear is sewn from artificial fur, the material should be with a short pile. Also, to create this model, you need to stock up on thick cotton fabric to make the inside of the paws, the inside of the ears and the muzzle.
- The pattern pieces should be made in mirror image to each other, this will help to create artificial fur lying in one direction, which will create realism to the toy.

- The bear's limbs must have holes to create fastenings for their mobility.
Operating algorithm:
- Transfer the patterns of the parts onto the pile fabric; they should be mirror images;
- Cut them out, leaving holes for the paws to create fastenings;
- The ears and paws are made from two different materials, the outer side is made of pile, the inner side is made of cotton;
- Sew them together;
- Turn inside out and then stuff with filling;
- The next step is fastening;
- They are inserted into a previously left space, these are cardboard disks with a hole with a mounted bolt (the body of the bear);
- A nut is also sewn into the limb and then filled with foam rubber;
- The attachment is carefully sewn into the limbs and body, making them invisible;
- Next, you need to screw the limb to the body; this type of fastening gives the soft toy mobility;
- By analogy, do this manipulation on all the paws;
- After the bear's body is ready, you should embroider the eyes, mouth, and nose with thread;
- Tie a bow or ribbon around your neck;
- Teddy bear is ready.
Ballerina Teddy Bear
To sew a teddy bear - a ballerina, you need to take a dense material, preferably from a short pile. For heels, palms and the inside of the ears, you need to choose a soft fabric, for example, silk, cotton.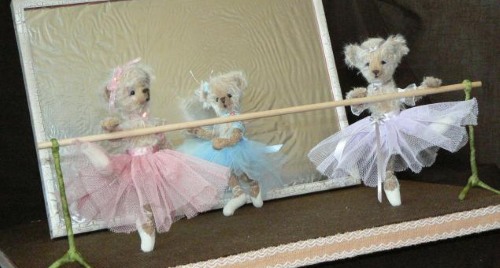
The patterns need to be made according to templates, there will be many details here, because the legs, palms, knees and shoulders are movable, they are sewn separately. In order for the pile to lie in one direction, all the fragments of the bear are made in mirror image, and then sewn together. They are turned to the front side, stuffed with foam rubber and sewn with a blind stitch.
The ankles, legs, shoulders and palms of the toy are movable, this is achieved with the help of button fastening. There are 2 design options: hidden (when stitches and buttons are sewn into the parts from the inside) and external (they are sewn onto the front side and look pretty cute, only the color of the fabric and the color of the buttons must match).
The loop is made on the body, and the button is sewn on the paws. Next, the loop is made on the arm or leg, and the fastening is sewn on the palm or ankle. To decorate the face of the ballerina bear, beads or multi-colored sequins are most often used. A ribbon is tied around the neck, and the same is attached to one ear.
A mandatory accessory for this toy is a ball gown, it is created by hand and made of transparent bright fabric, such as chiffon, veil, cambric.
The cut should be short, it should be baited on a thread evenly distributed to get beautiful voluminous waves. Pull the skirt at the bear's waist, sew it with a blind seam, you can also insert a narrow elastic band, this will give the opportunity to change clothes for the ballerina bear.
Polar bear
This soft toy differs from all the previous ones not only in color, but also in the fact that the bear stands on four paws. Therefore, sewing a polar bear differs from the rest. The fabric should be thick with a long, hard pile, the pattern should be made strictly according to the template, performing in mirror image. Sew the fragments together, fill with filler through a small hole.
To make the toy stable, the paws must be filled very tightly.
In one version, the polar bear is made in a motionless state, the limbs are sewn to the body, and in another, hidden button fastening can be made.
Mother bear with cubs
There are many pattern options to make a soft toy of this type, it can be a bear in a lying position, and around her several of her cubs. And also sitting with an offspring on her lap, or even standing. The complexity of this composition is that you will have to work with small details. The fabric can be varied, starting from artificial fur or regular cotton.
For sewing the family, no movable fastenings are used, all the limbs are sewn tightly to the body. To create the muzzles, buttons are selected from the mother, for babies, the mouth, nose and eyes are most often decorated with floss or glued with small sequins.
What stitches should I use when sewing a soft toy?
The threads for sewing the toy must be strong and necessarily in the tone of the product. The only exception is when making a decorative loop stitch, it is used as a finishing stitch and not only sews the parts together, but also processes the edges of the fabric.
To create a soft toy with my own hands, I usually use the following types of seams:
- External - the internal fragments are sewn together, it should go with small stitches and look neat, there should be no gaps between them.
- Loopy seam - the thread is passed through a loop over the edge of the fabric and tightened, thus processing loose fabrics and sewing together pattern pieces.
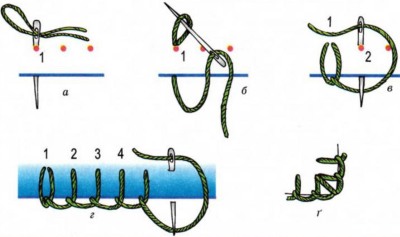
- Secret - the thread should be inserted into the fabric with a needle from the inside, having previously folded the edge of the material together. The stitches are small and neat, it is necessary to ensure that the needle and thread go straight along the line, without going to the front side.
- Docking seam - this method is used to sew a button and some other accessories to a soft toy, as well as fragments, such as limbs, head, tail, etc. They are sewn with small stitches on the front side, passing the needle through the fabric.
How to connect the parts of a soft toy
If the toy parts are sewn together without fastenings, then a butt seam is usually used. To do this, you need to form each of them, then simply attach the workpiece to the joint and, threading a needle with a thread, carefully sew them together with small stitches along the front side.
If there are movable fasteners, then sew them into the part with a blind stitch and, after connecting them, also use a blind stitch.
What is the best material to make the bear's eyes and nose from?
Most often, buttons are used or glitter is glued on, but sometimes you can use Mouline threads to decorate the face. To do this, you should master the embroidery method. The most common of them is satin stitch, the stitches are made even, tightly adjacent to each other. Cross stitching is also used, this is the simplest method.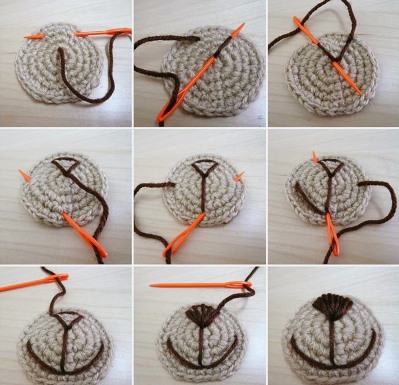
For some toys the applique method is used.
Here you need to cut out a small piece from fabric of a different color and sew on the pattern using a buttonhole stitch.
How to fill a sewn toy
Foam rubber is most often used as a filler; this material is dense, it does not fall off and holds any shape perfectly. It is also easy to take out if the toy needs to be washed. You can take regular cotton wool, but it quickly gets lumpy, and the product may lose its original appearance.
Sintepon is also used - it is easy to buy, and it is a pleasure to work with it. With it, the toy will keep its shape for a long time, it dries easily and does not get knocked down. An alternative option is holofiber - this material is durable and easy to use.
Natural fillers are used as filler, this is wool. It is environmentally friendly, will allow the product to keep its shape and even emit heat, with such a toy the child will be very pleased to sleep.
How to insert a wire frame
A wire frame is used in soft toys quite often, it allows to keep the shape and gives it flexibility. To create it, you will need a little wire, for safety its ends should be bent with round-nosed pliers. The wire should be copper or floral, along the entire length of the toy.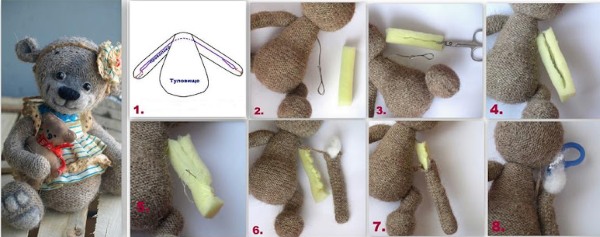
Then, when the necessary blank is made, it is lightly coated with glue and wrapped with the selected filler. This will prevent it from coming out during the use of the toy. Then the filler is evenly distributed around it and a frame is obtained, which is then placed in a fabric pattern. The fragment is sewn together.
Thus, the wire frame is inserted into the body, limbs, or even ears and tail of the toy.
How to decorate a soft toy
There is a huge selection of accessories for decorating toys. Most often, beads, buttons, sequins, ribbons and bows are used. They are sewn to the product using a blind stitch or special glue. You can also take small pieces of fabric, such as velvet, cambric, silk, chiffon, they are applied and then sewn using a loop stitch.
Sometimes original embroidery is used as decoration, as it helps make a soft toy unusual. This option has become increasingly used when the product is created by hand.
Another option for creating a unique look could be specially tailored clothing, such as a dress, skirt or jumpsuit. It is made from beautiful, lightweight fabric.
Author: Elena Petrova
Video: How to Make a Soft Toy with Your Own Hands. Bear Pattern
How to make a teddy bear with your own hands, watch the video:
Let's draw a pattern for a soft toy: