Mostly knitting any detail must end with closing the loops. Otherwise, the finished fabric will unravel. There are several options for finishing the end of the knitting.
Closing loops classically
There are many options for closing loops with knitting needles. However, for beginner knitters, it is initially recommended to familiarize yourself with the basic techniques. Later, you can move on to familiarizing yourself with more complex patterns.
The choice of the optimal method will depend on the fabric to be knitted, the functionality and the requirements for the edge in terms of beauty. Some patterns are suitable for smooth knitting, others allow you to finish the elastic band elastically and firmly so that it stretches normally and returns to its original state without deformation.
There are also methods that allow you to give the bottom an airy and beautiful appearance.
The following are considered basic knitting techniques:
- without yarn, with a knitting needle on a fishing line;
- decorative method;
- closing the holes in twos;
- Icelandic way;
- on an elastic band using a needle;
- with tapering of the web;
- elastic knitting finish.
The classic pattern for closing holes with knitting needles involves forming a chain.
The latter can be positioned differently relative to the edge of the canvas:
| Type of loops | Accommodation Features |
| Facial | If you only knit the front holes when closing, the chain will shift slightly to the front side. |
| Purl | When closing the fabric using the back elements, the edge will be formed on the back of the garment. |
| Alternating front and back stitches | By alternating loops during closing, the edge will be fixed and straight. |
With face loops
The technique of finishing knitting with face loops can give an edging that will be visible from the front side of the fabric. This scheme is easy to perform, so novice needlewomen can handle it.
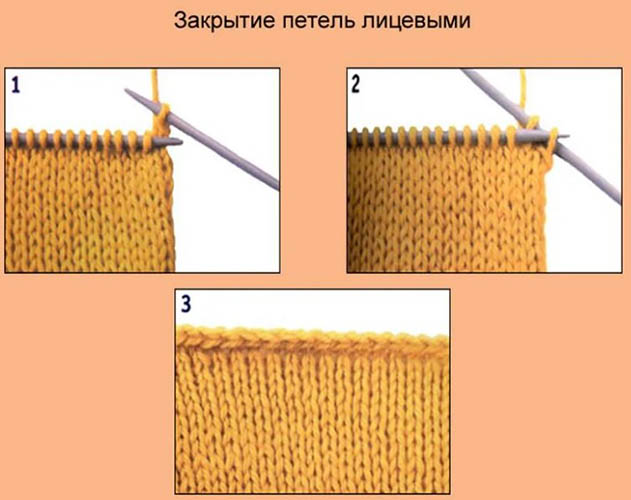
Step by step instructions:
- Form a simple knit hole by knitting two loops at the same time.
- Transfer the resulting hole from the left side to the right knitting needle.
- Repeat the first step again, from 2 holes - old and new.
- Move the new element to the right rod.
- Continue these steps until the last hole remains.
- Shorten the thread so that the end of the yarn is 8 cm long.
- Pull the end of the thread through the hole and secure it firmly.
Purl stitch
The purl knitting pattern will be almost identical to the technique of closing the fabric with face loops. However, the edge will be created on the back side of the product.
Step by step instructions:
- Purl stitch two holes together.
- Transfer the loop that has formed on the right knitting needle to the left needle.
- Complete step 1 and transfer as in step 2.
- Alternate the above steps until the edging is completely formed.
- Shorten the thread at a distance of 8 cm from the fabric.
- Pass the end of the yarn through the last hole and tie it tightly.
There is a technique for closing loops, where a combination of front and back holes is used. In this scheme, the edging braid will be located in the center of the knitted product. At the same time, it will not shift to one of the sides.
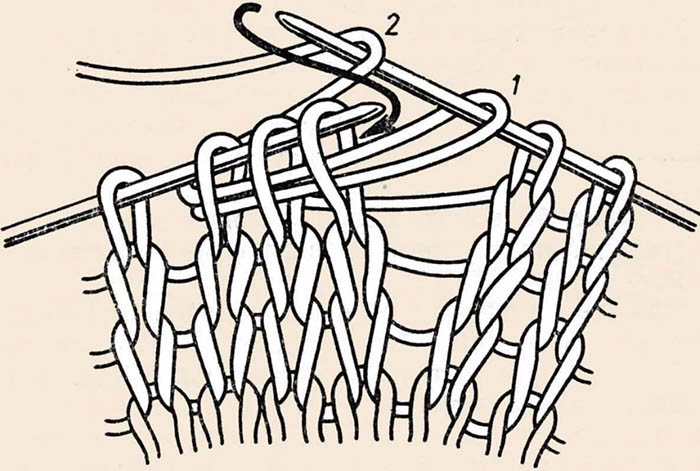
Straight braid closure
It is permissible to close loops on knitting needles using the classic straight technique in the form of a braid, which is considered the basic pattern. It is with this that you need to begin familiarizing yourself with the process of closing holes.
Step by step instructions:
- Transfer the edge element to the right knitting needle without knitting.
- Knit the next hole using the pattern as a guide.
- Insert the left tool into the edge piece removed in step 1 and pull it to the left. On the working knitting needle, hold the second hole, carefully pulling it through the center of the first piece.
- Cast on a new loop, following the same principle. Knit the element again, taking into account the pattern of the purl or front, having performed the previous action.
- Form a braid until there is only one unknitted element left on the working rod.
- Transfer this loop to the left knitting needle, insert the right tool, slightly stretch the hole and pass the broken thread through it.
- Tighten and secure the resulting knot.
To close loops in the circular knitting method, the principle of work will remain unchanged. However, the first hole on the working knitting needle must be removed with knitting.
Closing the loops for the neck
To shape the neckline or other uneven edges, it is not recommended to use the simple method, since it is quite difficult to achieve a smooth transition. In this regard, it is recommended to use elastic closure of the holes of the front surface with knitting needles, which goes well with step knitting.
Step by step instructions:
- Slip the first hole of the final row without knitting.
- Form the second element following the pattern.
- Pull out the first hole and pull it through the second knitted one.
- Knit the third element according to the pattern, pulling the first loop through it.
- Close all the holes in the row in a similar manner.
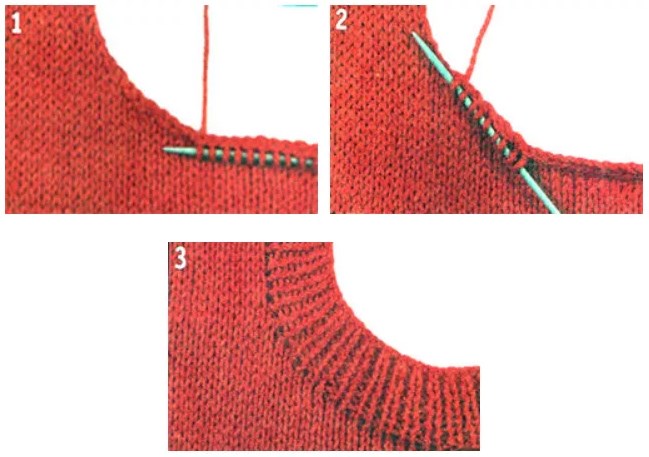
To create a smooth curve, it is recommended to practice on a test piece, after which you can proceed directly to work.
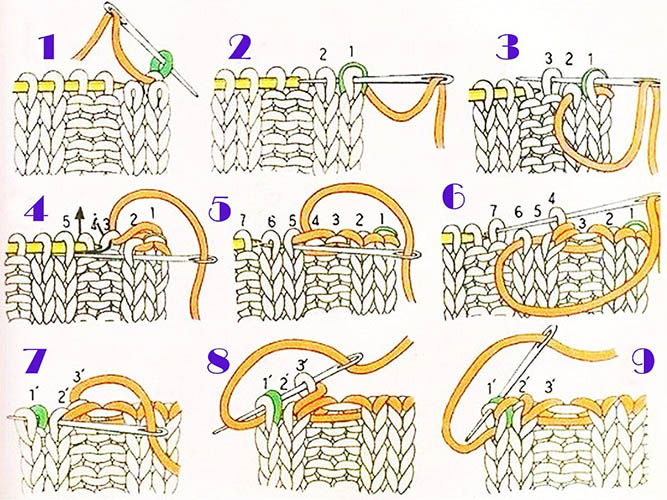
Elastic band closure
It is permissible to form the final row on the elastic band with knitting needles. However, when closing the loops, it is necessary to maintain elasticity. In this case, it is recommended to use a needle with a wide eye and a knitting rod that is half a size smaller than the tool used to create the product.
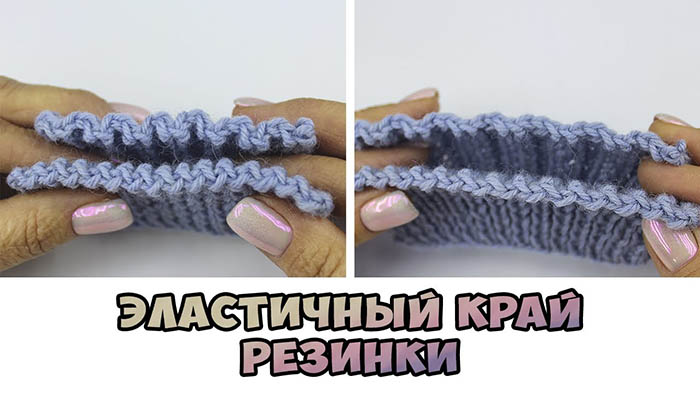
Step by step instructions:
- Distribute the holes from the final row. One knitting needle should have all the front ones, the other one – only the back ones.
- Shorten the thread so that its size reaches the width of the edge multiplied by 3. Thread the end of the yarn through the needle.
- Transfer the first two front holes to the needle, passing the thread through them.
- Go to the purl elements. Insert the needle into the first hole. Pick up the second element from the end and wrap it. Remove two loops on the thread without tightening.
- Return to the row with the front loops. Take the removed pinned hole and insert the needle into the free last element on the knitting rod, pulling the thread through them.
- In the row with purl loops, repeat the previously described manipulations, creating a grip with a fold.
- Continue closing the holes in pairs, keeping the thread taut so that the end does not wrinkle.
- Close the last hole using the classic pattern.
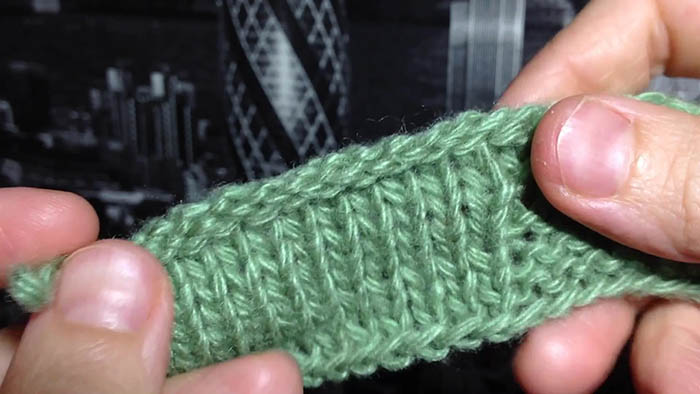
As a result, a machine stitch will be formed, used when interacting with a knitted product. This method is perfect for the classic 1x1 elastic, where there is an alternation of loops.
The quick way
When closing the elastic band on the neck of the bib with simple holes, it may not pass over the head or will be too tight around the neck area. To solve this problem, you can use a quick way to close the loops. For this, it is recommended to use knitting needles of a smaller size than the rods used to design the elastic band.
Step by step instructions:
- Remove the first hole. Since the next loops will be purl, make a yarn over from yourself.
- Knit the hole as a purl, throwing a yarn over it. Make the yarn over with the left knitting needle.
- There should be 2 elements left on the right tool. Pick up the first one with the left rod and throw it over the resulting one. As a result, there should be 1 loop left on the knitting needle.
- The next hole should be the wrong side, so all manipulations should be repeated.
- The next element should be the front one, therefore the yarn over should be done towards yourself.
- Knit a front loop and remove two holes on the right side.
- When continuing knitting, the front loops should be above the front holes, and the back loops should be above the back holes. Continue the manipulations until the end of the row.
As a result, after the work has been done, a wavy edge will be formed, which will spring back, just like an elastic band.
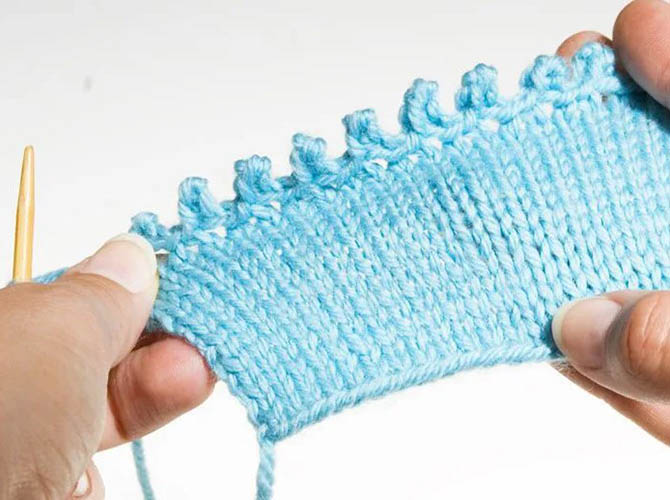
With embossed edge
When closing the edge of the knitted fabric, you can form a round, relief edge, which looks like an edge cast on with a Bulgarian start. This option for finishing knitting can be used when forming turning rows and knitting in a circle. When casting on a certain number of loops, the closing pattern should be a multiple of 2.
You can close loops on knitting needles with a relief edge in the following way:
- The first row should be knit. Remove the hole, leaving the thread in front of the work. Make one purl element.
- The second row should be purl. Make one knit stitch. For turning rows, remove the stitch, leaving the yarn behind the work. For circular knitting, cast on one knit stitch, removing the stitch and leaving the yarn in front of the work.
- In the third row, close the holes using the classic method. Remove the first element, tie the second one with the front side and pass it through the unknitted one.
Icelandic way of closing loops
It is acceptable to close loops on knitting needles using the Icelandic method, which looks like a cord. This decorative element is well suited for decorating the edges of a bedspread, cuffs and neckline.
This option for finishing knitting can be used by beginners, since it is done exclusively with facial loops.
Step by step instructions:
- From right to left, as for the purl holes, insert the tip of the right knitting needle into the front wall of the first element on the left rod. From left to right, lift the front wall of the second hole as for the front.
- Without removing the loop from the left knitting needle, pull the front wall of the second hole through the first element.
- Wrap the thread around the tool and pull it through the front wall of the second hole.
- Remove two holes from the left knitting needle.
- Move the new element to the left rod by repeating the previous steps.
- Continue knitting according to the given pattern until one hole remains.
- Cut the thread by pulling the end of the yarn through the last hole.
With tapering of the web
It is permissible to close loops on knitting needles for the neck opening by narrowing the fabric. This allows you to reduce the diameter of the outer zone, preventing stretching and deformation during washing and wearing clothes.
This method is suitable for knitting a sleeve or armhole, as well as for creating lantern-style sleeves on children's clothing. The knitting method with tapering of the fabric is convenient to use when decorating a product with a raglan from the bottom up.
Step by step instructions:
- At the beginning of knitting, form the first two holes together.
- Pull the fourth element through the third loop.
- Knit the next two holes together again using the front stitch.
- Pull the eighth loop through the seventh hole.
- Perform the described actions one by one until the canvas is completed.
- In the new row, knit two holes into one, using the purl technique.
- The last third row is made with two holes together, returning the resulting stitch to the original knitting needle.
Decorative method
Clothes knitted from woolen threads are very warm, comfortable and beautiful. Various details are suitable for creating a spectacular appearance. There are various ways of knitting products with a decorative frame.
They are suitable for creating collars, round necks, and hems. However, they are not recommended for use on shoulder seams or other seams where strength is essential.
There are several options that allow you to create decorative, openwork details:
- 5 loops using a hook (the thickness of the hook must be selected taking into account the thickness of the knitting needle)
- pico;
- flowers.
Step-by-step instructions for closing holes with knitting needles using a crochet hook:
- Using a hook, pull five loops up from the first outer hole.
- Thread the next four holes and knit together.
- Perform the above steps in turn until the edge is finished.
- Shorten the thread at the end and secure it tightly.
Tips for Beginners
Tips for Beginners:
- When finishing knitting some parts, open holes can be transferred to a waste thread. Due to this, it is easy to bend and twist the element being knitted.
- Each type of product requires its own version of loop closure. For a uniform texture, a classic straight closure is suitable. It also goes well with a stable part of the fabric that will not shrink. If you need to finish the edge of the elastic, it is better to use the needle closure technique, since it will not form a hard edge and will retain an elastic structure. This scheme is suitable for a cuff on a sweater or on the shaft of a sock.
- Before finishing the part of the fabric, the required number of rows can be done using the stocking technique. Having stopped at the back side, you can close the part with a whole row, throwing the first hole unknitted onto the right knitting needle. The second element can be made purl. The left rod should hook the first loop by the outer wall.
- If the edge is too tight or constricted when closing a row, it is recommended to replace the knitting needles with larger ones and also to make sure that the yarn does not tighten. When creating each hole, it is necessary to stretch it before making the next loop.
- If the piece is finished and does not require additional knitting, the open holes should be transferred to a pin. Thanks to this, the piece will be stored until the remaining parts of the fabric are knitted.
- Beginner knitters are advised to master the technique of closing holes on a straight section. Thanks to this, you can see and correct mistakes, bringing the process to automatism.
- Using the traditional technique of closing holes, when a chain is formed along the edge of the product, the latter can be made invisible. In this case, it will be necessary to use purl loops so that the edge is formed from the back of the fabric. The thread that remains does not need to be shortened. It can be used if it is necessary to fasten the edge to another.
- When knitting openwork, it is advisable to close the holes with a yarn over. As a result, the product will not lose its airiness.
- When choosing the reverse closing of the holes, the finished fabric can have a different appearance. The closed edge can be free or stretched, everything will depend on its placement. In this case, the processing can be preliminary or final.
- When choosing a braid closure technique, it is advisable to practice on a small piece, trying to close the holes in different ways so that the edge does not wrinkle. When closing such a pattern, it is recommended to decrease two elements for each braid.
- The knitting pattern for two holes together is very easy, so beginner knitters can handle it. However, this technique is not suitable for all fabrics. It cannot be used to finish the elastic, since the edge will look untidy and stretch very quickly. This pattern is suitable for clothes that do not stretch during wear, such as scarves, the bottom of a dress, a blanket, a scarf. The technique is also suitable for beveling the shoulder seam, which will then be stitched with a textile seam. The braid will be formed very neatly and will firmly pull the end of the thread.
When the required number of rows have been knitted with knitting needles, the knitted product must be closed. The closed loops must not be too coarse, large, or stand out from the general pattern. If it is necessary to continue part of the knitting, such openings do not need to be closed, leaving them free. To preserve the knitting, the loops can be gathered on a waste thread or a special pin.
Video about closing loops when knitting
Closing loops using the “Bulgarian start” method: