Thanks to the fine work with a crochet hook, knitted crafts not only give the opportunity to get a unique home decor item, and develop creativity and fine motor skills of needlewomen. Patterns and descriptions of the knitting process will help you crochet Christmas trees with your own hands in various options and techniques - with or without additional decorative elements.
Choosing yarn and hook
Before you start knitting, you need to choose the right yarn and hook. Examples of good options are given in the table for beginners in knitting.
| Hook | Yarn | Comments |
| № 1-2 | Iris | The product turns out thin and delicate. |
| No. 3 | Vita, Violetta, Celebi | The hook size is suitable for starting to learn knitting |
| No. 4-5 | Cotton types, Lace, children's Pekhorka | |
| No. 7-8 | Kartopu, grass yarn options | Bulky items; knits up quickly |
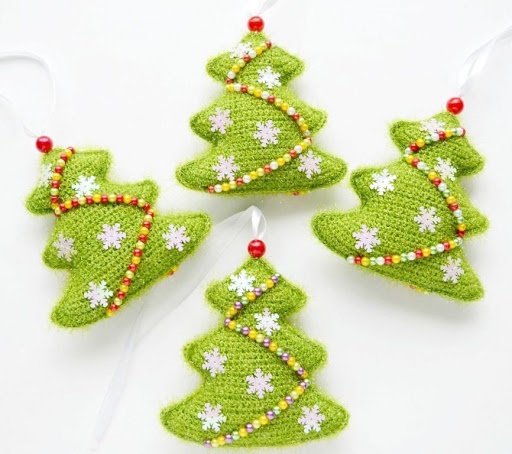
Small Christmas tree pendant
A small flat Christmas tree is created from 2 elements – loops and posts. The finished product will have a round part on top, imitating a star, and a rectangle at the bottom – the trunk.
The tree is knitted from the top, the trunk part is made separately. To get a beautiful even tree, you need to carefully monitor the correct placement of the posts on the levels.
For knitting you will need:
- Green yarn “Iris”.
- No. 2 – hook.
- Scissors.
- Sewing threads are green.
- Sewing needle.
- Gold beads for decoration.
- Ribbon.
A crochet Christmas tree, the pattern and description of the knitting process of which will help beginner needlewomen, is a fake on which you can practice your knitting skills.
The following abbreviations will be used in this master class:
- air loops (air loops) and half loops (h. loops);
- column (st.);
- double crochet (dc) and single crochet (ssc);
- half double crochet (hdc).
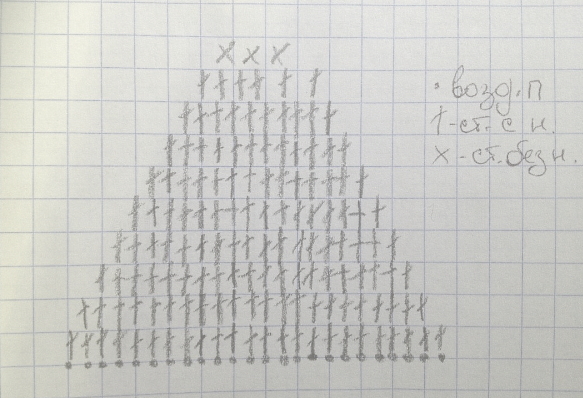
Knitting pattern and features
A small flat Christmas tree is created from two elements – loops and posts. The finished product will have a round part on top, imitating a star, and a rectangle at the bottom - the trunk. The tree is knitted from the top, the trunk is made separately.

To get a beautiful, even tree, you need to carefully monitor the correct placement of the posts at the levels indicated in the diagram.
Step by step knitting instructions
- Star: ring of 8 ch, 16 sc.
- Greenery: Row 1 is worked partially, 13 dc in total. 6 free loops are formed alternately on each side of the tree.
- 2nd row: 2 dc together on opposite sides of the tree, in the center 8 dc, separated by 2 ch. The right and left sides of the tree are made in mirror image.
- 3rd, 5th, 7th rows: one piece – 3 dc, 2 ch, 3 dc. As the tree widens downwards, the central piece is added 1 time.
- Rows 4 and 6 contain two repeating elements: 3 dc, 2 ch, 3 dc and 3 ch, 3 dc. Repeat the fragments.
- On the last tier, 6 dc. They need to be done 6 times.
- Trunk: 14 sts, in the 1st-2nd rows 14 sts with n. It is sewn on from the bottom of the tree.
- Beads are sewn on at different levels in the places of the holes: 4 pieces on the 9th row, 3 on the 7th, 2 on the 5th and 1 on the 3rd.
- A ribbon is threaded through the top circle of air loops and columns.
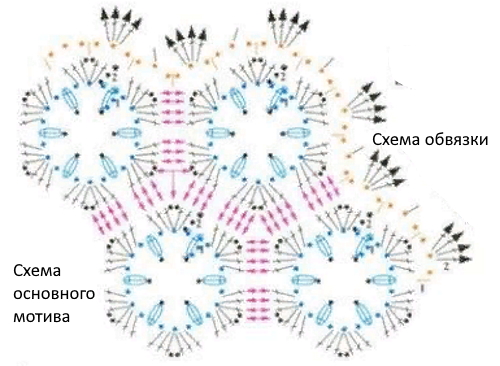
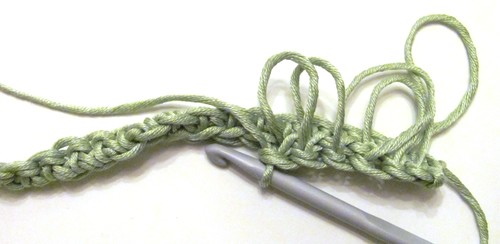
Fillet white herringbone crochet
Filet knitting is a combination of columns and free loops, which creates a pattern on the product that resembles lace. A herringbone in this style can be used as a decorative napkin for the table, its size is 30 by 28 cm.
A fillet crochet Christmas tree, the diagram and description of which will help novice needlewomen, can be made with your own hands from the following set of materials:
- Thin white cotton yarn.
- No. 0.9 – 1 hook.
- Scissors.
- White thread and needle.
- Bell with ribbon for decoration.
Knitting pattern and features
The white tree consists of identical fragments, they need to be knitted several times. The details must be made according to 1 pattern, be the same size, otherwise the tree figure will be distorted. There are 37 of them in the master class, but it is permissible to reduce the number to simplify knitting. The expressive pattern of the tree will be emphasized by the openwork edging along the outer edge.
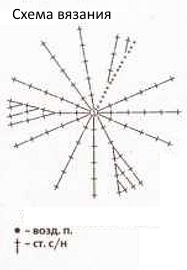
Schematic representation of the main elements, assembly and piping of the Christmas tree:
Step by step knitting instructions
- First 6 air sts in a closed circle.
- 1st row: 3 dc and 3 ch – repeat 6 times, join the tier with st.
- 2nd row: for free ch. sts knit 3 dc, 2 ch. sts and 3 dc. st. Make 36 more such polygons.
- The parts are connected to each other along the side by means of sl st, which are knitted into each sl st of the other row. First, the horizontal tiers are prepared, then they are sewn together vertically. The final version has 8 rows: 8 parts on the lower level, 1 on the upper one. The trunk is attached to the bottom in the center of the sl st.
- The binding is done on the sides. It starts from the lower right corner, goes through the top and ends in the lower left area of the tree, the bottom and trunk are not bound. It consists of: ch. p., 4 dc in the 6th ch. p. For all binding dc. a picot is made: 3 ch. p. + connecting dc.
- Form knots at the ends of the threads and cut off the tails.
- The craft is treated with starch, at this point you can adjust the shape of the tree. It needs to be left to dry.
- The bell is sewn on top.
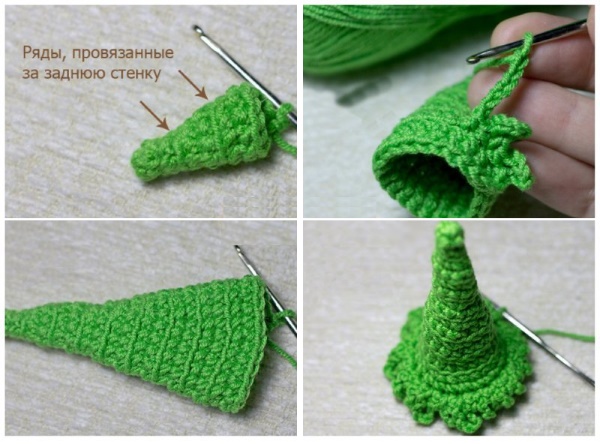
New Year tree with garland crochet
Knitting such a Christmas tree is not difficult, the process does not take much time. Knitting begins from the base of the tree. In size, it turns out to be almost miniature - about 10 cm in height and 6 cm in width.
To make this craft, you will need the following materials:
- Yarn “Iris”: green and white skein, yellow and orange piece.
- Hooks No. 3 and No. 2.
- Scissors.
- The threads are green or white.
- Sewing needle.
- Cotton wool or cotton pads as a filler.
Knitting pattern and features
A crocheted New Year tree is created in several stages:
- First, a flat cone-shaped trunk is knitted, branches are knitted separately and sewn to the main part.
- The festive garland is made after the tree is knitted, it consists of a multi-colored air chain.
In the master class, the tree will be presented in a double color scheme - white and green, where green symbolizes foliage, and white - snow. The cone is knitted in a circle, side seams are not assumed. Almost all rows are simple double crochets.
To make such a craft, you need to use the following diagram:
Step by step knitting instructions
- Green and white threads are joined together, 24 ch are knitted. The 1st and last loops are combined into a circle. Take hook No. 3.
- 1st row: 24 dc.
- From the 2nd to the 8th row, the decrease begins: each time 1 st is decreased from the sides. By the 9th row, 10 sts should remain.
- At level 9, sts are made every 1, resulting in 6 pieces.
- The 10th level is the last one, in it similar reductions are made. At the exit there are 3 st. without n. They are knitted as 1, that is, without finishing the 1st, there is a transition to the 2nd, knitted halfway, and then to the 3rd; the thread at the end passes through all 3 st.
- The finished trunk is filled with cotton wool and sewn up from below with a blind stitch, using green or white threads.
- Branches are made. There should be 6 parts in total – 3 branches on each side. 2 upper: start – 7 ch, 1st-4th rows: gradual decrease from 4 dc to 1 sc. In each row, 1 loop is skipped.
- Similarly, make 4 lower branches. They are a little wider: start - 8 ch, from the 1st to the 4th row decrease from 5 dc to 1 sc.
- The details are sewn to the side of the tree. The branches are placed slightly below the top of the tree. All tails and protruding threads are tucked inside the product.
- Colored garland. It is made of yellow and orange yarn, looks like a cord. For the rope, you need to dial 60 ch. p., the knitting should be of medium or weak density with a No. 2 hook.
- The garland is loosely wound around the tree. To secure it, a cord should be threaded through the trunk posts. The tails from the threads are tucked in.
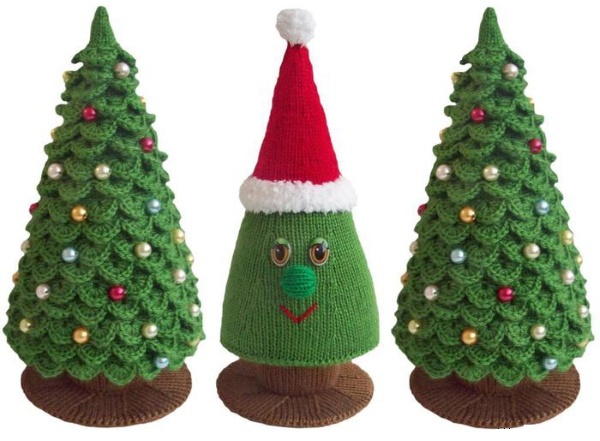
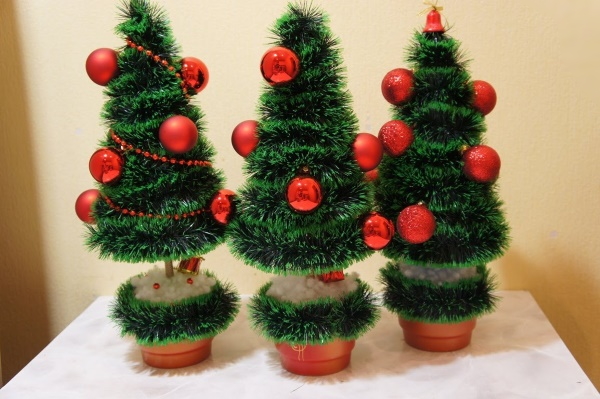
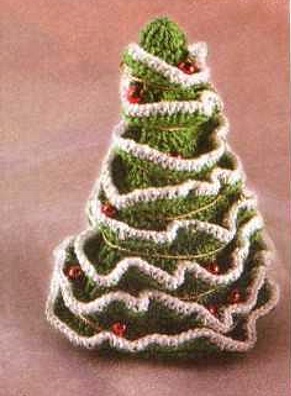
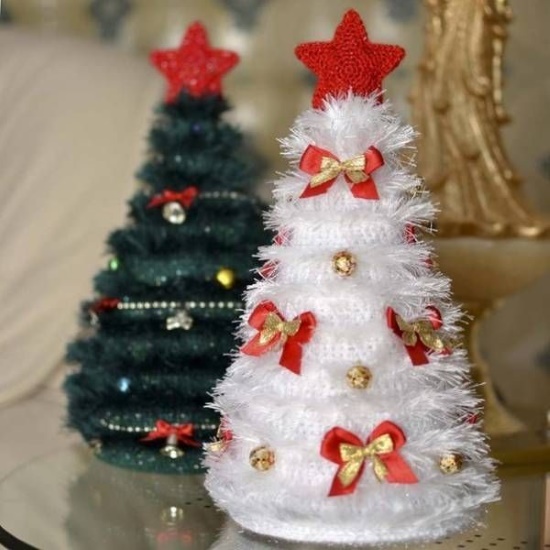
Fluffy crochet Christmas tree
The work includes knitting simple columns in combination with an unusual technique of pulling out loops. Due to this, the Christmas tree turns out voluminous and lush. As a yarn, you can choose shiny grass (for example, “Crystal”) or yarn with already stretched threads along the entire length (Celebi).
DlI will need the following work:
- Yarn “Crystal” (or Celebi).
- Hook No. 3.
- Scissors.
- Threads in tone.
- Sewing needle.
- Sintepon for filling.
Knitting pattern, features
The knitting description indicates long loops as the main elements. They are made by pulling the thread through the loop when creating a column and knitting a single crochet into the same loop. It is recommended to fix the pulled loop with your fingers or a clamp.
The difficulty of working according to this pattern is that in the process of forming the tree levels you can get tangled in the protruding yarn.
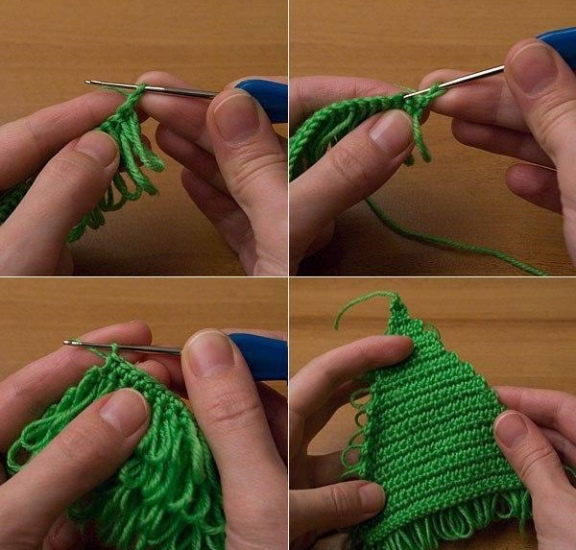
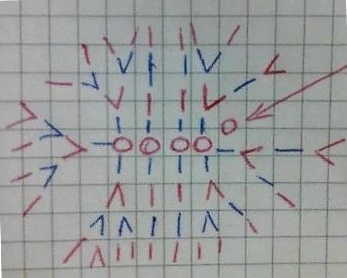
The photo serves as a guide for knitting a Christmas tree from elongated loops:
Bottom diagram:
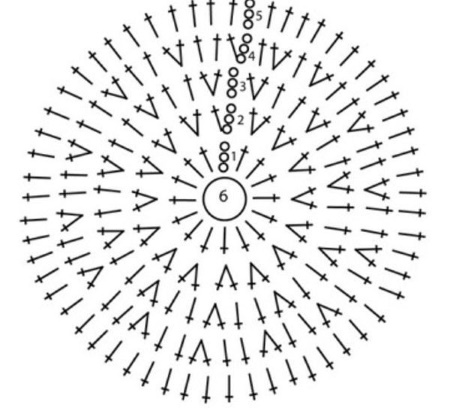
Step by step knitting instructions
- First, you need to dial 3 air stitches and make a connecting ring.
- 1st row: 8 sts without s are knitted in a circle.
- Rows 2-5 – no changes.
- From the 6th row, you need to evenly add 4 sts without n.
- Row 7: Knit 12 sts with hanging loops (each about 1-2 cm long).
- Row 8: add 2 dc.
- The following levels are a repetition of the 7th and 8th rows. The Christmas tree is knitted to the desired height: with 10 rows you will get a small Christmas tree, about 5 cm, 20 levels - the tree will be 10 cm high.
- The product is filled with synthetic padding.
- The tree needs a bottom. It is knitted in a circle from the same yarn: 6 ch. 1st row – 16 dc. In the 2nd row, 2 dc in 1 loop. From the 3rd row – 2 dc through 2 loops. The diameter of the bottom should match the base of the tree. The entire circle is finished with dc without increases.
- Sew the bottom to the main part. Remove excess threads.
Original amigurumi crochet Christmas tree
The amigurumi Christmas tree differs from the classic versions in that it is flat and voluminous, knitted in a circle. The tree will be made from a long crocheted chain of loops and stitches that is wound around a wire.
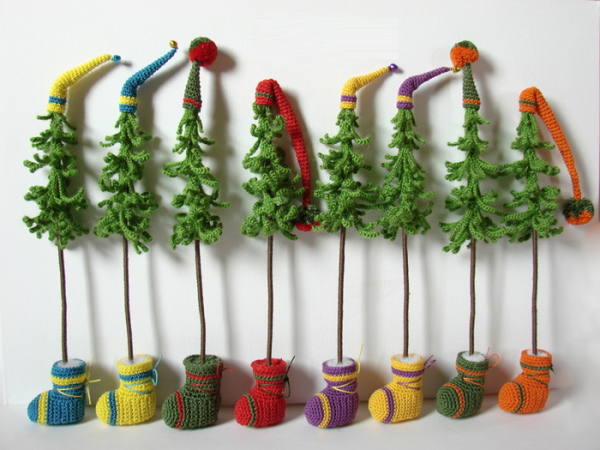
The craft includes the creation of 2 small boots and a scarf, the total height is 23 cm. Cotton yarn or plush types are suitable for knitting soft amigurumi toys - Alize Bella, Dolphin Baby, Nazar, Vita Fancy.
List of materials:
- Yarn “Pekhorka” (brown, green, white, red).
- No. 2 – hook.
- Flexible wire of medium thickness.
- Scissors.
- Glue.
- Several coins of 5 or 10 kopecks.
- Filling – holofiber.
Knitting pattern, features
The specificity of knitting amigurumi is not only in the formation of columns and air loops, but also in the obligatory increases and decreases in more complex figures. To make an increase, that is, to increase the number of loops, you should make 2 dc in 1 loop of the previous level.
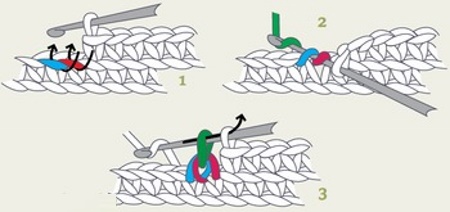
It is better to reduce the number of loops and reduce the size of the product using the invisible decrease method:
- insert the hook behind the front part of the 1st loop and immediately behind the wall of the 2nd loop at the base; there are 3 loops on the hook: the main loop and 2 p. p.;
- take a thread, pull it through 2 sts; 2 loops on the hook;
- pull the main thread through 2 loops.
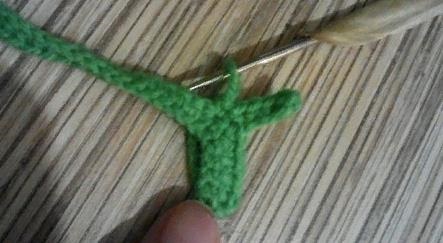
Photos of knitted branches:
In round amigurumi crafts, an amigurumi ring is always knitted: ch. p., connected in a circle. The element makes the knitting denser, eliminates the formation of holes. When making this craft, it will be useful when knitting the toe area of the boots.
Knitting pattern for shoes:
Step by step knitting instructions
- To create greenery, you need to collect a chain of air threads 50-55 cm long.
- The 2nd row consists of only st. without n.
- 3rd row: 5 dc, make 5 ch and in them 4 dc – you get a branch. Make 10 branches.
- Shoes. For the base: a chain of 5 ch with red yarn. 1st row: 10 dc in a circle. 2nd row: evenly increase 6 dc. 3rd row: increase 8 dc. 4th row: increase 4 dc. 5th row: complete the level with 5 dc. 6-9th rows unchanged. In the 7th row use white yarn.
- Cut out a cardboard oval in the shape of the finished boot part, glue it inside along with coins for weight.
- Row 10: Decrease 2 times. Row 11: No changes. Row 12: Decrease by 6 dc. Row 13: Remove 4 dc.
- Fill the shoe with holofiber.
- Row 14: 15 sc (white). Row 15: no change. Rows 16-18: increase 1 sc each. Rows 19-21: no change. The last rows are knitted with white yarn. Knit to the end.
- Special attention should be paid to the toe: an amigurumi ring of 6 loops. 1st row: make 12 sc. 2nd row: increase sc. 6 times. 3rd-8th rows: sc. in a circle. 9th row: do not knit to the end, 1 ch., turn the shoe, 12 sc., 1 ch. and turn again. 10th-14th rows: 12 sc., 1 ch., turn. 15th row: fold in half, connect the parts with 6 tbsp. 16th row: sc. in a circle, finish knitting to the desired height. The last row is made in the form of small teeth: (1 ch., connecting st. in sc.) - to the end of the thing.
- Knit the 2nd boot. Cut off the protruding threads, tuck the tails inside.
- Scarf: make a 15 cm long chain stitch, knit 1 row of single crochet stitches in red, the 2nd row in white.
- Connect 2 pieces of wire and secure with tape or glue.
- First, wrap the wire base with brown yarn, and wind the tree on top. Glue all the ends. Tie a scarf closer to the top.
- Twist the lower parts of the wire into flat spirals, coat with glue and put the boots on them.
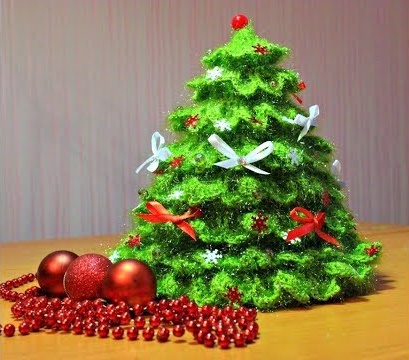
Volumetric crochet Christmas tree
A volumetric Christmas tree should be knitted from the top to the base. Using this method, you can make a Christmas tree of any height - depending on the number of rows. To keep the shape of the product, you need to prepare a cardboard base.
To make the product you will need the following materials:
- Cotton yarn “Gogo” (green and white).
- Hook No. 2.
- Scissors.
- A cardboard cone to fit the size of the product.
- Glue.
Knitting pattern, features
The fluffy Christmas tree is knitted in a circle. In the master class, the main part of the tree will be green, the edging is made in white, reminiscent of snow. The finished product can be given a clear shape and stability due to the cardboard insert.
Step by step knitting instructions
- A chain of 5 ch is made. It is closed into a ring.
- 1st row – 12 dc, knitted in a circle.
- From the 2nd row, the increase begins: 3 ch for lifting, 1 dc in the 1st loop, 11 dc.
- Level 3: add 1 dc into the 5th and 9th stitches.
- The following rows are made according to the following pattern: alternating addition of 1 dc into the 1st loop on even rows and 2 dc on odd rows.
- To add volume: embroider around the tree using the spiral method, 1 level of 2 dc in each loop. To get beautiful frills, use a chain stitch.
- The finished ruffles are tied with 1 row of single crochet stitches using white yarn.
- Depending on the height and width of the tree, a circle is cut out of cardboard, 1/3 of which is removed. The figure is rolled into a cone, fixed with glue (or tape). The cardboard is inserted inside the tree.
Tips for Beginner Craftswomen
- Any crocheted item starts with a set of chain stitches. A simple item can be made from just single stitches.
- When doing your first work, it is important to adequately assess your capabilities. It is worth practicing creating a small craft and choosing an easy pattern, for example, a flat Christmas tree.
- The hook size should match the thickness of the yarn: a small hook for thin thread, a thick one for wool. Knitting with thin yarn is more difficult and takes longer.
- Beginners are not recommended to use smooth types of yarn, as they are difficult to hook. Yarns with elastane are also not suitable - without the necessary skills, the item may stretch out and lose shape during knitting. It is worth considering a budget option of yarn - "Iris". It is sold in small skeins and has more than 20 types of colors.
- Multi-colored threads, beads, sequins, and ribbons add originality and attractiveness to the knitted product.
- To make the tree stable and have shape, a cardboard frame or wire is inserted inside.
- The volume of the tree is given by the filler - cotton wool, pieces of rags and threads, synthetic padding or foam rubber. Bulk products are used as weights. To create a scented item, herbs are put into it.
Knitting a Christmas tree begins with determining a suitable pattern and step-by-step execution of the basic elements indicated in the description. The decisive preparatory moment is the correct selection of a hook and yarn, as well as a complete understanding of the pattern and the step-by-step knitting process.
Video on the topic: how to crochet a Christmas tree - diagrams and descriptions
Master class on crocheting a voluminous Christmas tree: