A drawing with the inscription "September 1" is often drawn in drawing lessons on the first days of the new school year. How to draw such a drawing is a question that interests not only schoolchildren, but also their parents.
The design may include a bell., symbolizing the first bell, school supplies, a notebook or a book. For drawing you will need a set of colored pencils, a sheet of paper and an eraser.
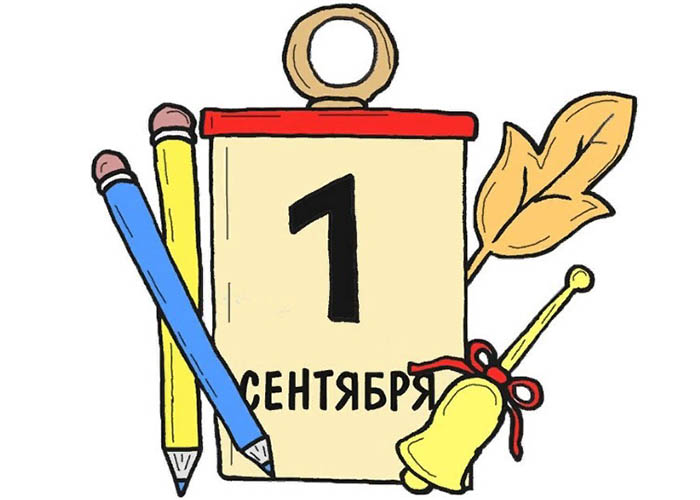
Calendar and September 1st
The process of drawing a picture on the theme of "September 1" consists of the following steps:
- Draw a rectangle 5 cm wide and 7 cm high (calendar). Then draw a large number 1 in the middle, and write the word "September" in large letters under it. Then fill the number and the inscription in black.
- Above the top line of the calendar outline, draw a rectangle 0.5 cm high and the width equal to the width of the calendar. Then fill this rectangle with red. The result will be the top fastening of the calendar.
- Above the top of the calendar mount, draw a ring 0.5 cm wide, and then fill it with yellow.
- To the left of the calendar, draw a pencil in the form of an elongated rectangle, 0.5 cm wide and 7 cm high, located at an angle of 100° relative to the vertical of the drawing. Then you need to fill it with red, after which, at the top of the pencil, draw a small horizontally elongated oval, and above it, draw a semicircle (eraser). Then fill it with pink.
- At the bottom of the pencil, draw a sharpened lead in the form of an equilateral triangle. Then fill its tip with black.
- Draw a second pencil parallel to the first and located a little closer to the calendar, with its lower part hidden behind the calendar and its body painted blue.
- On the right side of the calendar, at the top, depict a maple leaf located at an angle of 45° relative to the vertical of the drawing. The leaf should consist of 3 parts, each of which is similar in shape to a petal. Inside the leaf, it is necessary to depict the frame of the leaf in the form of a trident.
- On the right side of the calendar, at the bottom, depict a bell pointing downwards. In the upper part of the bell, depict a bow with stripes coming out of it, directed to the left and right sides relative to the upper part of the bell outline.
- Above the bow, draw a special handle in the form of an elongated tube, at the top of which draw a small circle.
- Fill the bell with yellow and fill the bow with red.
- Fill the bell handle with brown.
September 1st in pencil
First graders often ask their parents how to draw September 1. To draw this picture, you will need a simple pencil, a sheet of paper, a stencil and an eraser.

The drawing process consists of the following steps:
- At the bottom of the sheet, use a stencil to write in large letters the inscription “September 1”.
- In the upper left corner of the sheet, draw a globe, for which you first need to draw a circle with a radius of 2 cm. Then, inside it, draw the outline of the continents of the earth.
- Along the right side of the circle outline, at a small distance from it, depict a curved rectangle - the globe frame. Then, at the upper and lower ends of this frame, depict small triangles connecting the frame with the circle outline.
- Below, under the frame, draw a horizontally elongated rectangle, and under it, draw a horizontally elongated oval. Then, along the edges of this oval, draw small vertical segments and connect them with an arched line parallel to the lower part of the elongated oval's outline. The result will be a globe stand.
- In the upper right corner of the sheet, depict an open notebook, for which you first need to draw a line 5 cm long, located at an angle of 45° relative to the vertical of the drawing. This will be the central line of the notebook.
- Place the pencil at the top point of the central line of the notebook and draw an arched line, convex upward and directed to the right.
- Place the pencil at the top point of the central line of the notebook and draw an arched line, convex upward and directed to the left.
- Place the pencil at the bottom point of the central line of the notebook and draw an arched line, convex upward and directed to the right.
- Place the pencil at the bottom of the central line of the notebook and draw an arched line, convex upward and directed to the left.
- Connect the ends of the curved lines on the right with a straight line parallel to the central line of the notebook.
- Connect the ends of the curved lines on the left with a straight line parallel to the central line of the notebook.
- Place the pencil slightly below the top of the left line of the notebook sheet outline and draw a small segment perpendicular to this line. Then, starting from the edge of this segment, draw a contour parallel to the outline of the notebook sheet. The result will be another sheet located under the main one.
- Similar to the previous point, draw another sheet located under the previous one.
- Place the pencil at the bottom of the central line of the notebook and draw an arc under the main outline of the sheet, convex upwards and directed to the right. Then connect the right end of this arc with the bottom line of the outline of the right sheet of the notebook. The result will be the bottom of the sheet located under the main one.
- Place the pencil at the bottom of the central line of the notebook and draw an arc under the contour of the second sheet, convex upward and directed to the right. Then connect the right end of this arc with the bottom line of the contour of the second sheet of the notebook. The result will be the bottom of the third sheet, located under the second.
- On the left sheet of the notebook, draw several arched lines parallel to the upper part of the notebook sheet outline. The lines should be located at a distance of 0.5 cm from each other.
- On the right sheet of the notebook, draw several of the same lines as on the left sheet. Then draw the number 5 with a plus under them.
- Draw a maple leaf in the lower right part of the album sheet. Then draw the same leaf in the lower left part of the sheet.
- Draw a small maple leaf to the right below the globe. Then draw another small maple leaf to the left below the notebook.
- The drawing can be filled in if desired.
Merry bell
How to draw September 1 is often told by parents to their children who are just about to go to school.
This drawing is suitable for children of primary school or preschool age. It can be depicted with felt-tip pens or colored pencils.
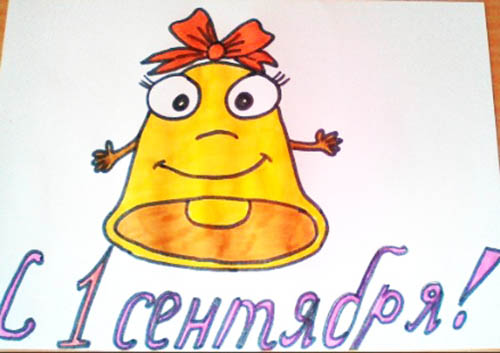
The process of drawing a "merry bell" consists of the following steps:
- Draw two eyes in the form of small circles with a black felt-tip pen. Then draw round pupils in the center of the eyes and color them in, leaving a small area uncolored in the center of the pupils.
- Between the eyes, slightly below the center, draw the nose in the form of a small arc, convex upwards.
- Under the nose, depict a smiling mouth in the form of a wide arc, convex downwards. Then, along the edges of this arc, depict small notches in the form of vertical segments.
- A little lower, draw an oval elongated horizontally, and in its upper part, draw a semicircle directed downwards. The height of this semicircle should be equal to half the height of the oval.
- Fill the inside of the oval with orange and fill the semicircle with yellow.
- Draw an arc under the oval, parallel to the bottom of the oval outline.
- Draw an arched, upward-pointing line connecting the left and right eyes.
- Place the pencil at the lower left edge of the left eye outline and draw a line connecting the eye to the left end of the lower arch.
- Place the pencil at the lower right edge of the right eye contour and draw a line connecting the eye to the right end of the lower arch.
- Above the bell's head, draw a small circle, then to the left and right of it, draw rectangles with rounded corners. Then to the left and right below them, draw elongated rectangles with notches at the ends. The result will be a bow.
- Fill the bow with red color.
- Draw eyelashes near the eyes. They should be directed in different directions at an angle of 45° relative to the vertical of the drawing.
- Draw hands to the left and right of the bell and fill them with orange color.
- Fill the bell with yellow.
- Under the bell, write in large letters “Happy September 1st!”
- Fill the letters with purple.
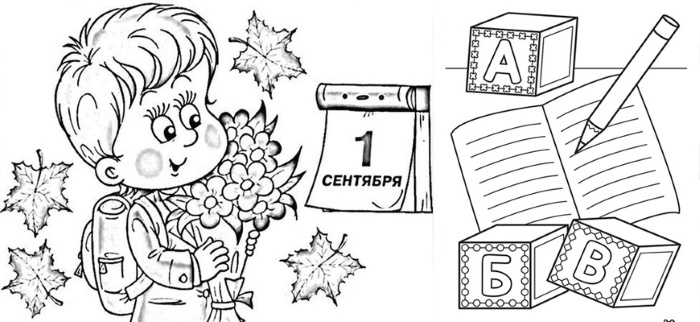
Knowledge Day
As you know, September 1 is the day of knowledge.
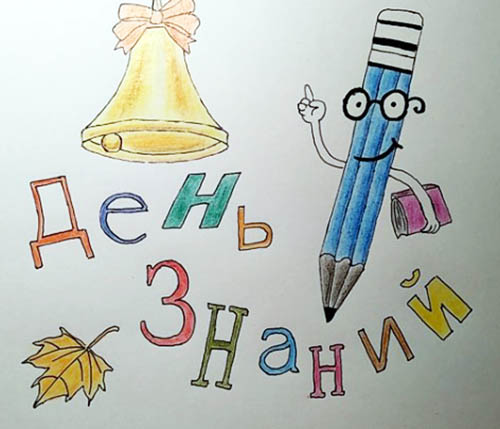
To draw a picture about this important day, you need to do the following steps:
- In the upper left part of the album sheet, depict glasses in the form of two circles connected by a small line. To the right of the glasses, depict a small hook. Then, in the center of each circle, depict the pupil in the form of a thick dot.
- Above the glasses, depict the upper part of the pencil as a rectangle with rounded corners at the top. Then divide this rectangle into two parts using a thick line, which must be depicted in the center of the rectangle. The upper part of the pencil will be an eraser, inside which you need to draw several horizontal lines of different thicknesses, located at different distances from each other.
- Under the glasses, depict the lower part of the pencil as a long rectangle, at the bottom of which depict the lead as a triangle. Then you need to paint the lower part of the lead black.
- Inside the pencil, draw 2 lines parallel to the pencil outline. These lines should divide the pencil into 3 equal parts.
- Starting from the middle of the left part of the pencil outline, depict the right hand as a curved tube directed upwards. On top of the hand, depict a hand with bent fingers, and the index finger should be straightened and directed upwards.
- Starting from the middle of the right part of the pencil outline, depict the left hand as a curved tube directed downwards. At the bottom of the hand, depict a hand with bent fingers, and then depict a book located behind the hand.
- In the central part of the pencil, draw a smiling mouth in the form of an arc, at the right end of which draw a small notch perpendicular to the arc.
- Fill the pencil with blue and the lead with brown.
- Fill the book with red color.
- In the upper left part of the album sheet, draw a small circle, to the left and right of which draw elongated horizontal rectangles. Under the rectangles, draw rectangles curved downwards with notches at the ends. The result will be a bow.
- From the lower left part of the bow, draw a curved arc directed downwards and to the left.
- From the lower right part of the bow, draw a curved arc directed downwards and to the right.
- Draw an elongated horizontal oval that should connect at the edges with the previously drawn left and right arcs. The result will be a bell.
- Inside the oval, draw the same oval, but smaller in size.
- Inside the oval, on its left side, draw a small circle.
- Fill the bell and the inner circle with yellow. Then fill the inner oval of the bell with orange.
- Write the word "Day" in large letters under the bell.
- Write the word "ZnaNiy" in large letters under the pencil.
- Fill the outlines of the letters "Д", "Ь", "З", "и" with red color.
- Fill the outlines of the letters "e" and "a" with blue.
- Fill the outline of the letter "й" with yellow.
- Fill the outline of the letter "H" with green.
- In the lower left part of the album sheet, draw a maple leaf and fill it with brown color.
September 1st against the backdrop of leaves
How to draw September 1 is often asked by schoolchildren to their parents. Since "September 1" is also associated with the first day of autumn, maple leaves are often depicted in such drawings.

The process of drawing this picture is as follows:
- In the center of the album sheet, draw a large number 1, and under it, using a stencil, write the word "SEPTEMBER" in large letters. Then you need to fill in the number and the inscription in red.
- To the left of the number 1, draw a globe, for which you first need to draw the Earth as a medium-sized circle, and inside its contour draw the continents, which then need to be filled in green. Then the entire remaining inner area of the circle needs to be filled in blue.
- To the left of the Earth, draw a semicircle parallel to the Earth's contour. To the left of this semicircle, draw the same semicircle, and then use lines to connect its ends to the Earth's contour.
- Place the pencil at the bottom of the semicircle outline and draw a small vertical segment, then draw a perpendicular segment of the same size under it. The result will be the globe body, which must be filled in red.
- To the right of the number 1, draw 2 bells connected at the top and pointing in different directions.
- Draw bows above each bell.
- Fill the bells with yellow and fill the bows with red.
- Outline the word "SEPTEMBER" in orange.
- Around the outline, draw maple leaves, which then need to be painted brown.
Autumn calendar
How to draw September 1 is usually taught in the first drawing lesson at school. This drawing can be drawn with both felt-tip pens and colored pencils.

The drawing process consists of the following steps:
- In the center of the album sheet, draw a calendar in the form of a rectangle, 5 cm wide and 8 cm high.
- In the middle of the rectangle, draw a large number 1, and under it, using a stencil, write the word “SEPTEMBER”.
- fill in the number and inscription in red.
- Along the top of the calendar outline, draw small vertical segments, the distance between which should be no more than 1 cm. Then draw bold dots under the segments. The result will be a decorative fastening for the calendar pages.
- In the upper left part of the calendar, draw a small circle with a red pencil. Then, to the left and right of it, draw elongated ovals that should narrow when connected to the circle. The result will be a bow.
- Starting from the center of the bow, draw two curved lines directed to the left and down.
- To the left of the calendar, draw 3 large maple leaves, fill the first one with dark brown, and fill the other 2 with light brown.
- To the right of the calendar, draw a bell handle in the form of an elongated tube with rounded ends and located at an angle of 45° relative to the vertical of the drawing.
- Draw a square at the top of the handle, and draw equilateral triangles to the left and right. The result will be a bow.
- Under the bow, on the left and right, depict ribbons in the form of curved rectangles directed downwards, at the end of which make corner cutouts.
- Above the bow, draw a bell, directed upwards at an angle of 45° to the vertical of the drawing. Then, above the upper part of the outline of the bell, draw a small semicircle, convex upwards. Then you need to fill it in orange.
- Fill the bow with red color.
- Fill the bell with yellow.
- Fill the bell handle with brown.
Drawings on the theme of "September 1" are drawn not only by primary school children, but also by teachers themselves, to decorate the classroom for the new school year. Almost every schoolchild knows how to draw such a picture, and teachers and parents will be happy to tell you how to make the drawing more colorful and diverse.
Video about the drawing