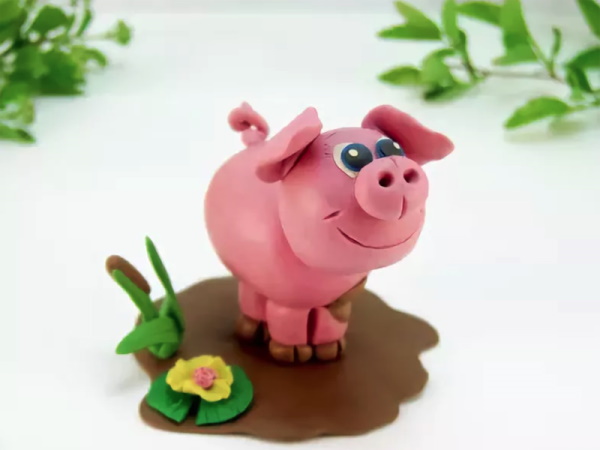
From plasticine You can mold different pigs. They can look like real ones or be miniature copies of favorite characters from some cartoon. Before modeling with children, parents should find out what materials and tools need to be prepared, and also read several step-by-step instructions to be able to explain the order of actions to the child, without mistakes.
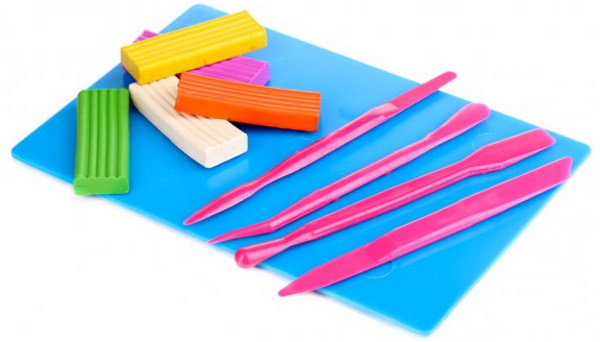
What you need to make pigs from plasticine
To mold a pig, you will need pink plasticine. If the purchased set does not have this shade, you can mix white and red plasticine in a 2:1 ratio. The parts should be mixed for a long time so that the color of the material is uniform, without streaks and inclusions. For detailing the crafts, you need plasticine of different colors.
The shades that are most often used for sculpting piglets are:
- white;
- black;
- blue;
- dark pink;
- red;
- brown.
In the table you can see the names of additional tools and materials needed for the work, as well as what they are intended for.
| Material | Purpose |
| Aluminum foil | It is needed for forming large parts. You can roll any shape out of foil and then cover it with plasticine. This helps to save material. |
| Matches | Useful for securely connecting parts of a piglet's body. |
| Toothpicks | They can be used to extrude various textures and make even holes. |
| Stack | A special plastic knife for cutting plasticine into even pieces. |
| Rolling pin | Allows you to roll out plasticine into thin layers. |
| Ruler | Needed for measuring parts. |
Sometimes plasticine stains your hands, so there should always be wet wipes on the table. It is also important to keep the work surface clean. You can buy a special modeling board or a mat.
They are easy to clean from the stuck plasticine, so the craft molded on such a surface will turn out neat. The risk that brown or black plasticine will accidentally stick to a piece of pink is reduced. Step-by-step instructions, which can be considered further in the article, will help adults teach children to mold pigs from plasticine quickly and easily.
How to make a plasticine pig for kids
A child of 3-4 years old can be offered to mold a piglet similar to a real one. During the process of making the figurine, parents should talk through all the actions and explain to the child which part of the body and where to attach. This way, the child will quickly understand how a pig differs from other animals. He will learn that piglets have hooves, a snout and a hooked tail.
To work you will need:
- plasticine of pink, brown and black colors;
- 3 matches;
- stack;
- modeling board.
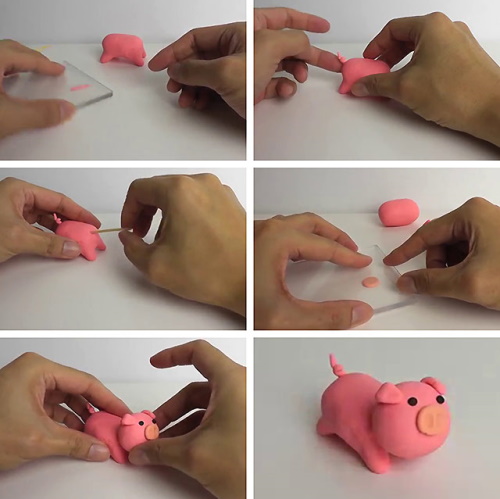
How to sculpt:
- Knead the pink plasticine well until it becomes soft.
- Roll the entire bar into a sausage about 10 cm long.
- Using a stack, separate 4 small pieces to form the legs.
- Then cut off a larger piece, from which the pig's head will be molded.
- Separate another piece of plasticine, which should be 2 times larger than the “head”.
- Pinch off 4 small pieces of the same size. They will be used to mold the ears, snout and tail.
- Roll an oval from the largest part. This is the body of the future piglet.
- Break 2 matches in half and scrape off the sulfur. Insert them into the plasticine blank so that half remains inside and the other half sticks out. The legs will be held on the matches.
- Roll all 4 pieces intended for forming legs into identical thick sausages.
- Put these sausages on the matches sticking out of the body blank. Press the legs tightly to the body. The matches should not be visible.
- Carefully seal the joints with your fingers so that they become invisible.
- Now you need to break another match and insert half of it into the front part of the body. The head will be held on this match.
- Roll a smooth ball from the prepared part of the plasticine and put it on the protruding match. Carefully rub the joints.
- Take 2 small pieces from the remaining 4 and press them with your fingers onto the board. You will get 2 flat pieces that need to be placed on the pig's head. Piglets have slightly drooping ears, so you need to bend each piece with your finger.
- Roll another piece of pink plasticine into a ball and press it lightly with your finger so that it takes the shape of a puck. Attach it to the piglet's snout. This will be the snout.
- To make the tail, you need to roll the last piece of plasticine into a thin sausage, about 1 cm long, roll it into a spiral and attach it to the piglet’s body, at the back.
- Cut off a 0.5 cm wide piece of brown plasticine, knead it and roll it into a 2 cm long sausage.
- Divide into 4 equal parts, each of which must be flattened by pressing with your fingers onto the modeling board.
- Wrap the resulting strips around the bottom of each hoof.
- Use the remaining half of the match to squeeze out indentations on the piglet’s face under the eyes, and also to shape the nostrils on the snout.
- Cut a small piece of black plasticine. Divide into 2 parts and roll 2 small balls. Insert them into the eye sockets.

The plasticine pig is almost ready. All that remains is to divide the hooves into 2 parts using a stack.
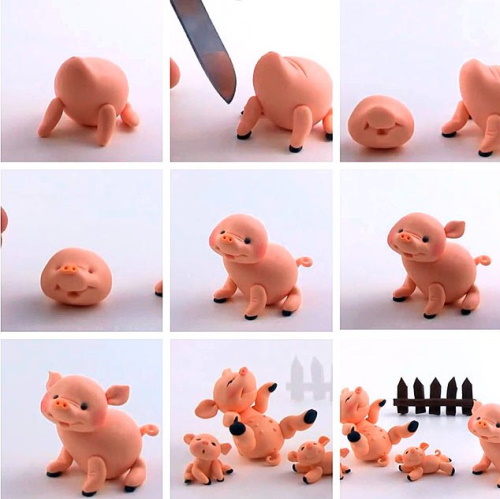
Pig made of light (airy) plasticine
It is much easier to sculpt from airy plasticine than from regular plasticine. It does not need to be kneaded before work and additional materials (matches or toothpicks) are used to fix the parts. Even the smallest elements are securely attached to the figure. In addition, such plasticine has a wide range of different shades.
For work you will need several colors of plasticine:
- pink;
- white;
- black;
- red;
- brown.
The plasticine pig, described step by step in this master class, has non-standard shapes. It looks more like a cartoon character than a real pig. Such a figure looks funny.
Air plasticine dries in the air and loses its plasticity, so the molded piglet will be used for games.
How to sculpt:
- Separate a portion of the pink plasticine and roll it into a smooth ball with a diameter of 1.5-2 cm.
- Separate another smaller part, roll a new ball 1 cm in size. Press it lightly so that the top and bottom of the part become flat. Attach this element to the piglet's muzzle. This will be the snout.
- Since the air plasticine hardens quickly, the nostrils in the pig's nose need to be cut. Use a match to squeeze out 2 indentations.
- Take some more pink plasticine and roll out a sausage of medium thickness, its length is about 4 cm. Divide it into 4 equal parts.
- Make the front legs from 2 parts, placing them on the sides of the ball. Glue the back legs from below as if the pig is sitting.
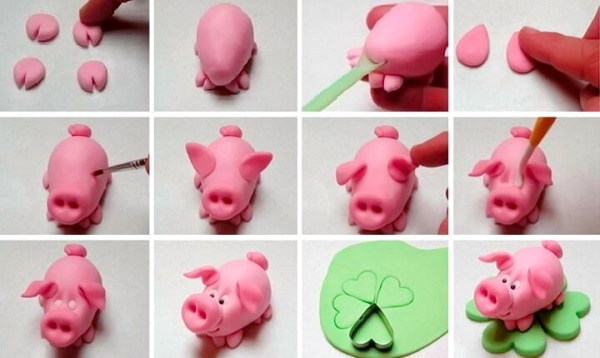
- Pinch off 2 more pieces of pink plasticine, roll them into 2 small, thick sausages and flatten with your fingers. Attach to the piglet's head, like ears. Press lightly so that they hang down.
- Separate another small piece of plasticine and roll a thin sausage 1 cm long. Twist into a spiral and attach as a tail.
- Roll 2 small balls from white plasticine, flatten them and place them above the snout. These will be the eyes.
- Now you need to make pupils from black plasticine. To do this, separate 2 small parts from the total mass and roll balls that should be 2 times smaller than the white ones.
- Place these balls in the center of the white “eyes” and gently press them down so that they flatten.
- Pinch off a small piece of red plasticine and shape it into a teardrop shape. Flatten it with your fingers and place it under the snout, on the side. This will be the pig's tongue, as if it were teasing or licking itself.
- Use a stack to draw a strip down the middle of the tongue.
- Tear off a piece of brown plasticine and roll it into a sausage 2 cm long.
- Divide into 4 equal parts, each of which must be flattened by pressing with your fingers onto the modeling board.
- Wrap the ends of all the legs.
- Use a stack to divide each hoof into 2 parts.
In order for the figure to be playable, it must be left in the air until it dries completely for 1 hour. Do not place the craft on a radiator or other objects that emit heat. The plasticine will dry unevenly and may crack.
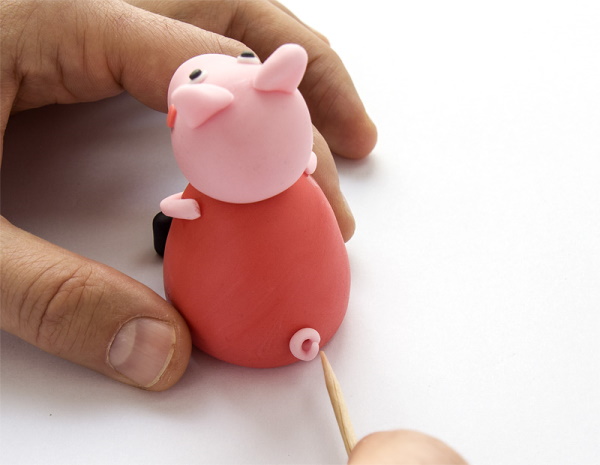
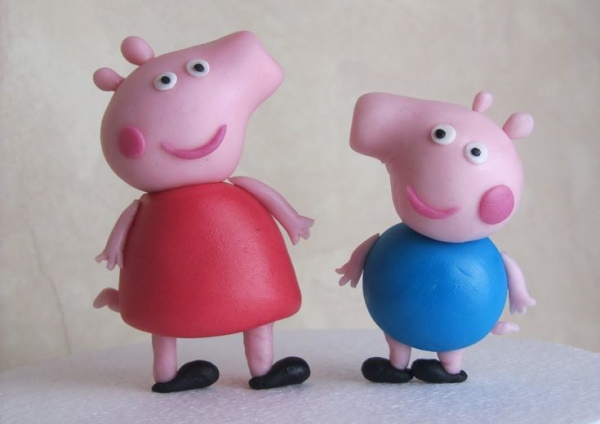
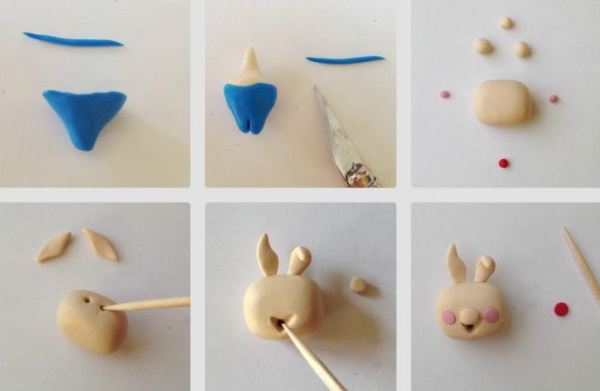
Peppa Pig
The plasticine pig, described step by step in this master class, is the main character of a children's cartoon series. It has an unusual head shape, which is easy to repeat.
What colors of plasticine will you need:
- light pink;
- pink;
- red;
- black;
- white.
Additional materials and tools:
- stack;
- foil;
- 1 match;
- rolling pin;
- ruler;
- modeling board.
How to sculpt:
- Roll a 2 cm ball out of light pink plasticine. This will be the head.
- Separate another part of light pink plasticine and roll a thick sausage with a diameter of 1 cm and a length of 0.5 cm. Slightly flatten the sausage on both sides so that its ends become flat.
- Attach this part to the head blank from the side, smooth the joints carefully. Now you have a head with a snout.
- Now you need to use a match to squeeze out the pig's nostrils.
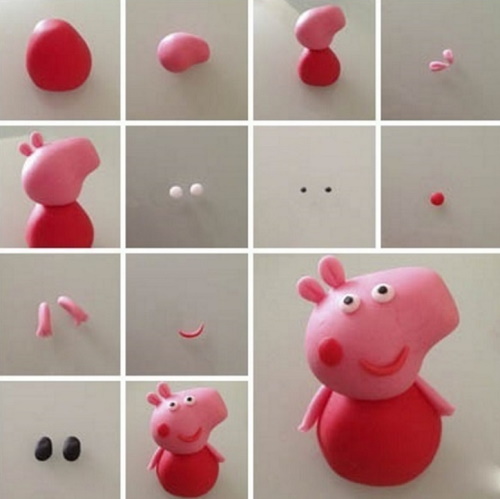
Step-by-step modeling of Peppa Pig from plasticine. - Roll a 3 cm oval out of foil. Compact it well. It will become the basis for the body.
- Pinch off 2 small pieces of the same size from the light pink plasticine and roll them into round layers. Stick the plasticine onto the foil oval at the top and bottom.
- Cut off a small piece of red plasticine and roll it into a layer 0.3 cm thick.
- Using a stack, cut a rectangle 3 cm wide and 7 cm long from the layer. Cover the pig's body with this layer. This will be the dress. The edges at the bottom need to be straightened to imitate the flounces on the hem.
- Attach the head to the upper part of the body. Mask the joints.
- Pinch off a small piece of pink plasticine and roll it into a sausage of medium thickness, 4 cm long. Divide it into 4 equal parts and attach to the body like arms and legs.
- Use a stack to divide the edge of the hands into 3 parts to form the fingers.
- Roll 2 balls of 0.5 cm diameter from black plasticine. Flatten them slightly and attach them to the legs. These will be Peppa's shoes.
- Pinch off 2 small pieces of white plasticine and roll into balls. Flatten them with your fingers and attach them to the pig's face as eyes.
- Similarly, make black pupils for Peppa. The balls should be 2 times smaller than the white ones.
- Use a stack to make an indentation for the smiling mouth.
- Roll a thin sausage out of red plasticine and insert it into the prepared slot.
- Roll 1 small ball from pink plasticine, flatten it with your fingers and give the pig a blush on its cheek.
- Pinch off 2 small pieces of light pink plasticine, shape them into droplets. Attach to the head with the narrow side down.
The plasticine figure of Peppa Pig is ready. If the craft was made from airy plasticine, then it can be dried and played with.
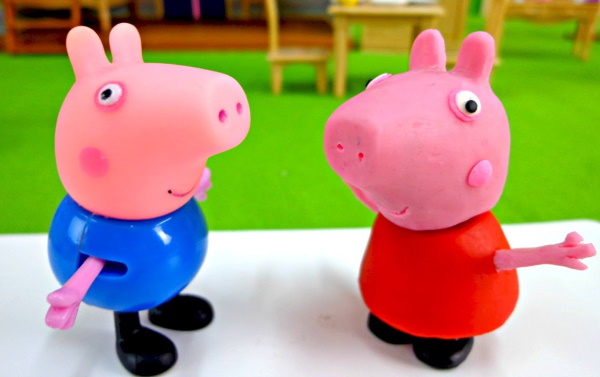
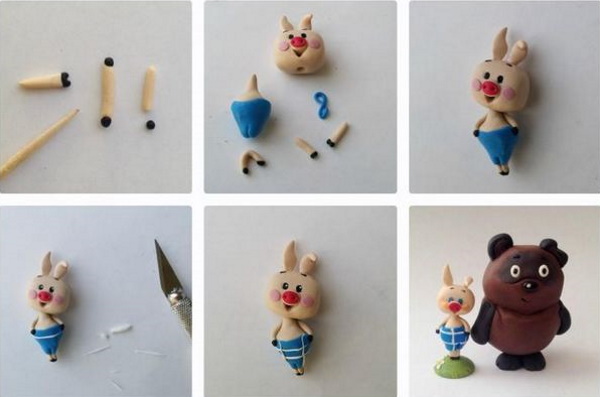
George the Pig
A pig named George is Peppa's younger brother. Since George is younger than his sister, he should be small. For work, you will need plasticine of the same colors as for modeling Peppa. Only the color of the pig's clothes changes, from red to blue. The same tools can be used.
A plasticine pig (following the instructions step by step, it is important to pay attention to the sizes of the parts) named George, is molded as follows:
- For the head, pinch off a piece of light pink plasticine and roll it into a ball with a diameter of 1 cm.
- Separate another part of light pink plasticine and make a snout measuring 0.5 cm. Slightly flatten the part on both sides.
- Attach the snout to the head blank from the side, smoothing the joints carefully.
- Use a match to squeeze out the pig's nostrils.
- Roll the foil into an oval 3 cm in size.
- Cut 2 small pieces of light pink plasticine and roll them into round layers. Stick the plasticine on the foil oval at the top and bottom.
- Separate a small piece of red plasticine and roll it into a layer 0.3 cm thick.
- Use a stack to cut a rectangle 2 cm wide and 5 cm long from the layer. Cover the pig's body with this layer. This will be George's shirt. The edges should fit tightly to the body.
- Attach the head to the upper part of the body. Mask the joints.
- Pinch off a small piece of pink plasticine and roll it into a sausage of medium thickness, 2 cm long. Divide it into 4 equal parts and attach to the body like hooves.
- To make George's shoes, roll 2 balls of black plasticine with a diameter of 0.5 cm. Flatten them slightly and attach them to his feet.
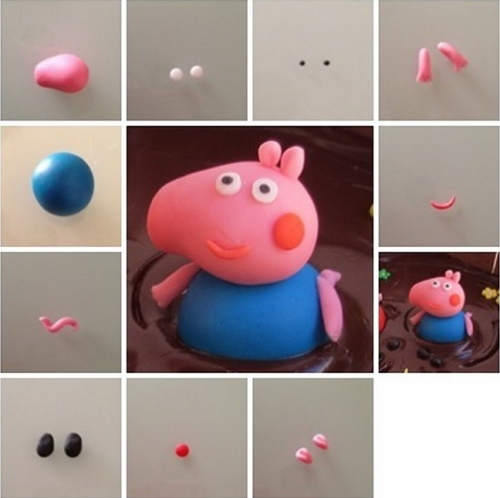
- Separate 2 small pieces of white plasticine and roll them into balls. Flatten them with your fingers and attach them to the muzzle as eyes.
- Make the pupils black.
- Use a stack to make a depression for the smiling mouth and fill it with a thin sausage of red plasticine.
- Roll a small ball out of pink plasticine, flatten it with your fingers and give the pig a blush.
- Pinch off 2 small pieces of light pink plasticine, shape them into droplets. Attach to the head with the narrow side down.
In the cartoon series about Peppa, the main characters are not only herself and George, but also their parents: Mummy Pig and Big Daddy Pig. They can be molded from plasticine by analogy, but all the details need to be increased in size.
Other pig crafts for kids
The plasticine pig, described step by step in this master class, is the heroine of the animated series "Smeshariki". Her name is Nyusha. This is a round pig with red pigtails.
To make Nyusha, you will need plasticine of different colors:
- light pink;
- pink;
- orange;
- brown;
- white;
- black.
Additional materials and tools:
- stack;
- rolling pin;
- 1 match;
- modeling board.
Procedure:
- Roll a ball with a diameter of 3 cm from light pink plasticine.
- Roll out a small piece of orange plasticine into a round layer with a diameter of 1.5 cm. Use a stack to separate a small triangle from the resulting circle.
- Place the layer on the ball, smoothing the cut line with your fingers.
- Separate 2 small pieces from the white plasticine, roll into balls, crush and glue onto the main blank. These will be Nyusha's eyes.
- Roll a small ball from orange plasticine, flatten it and cut it in half with a stack.
- To make the eyelids, you need to glue these halves on top of the white eyes, cut side down.
- In the same way, make pupils from black plasticine. Place them on the white part of the eyes.
- Then take some more white and roll very small balls, twice as small as the black ones. Glue them onto the pupils, imitating the glare in the pig's eyes.
- Roll a small ball and 1 small sausage from pink plasticine. Crush the ball on a modeling board and shape the pig's snout.
- Use a match to press out 2 indentations to imitate nostrils.
- The sausage will be attached in the shape of a smile.
- Nyusha has spots on her sides in the form of large hearts. They need to be cut out with a stack from a thin layer of pink plasticine and attached to the body.
- Make legs and arms from light pink plasticine.
- Separate 5 equal parts from the brown plasticine. Flatten 4 of them and wrap each hoof in these layers.
- Roll a thin sausage from the remaining plasticine. Divide into 2 parts and shape the pig's eyelashes.
- Roll a short sausage of medium thickness from orange plasticine and attach it to the top of Nyusha's head. This will be her braid. The end of the braid can be decorated with a ball of white plasticine, as if it were an elastic band.
To make the craft look complete, use a stack to make short furrows on the pig's hair, imitating strands of hair.
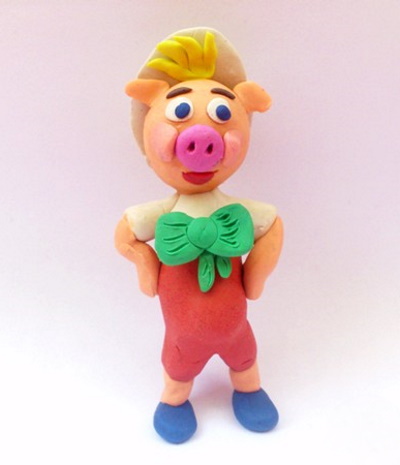
You can mold different pigs from plasticine. For example, you can make the pig Funtik from the Soviet cartoon.
Brief instructions:
- From pink plasticine, mold a round head and an oval body. And also roll 4 sausages of the same size for the arms and legs.
- Connect all parts using matches.
- Design the pig's face by molding the snout and blue eyes.
- Make clothes and a hat from multi-colored pieces of plasticine.
- Use brown plasticine to create the hooves.
It is also easy to create a plasticine figurine of Piglet from the cartoon about Winnie the Pooh.
Procedure:
- Make a round head, oval body, snout and ears for the pig from pink plasticine.
- Attach arms and legs to the body.
- Roll out a layer of blue plasticine and mold Piglet's costume.
- Use a match to make indentations for the eyes and nostrils.
- Roll 2 small balls from black plasticine and press them into the prepared depressions.
- Make hooves from brown plasticine.
It is important not to forget about detailing. Using special tools, you can imitate hairs, strands of hair, and the texture of fabric on clothing.
Step-by-step instructions will help parents teach children to sculpt pigs of different sizes and shapes from plasticine. Experts advise creating 2 figures at once, one of which is sculpted by an adult, and the child makes the other, repeating the actions of mom or dad. This way, children's fine motor skills develop faster, and interest in plasticine does not fade for a long time.
Video about modeling a pig from plasticine
How to easily mold a funny pig from plasticine: