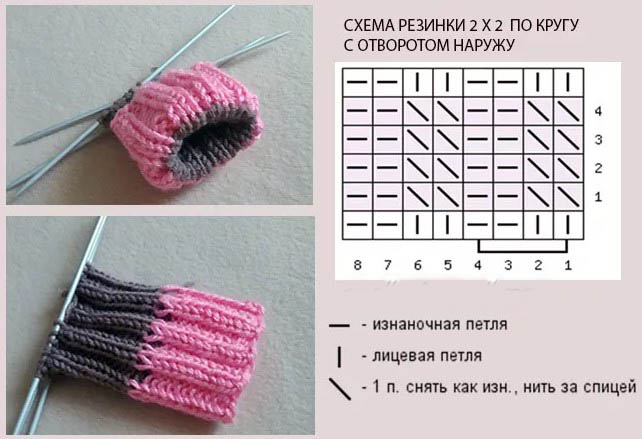
Elastic band knitted in the round, is able to return to its original position after stretching. This effect can only be achieved using a crochet hook. Knitting needles will not allow the elastic to be made elastic enough.
Necessary tools and materials
Crocheting involves hard knitting, so the elastic bands will be tight (the longer the fabric, the more elastic the elastic band will be). To start knitting a hat or any other thing, it is permissible to make the elastic band itself or the tassel loops in the fabric itself.
The last elements often need to be designed in columns without throwing, as a result the elastic columns need to be fixed specifically to these elements.
To knit a 1x1 elastic band, you need to prepare a minimum set of tools and materials:
- any type of yarn (it is permissible to use blended threads based on 50% acrylic and 50% wool; there should be 240 m of material in a 100 g skein);
- hook No. 4-4.5 (the size of the tool will depend on the knitting density);
- scissors.
To make a 2x2 elastic band, you need to take any type of thread material, as well as tool No. 2.5 or 3.5.
Crocheting a circular elastic band for a hat requires the correct selection of thread material.
In this case, it is necessary to pay attention to the composition of the yarn:
| View | Threads |
| Unable to hold a rubber band | You should not use cotton, mohair, cashmere, down yarn, or completely acrylic threads (the blended material should contain no more than 50%). |
| Medium elasticity | You can use lamb, alpaca, wool or mixed threads made of synthetics and wool (the synthetic material should not be more than 50%). |
| Retaining elastic | In this case, yak, merino wool, elastane and polyamide are perfect. |
There is a wide range of knitting tools available for sale, made from different materials.
The hook can be made from:
- Plastic surgery. This material is considered inexpensive and the most common, so it is suitable for creating tools of different sizes, shapes and shades. Plastic hooks are easy to use, inexpensive, and also available in all sizes. However, such tools can creak when in contact with certain types of threads, and also deform if the hook size is small.
- Trees. Characterized by a similar shape as a plastic tool. Has a pleasant texture, beautiful appearance and good sliding if the manufacturing technology is followed. However, wooden hooks are expensive and can be fragile.
- Aluminum. Resembles bamboo and plastic instruments, but is characterized by a metallic shine. At the same time, it can create a corresponding sound if it falls on a hard surface. An aluminum hook is inexpensive, always available for sale, is difficult to deform, and also slides well. But if the instrument is small, it can bend. At the same time, such hooks will often slip out of your hands.
- They became. This tool slides well, is strong and is difficult to deform. However, it is more popular among experienced knitters. This is explained by the fact that a steel hook is characterized by a higher cost than an aluminum or plastic tool.
- Combined with handle. Several types of material are used to produce knitting tools. Steel or aluminum is often chosen for the tip, wood or plastic for the handle. It is characterized by a wide choice, but it will not be convenient for everyone. The handle can be curved or straight. The main advantage of such a hook is a wide choice of materials with the ability to choose a comfortable handle. However, sometimes the tip can fall off the handle. This often happens if the technology is not followed in production.
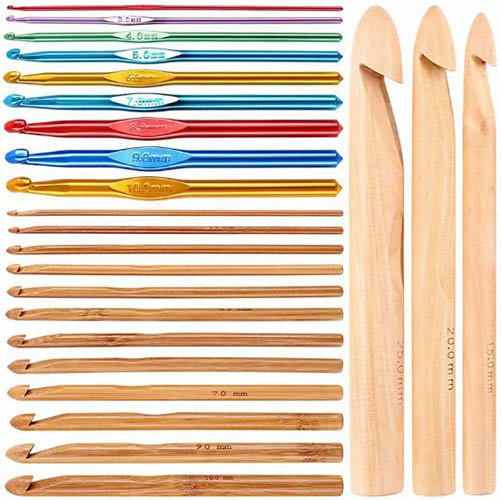
The knitting tool can be short and long. Different knitting needles need to be used in different working techniques. For example, a long hook is approximately 20-40 cm long. Often, wood is used to produce the tool. However, it is suitable for creating exclusively Tunisian crochet.
This technique is completely different from the traditional one, so it is not in great demand. Both regular hooks and hooks with fishing line are suitable for Tunisian crochet. The latter will be inconvenient to work with when knitting normally.
The length of a short hook is approximately 12-15 cm. This is considered a standard size, so it is suitable for creating hats, blankets, toys, scarves and other fabrics from thread material. When mastering the technique of crocheting, it is better to give preference to a short tool, because it is universal.
Schemes with description of works for beginners
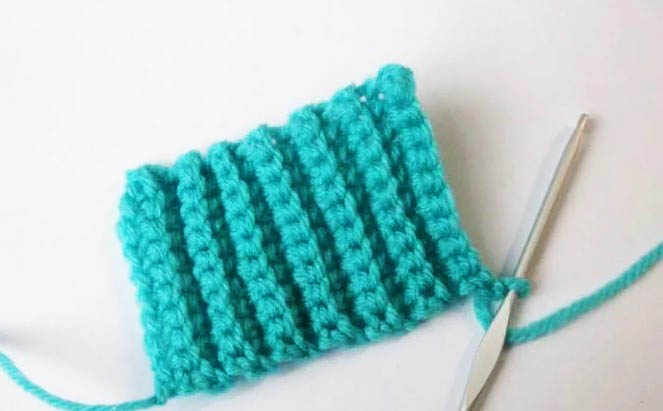
It is convenient to crochet an elastic band for a hat so that the product does not stretch later. To avoid a connecting seam, you need to design the work in a circle. There are 2 ways to create an elastic band - with relief columns, as well as concave and convex columns. Each person decides for themselves which option is more convenient.
Elastic band 1x1
The elastic band crocheted in a circle for a hat can be made 1x1. The width of the rapport should be equal to 2 loops, the height is 1 line. This knitting element is suitable for decorating not only hats, but also sleeve cuffs. The elastic band is moderately elastic.
Step-by-step description of the knitting pattern for 1x1 elastic:
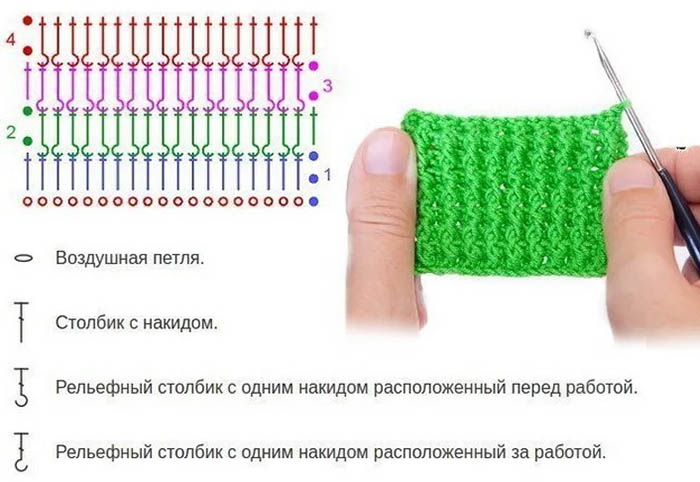
- Initially, make a set of air loops. The number of elements should be a multiple of 2. For example, you can dial 40 air loops. Do not tighten the elements.
- Before closing the chain into a ring, the loops should not be twisted. Insert the knitting tool into the 1st chain stitch to create a connecting column.
- In the 1st row, first knit 2 air loops of lifting. Then make a yarn over and insert the hook into the air element to create a column with 1 yarn over. Knit such columns until the end of the circular stitch. To close the row, insert the knitting needle into the 3rd air loop of lifting and make a connecting column.
- In the 2nd row, pass the tool behind the fabric to catch the lifting loops. To do this, hook the working yarn and make a concave column without a yarn over. Then knit 2 air elements of lifting and make a yarn over on the tool to knit a convex column with 1 yarn over. To do this, insert the hook in front of the fabric, hook the column with the thread material and knit a column with 1 yarn over.
- Then make another yarn over, pass the tool behind the fabric and pick up a new column to knit a concave column with 1 yarn over. Then make a convex column with 1 yarn over. Continue alternating concave and convex columns until the end of the 2nd row. To finish the line, insert the knitting tool into the 2nd air loop of the lift and knit a connecting column.
- All subsequent circular stitches are designed in the same way as the 2nd row. The number of rows will depend on the desired height of the elastic band.
Elastic band 2x2
The crochet elastic band in a circle for a hat can be made 2x2 using relief columns. The number of air loops can be arbitrary, but must be even. Due to knitting in a circle, there will be no seam on the hat.
This is because when knitting, you don't need to make lifting loops. In this case, you just need to pull the thread at the beginning of each circular stitch.
Step-by-step description of the knitting pattern for 2x2 elastic:
- Cast on an even number of air elements. Then turn the chain towards you so that the loops are not twisted. Bring the edges of the chain together to close the ring. To do this, insert the knitting tool into the 1st air loop, forming a connecting column.
- Next, knit 3 lifting loops to start 1 circular row. Yarn over the tool and insert the hook into the next chain stitch to create a column with 1 yarn over. Repeat the pattern to the end of the row until all the chain elements are knitted. To close the row into a circle, insert the knitting needle into the 3rd lifting loop to create a connecting column.
- To start a new row, pull out the connecting loop a little, the height of which should be equal to the height of 1 line. Then throw it onto the tool to grasp the lifting elements from the front part of the fabric. Next, hook the working yarn and pull it out so that 3 loops are obtained on the knitting needle. Then again grab the working thread material to knit the first 2 elements on the tool. Then again grab the working thread and knit 2 loops on the hook.
- Make a cast on on the tool to form the 2nd front relief column. To do this, in the next column of the bottom row, grab the yarn from the front side, pull it through and knit the first 2 elements on the hook. Then grab the thread again and knit 2 loops together so that only 1 element remains on the knitting needle.
- Then proceed to the design of the purl relief columns. To do this, perform a yarn over and grab the leg of the next column. From the back, pick up the working yarn and pull it out. Knit together the first 2 loops, perform a yarn over and knit together 2 elements on the hook again.
- Repeat steps 4-5 alternating (2 front and 2 back loops) until the end of the circular row.
- After finishing the line, return to the 1st relief column, which was the front one. Insert the tool in such a way as to catch the first yarn and the second thread, which goes immediately after the first. Then bring the knitting needle to the wrong side to create a connecting element.
- Repeat the pattern from steps 3 to 7 until the required number of rows is created. For the elastic to be elastic and springy, the height should be at least 5-6 cm.
Secrets for Beginners
Secrets for Beginners:
- Each column should have the same number of yarn overs. When knitting a 1x1 or 2x2 elastic, the number of concave and convex columns should be the same.
- When capturing a column, you cannot simultaneously catch another yarn. Otherwise, the knitted elastic will not be able to stretch.
- If, when creating an elastic band with connecting columns and columns without yarn overs, you do not hook the working yarn onto the back thread in the loop, you will not be able to create the necessary part of the fabric.
- If the selected thread material cannot hold the elastic, it is recommended to mix different yarns, one of which will hold the elastic perfectly. In this case, it is allowed to create a new skein from 2 threads or to knit from 2 skeins at once. As a result, the more elastic material will hold the less springy one, which will allow you to achieve the desired effect.
- If the yarn does not fall off the knitting tool, then the hook is suitable for the material. If the yarn slips, you need to use another knitting needle, because the thread is too thick for such a hook.
- When mastering the knitting technique, it is advisable to use a tool of size 3 or 4, which is made of stainless steel material. Over time, you can learn to select a hook by size and thickness so that it matches the type of thread material and the purpose of knitting.
- For a better view of the ornament and mistakes, it is recommended to give preference to a single-color thread material that is well twisted and has a uniform structure. At the same time, the yarn should have a calm color and be pleasant to the touch, so that you can comfortably work with the material.
- Do not tighten the loops too tightly, otherwise the fabric will become stiff and will not stretch. If you are prone to tightening elements too much, it is recommended to use a tool that is slightly larger in size than indicated on the yarn label.
- To restore a damaged fabric, you need to knit new columns in place of the damaged ones. Then you should carefully hide the edges of the new yarn.
- To introduce new thread material into knitting, it is advisable to do these manipulations at the end of the line. To do this, you need to insert the tool into the extreme element of the previous line to pull the new yarn through and create air loops for lifting.
- If the number of loops is more than required, it is recommended to make 1 from the edge of the work from 2 columns. In this case, the working yarn should initially be passed under 1 element of the previous row, then under the new loop. Then it is necessary to knit 2 elements together. If the number of loops has become less, it is required to make 2 from 1 column. In this case, it will be necessary to knit 1 loop of the previous row 2 times. Thanks to this, it is permissible to increase the number of elements.

The elastic band should be crocheted almost in the same way as the elastic band created with knitting needles. It is better to do this element in a circle so that the seam is not visible. When creating a hat, you cannot do without an elastic band, because this part of the product helps the headdress fit well to the face.
Beginner knitters are recommended to start mastering the elastic band with relief columns. As a result, it is possible to create a practical headdress, which must be decorated entirely with an elastic band.
Video about knitting