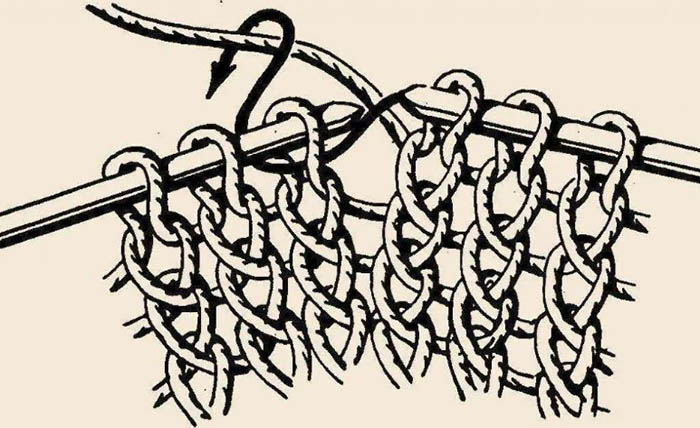
You can knit with knitting needles a large number of different loops that will perform different tasks. The most common is the crossed face loop, the walls of which will cross each other.
The crossed front loop is suitable for making gloves, mittens, and socks so that the fabric is strong, dense, and not very stretchy. Crossed elements are characterized by the fact that the loops of the product will be tilted to one side. As a result, the knitting may be slightly skewed.
Where is it used?
The front crossed loop (both experienced and beginner craftsmen can knit such loops) gives more expressiveness to the patterns with the movement of elements with the 3rd knitting tool. In this case, the crossed elements should be knitted along the edges of the interlaced zones so that the loops are always the outermost ones.
As a result, you can achieve more defined interlacing, as well as relief, convex and neat strands, diamonds and braids. Experienced craftsmen are familiar with this feature, so they always adhere to it, even if it is not indicated in the diagram.
When using crossed loops in the design of the elastic, the fabric will be moderately elastic, resilient and will hold its shape well. As a result, finished clothes with elastic will not deform much when worn, which helps to increase the service life of the product.
However, it is necessary to take into account that the knitting density for such elastic bands will be higher than for the others. In this regard, when determining the number of loops for the set, it is necessary to knit a control sample in the form of an elastic band with crossed elements.
When making increases, to avoid holes from throwing over, the latter must be made with crossed loops. This helps fill empty spaces due to their special structure.
When knitting various openwork ornaments from front and back elements, it is permissible to give foliage, stems and flowers greater relief and clarity. This technique is often used in Japanese ornament patterns with complex openwork patterns, in order to more clearly highlight, for example, veins with the texture of a leaf among other patterns on the general canvas.
However, knitting with crossed loops has some disadvantages. Such elements can be turned towards the surface of the product. For this reason, the fabric can be skewed. This is especially noticeable when making stocking knitting.
There are nuances when changing the fabric, when it is necessary to unravel the knitting, then again collect loops on the knitting tools to continue the work. In this case, you need to be careful, because crossed elements may appear, which should not be.
To prevent this problem from occurring when creating a row in any chosen way, the loops on the back or front wall should be placed on a knitting needle. When creating a new line, you need to ensure that no crossed elements appear in areas where they should not be.
Large loops
The front crossed loop (it is advisable to knit according to the patterns with a detailed description to avoid mistakes) is suitable not only for creating various ornaments. This technique helps to eliminate various defects associated with loops.
For example, if when collecting elements for the cross walls and toe heel strips, enlarged loops appeared on each side of the fabric. To eliminate the problem, the stretched element must be designed with a front crossed loop. As a result, there will be no large hole.
Subtleties of knitting
When knitting crossed front loops with knitting needles, it is necessary to take into account several nuances:
- This technique is not very suitable for creating regular patterns, because it can completely change or ruin the ornament. Despite the fact that on the front surface some edges need to be decorated with crossed elements, the texture will be noticeable with stocking knitting. This technique is better used to create initials on the product. As a result, the clothes will not be very intrusive.
- Initially, it will be difficult to cope with the task, in this regard, it is recommended to make such elements free, not very tight. Thanks to this, you can gradually master this method, picking up loops without errors and quickly.
- When shaping a straight face element, a hole may appear in the area of the increase, which spoils the appearance of the fabric. To correct the situation, it is recommended to add a crossed loop to mask the hole with a cross of yarn. As a result, the knitted fabric will have a neat and even appearance.
- When designing a rib with crossed loops, it is necessary to take into account that the knitting density will be high. When calculating the number of elements, the control sample should be a rib with crossed elements. Due to this, it is permissible to get rid of empty areas, as well as to give the pattern more expressiveness.
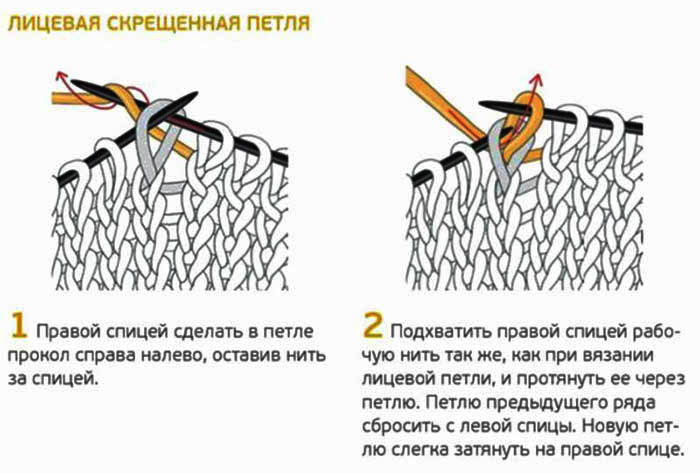
- When creating a regular face element, the loop must be picked up by the front wall. For crossing, the face loop must be picked up not by the front wall, but by the back wall.
- The working yarn should always be behind the fabric. The knitting should be done with the tool in the right hand to pick up the far wall of the element. After grabbing the main working thread material, the thread can be pulled into a new loop. The previous element should be thrown onto the left knitting tool. You should work slowly and carefully to get identical loops.
Knitting instructions
Before starting work, you need to select an ornament, and also set the frequency of repetition of crossed elements on the canvas. By knitting one element through another, the product will be uniform.
In this case, it is permissible to additionally include ornaments, stripes or flowers. By knitting 2 loops through a similar number of elements, the ornament will resemble a chessboard. This technique is more suitable for creating men's clothing. In order not to do extra work, it is necessary to think over the pattern of crossed facial elements in advance.
For example, it is permissible to create:
- diagonal or wavy lines;
- diamonds;
- honeycombs.
The front crossed loop (there are different ways to knit, so everyone will find the option that is more convenient) should be knitted behind the front wall. However, the working yarn can be taken clockwise or counterclockwise. The type of the resulting element will depend on the chosen method.
There are 2 ways to create crossed loops:
| Method | Peculiarities |
| From the throw | It is required to expand the knitted product. If the increases are excessive, 2 adjacent elements after throwing over should be knitted together. |
| From a drawn or transverse thread material | Often the transverse thread is called a draw-through, in connection with this, some schemes with a description of this technique of designing crossed face elements imply knitting from a transverse thread material. In rare cases, this method is called knitting from a gap. However, this will be the same knitting method. |
To create crossed loops using any method, beginner knitters are recommended to use flat No. 3 tools, as well as semi-woolen or woolen yarn.
Description of crosswise knitting:
- Cast on a small number of elements, making several lines using the garter stitch technique.
- Initially knit the crossed elements from the back stitch. To do this, between the knit and the next element, bring the working yarn, located on the left knitting needle, under the drawstring.
- Place the broach on the left tool and cross it with the working tool over the right wall.
- From the crossed element formed from the drawstring, draw the purl element to the adjacent loop.
- Knit the new element using the classic technique. As a result, the hole between the loops will be completely invisible.
Step by step process for making crossed stitches from yarn over:
- Cast on a small number of stitches by knitting a few lines using the garter stitch technique.
- In one of the rows, start knitting the crossed elements. In this case, make 1 yarn over, throwing the working yarn onto the right knitting tool.
- Place the yarn over on the left knitting needle and turn the formed element clockwise to cross. Knit the front loop from the yarn over, similar to the draw through.
Patterns
The front crossed loop (both simple and Japanese patterns can be knitted) is a regular front element that must be knitted behind the other wall. This knitting technique allows you to create unusual patterns. At the same time, with the help of crossed elements, it is permissible to design the fabric with a front surface.
Simple patterns
Crossed face elements ornaments are suitable for creating different things. As a result, the fabric will have an elegant and relief look. Crossed loops are a simple method for creating dense knitting.
Due to this, finished clothes will have a long service life, so this technique is often used for knitting mittens and socks that are subject to rapid wear.
The front crossed loops are suitable for creating the most common ornaments in the form of a rib, stockinette stitch and garter stitch. The latter is an easy pattern that can be easily created with front crossed elements.
In this case, the pattern rapport should consist of 1 element and 1 line, which was designed with crossed front loops.
To create the front surface, the front and back elements must be knitted through the back wall.
The pattern rapport in this case should consist of 2 loops and 2 repeating lines:
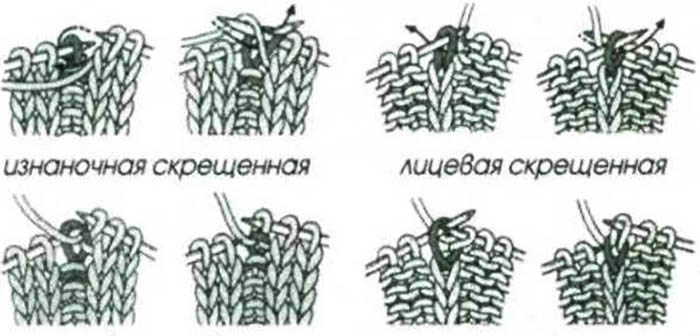
- Row 1 should be made with crossed front loops;
- Row 2 should consist of purl crossed elements.
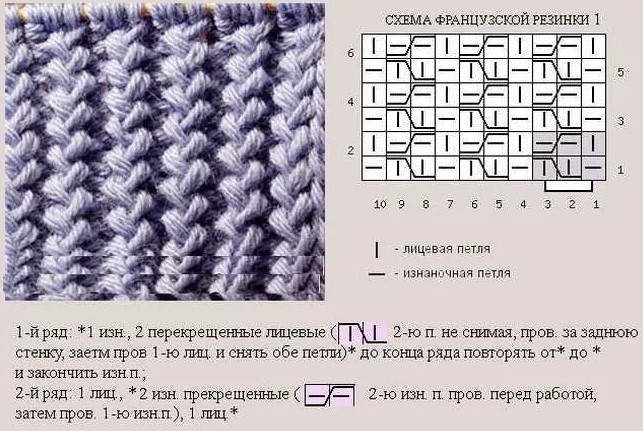
To make the 1x1 elastic band elastic enough, you need to use crossed front and back elements for knitting.
Step by step description:
- Cast on an even number of stitches, plus 2 additional edge elements. The pattern should consist of 2 rows.
- In the 1st row, knit 1 edge element. Then, from the beginning to the end, repeat the pattern consisting of 1 crossed front loop and 1 crossed back element. Finish the row with 1 edge element.
- In the 2nd row, knit 1 edge loop. Then, from the beginning to the end, repeat the pattern consisting of 1 purl crossed element and 1 front crossed loop. To complete the row, knit 1 edge element.
Step-by-step instructions for creating relief:
- In rows 1, 3, 5, 7 and 9 from the beginning to the end, alternately knit 1 crossed front element, 3 purl loops and 1 crossed front element. Then make 1 purl and front loop, as well as 1 purl element.
- In the 2nd, 4th, 6th, 8th and 10th rows, knit 1 purl and 1 front loop, again 1 purl element. Then, holding the yarn in front of the fabric, remove 1 element, knit 3 front loops and remove 1 element again. Perform all actions from the beginning to the end with alternation.
- In rows 11, 13, 15, 17 and 19, knit 1 crossed knit element, 1 purl, 1 knit and 1 purl loops. Then make 1 crossed knit element and 3 purl loops. Repeat from beginning to end with alternation.
- In rows 12, 14, 16, 18 and 20, make 3 front loops, remove 1 element. Then knit 1 purl, 1 front and 1 purl loop. Remove 1 element. Alternate actions from the beginning to the end.
When sewing together the fabric parts with a running stitch after the edge element in knitting, it is necessary to make a chain of one loop, which on the front part should be made purl, and on the back part – front. Thanks to this, it will be convenient to connect the parts of the product, and the line will be even.
Step-by-step description of creating columns:
- In the 1st row, repeat the alternating pattern of 1 crossed front element, 1 back, 1 front, 1 back, 1 front and 1 back loop.
- In the 2nd row, repeat the pattern with alternation, consisting of 2 front elements, 1 back element, 2 front loops and 1 crossed back element.
Step-by-step process for decorating corners:
- 1 row consists of 1 purl, 2 crossed front, 1 purl, 1 crossed front and 1 purl elements. Then knit 4 front and 1 purl loops. Repeat the actions with alternation.
- In the 2nd and other even rows, make the crossed front elements purl.
- For rows 3 and 15, knit alternating 1 purl, 1 crossed knit, 1 purl, 1 crossed knit, 1 purl, 3 knit, 1 purl and 1 knit elements.
When knitting a V-neck, it is permissible to make a decrease not only near the edge, but also slightly stepping back from the outline. This technique is often used when creating relief cords or vertical stripes. Loops must be decreased near the ornament on the side that faces the armhole. Thanks to this, the ornament will be parallel to the bar.
Japanese patterns
The front crossed loops often act as a decorative element when creating Japanese ornaments. In this case, the pattern rapports will have several lines and loops.
Using this knitting technique, it is possible to design:
- Braids. The ornament will be created from 2 crossed elements. It is also permissible to use 4 or more loops. The main thing is that the number of elements is even.
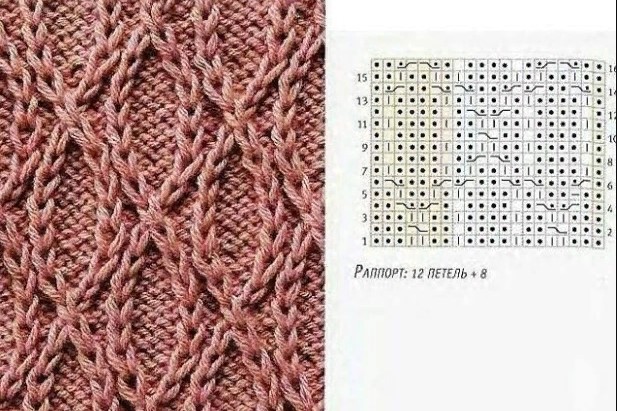
- Rhombus. This ornament is suitable for creating a hat or a sweater. To design the pattern, you need to dial a certain number of loops, which will be a multiple of 8. Then you need to additionally knit 10 elements so that the ornament is symmetrical, as well as 2 elements for the edge.
Step-by-step description of knitting a vertical openwork pattern:
- 1 row consists of face loops.
- Knit the 2nd row with purl elements.
- In the 3rd row with alternation from the beginning to the end, knit 3 front loops with 2 yarn overs, 5 elements together with a crossed front loop. Then perform 2 yarn overs and make 2 front loops.
- Row 4 consists of 3 purl, 1 knit, 1 purl, 1 knit and 4 purl elements. Alternate actions until the end of the row.
This method of designing a pattern is suitable for canvases that have been decorated with relief or openwork ornaments.
Based on crossed front loops, it is permissible to create openwork bumps on the fabric.
Step-by-step description of knitting:
- In 1 row, knit 5 from 1 element. To do this, make 1 front loop, 1 yarn over, 1 front element, 1 yarn over and again 1 front loop. Then make 1 yarn over and knit together 3 elements with purl. Make 1 yarn over and knit 5 from 1 element. Repeat all actions with alternation until the end of the row.
- In the 2nd row, knit alternating 1 yarn over, 3 loops together purlwise, 1 yarn over and 5 elements together with crossed front loops. Repeat the actions to the end of the row.
- In the 3rd row, initially knit 2 elements together, 1 yarn over and knit 5 from 1 loop. Then repeat to the end of the row alternating 1 yarn over, 3 loops together purlwise, 1 yarn over and knit 5 from 1 element.
- Row 4: Start with a knit stitch. Then repeat with alternating pattern consisting of 5 knit stitches crossed together, 1 yarn over, 3 stitches together purlwise and 1 yarn over.
To create crossed face loops, you do not need much experience and skills. Having mastered this technique of knitting products with knitting needles, it is permissible to create various ornaments that will decorate any fabric.
Video about knitting