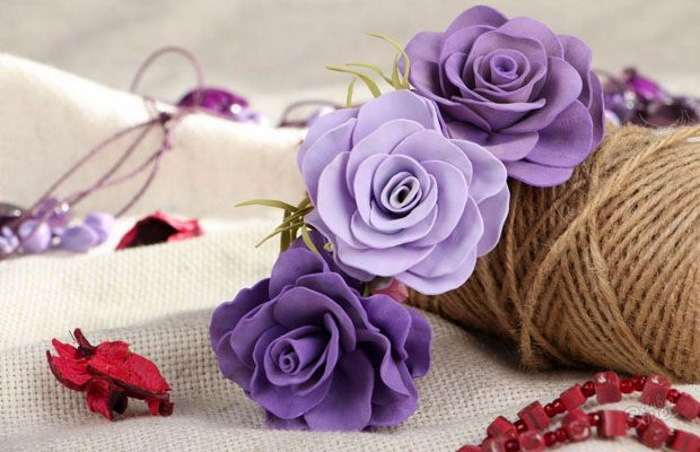
Flowers made of foamiran are a real art that allows you to create realistic roses, peonies, daffodils with your own hands. This trend has become one of the most popular in the hand made sphere. Anyone can learn to work with foamiran. This material is sold in a handicraft store.
Features of foamiran
The term "foamiran" comes from the English word "foam", which means "foam" in Russian. The main component in its composition is ethylene vinyl acetate (polymer), so, in fact, it is porous.
Foamiran is sold in the form of thin sheets. It is soft to the touch. Because of this, it is often called plastic suede. This material has increased adhesion to various other materials. It can withstand temperatures up to +70°C.
Scope of application:
- Floristic region.
- Needlework.
- Making jewelry.
- Children's creativity.
Interesting fact: Abroad, foamiran is called foam sheet.
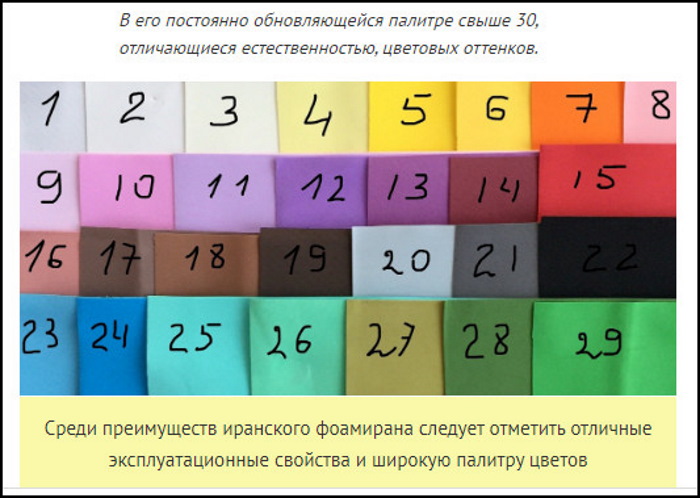
Types of Foamiran. Which one to choose for flowers
Varieties of foamiran
| Name | Description |
| Iranian | One of the very first varieties of foamiran, used to create flowers. It stretches well, but is inferior to other options in this regard. Beginners are advised to start working with this variety, since it is less capricious. Thanks to this, you can get your hand in. |
| Marshmallow | Soft, airy. Stretches effortlessly. Minus - easily torn. When working with hot glue, the flower leaves change shape, which spoils the decorativeness of the craft. Products made from it are light. But to achieve this effect, you will have to learn how to carefully thin it. |
| Silk Lux | This type of foamiran got its name because it resembles silk. The material is pleasant to the touch. It stretches easily, but unlike marshmallow, it has increased stability. If you make flowers from it, the petals hold their shape well and do not deform after all manipulations. At the same time, the rich color remains. |
| Silk classic | Its characteristics resemble those of marshmallow foamiran. However, its density is higher. It holds its shape well and does not tear when stretched. |
| Turkish | It is similar to silk. The material is smooth, thin, easy to work with, as it is easy to shape. Flowers can be made from it even without preheating. |
| Korean | Similar to Iranian. Dense, rough in comparison with silk varieties. |
| Glittery | It differs from all types of foamiran by its shiny surface. One side of the sheet is covered with glitter. It is difficult to stretch it by hand. Therefore, it is heated on an iron. |
| Chinese | Similar to Iranian and Korean. The texture is rough, thick. It requires effort to process. But despite its increased durability, it tears easily. |
The type of foamiran to choose for creating flowers depends on the craft. This is affected by its size and purpose. So, for large buds, Iranian foamiran with a thickness of 2 mm is used. It is difficult to work with it by hand. You will have to use an iron.
In general, any type of foamiran is suitable for creating flowers.
A simple option for beginners. Tulip
DIY Foamiran Flowers It's easy to do. Beginners are advised to follow step-by-step master classes to understand the essence of the work.
All flowers are made using the same technology: preparation of materials, cutting out templates, processing of blanks, assembly. The complexity depends on the type of flower. Multi-petal options (peonies, for example) are more difficult to create than a tulip.
Materials
- children's white modeling paste (the material dries in the air and becomes elastic);
- toothpick;
- awl;
- Korean or Iranian foamiran 1 mm thick, green and white;
- scissors;
- glue gun;
- iron;
- soft dry pastel, shade No. 007;
- hard brush;
- pencil;
- drinking straw;
- gerbera wire;
- nippers;
- green tape;
- stamens for flowers (artificial).
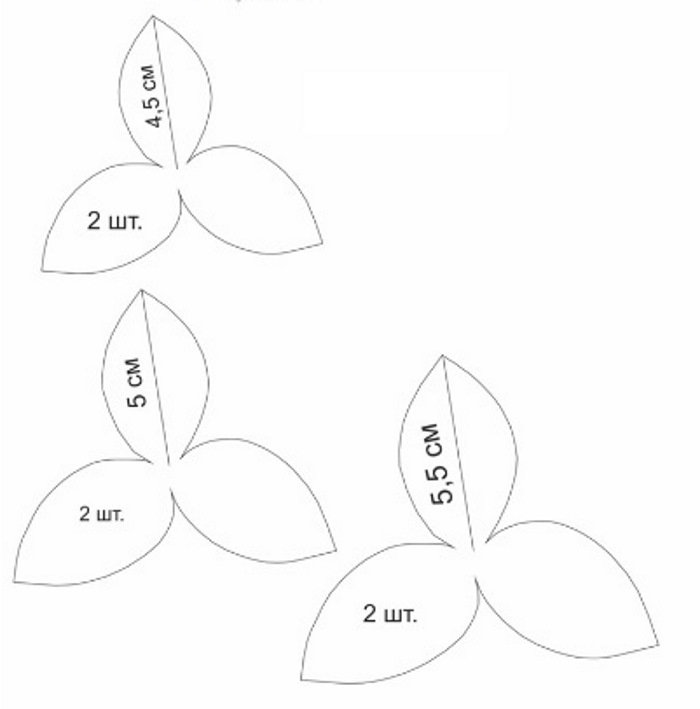
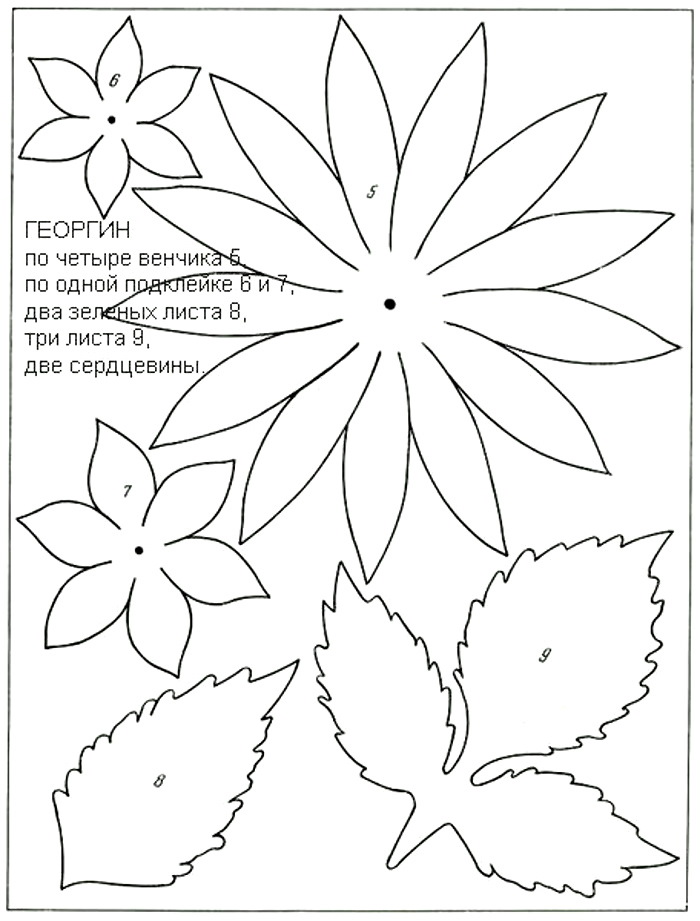
Flower template
Sequence of actions
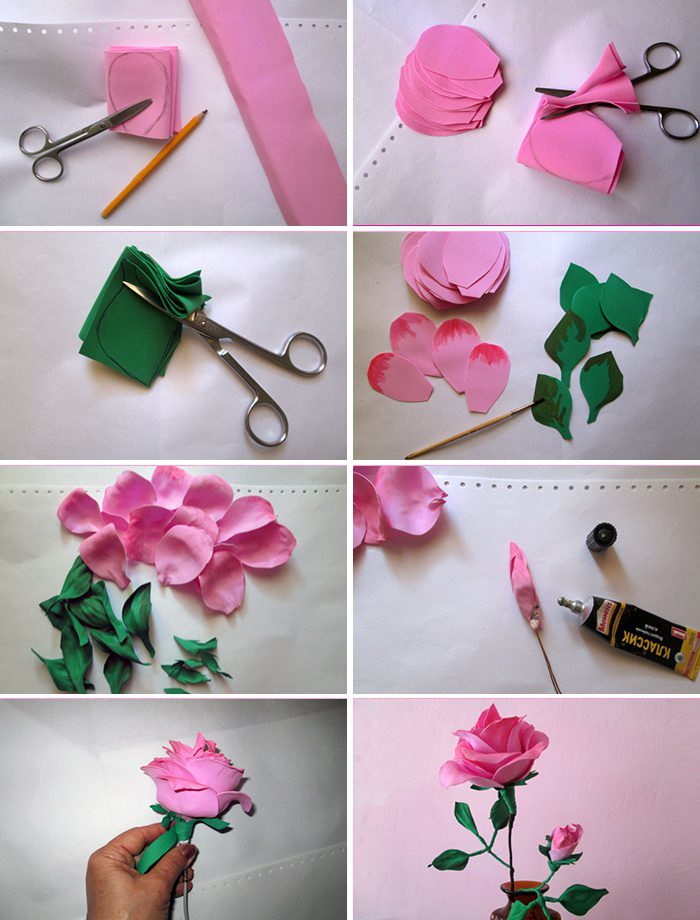
- A piece of modeling paste is wound around a toothpick, making the tulip's pistil. Its shape resembles a star with 3 corners. Characteristic lines are made at the top with an awl.
- Give the pestle time to dry.
- Redraw the template onto a sheet of foamiran and then cut them out. You should end up with 6 shapes (2 pieces each): 4.5 cm, 5 cm and 5.5 cm.
- Heat up the iron.
- Each petal on the blanks is applied to a hot surface for 2-3 seconds so that the material begins to take on a convex shape.
- Using an awl, make veins on the petals: from the center of the workpiece upwards. You can draw with arbitrary movements.
- On green foamiran draw leaves for a tulip 10 cm long.
- They cut them out.
- They make veins on the leaves using an awl.
- Each sheet is stretched by hand. It is slightly crumpled to give it a characteristic waviness.
- Dry pastel is ground onto paper with an awl to give it a powdery state.
- Using a hard brush, take some yellow, crushed pastel and cover the pistil. It will imitate pollen.
- The base of the pistil is coated with glue and the stamens are placed on it. Their dangling ends can be removed with scissors.
- Assemble the flower. First, prick the smallest piece (4.5 cm) onto a toothpick. Form a bud. You can adjust the degree of its closure. If you need a half-open flower, then raise the petals with their tips toward each other, and glue their side parts just above the middle.
- String on a blank with petals 5 cm long, and then 5.5. Do not forget to glue them so that the flower holds its shape well. It should repeat the classic outline of a tulip.
- The wire is wrapped around a toothpick and a long end is left – 10 cm.
- A toothpick is coated with glue and a drinking straw is threaded onto it.
- Glue is dripped onto the tip of the green tape.
- Glue the end of the ribbon at the very base of the bud.
- The ribbon is wrapped in a spiral around the tube – this will be the stem.
- Attach the tulip leaves with glue and wrap them with tape.
If you don't have an awl, replace it with a needle or knitting needle. You can make the tulip look more realistic using soft oil pastels. Choose tones that match the flower.
If the bud is white, then use a milky shade, pink. Pastel tone No. 232 will suit green foamiran. If there are no black stamens, then use any others. It is enough to cover them with dark acrylic paint.
How to make big flowers. Peony
Flowers made from foamiran, made by hand, are used as interior decoration. For this purpose, huge bouquets are created and placed in floor vases.
The size of the buds is selected based on the area of the room. Peonies look spectacular.

Materials
- marshmallow white foamiran 1 mm for petals;
- Iranian foamiran 1 mm for leaves;
- ruler;
- stationery knife;
- wire 1.6 mm (Wire);
- stack with a ball;
- toothpick;
- thin wire;
- tape;
- green dry pastel;
- scotch;
- any container that will serve as a stand for the light bulb;
- regular light bulb (top width 4 cm).

Sequence of actions
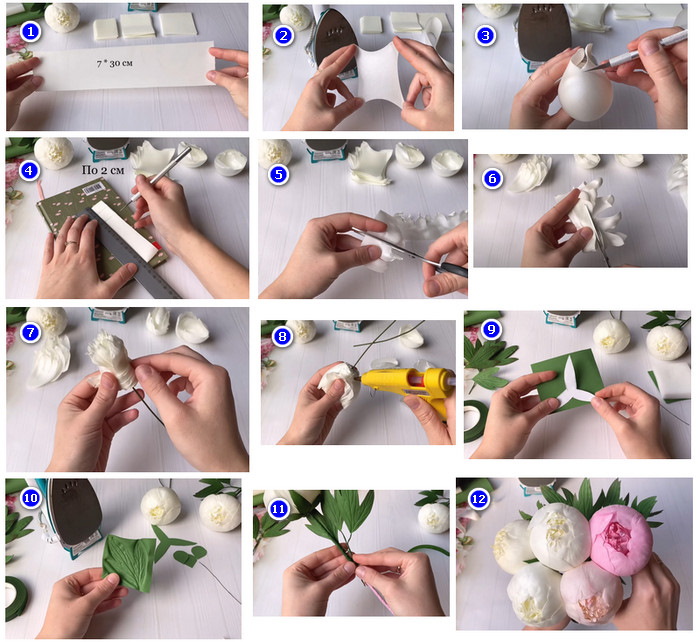
- The following blanks are cut out of white marshmallow foamiran: 10 pieces – 5x6 cm, 7 pieces – 7x7 cm, 5 pieces – 7.5x7.5 cm, a strip 7x30 cm.
- Heat the iron to maximum.
- Apply a strip of marshmallow foamiran to a hot surface and stretch it to the sides.
- Work with 5x6 cm blanks. Carefully holding them by the edges, lean them against the hot surface, wait for it to soften and remove from the iron.
- Stretch to the sides. Do this with the remaining 9 blanks.
- Take a light bulb. Insert it into any convenient jar so that the upper spherical part is accessible. For example, you can use a toothpick container or a toilet paper roll. To fix it, wrap the lower part of the bulb with tape, thus fastening it to the container.
- Work with 7x7 cm blanks. Take 1 piece in your hands, heat it on an iron. Stretch the corners to the sides and pull the piece onto the light bulb.
- Cut in a circle with a stationery knife, leaving the spherical part of the foamiran intact. Only the convex area of the workpiece should be preserved. As a result, you should get a characteristic peony petal. Its height is approximately 7 cm, width - 3.5 cm.
- Repeat the steps with the remaining 6 pieces.
- Work with 7.5x7.5 cm blanks. Heat them one by one and then stretch them on an iron. Wrap around the bulb and then cut off the excess. Important – you need to form a petal 7.5 cm long and 4 cm wide.
- They begin to process the strip. They trim its edges with scissors.
- Fold the strip 4 times. The length should be approximately 14 cm.
- Using a stationery knife, divide it into equal parts of 2 cm each.
- Cut the edges of the petals into a round shape, working within each of the 2 cm sections. You don't need to cut them off completely. You should end up with a strip of wavy petals.
- Unfold the strip.
- Fold 3-4 petals like an accordion and rub their tips. Do the same with the remaining sections on the strip.
- Using a stack with a ball, give the petals a rounded shape.
- Trim the petals, leaving 1 cm at the base.
- Put the strip aside.
- Take 3 pieces 5x6 cm.
- They are stacked in a pile.
- The stack is folded in half.
- Cut out the petal shape, leaving the curve intact. The top should look like a crooked heart. If you unfold the shape, you will get a petal with 3 tips.
- Rub the tips of the stack with force.
- They separate the stack.
- Work separately with each petal: using a stack with a ball, give them a rounded shape, simultaneously stretching them with your hands to the sides, and then from the center up. In finished form, it should come out about 7 cm in height and 4.5 in width.
- The remaining 7 pieces are processed in the same way.
- The blanks (the previous 7x7 and 7.5x7.5 cm) are folded in half, and the edge of the petal is cut in any way you like (wavy, for example). The material is rubbed hard in the upper part, and lightly in the center. The formation of the edge of the petal depends on the imagination of the master.
- From the scraps of foamiran obtained from the tape, make 5 strips. Heat them on an iron and stretch them slightly to the sides. From them, the base of the peony will be made later.
It is difficult to make flowers from foamiran with your own hands at the beginning of the process, when the material has to be heated and processed. You have to master the technique of crumpling. This requires special skills. It is much easier to work at the stage of assembling the flower.
Connecting all the parts
- Take a 1.6 mm wire (Wire). For ease of work, fold it in half.
- The strip with petals, which will serve as the 1st row, is glued to the wire, wrapping it in a circle at the same level.
- Form the base of the peony. Glue strips under the petals of the 1st row, wrapping them around the axis of the future bud. The base should be approximately 2 cm in diameter. The height of the base together with the petals of the 1st row is 5.5 cm.
- Glue the petals of the 2nd row overlapping, in a circle. They are placed slightly higher than the previous ones. About 1-2 mm.
- The 3rd row consists of spherical petals obtained from 7.5 x 7.5 cm blanks. They are glued by the base. Do not get hot glue on the petal itself. Otherwise, the material will melt and lose its shape.
- Glue all the petals, forming a lush peony, while maintaining its roundness.
- They work with Iranian foamiran. They cut out peony leaves and its sepals from it.
- Cut out 3 rectangles of 2x2.5 cm from green foamiran, and then make semicircular leaves from them.
- Use a toothpick to mark the veins on the leaves.
- The leaves are tinted with dry green pastel.
- The leaves are applied to the iron so that they acquire a rounded shape.
- Thread the sepal onto the wire, pulling it to the base of the peony. Secure with glue.
- Round leaves are glued to the sepals.
- Peony leaves are glued to thin wire.
- The wire is wrapped with tape.
- The peony stem is wrapped with a strip of marshmallow foamiran for strength.
- Wrap the stem with green tape, simultaneously attaching the leaves to the wire.
Peonies look attractive in large quantities. To decorate the interior, you can make a bouquet of 7-9 flowers.
Small flowers. Marshmallow flower from foamiran
Anyone can make flowers from foamiran with their own hands. It is recommended to start with small-sized crafts. In case of damage to the material, the loss will be small. If you start mastering this craft by creating large flowers, then a mistake will spoil a significant amount of foamiran.
Material
- Iranian foamiran;
- circle with a diameter of 6.5 cm;
- bead for the core;
- ruler;
- scissors;
- toothpick or sharp stick;
- oil pastel of the same color as the foamiran (you can take a related shade to give the craft expressiveness);
- a piece of sponge or regular foam rubber;
- a ball (to give roundness to the petals) made of any material;
- lighter;
- iron;
- leaf mold;
- green foamiran for the flower leaves.
Sequence of actions
- Place a circle with a diameter of 6.5 cm on a sheet of foamiran.
- Draw a circle with a toothpick, pressing slightly so that a mark remains on the foamiran.
- Cut out 3 circles from foamiran.
- The circles are collected into a stack and their edges are outlined with oil pastels.
- Take 1 circle out of 3 and work with it. Make a mark in its core using a toothpick.
- Using scissors, make 2 cuts from top to bottom opposite each other. They should divide the circle into 2 halves.
- In each half, make 2 more cuts at an angle. After this, the circle should have 6 separated particles united by a common core.
- Each piece is folded in half and made round with scissors. This is how the flower petals are already formed. If these manipulations are difficult to do, you can find a template for a flower made of foamiran.
- The areas where the foamiran had to be cut off are painted over with pastel.
- Heat up the iron.
- Place the flower blank on a hot surface and wait until the foamiran begins to change shape.
- The workpiece is removed from the surface.
- Place the flower on the sponge and press 1 petal with a ball, giving it a spherical shape. Repeat this with the remaining particles. If the foamiran has cooled down, then apply it to the iron again, leaving only the already formed petals unpressed.
- The petals are collected, joining them at the top. They need to be given the image of a closed bud.
- The lower part of the closed bud is pressed against the hot surface of the iron for 2-3 seconds.
- Remove from the iron. Place on a sponge and insert the ball into the core of the bud, forming a depression in it.
Work with the remaining 2 blanks. Repeat steps #5 through #12 with them. As soon as the foamiran begins to change shape, remove it from the hot surface.
Stretch the petals a little, making them slightly uneven. Lightly run a lighter along the edge of each one, then use your fingers to crumple it to create a waviness.
Next steps
- 4x4 cm squares are cut out of green foamiran.
- They are applied to the hot surface of the iron.
- Hold for 3-4 seconds.
- The hot square is applied to the mold with pressure.
- A leaf of any shape is cut out from a square with an imprint of veins.
Flower assembly
- A bead is inserted into the blank that will be the center of the flower (it was formed using a ball). It is advisable to secure it with hot glue.
- The remaining blanks with petals are glued to the bottom, one by one.
- Green leaves are glued to the bottom of the flower.
This flower is suitable as a hair decoration. Only for this it needs to be attached to a hair clip or elastic band.
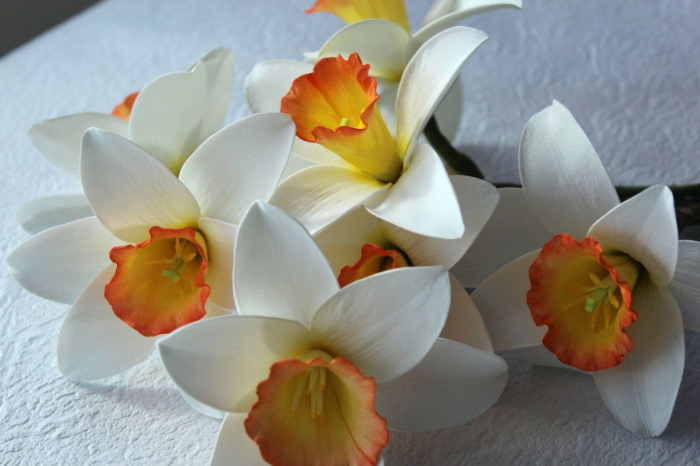
Spring flowers. Narcissus
Flowers made of foamiran made by hand will be a great gift for March 8. Experienced craftswomen create real masterpieces. Bouquets are expressive. Unlike fresh flowers, they can decorate the room for a long time.
Materials
- Iranian foamiran 1 mm olive, white, yellow, soft pink (you can use Korean or Chinese);
- ruler;
- scissors;
- 2 sheets of office paper;
- gerbera wire;
- yellow stamens;
- acrylic varnish;
- semolina;
- soft oil pastel;
- sponge;
- mold for daffodil petals (you can use a homemade one);
- iron.
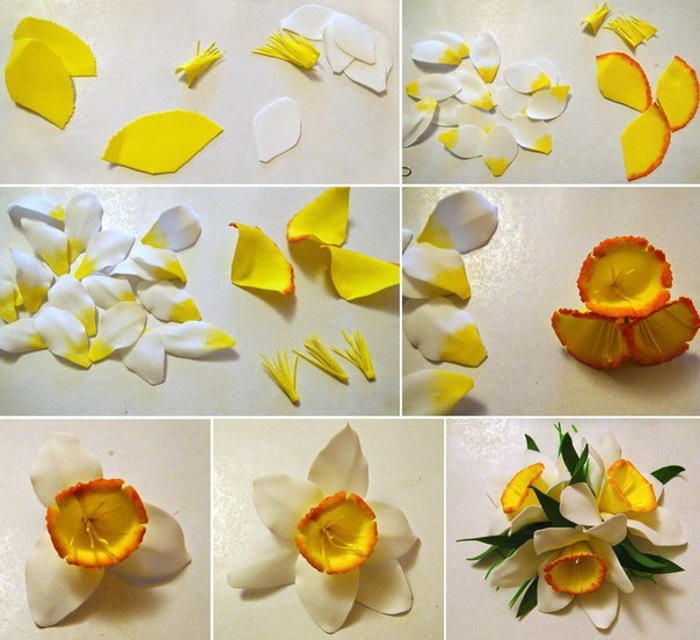
Sequence of actions
- A rectangle 16 cm long and 8 cm wide is cut out of white foamiran.
- On yellow foamiran draw a 7x7 cm square and then cut it out.
- A 4x3 cm shape is cut out of soft pink foamiran.
- Heat the iron to medium temperature.
- The blanks are placed between 2 sheets of office paper and ironed to make them thinner.
- The white foamiran blank is cut into 2 long strips.
- Stack them and cut into 3 equal parts. There should be 6 pieces.
- The mold is placed on the sponge.
- Place 1 piece of white foamiran on the hot surface of the iron, then lean the soft material against the mold. The sheet should retain a characteristic vein pattern. Repeat this with the remaining 5 pieces.
- Narcissus petals are cut out from squares with a vein pattern.
- Work with a soft pink piece of foamiran. It is also heated on an iron, then textured with a mold and cut out. This will be the covering leaf of the daffodil.
- Work with a piece of yellow foamiran. This will be the crown of the daffodil. Insert a bead (3-4 mm in diameter) strung on a toothpick into the sponge.
- Yellow foamiran is heated on the hot surface of the iron.
- The middle of the form is put on a bead, the foamiran is pulled carefully downwards. The edge is stretched, and then the material is thinned by rubbing it between the fingers.
- Use scissors to cut off the edge of the yellow foamiran form. Grind again and then stretch.
- Yellow stamens are attached to a thick wire and fixed with glue.
- The tips of the stamens glued to the wire are dipped in acrylic varnish.
- While the varnish is still wet, dip the stamens into semolina.
- Narcissus leaves are drawn on green foamiran.
- Use a toothpick to make veins on the leaves.
- The petals and leaves are tinted with soft oil pastels. The colors are chosen to be harmonious.
- All the leaves are kneaded by hand, rubbed and then stretched. This will make them look more realistic.
- The flower is fastened, fixing everything with glue. First, the crown of the daffodil is strung onto the wire.
- The base of the crown is coated with glue and the petals are attached.
- The base of the bud is wrapped with tape and then lowered down the wire.
- Attach the closing petal 2-3 cm below the bud.
- Leaves are attached 4 cm below the closing petal.
More realistic and delicate daffodil petals are made from marshmallow foamiran.
Flowers made from foamiran with your own hands have many advantages. The scope of their application is diverse. The strong point of the material is its environmental friendliness.
Artificial flowers do not emit harmful toxins. Therefore, they can be used as decoration for children's hair.
Video on how to make flowers from foamiran
A simple way to make very beautiful flowers from foamiran.