You can depict winter using different materials, but The best choice for children's creativity is gouache. It is ideal for learning, and young artists will be able to easily and effectively convey the beauty of winter landscapes. It will be easier to cope with the task if you draw step by step, following the step-by-step examples of professionals.
How to draw winter trees
Most winter landscapes are depicted with trees. Learning to draw this element will not be difficult. For work you will need sheets of thick paper, a simple pencil, an eraser, gouache paints, water, brushes of different sizes and shapes.
When drawing using non-traditional techniques, sponges, crumpled paper, toothpicks, and cocktail straws can be used as auxiliary materials.
Let's draw winter with gouache, step by step considering the methods of depicting trees. It is important to remember that the background of the drawing is applied first, and then the foreground elements are painted with paint.
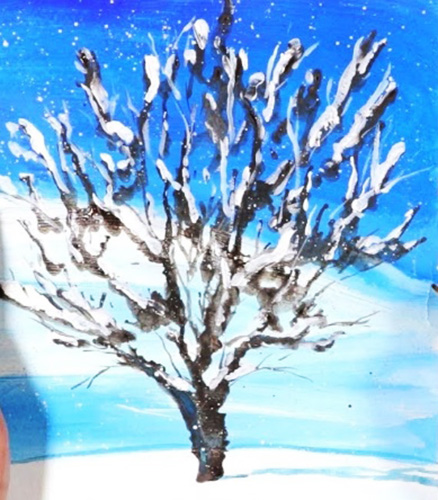
Deciduous trees
Method 1
Drawing stage:

- Beginner artists can sketch trees with a simple pencil. Draw the tree trunk with light lines, and draw thick branches from it. As they approach the edge, the branches become thinner and thinner.
- Dip a damp wide brush into brown paint and draw the trunk. You can add shadow to the tree by using a darker shade of brown. Then smoothly draw a thin brush along the outlined branches, making them beautifully curved. Leave the drawing to dry for a few minutes.
- Draw white snow on the branches and some parts of the trunk, as well as a snowdrift under the tree. The snow can be shaded with blue gouache.
Method 2
You can draw a tree in an original way using the blotography method, which children really like. Experts say that in addition to getting a beautiful drawing, the child also strengthens the health of his respiratory system.
Stages of drawing:
- Brown or black gouache must be diluted to a liquid state. Then you need to scoop up some paint with a plastic spoon, pipette, or simply dip a brush generously into the gouache and drop a spot of paint onto a sheet of paper.
- Blow the blot through a cocktail straw in the direction from the bottom up, and then a little to the left and right, creating a trunk and branches. The straw should not touch either the blot or the paper.
- After several shoots have formed, each of them should be blown out separately.
- If you need to add branches, you need to add more gouache blots and repeat the blowing procedure.
- You can apply white gouache to the formed tree branches using a thin brush.
Method 3
Another unconventional way of drawing is stamping. With its help, in a few seconds you can form a snow-covered crown of any tree.
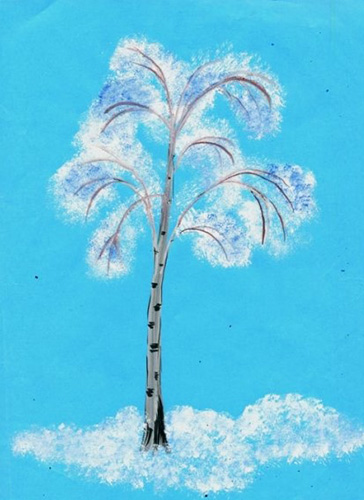
Stages of drawing:
- Dip a washed brush into white gouache and draw a wide line – a birch trunk.
- Use a thin brush to draw black outlines of the tree, as well as spots on the trunk. Draw curved hanging branches. Allow the paint time to dry.
- Create a stamp from crumpled newspaper or a piece of paper.
- Apply white gouache to the stamp with a brush or gently dip the lump into the paint. Press the crumpled paper onto the birch branches with patting movements, creating frost or a snow-covered cap. You can depict white snowdrifts, bushes, and a distant forest in the same way.
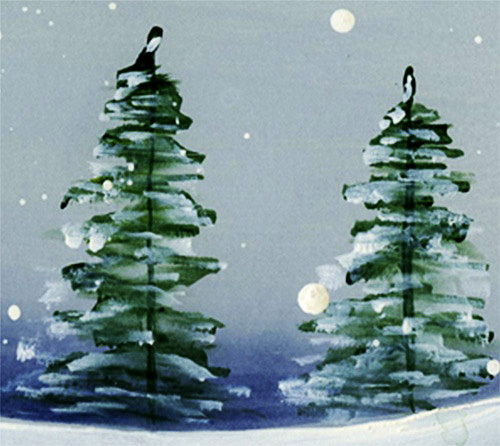
They ate
Evergreen fir trees look very beautiful in winter landscape paintings.
There are several ways to draw trees.
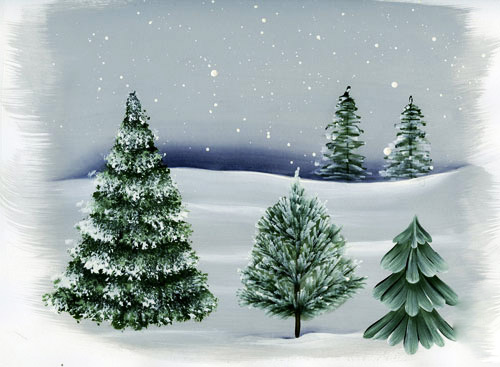
Each method is unique and beautiful in its own way.
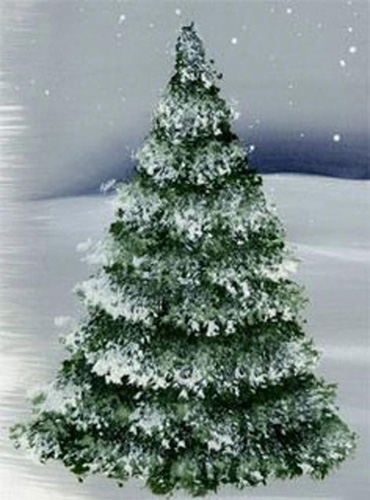
Method 1
This is how trees located in the background are most often drawn.
Stages of drawing:
- Rinse a flat brush in water and dip it in green gouache. Use the edge of the brush to draw a thin vertical line – the trunk.
- Rinse the tool in water and dip the corner of the brush into green paint. Draw the top of the tree. Then, with a damp brush, without dipping it into gouache, draw zigzag lines in the left-right direction. Going down, the strokes should be gradually lengthened.
- After the green gouache layer has dried, repeat the process with white paint to depict snow.
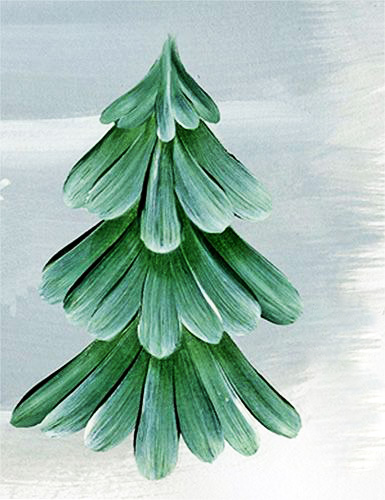
Method 2
Stages of drawing:
- Using a pencil, you should draw the base - a triangle with a line marking the middle.
- Dip a brush with beveled bristles into green gouache and begin to form the lower part of the tree. The middle of each row should be slightly lower than its edges. This will give the tree volume. The brush should be placed with the beveled end forward. The texture of the prints should repeat the bristles of the brush.
- Moving upwards, you should cover the entire triangle with needles.
- Dip the edge of the brush into white gouache and cover the spruce with snow in a similar manner.
Method 3
Stages of drawing:
- First, you should sketch out the branches with a pencil.
- Dip a round brush into dark green gouache, and then dip the edge of the brush into white. Turn the sheet with the drawing over. The bottom row of branches will be on top, and you should start drawing from it. Smoothly drawing each branch, you should first press on the brush, and then soften the emphasis.
- In this way, form each row, heading towards the top of the tree. Turn the sheet over and the Gzhel-style Christmas tree is ready.
Method 4
Stages of drawing:
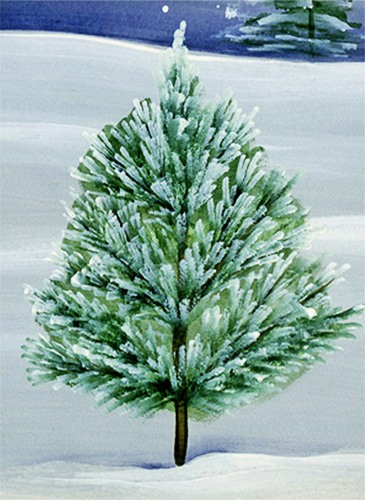
- Dip a thin brush into brown paint and paint the trunk and branches of the tree.
- Prepare a flat brush. Dip one corner into dark green gouache, and the other into white. Make neat imprints of needles on the branches, periodically selecting white and green paint. The more needles there are on the spruce, the more lush and beautiful it will look.
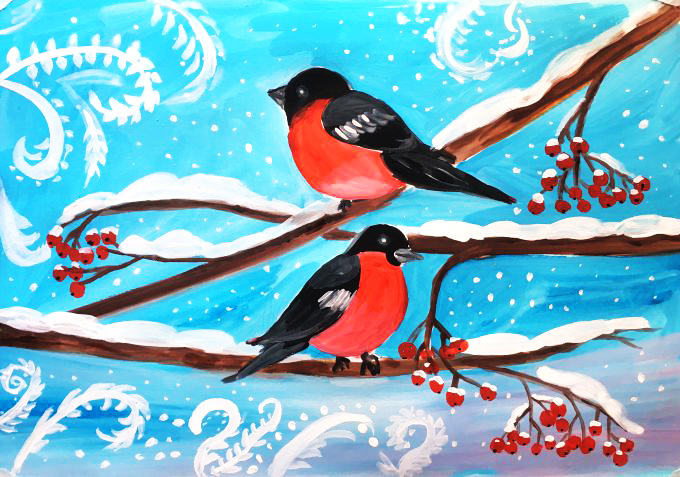
Bullfinch
We draw winter with its beautiful representatives of fauna – bullfinches. Artists share secrets on how to draw these bright birds with gouache step by step.
This will be within the power of school-age and even preschool-age children.
Stages of drawing:
- The creative process should begin with a sketch in pencil. Use light, thin lines to outline the branches. Make a sketch of a bullfinch: an oval body, a semicircular head, an oval wing, pointed on one side, and a long tail. Do not draw small details such as rowan berries, eyes, paws, and feathers of the bird.
- Using a damp wide brush and blue gouache, apply the background of the drawing, leaving the birds and large branches unpainted. You can also add blue, pink or purple paint. Do not make the paint runny, it should lay thickly on the paper.
- Paint the branches with brown gouache.
- Paint the bullfinch's chest red, its head, wing and tail black. Add a drop of black to the white gouache and paint a few feathers of the wing and tail with the resulting grey color. Also draw a few lines on the wing with white gouache and draw an eye on the head. Use a thin brush to draw the black paws of the bullfinch.
- Add rowan berry clusters. To work with red gouache, you can use a round brush or cotton swabs, and to put black dots on the berries, use a thin brush or a toothpick.
- Use white gouache to paint snow lying on the branches. You can also use a thin brush to paint curled frost patterns, and use a cotton swab to paint falling snow.
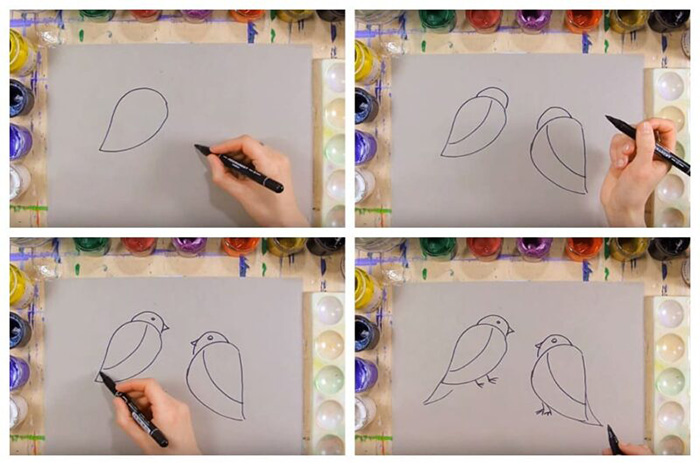
You can also draw bullfinches in the following way, which will be more appealing to small children:
- On the left side of the sheet, draw a large drop with a pencil, resembling the body of a bullfinch. In the same way, draw a drop-shaped body of another bullfinch, but larger.
- By adding semicircles to the top of the bodies, we get the heads of the birds.
- Draw an arched line on the body to represent the bird's wing.
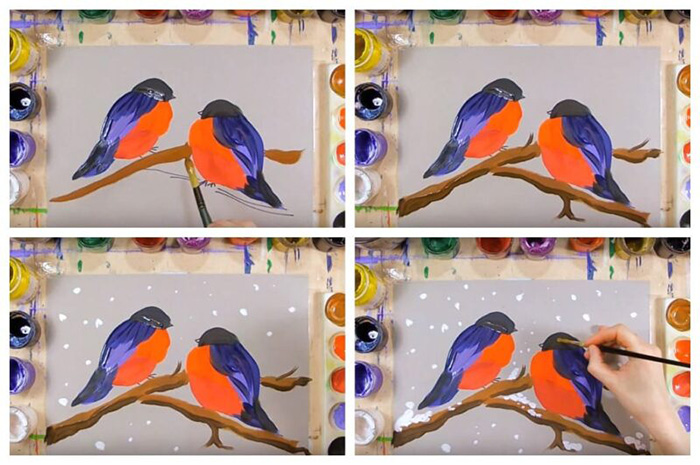
- Rinse the brush in water and dip it in bright red gouache. Paint the upper part of the chest. Make the lower part of the belly burgundy.
- Cover some of the wings and feathers on the tail with lilac gouache, the rest with dark blue. Paint the heads and a few feathers on the tails of the bullfinches with black gouache. Draw the eyes and beaks of the birds.
- Paint the branches with brown gouache, shade their lower part with a darker color. Finish drawing thin branches.
- Use white gouache to depict snow on the branches. Also create the effect of falling snowflakes by placing many white dots of different sizes.
Easy gouache drawings on the theme of winter
Children love to draw on a winter theme. These are not only delightful winter landscapes, but also a funny snowman, a New Year tree with Santa Claus, winter fun and sports games. With the help of gouache paints, children's observations and fantasy can be successfully transferred to paper. And several master classes on a winter theme for children of different ages will help with this.
1-2 grade
Let's draw winter with gouache step by step with the youngest schoolchildren. When working with children of this age, you can use non-traditional drawing techniques.
They do not require great artistic skills, but the drawings will turn out beautiful and original.
Winter forest
Stages of drawing:
- Prepare a sheet of blue paper or make a background for the future drawing on a white sheet yourself.
- Dip a flat brush in white gouache and paint the snow-covered ground. Then depict tree trunks with several large branches. They can also be made white.
- Crumple a newspaper or a sheet of paper. Using a brush, apply white gouache to the lump. Using the clapping motions of this stamp, form snow-white tree crowns.
Snowflakes
Stages of drawing:
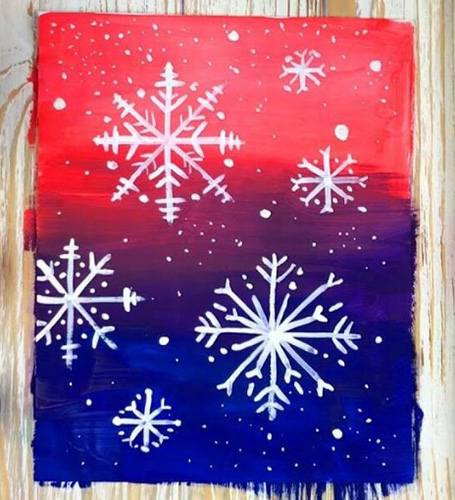
- Create an interesting background for the future drawing. Dip a wide, damp brush into red gouache and cover the upper part of the sheet with strokes.
- Apply blue paint to the central part of the sheet. Then, using a washed, clean brush, make a smooth transition between the two colors, carefully shading their border.
- Paint the bottom of the sheet blue. And similarly to the previous action, soften the transition of blue and light blue. Leave the drawing to dry.
- Using a thin brush, draw vertical and horizontal lines intersecting at one point, then add 2 diagonal lines. Add check marks to each line. You can also draw small additional lines in each section.
- Use a medium-sized round brush to paint circles of white snow. Then use smaller brushes to add dots.
3-4 grade
Let's draw winter with gouache step by step with children of grades 3-4. The drawings are easy to work with, but require more confidence and perseverance from the little artists.
Snowman by the spruce
Stages of drawing:
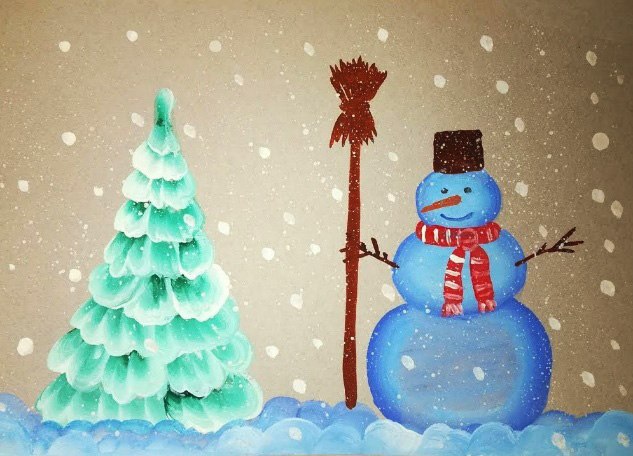
- Use a pencil to draw a large circle – the base of the snowman. Place a smaller ball above it and the snowman’s head at the very top. Erase any extra lines with an eraser.
- Use thin lines to outline the scarf, rectangular bucket, branches-arms and broom. You can also make a sketch of a Christmas tree in the Gzhel style: draw each row of branches.
- Paint the snowman with light blue gouache and shade the sides with a darker color.
- Draw a red scarf. When the paint dries a little, draw white lines on it.
- Draw a brown bucket and broom for the snowman. Use a thin brush to depict hands, as well as eyes, a mouth and a carrot-shaped nose. In addition to a brush, you can also do this with a cotton swab.
- Dip the corner of a round brush into green paint and the other into white. Pressing lightly on the brush, smoothly draw each fir branch. Start from the bottom of the tree and move up to the top, row by row, periodically picking up gouache.
- Using a round brush and blue gouache, paint voluminous fluffy snow. Draw falling snow with cotton swabs soaked in white paint.
New Year trees
Stages of drawing:
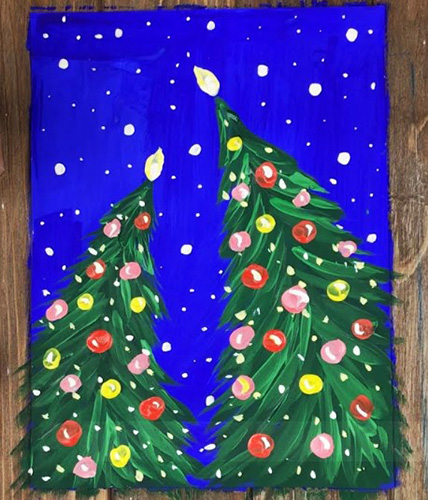
- Rinse a wide brush with water and dip it into blue paint. Paint the entire sheet with gouache. Wait until the paint dries.
- Dip a medium-sized brush in green gouache and draw 2 arched lines "looking at each other." Then draw dark green branches on both sides of each trunk.
- While the green gouache is drying, you can start drawing snowflakes. To do this, dip the brush in white paint and draw small circles on the blue background. Then repeat the action with a smaller brush. And finally, you can make very small dots using a toothpick.
- On top of the dried green gouache, draw some more thick light green branches. Leave the drawing to dry.
- Using a round brush, decorate the trees with tops, red, yellow and pink balls. When the paint dries, you can add white highlights to the decorations. You should also use a thin brush to add white snowflakes to the tree branches.
5th grade
Let's draw winter with gouache step by step with 5th grade students, moving to a new level of difficulty.
Particular attention should be paid to the planning of the drawing, as well as the skill of mixing paints, both on the palette and on the paper itself.
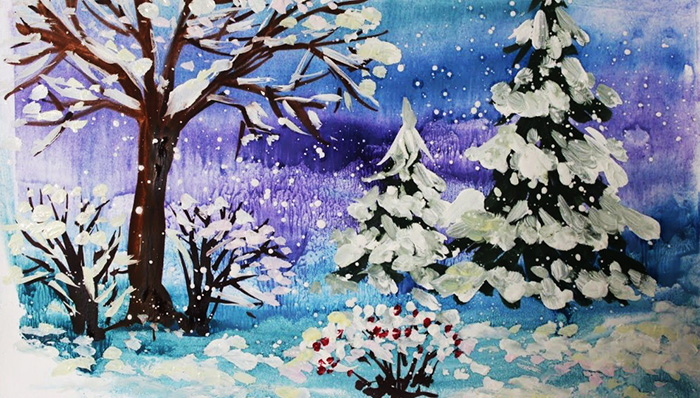
Winter landscape
Stages of drawing
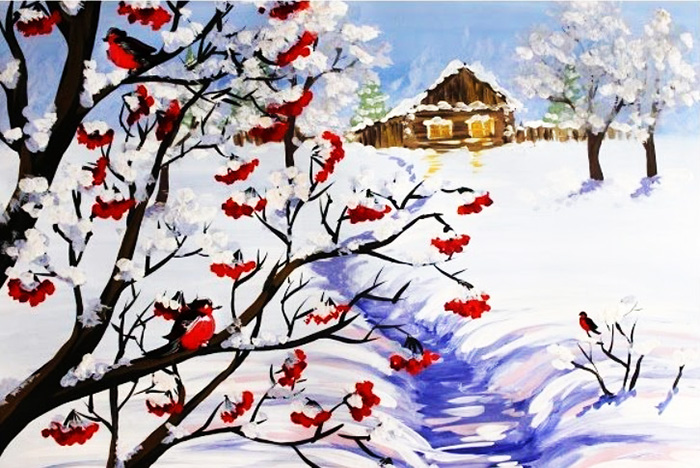
- Paint the top of the sheet blue. Add a little white on top and mix the paints well. Add a little blue to the white gouache, mix and fill the rest of the sheet with the resulting color.
- Add a drop of violet to the light blue paint. On the horizon line, use large, chaotic strokes to outline the contours of the distant forest.
- Mix green, white and violet gouache to paint several fir trees on the horizon line. Cover the green branches and the base of the trees with white snow.
- Combine brown and white gouache and draw the base of the future house - a rectangle, and a triangle on top of it. On the sides of the house, mark the line of the fence with strokes. Use a darker shade to show the lines of the logs on the house. Draw the windows with light orange paint. Use the same color to make the reflection from the windows on the snow. Use white gouache to depict the snow on the roof and windows.
- Mix brown and purple paint and form trees near the house. Cover them with snow from white and blue gouache.
- The snow under the trees should be shaded with light purple. The same paint should be used to depict the path winding away from the house. In the background, it is drawn narrow, and as it approaches the foreground, it widens. On the sides of the path, the volume of snowdrifts should be marked: first with purple, and then enhanced with blue gouache. The colors should be softly shaded with a damp brush. The reflections on the snow should be marked with pink paint.
- In the foreground of the drawing, paint tree branches and thin rosettes for berries with a mixture of black, brown and violet. After the paint dries, add brown highlights to the bark. Paint rowan berries near the rosettes with red gouache, some berries should be highlighted with a dark cherry color. Place white and blue snow in the places where the branches are attached and on the rowan bunches. After the drawing dries, you can add pure white snow to some more areas.
- You can draw a pair of bullfinches on the rowan branches.
Creativity with gouache allows you to draw bright and rich winter landscapes, step by step improve children's drawings. In addition to artistic skills, it also develops imagination, love for nature, emotional and aesthetic feelings.
Video about painting winter with gouache
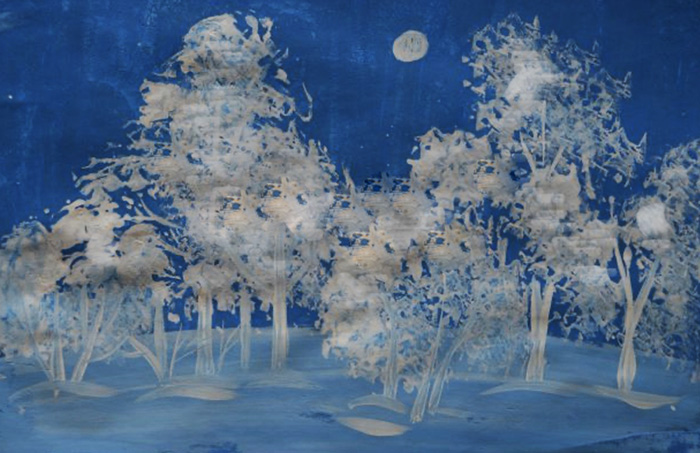
Master class on painting a winter night with white gouache: