For Beginner Artists creating drawings Using gouache may seem difficult, as working with thick paints requires special skills.
Before starting art classes, a beginner should learn gouache painting techniques and purchase all the necessary stationery. Having an idea of the algorithms for creating images using the type of paint in question, a novice artist will be able to draw a high-quality composition after 7-10 days of regular practice.
Types of gouache for beginners, choosing a brush and paper
Gouache drawings (for beginners, it is better to copy ready-made images for the first 5-7 days) cannot be created without a correctly selected set of stationery.
Stationery
Brief description
Paper or cardboard
Gouache is most often used to paint on paper surfaces, but due to its dense texture, such paints can also be used to create images on wood or plywood.
The chosen material for creativity should have a rough surface and a high density index. Otherwise, the gouache will not lay down in a dense layer due to poor adhesion to the paper.
To prevent paper or cardboard from deforming during the process of applying paint and water, the sheet should be stretched over a tablet or easel, securing it at the corners with masking tape or safety pins.
Brushes
Brushes should be selected taking into account the technique the beginning artist plans to work in. If gouache drawings are to be created in a “dry” style (brushes only come into contact with paints), it is best to use bristles for them.
If you need to mix gouache with water, it is recommended to choose kolinsky or synthetic bristles. This type of brush is characterized by high elasticity and softness at the same time.
Brushes that are too soft, such as those made from pony hair, are not suitable for painting with gouache because they do not transfer paint well and, when wet, they lose their elasticity.
Palette
Necessary for mixing paints to obtain a new shade.
Because there are a number of varieties of gouache, beginners should study the features of each before purchasing, as well as evaluate the existing subtypes for compliance with the painting technique in which a particular artist plans to work.
The following are sold on the modern consumer market:
professional or artistic gouache (used to create large paintings);
poster gouache (used for painting posters, decorations and other drawings that require paints with a high degree of resistance to fading);
fluorescent gouache (distinguished by its rich acid shades and the ability to glow under UV light);
acrylic gouache (the most optimal type of gouache for beginning artists. Such paints apply evenly to all types of surfaces and are quite resistant to mechanical damage).
Gouache painting techniques
Gouache drawings for beginning artists can be created using several techniques.
Glaze
The distinctive feature of this style is that the artist applies another translucent layer on top of the main thick layer of gouache, after it has completely dried.
For repeated application to the working surface, gouache is recommended to be diluted with water as much as possible until the color saturation is lost by at least 90%. With the help of glazing, artists create the effects of rain, fog or twilight in their paintings.
Paste technique
This technique began to be used by artists in working with gouache relatively recently. Initially, it was used exclusively when creating images with oil paints. The essence of the impasto technique is to draw objects using dense strokes of saturated color.
To highlight the texture, angle of light or shadow, artists use different directions of brushstrokes, and also adjust their shape and location. Beginners who have chosen this technique for their work should remember that artistic gouache, if applied in too thick a layer, may begin to crumble and crack as it dries.
Sgraffito
Externally, the sgraffito technique resembles the process of creating an engraving. Its essence consists of scratching the top layer of paint with a thin needle in order to expose the bottom one.
When working with gouache in this technique, it is recommended to perform sgraffito as quickly as possible, since one of the main physical properties of gouache is the fastest possible drying speed (no more than 5 seconds).
Mixed media
Mixed technique of creating gouache drawings is the most popular among contemporary artists. It involves combining several styles within the framework of working on one image.
For example, a background picture can be drawn with sgraffito, and some of the key objects - with impasto technique. A competent combination of existing drawing directions helps artists achieve unique shades and textures of paintings using the primary colors of gouache.
Step-by-step master classes in gouache painting on paper for beginners
Gouache drawings (for beginning artists, it is best to strictly adhere to standard algorithms for creating even the simplest images at the learning stage), namely their main idea, should be chosen by the beginner taking into account his own interests.
Otherwise, working on a painting will be tiring, which after just a few hours will provoke irritation and rejection of the creative process in a person.
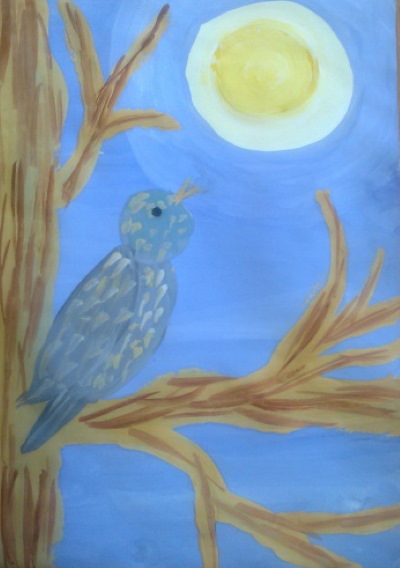
Animals
Animals can be painted with gouache in a realistic or cartoon style, at the artist's discretion.
Gouache drawing variant
Workflow Algorithm
Create a background for the image by painting the working surface with a rich blue gouache color.
After the paint has dried, draw an even circle in white (moon) in the center of the sheet of paper you are using.
Mix white and blue gouache and draw a relief of the moon, filling the inner part of the circle with streaks, placing them randomly.
Use a blue-white shade to create the effect of the moon “shining”, slightly blurring the outline of the celestial object.
Use randomly placed white dots to represent stars.
From the right border of the working plane, using 2 parallel lines with smooth curves, draw a tree branch passing through the moon and directed towards the left edge of the sheet of paper used.
Detail the image of the branch by drawing branches of arbitrary length, thickness and direction.
In the middle of the moon, draw a black silhouette of a cat sitting on a tree branch with its back to the viewer. To do this, draw an oval of the appropriate size with 2 triangles on top, and then adjust the outline, making it as similar as possible to the body of an animal.
Along the entire length of the left edge of the sheet of paper used, stepping back 3-5 cm from the edge, draw a vertical line (tree trunk).
From the right edge of the trunk, draw 2 main branches at a distance of 7-10 cm from each other so that one of them is directed upwards and the second downwards.
Draw small branches of arbitrary length, thickness and direction.
Between the branches, closer to the upper right corner, draw a yellow circle, smearing its borders with white gouache (the sun). Also make the middle of the circle white.
Draw a silhouette of a bird on a branch pointing slightly downwards. It is recommended to do this using a close-up image (from bottom to top) of a triangle (tail), oval (body) and circle (head). Geometric figures should be connected with smooth lines, and then the drawing should be detailed by drawing the bird's plumage, beak and wings.
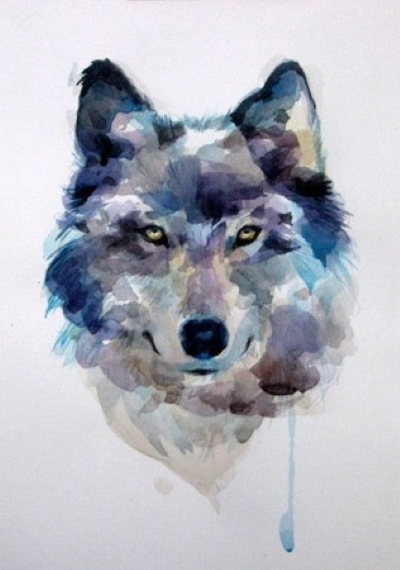
Paint the background light blue.
Draw a rough outline of the wolf's face using triangles for the ears and a rounded oval with a triangle at the base for the muzzle.
In the center of the animal's muzzle, draw 2 small ovals, placing them slightly diagonally in relation to the nose. (eyes)
Draw a small circle (nose) at the base of the triangle.
Draw a semicircle with a downward bend under the nose (mouth).
Paint the drawing with gouache, alternating rich, dense strokes with translucent ones.
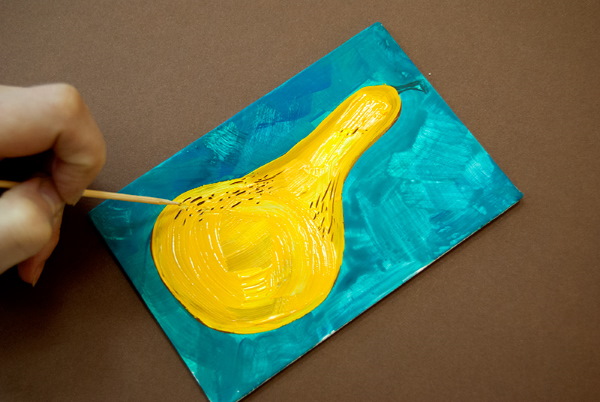
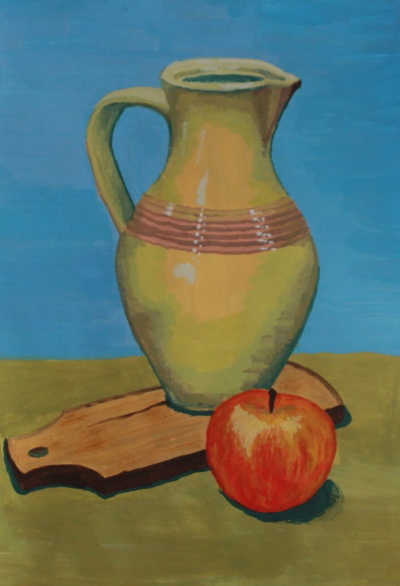
Still lifes
Drawings of dishes or food products are usually called still lifes. Such images can be created, among other things, using gouache
For beginning artists, this type of work should be made the main one (at least at the training stage), since, following the main stages of the given algorithms, drawing a still life will take no more than 1-2 hours, provided that the main objects of the composition are drawn in detail.
Gouache drawing variant
Workflow Algorithm
Find the horizon line by drawing a horizontal line dividing the working plane into 2 approximately equal parts.
Paint both halves with a thick layer of gouache in contrasting colors (for example, the upper area in blue and the lower area in green or brown).
Step back 2-3 cm from the horizon line and draw a slightly downward curved semicircle, no more than 3-5 cm long.
From the extreme points of the semicircle, draw 2 vertical lines so that at the bottom they are curved to the sides, and at the top - to the center. The bends of the lines should be located at the same level and be a strict reflection of each other.
Draw a small triangle (the neck of the jug) on the outside of the upper part of the left vertical line.
On the right side, on the outside, draw a semicircle with double lines, bending to the right (the handle of the jug).
Paint the inside of the jug as you wish.
Draw a fruit nearby, for example, a pear, determining its size based on its location relative to the horizon line and distance from the viewer. The pear is drawn using 2 vertical lines, curved in opposite directions at the base and tapering slightly toward the center at the top.
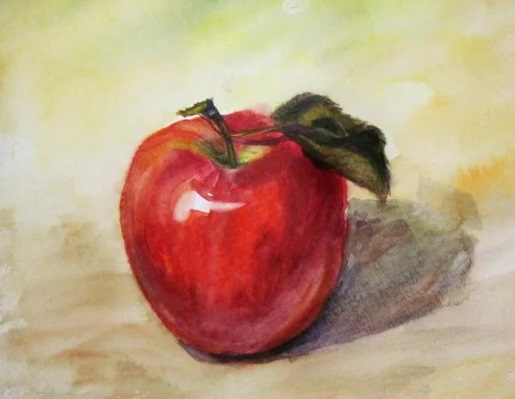
Determine the horizon line so that it divides the working plane into 2 halves.
Stepping back from the horizon line 3-4 cm down, draw a semicircle with a downward bend. The length of the semicircle should be no more than 7 cm, depending on the format of the sheet of paper used.
From the extreme points of the semicircle, draw 2 vertical lines upwards, equal in length.
Connect the top points of the lines with a semicircle curved downwards.
From the extreme points of the drawn semicircle, draw another semicircle with an upward bend (a mirror image of the first).
Between the semicircles, draw a small oval with a short vertical line coming out of its center (the apple stalk).
Adjust the outline of the drawing, making it more blurred and angular.
Paint the inside of the fruit using red, white and pink gouache.
Paint the background of the image using a pastel shade of paint.
To the right of the base of the drawn fruit, use long strokes to depict a shadow directed towards the upper area of the right edge of the sheet of paper used.
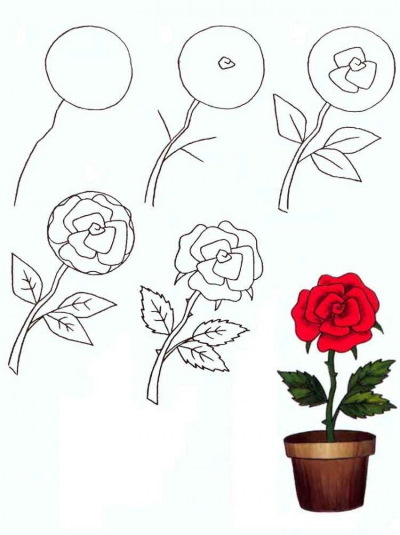
Floristics
The easiest way to draw flowers with gouache is as follows:
Gouache drawing variant
Workflow Algorithm
Step back 2-4 cm to the right from the center of the sheet of paper used and draw a circle (the outline of the rose).
From the side of the drawn circle, draw 2 smoothly curved lines, directing them to the lower left corner (stem). Connect the extreme points of the lines with a semicircle.
In the middle of the circle, draw another small circle (the center of the future bud).
Draw diagonal lines from the sides of the stem.
Draw ovals around the straight lines drawn from the stem, pointed at the top and base (leaves).
Inside the main circle, from the center of the bud, draw 3 small rectangles, placing them close to each other.
Fill the space between the rectangles with similar shapes. Continue drawing rectangles until most of the inner surface of the circle is filled.
Remove the bud outline.
Add detail to the image by drawing the thorns and veins of the leaves.
Colour the drawing using red and green gouache, adding a pot or vase if desired.
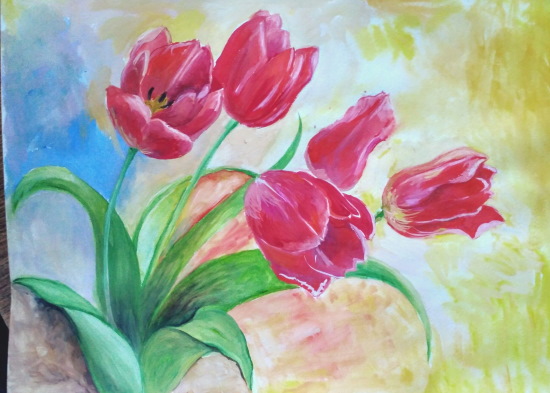
From the middle of the lower border of the working plane, draw up 2 slightly curved lines, placing them at a distance of no more than 1-2 cm from each other (tulip stem).
Step back 1-2 cm from the base of the flower stem and draw a smoothly curved downward line to the right.
From the extreme point of the semicircle, draw another curve downwards, with alternating bends in different directions (tulip leaf).
At the top of the stem, draw a small oval, elongated on the sides.
From the oval, draw several short, smoothly curved vertical lines, connected to each other by semicircles (the petals of the bud).
Add detail to the image and then paint the tulip using red, green, yellow and orange gouache.
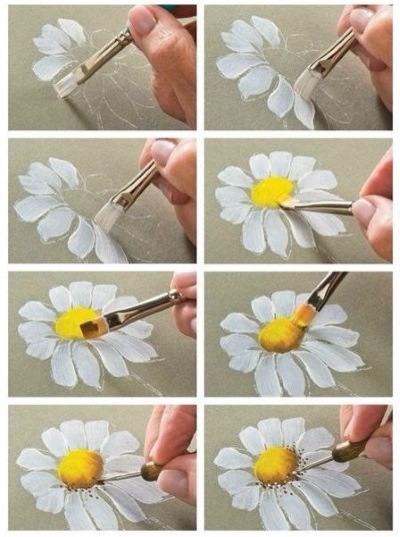
In the center of the working surface, draw a small circle (the middle of the bud) using yellow gouache.
Use strokes to create relief in the center of the flower.
From the edges of the flower, draw as many elongated semicircles as possible, placing them close to each other (petals).
Adjust the upper edges of the petals, making them zigzag.
Paint the inner part of the petals, located closer to the middle, with light blue gouache.
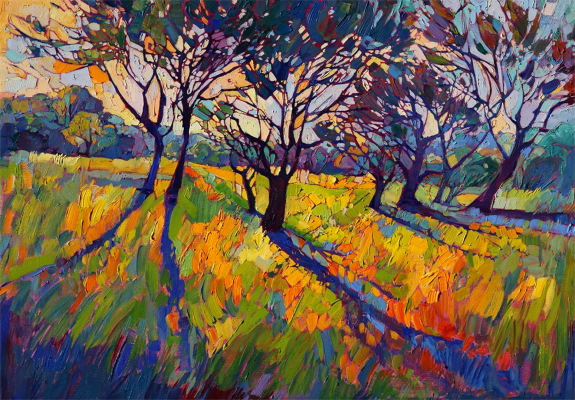
Landscapes
Gouache paintings (for beginners the most difficult task is usually to paint a landscape), provided the technique and shades of paint used are chosen correctly, can also convey the general atmosphere of the seasons or even a specific landscape.
Gouache drawing variant
Workflow Algorithm
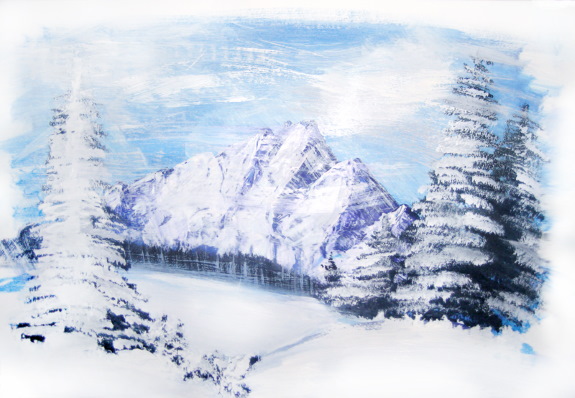
Mark the horizon line, visually positioning it so that it divides the plane into 2 equal parts.
From the middle of the lower border of the sheet of paper used, draw up 2 smoothly curved lines (at the base, the distance between them should be at least 5-7 cm), connecting at one point on the horizon line.
Taking the intersection point of the lines as the central area, draw a semicircle with a smooth upward bend.
Stepping back 3-4 cm from the semicircle, draw another similar curved line at the right and left edges of the working plane (snowdrifts).
On the distant semicircles depict the outline of fir trees or other trees, at the artist's discretion. The size of the trees should be determined taking into account their distance from the horizon line and the viewer.
Colour a winter landscape using gouache in blue, grey, black and white.
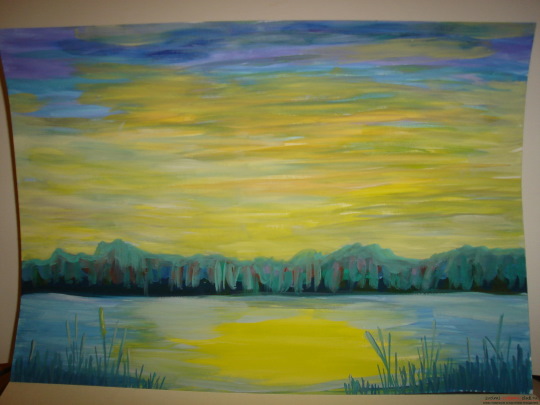
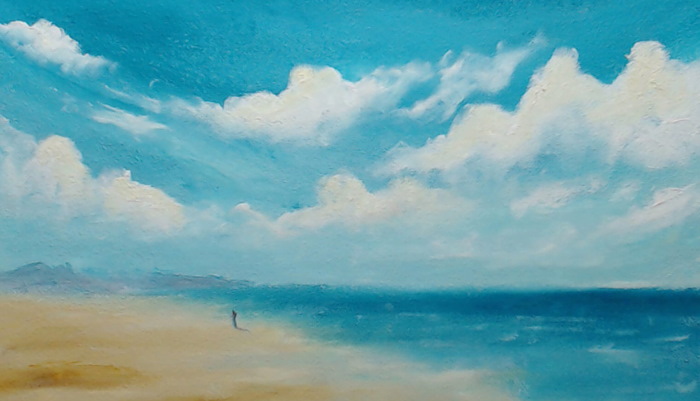
Mark the horizon line by drawing a straight line so that it divides the working plane into 2 parts. The lower part should be 2 times smaller than the upper part.
Stepping back from the horizon line 3-5 cm upwards, draw a slightly curved horizontal line from the left to the right border of the sheet of paper used (outlines of the forest).
In the middle of the lower half, draw a yellow semicircle (reflection of the moon or sun).
Using thick strokes of gouache, paint the image using blue, yellow, white, light blue and black.
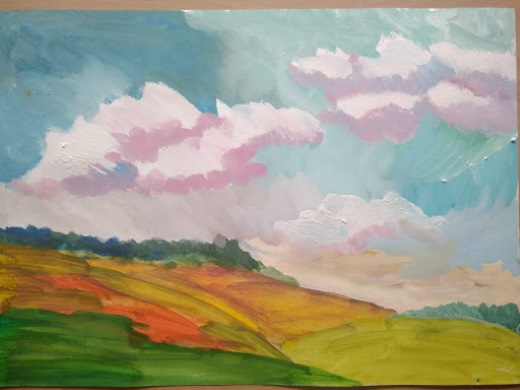
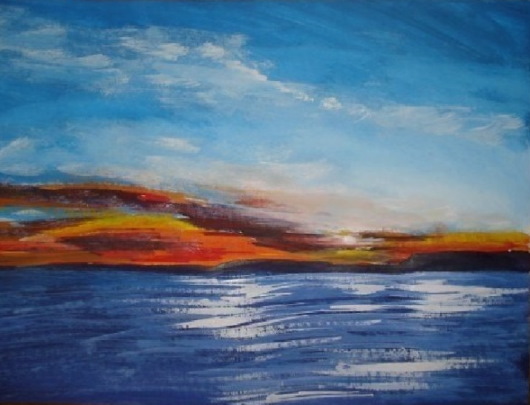
The sheet of paper used is divided into 2 parts so that the bottom one is half the size of the top one.
Paint the bottom half with long strokes of blue and white gouache.
Step back from the dividing horizontal line up to 7 cm, and draw a smoothly curved line from the right to the left edge of the plane (mountains or hills).
Paint the hills brown, yellow, red and orange, making the transitions as blurry as possible.
Paint the area of the drawing above the mountains with blue gouache, creating a cloud relief using white strokes of varying density and shape.
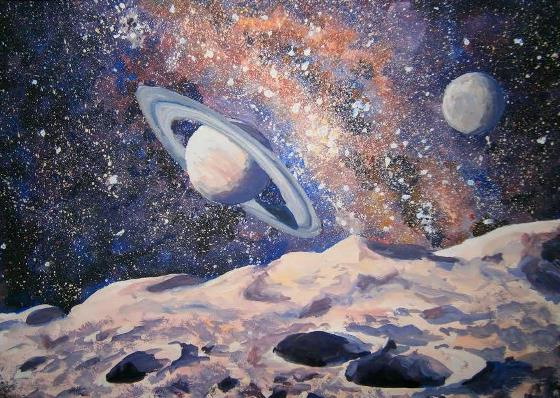
Space
It is extremely easy to paint space with gouache:
Using black, purple, lilac, pink, white and blue gouache, fill the working surface with long strokes, placing them randomly, close to each other.
Blur the boundaries of the strokes by mixing the paints in these areas with a brush dipped in water.
If desired, you can add the moon, planets or stars.
Gouache drawings for beginners - space
Drawings using gouache must be created in strict accordance with the basic rules of the chosen technique. For beginning artists, it will be easiest to draw in a mixed style, without limiting your imagination. With the necessary stationery and the original image for copying, a beginner can complete the work in a maximum of 2 hours.