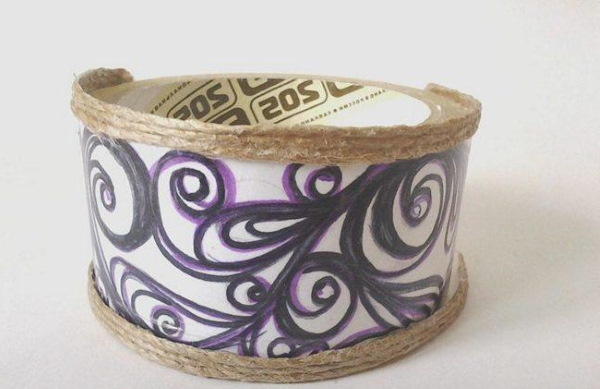
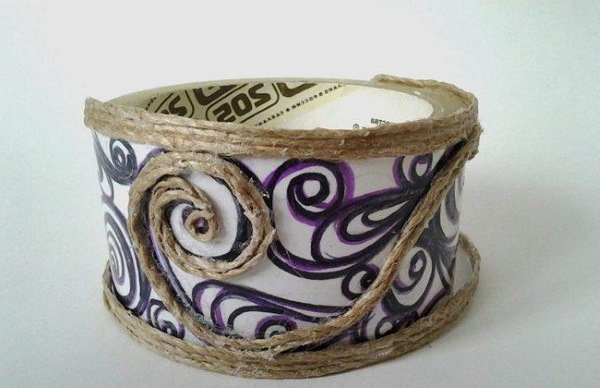
In skilled hands, jute acquires the elegance of the finest filigree, embodied in original products, the designs for which you can create yourself.
What is jute filigree
Jute filigree is one of the simplest techniques for creating beautiful openwork items and decorative objects from jute cord and glue. by weaving and combining them into single compositions.
 Stencils, pattern diagrams and sketches help beginners understand the process and start making simple jute filigree items.
In a simple sense, jute filigree is a pattern laid out from jute cord and fixed with glue. Crafts from jute are made with tweezers or fingers, the crafts are very light and elegant, and the appearance resembles wire lace, decorated with stones, beads and rhinestones.
What you need to work with jute
The necessary materials and tools can be purchased at any hardware store.
The table shows a list of accessories for working with filigree:
| Manufacturing of products using jute filigree method | |
| Materials | Tools |
|
|
Helpful tips for choosing threads
For creativity, you can choose any thread. It can be regular yarn and cords made of natural materials of different thicknesses.
To make colored items, craftsmen suggest pre-dying the same jute cord, then all the work is in a single style. The threads are dyed by dipping them in acrylic paint, or lightened to the desired color with a solution of household chlorine bleach.
Jute rope has some disadvantages that are inherent in natural materials: it absorbs moisture and is subject to decay. Therefore, to make presentable products, jute analogues are used, this is Manila cord and linen twine. Manila rope is stronger than its analogues and does not absorb water. The difference with linen cord is that it is soft and pliable.
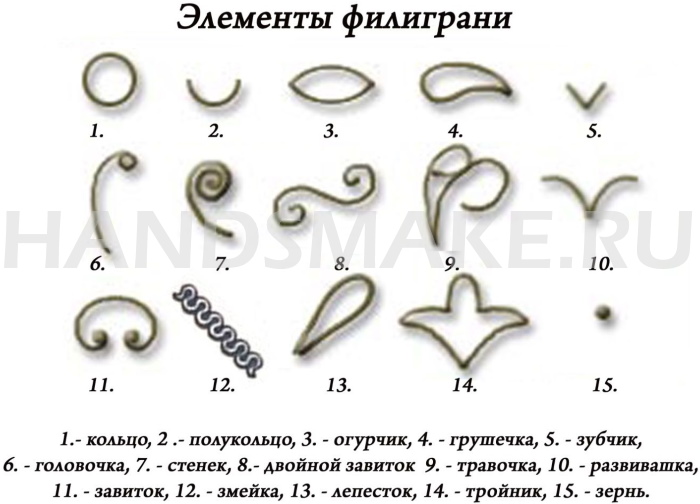
Basic weaving techniques for beginners
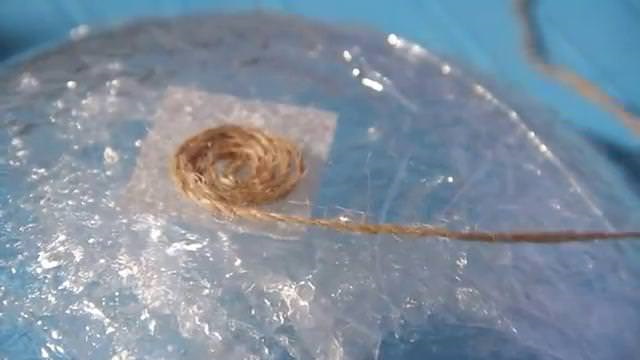
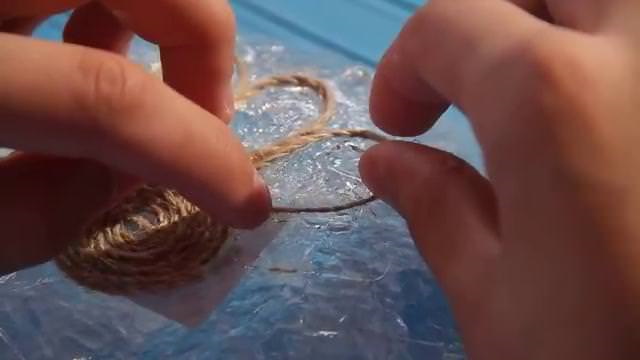
It is recommended to start creativity with studying simple basic elements, learn to make different types of loops, curls, leaves, snails. A frequently used element is a loop. It can be empty in the center or filled with patterns of threads. The loop can have a rounded, sharp or peak-shaped top.
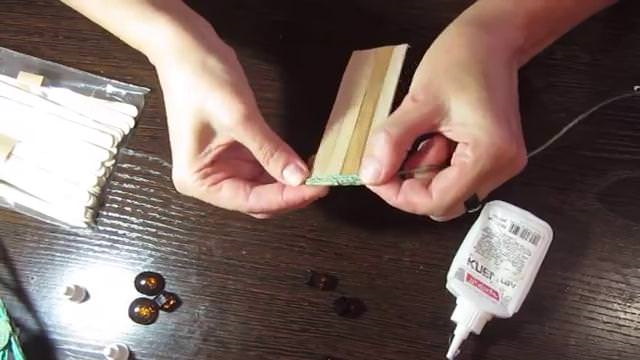
Another important skill that a beginner needs to master is making jute ribbons glued together from several threads. To do this, apply glue to the oilcloth with a length equal to the length of the cut threads, distribute it with a toothpick and place the threads (usually 3 pieces) tightly next to each other.
Without letting the glue dry, the workpiece is separated from the film and carefully smoothed with fingers along the entire length from beginning to end. After drying, the tape is dense and elastic.
Jute filigree and its easy-to-make elements allow you to create any product, the designs for which you can make yourself, using your imagination, tips from books or the Internet.
Jute filament technology
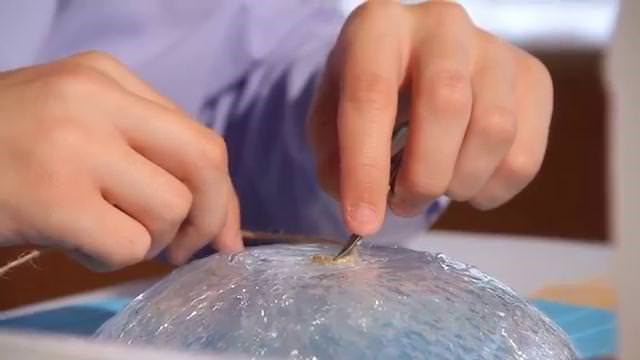
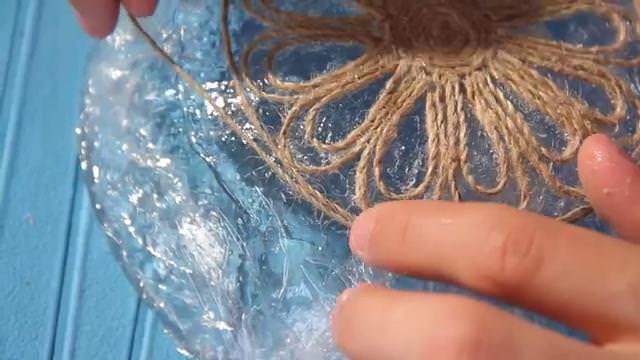
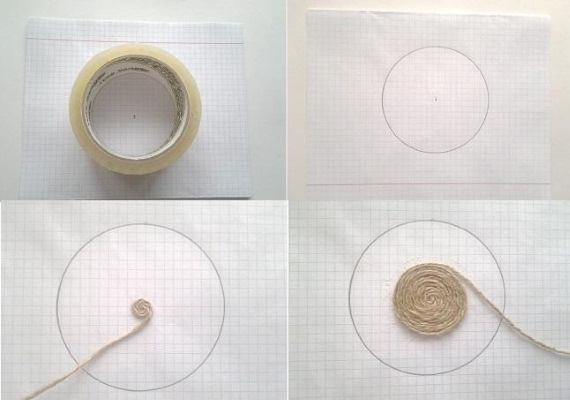
To start working, you need to apply a pattern to the paper or take a ready-made stencil. Put the sheet with the stencil in a transparent file bag. The jute pattern is laid out on the surface of the oilcloth and fixed with glue.
The steps for making filigree can be described sequentially as follows:
- Glue is applied to the element of the finished pattern, covered with film, and distributed with a toothpick or knitting needle. There should not be too much glue, otherwise the element will be difficult to fix and will take a long time to dry. Another technique involves applying glue directly to the cord.
- Using tweezers, lay out the jute cord on the drawing. There is no need to cut the thread in advance, it is better to make the element and cut the thread diagonally at the end with small scissors. The diagonal cut will be invisible and will harmoniously merge with the element.
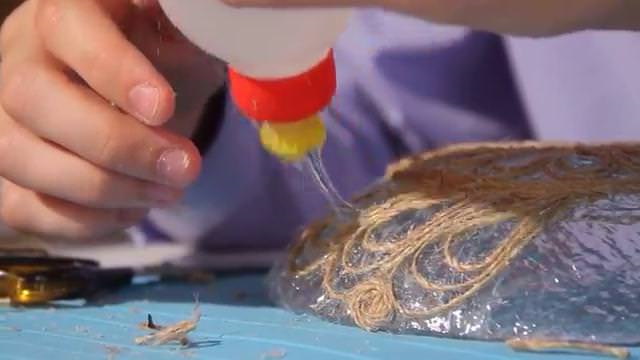
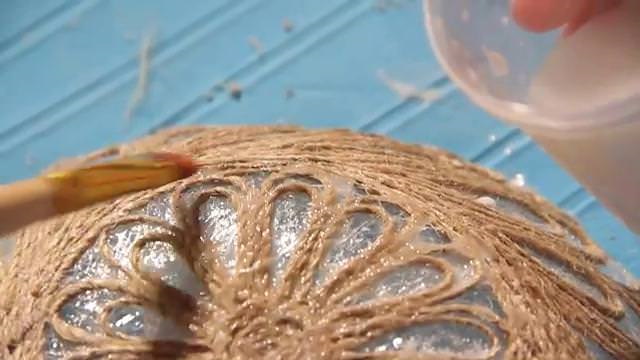
- The finished pattern (product) is treated with an aqueous solution of PVA glue, allowed to dry, separated from the film, varnished or, if desired, painted with acrylic paint.
Recommendations for creating stencils
It is most convenient to apply patterns to A4 paper and put it into a file of the same size. The material of the file package is convenient for creativity because it does not shift, does not wrinkle and fixes the patterns well.
To make a stencil you will need a little imagination and:
- clean paper;
- pencil and felt-tip pen.
- eraser.
Recommendations for creating a stencil:
- If there are no ideas at the first stage, you can study books with patterns or examples on the Internet. Then, knowing the basic elements, it will not be difficult to create your own drawing.
- Beginners are advised to draw patterns with a pencil and, if necessary, correct it by erasing unnecessary details. The finished pattern is outlined with a felt-tip pen.
- If you plan to make a three-dimensional structure with a thickness of one thread, the pattern should be made denser for the strength of the future product. If you use jute ribbons, the openwork can be made more airy, since the ribbons provide sufficient rigidity.
- The lines should be drawn clearly and with a thick line so that the stencil is clearly visible through the oilcloth.
- When creating a stencil, the masters use the principle of symmetry, it is more attractive to the human eye. But you can create images following your idea. The main principle is harmony.
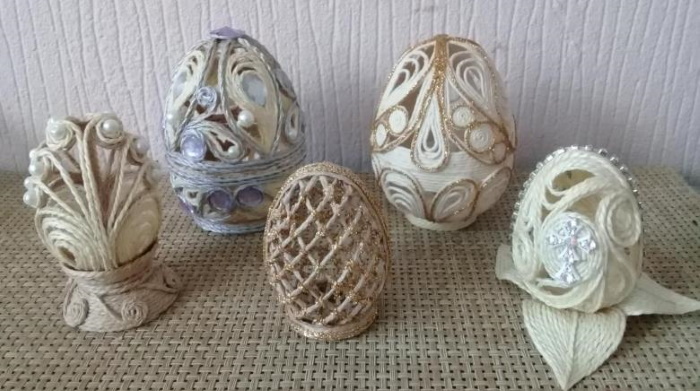
Jute Craft Ideas
Jute filigree (designs for products and master classes are presented later in the article) is the basis for creating all sorts of decorative and household items.

Items made using the filigree method can serve as an original gift for holidays and celebrations. Painted with gold or silver, the works will look like openwork woven metal items.
Examples of products that can be made using jute weaving technique:
- openwork napkins;
- coasters for hot dishes and mugs;
- napkin holders;
- boxes;
- decorative baskets;
- photo and mirror frames;
- lampshades;
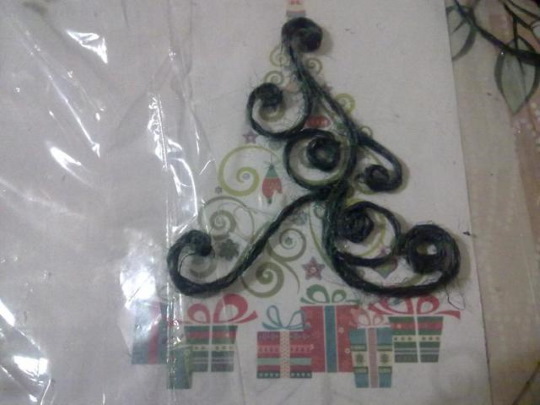
- decorative elements in the form of butterflies, feathers, dragonflies, flowers.
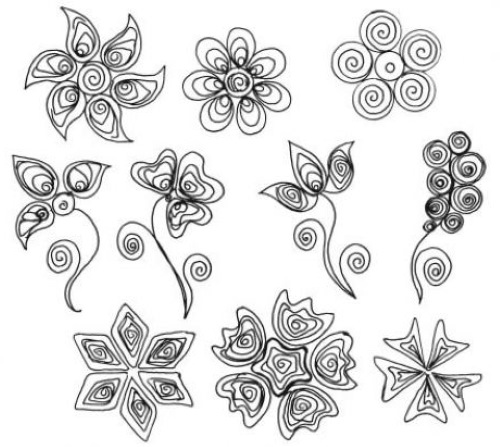
Drawings, patterns schemes
A huge variety of patterns and templates for filigree creativity will help everyone find a suitable option. The patterns used can be supplemented with your own elements, then the product will acquire greater originality.
Master classes and sketches of products in the technique of jute filigree for beginners
Jute filigree (designs for products are made on the basis of basic elements) is a job that requires patience and perseverance, but brings amazing results.
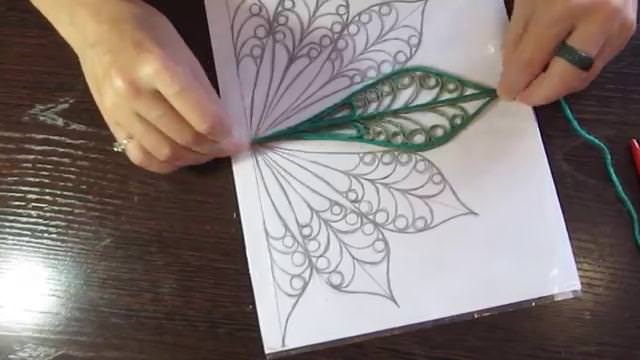
Feather
A feather can be an original gift, carrying meaning as a talisman or amulet. A filigree feather decorated with rhinestones will harmoniously fit into the interior.
For work you will need tools and materials:
- jute cord;
- glue;
- scissors;
- paper, file, pen;
- decor in the form of hemispheres marbles.
Progress of work:
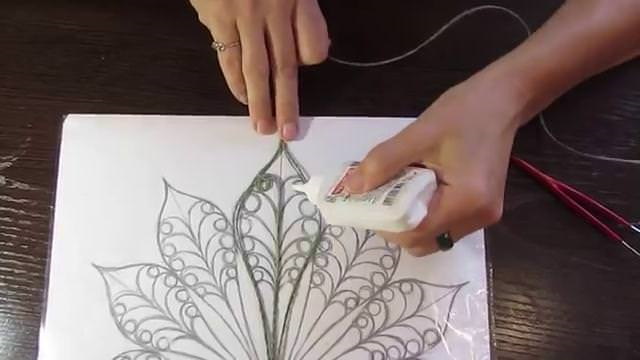
- The leaf should be decorated with an image of a peacock feather, in the form of a long elongated drop. At the top, space should be left for marbles.
- First, draw the outline with 2 layers of jute thread. The glue can be applied to the oilcloth or the threads can be greased with it.
- From the bottom edge (corner) to the place where the marbles are attached, lay the feather rod, strengthening it with 2-3 rows of threads.
- Lay out a snail from light-colored threads, where the glass decor will be attached.

- Cut the twine into 8 pieces, 8 cm long, and twist them into snails. They will frame the upper part of the feather along the inner contour.
- From 6 threads form details in the form of a curl with a long stem, which fills the space from the lower corner to the expanding base on both sides. Lay out the elements with the stem towards the shaft of the feather and the curl towards the outer edge.
- Glue marbles into the center, filled with white threads.
- Dry the feather and separate it from the film.
- Remove excess glue using a hot knitting needle.
Hot napkin
You can make napkins for your own interior or as a gift.
To work you will need:
- jute rope;
- glue;
- scissors;
- paper, file, pen.
Sequence of actions:
- To work, you need to make jute ribbons, as the product must be thick enough. Or make 2 identical blanks, which are then glued together.
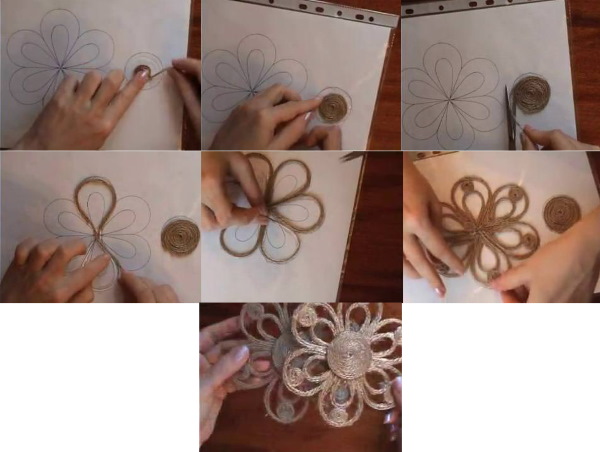
- Transfer the pattern you like onto paper. Napkins are often made in the form of flowers. Put the sheet with the stencil into the file.
- From the finished jute tapes, start laying out large elements first. To prevent the parts from shifting, they need to be held for some time, pressing them against the film.
- After forming the base, proceed to gluing the filling elements.
- Thoroughly coat the finished napkin with a solution of PVA glue diluted with water in a 1:1 ratio.
- Leave the product to dry.
- Separate the napkin from the film.
- If desired, paint with acrylic paints.
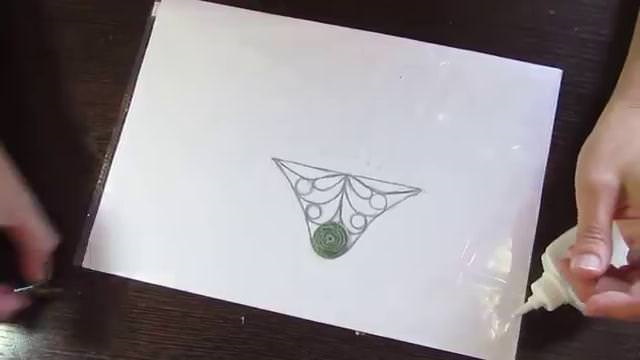
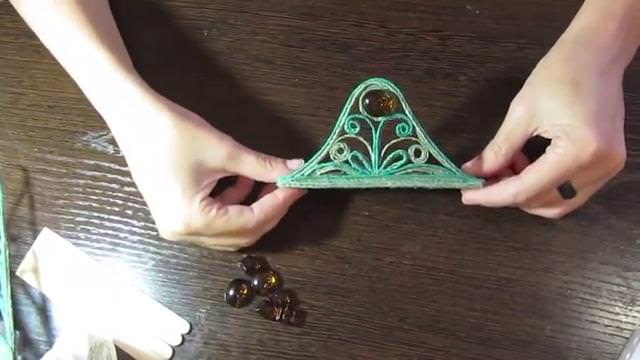
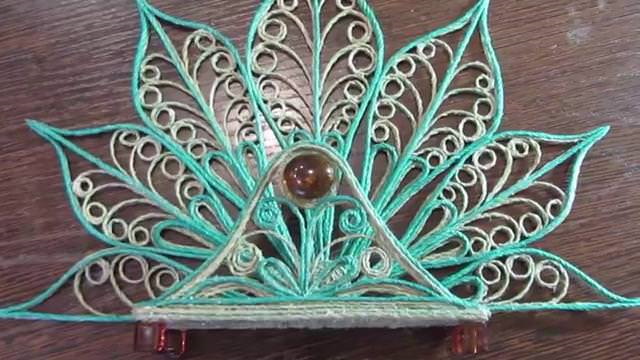
Napkin holder
A jute napkin holder can look very presentable if you use threads of different shades or colors.

Tools and materials:
- cords of different colors. You can use dark and light jute threads, this gives nobility to the product;
- Titan glue;
- scissors;
- paper, file, pen;
- toothpick;
- tweezers.
Making a napkin holder:
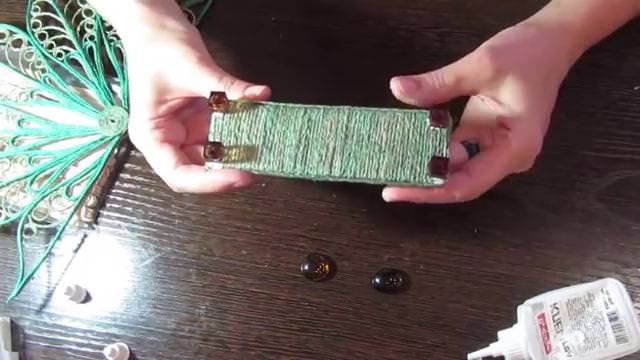
- Make the bottom. For this, use a jute tape of 3 threads. Twist 20 identical rings from it, wrapping the tape in 3 rows, 1.5 cm in diameter. Lay them out on the film in 2 rows. Let them dry a little and glue 3 rows of jute tape along the contour.
- The front and back walls of the napkin holder are created separately. They can be the same or different in pattern and size.
- The walls are also formed from a tape made of jute. Curls and snails are conveniently twisted with thin tweezers.
- Dry the elements and glue them to the base. If desired, paint with acrylic paint. Decorate the curl areas with glass or plastic rhinestones.
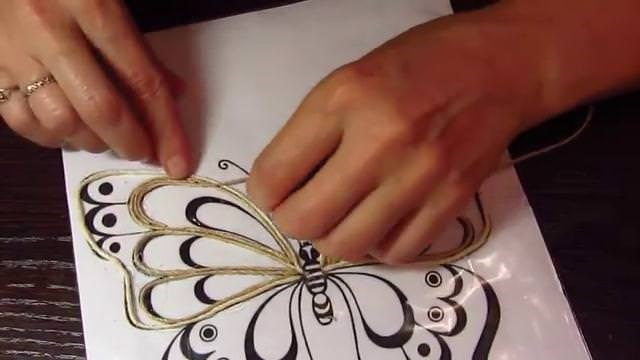
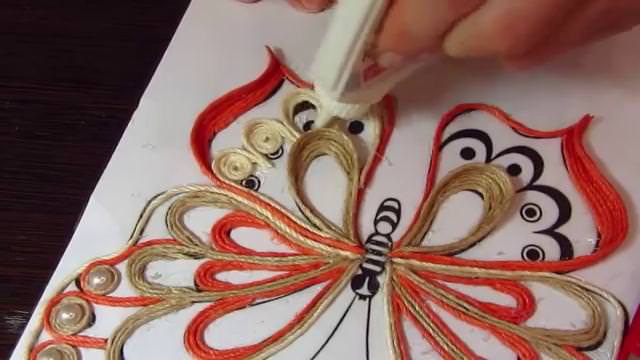
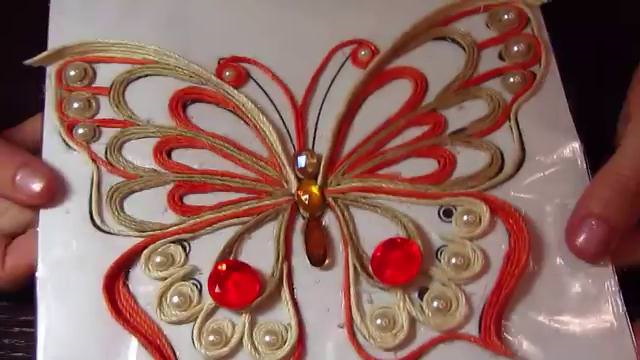
Lace butterfly
A butterfly can be used as a decoration for curtains, a panel, a dream catcher or as a hair ornament. To do this, you need to choose a suitable drawing, transfer it to paper and get to work.
Tools you will need:
- jute twine;
- glue;
- scissors;
- paper, file, pen.
Sequence of work:
- You can use colored threads to create the butterfly.
- Apply glue to the outline of the drawing and carefully work on the outline with a double layer.
- Move on to the internal elements and first of all lay out large patterns from threads of the required length.
- Fill the space with random small elements. The main thing is to maintain symmetry.
- Coat the finished product with a solution of PVA glue and place it under a press to dry for 6 hours.
- Separate the butterfly from the film.
- To use as a hair decoration, glue the butterfly to a hair clip or elastic band.
Plate
Any plate can be used as a basis for making. The plate pattern does not necessarily have to be symmetrical, so you can improvise. Any patterns you like will do. For making, you will need a standard set of tools, cling film and a plate.
Sequence of actions:
- Glue the stencil to the plate. If you do not use the stencil in your work, simply cover the surface of the plate with cling film. The pattern can be laid out both on the inside and on the outside of the plate.
- Work the edges of the product well, laying out the thread in several layers.
- It is better to start decorating the plate from the middle. Glue the curls and other elements with transparent glue and fix them well. You can use transitions of thread tones.
- Fill the entire surface of the plate with patterns and leave to dry.
- Separate the openwork plate from the base. Remove excess glue with a hot knitting needle.
- If desired, decorate the surface with beads and decorative stones.
Napkin Holder. Master Class for Beginners
It is very easy to make a filigree napkin holder. Such simple products are recommended for beginner craftswomen.
Flashlight
Jute filigree (the designs for the products can be adjusted based on the ready-made images) allows you to create even such products as a garden lantern. This is a rather complex design that requires time and patience.
To make it, you will need a wire structure covered with jute threads. The lantern consists of a base, side walls and a lid. All elements require careful development. Then the lantern will become a real work of art.
Necessary materials and tools:
- wire diameter 2 mm;
- jute cord;
- Titan glue;
- glue gun with silicone rod;
- scissors, tweezers, metal knitting needle.
Progress of work:
- For the frame, cut the following elements from wire: 4 pieces for the side ribs, 4 pieces for the top ribs, and 4 pieces for the bottom. The lantern can have different heights and widths, so a diagram with dimensions is first drawn up. For the lid, you will also need 4 pieces of the same length, they can be made slightly curved.
- Wrap all the frame elements with cord and glue them together using a glue gun.
- To decorate the walls, bottom and lid, you will need to make stencils and lay them out with a jute pattern separately. The walls can be completely covered with openwork, or you can make only a frame around the perimeter. The lid is decorated in the same way.
- Dry the finished elements well and glue them to the base with a glue gun.
- If desired, paint the lantern and decorate it. As decoration, you can use butterflies or feathers, master classes for which are given above.
Belt
Jute style will be a great addition to denim clothing.
To work you will need:
- jute of 2 colors (natural and bleached);
- belt buckle;
- Titan glue;
- scissors.
Making a belt:
- Make jute ribbons from 4 threads (2 light threads in the middle and 2 dark ones at the edges). The ribbons should not be very stiff, so do not use a lot of glue.
- Attach the ends of the ribbons to the buckle. Their number depends on the size of the buckle. Secure the joint with glue. If the length of the ribbons is not enough, they can be extended.
- Weaving is done using any of the methods used in macrame weaving.
- When the desired length is reached, cut the ribbons, bend them and secure with glue.
Frame for mirror
Any piece of mirror glass can be turned into a new thing using jute filigree. The materials required are the same: jute, stencil, glue, oilcloth and scissors.
Execution of work:
- Cover the back surface of the mirror with jute rope, starting from the middle and filling the entire space in a circle.
- Place jute cord in 3 rows along the mirror contour. Coat everything thoroughly with glue.
- Place the mirror on the oilcloth and apply glue around the circumference of the oilcloth. Lay out 4 rows of cord. Let it dry a little and lay out the same second layer of threads on the first layer.
- Separate the mirror from the film and remove excess glue.
- Glue a tape of 3 jute threads along the outer contour.
- Decorate the frame space with pearl hemispheres.
- On the oilcloth, lay out identical patterned elements using a stencil, which after drying should be attached along the contour of the mirror frame using a glue gun. You need to make such a number of elements that they completely fill the circle.
dream Catcher
Dreamcatcher is a popular decoration of modern interiors, and can also become an original gift. It is made on a round frame wrapped with threads. The diameter of the ring can be any. For work you will need a cord (you can use different colors), a stencil, a file, glue, scissors and tweezers.
To make a dreamcatcher, you can use any stencil of a round napkin as a basis. After making a pattern according to the stencil, dry the product and glue it to the ring. Glue a loop of jute ribbon to the top of the dreamcatcher. Decorate the bottom with cords with beads and feathers strung on them. Feathers can also be made from cord.
Flowers
Flowers made in the filigree style can be either an independent piece of decorative art or an element included in a composition. The technique of forming thread patterns on a stencil is used for production.
You can make each petal separately, then glue them together to make a three-dimensional flower. Or make the pattern whole, and then the decor can be used as a napkin or a hot pad.
Baskets
Baskets for sweets and fruits will decorate any interior. Any deep container can be used as a basis. For the durability of the structure, you can decorate any dishes and leave them inside without removing the jute decor.
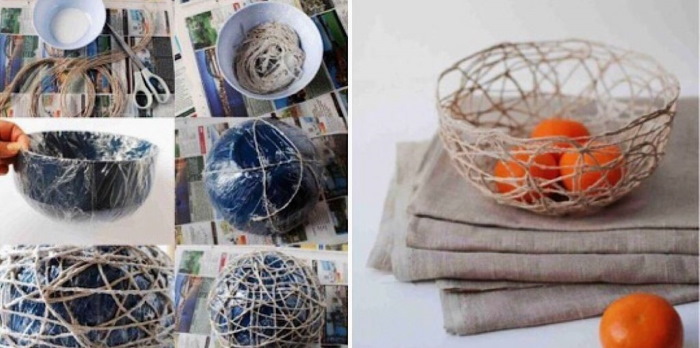
To work you will need:
- threads of different colors or the same tone;
- glue;
- stencils;
- food film;
- scissors.
Execution of work:
- Stick the stencil onto the container and wrap it in cling film.
- Make a contour of 6-8 threads along the edges of the basket.
- Start laying out the pattern with large figures, then fill the spaces with smaller curls.
- Once the design is complete, treat the product with a solution of PVA glue and dry thoroughly.
- Remove the basket from the base and separate the film. Cut off excess glue or remove it with a hot knitting needle.
- Weave a handle from jute ribbon and glue it to the base of the basket with a glue gun.
Snowflake
On the eve of the New Year holidays, you can create openwork snowflakes together with children. To do this, you need to print several stencils at once and put them in files.
When making snowflakes, you need to take care of children's hands. To ensure that the glue is easily cleaned off your fingers, lubricate your hands with regular cream. Filigree snowflakes can be decorated with glitter and hung on a Christmas tree or used to decorate the interior. To do this, you need to glue a loop to each craft.
Eiffel Tower
The jute filigree (designs for the products can be printed on a printer) of the Eiffel Tower is created in several stages and requires adherence to the schemes for each element.
How to make the Eiffel Tower:
- Form a tower frame from thick wire. Measure all elements precisely, wrap them with cord and glue them together.
- Place the decor of the side walls of the tower structure on the stencils and dry it well.
- Use glue to attach decorative elements to the frame.
Shade
Such a decorative product will fill the house with special warmth and comfort.
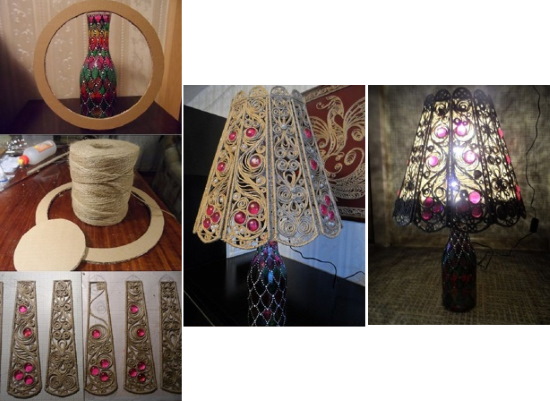
To make a lampshade for a table lamp, prepare:
- lampshade stencils;
- jute cord;
- base for the lamp;
- polyethylene film;
- PVA or Titan glue;
- scissors, ruler, metal knitting needle, tweezers.
Sequence of execution:
- For the lampshade, make a wire frame for 9 identical elements according to the stencil. There may be more or less elements, depending on the diameter of the lampshade.
- Wrap the frame with threads and glue it to the film. Start forming the internal patterns, sequentially laying them out with a cord and fixing them with glue.
- Separate the finished structures from the film and connect them together using a glue gun. Decorate the joints with jute tape.
- Attach the finished lampshade to the lamp base.
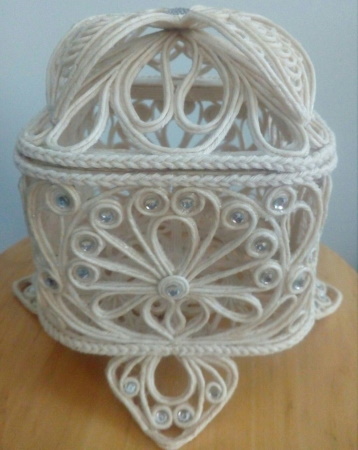
Openwork box
To make the box durable, it is better to make it from a 3-strand ribbon. Use Titan glue for the work.
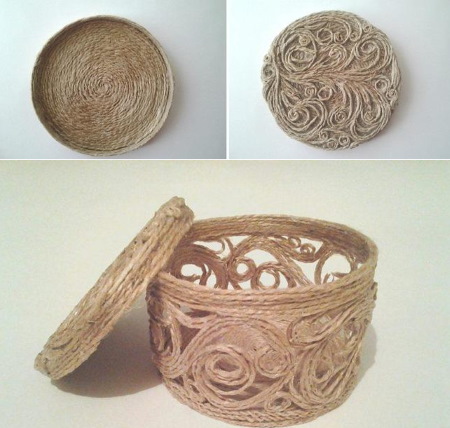
Procedure for performing work:
- For the base of the top and bottom of the box, you need to make 2 rings. For this, you can use a plastic mayonnaise bucket. Lay out the jute ribbon in 3 rows in the widest part of the bucket, let it dry and remove the ring from the base. Make 2 identical rings.
- Make curls and petals from the ribbon and arrange them symmetrically on the bottom ring.
- Glue the second ring on top.
- Make the bottom. To do this, lay out the twine on the file, starting from the center in a circle to sizes equal to the diameter of the bottom ring.
- Glue the bottom to the bottom ring of the box.
- To make a lid, you need to make a ring with a diameter smaller than the diameter of the box. To do this, take the same bucket and wind the tape in 6 rows in a narrower place.
- In the center of the lid ring, lay out a pattern of petals in several rows, gradually decreasing their size. Glue a snail to the center of the pattern and attach a handle in this place.
The technique of creating products in the style of jute filigree is easy to perform and accessible to everyone. To do this, you need to study the formation of basic elements and learn how to glue them together to create openwork patterns.
Video about jute filigree
Jute filigree - drawings, schemes:
Jute filigree turns out very beautiful if you initially bleach the tourniquet. Try it, you will not regret it! It is done very simply:
1. First, you need to pour bleach into a small container so that it completely covers the jute.
2. Next, you need to cover it completely with some kind of lid, maybe just foil. And leave it like that for 20 minutes.
3. Then rinse the jute in water, wring it out and dry it thoroughly - not in the sun. After that, roll it into a ball again.
In order for the jute to bleach evenly and have a uniform color along its entire length, the skein must be turned over in the container for at least 20 minutes. It is better to pour in bleach without dilution. It is better to cover it with film or a bag so that you can see the process and influence it. If you do not turn the jute over, the bleaching will be uneven. This option can also be used. In addition, bleached jute cord can be dyed in any color with fabric paints. Products made from unbleached cord dyed with a strong solution of potassium permanganate look good - again, if you need an uneven color, leave the skein in the solution without turning it over for 20 minutes, but if you need a uniform color, turn the cord over every 3-5 minutes. After bleaching and dyeing, the cord is rinsed and dried, wound into balls.