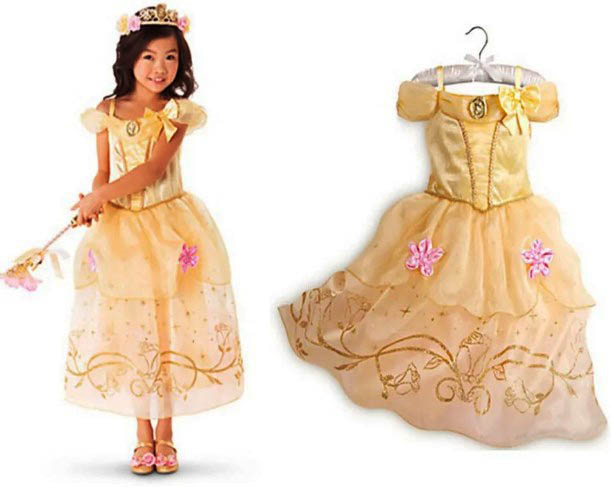
Belle's dress from Beauty and the Beast - New Year's costume, allowing the girl to try on the image of a Disney princess.
Made from golden yellow satin or organza, the fluffy dress with petticoat is decorated with crystals and artificial flowers, and is complemented by a high hairstyle decorated with a satin ribbon, satin gloves and a rose, instantly transforming the little girl into a real Disney princess.
Original dress
Belle's dress from Beauty and the Beast is a legendary outfit that became famous after the release of the Disney cartoon in 1991, where the kindness and beauty of the girl, twirling in a magical waltz with the Beast, helped break the spell and save the lives of the inhabitants of the enchanted castle.
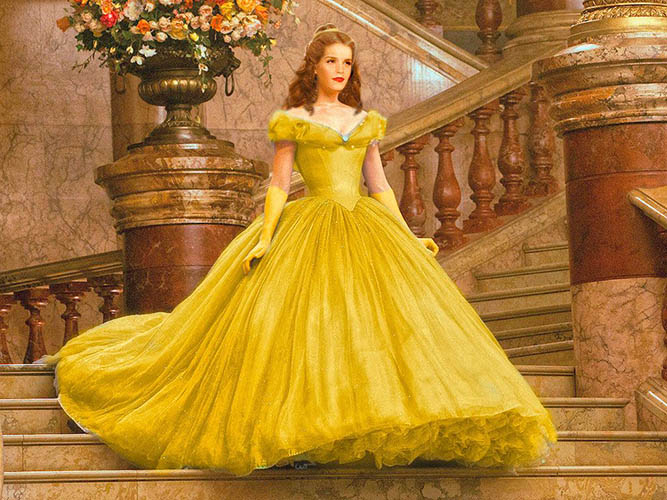
In 2016, the lush golden dress received its real embodiment in the film adaptation of the fairy tale thanks to the work of Oscar winner Jacqueline Durran. In a video dedicated to the work on the fairy tale, the designer spoke about the difficult task of bringing to life the cartoon version of the dress, made in the style of 18th century outfits.
The dress featured in the film was made from multi-layered golden yellow satin organza and required the use of over 900 m of gold-plated thread.
The top two layers of the dress are decorated with a gold leaf pattern that exactly replicates the floor of the ballroom in the Beast's rococo castle, where Beauty and the enchanted prince danced their first waltz, which became the climax of the film.
The decor for the girl's dress was not chosen by chance, since according to the plot of the fairy tale, Madame de Garderobe used gold leaf that fell from the ceiling of her bedroom to decorate the Beauty's outfit. In addition to gold leaf, the beauty's dress is decorated with Swarovski crystals, in the amount of 2160 pieces.
Emma Watson, who played Belle, took part in the creation of the dress. It was she who suggested the style of the dress to the designer and selected the fabric for its sewing.
Compared to the original 18th-century outfit, Belle's outfit does not include a corset. This detail was excluded by the film's designer, Jacqueline Durran, because, according to her, it could hinder Emma Watson's ability to move and dance freely.
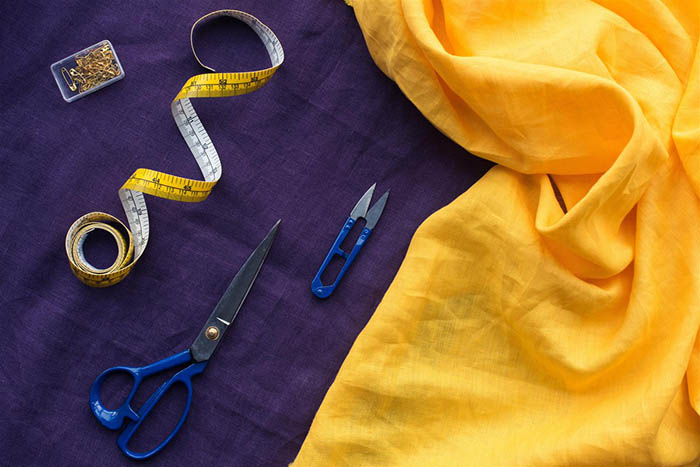
Necessary tools
Belle's dress from "Beauty and the Beast" can be bought, rented or made at home from golden satin or organza. A mandatory condition in this case will be the use of lace, various decorations, a fluffy skirt, a hair ribbon or a crown, allowing the little girl to feel like a real princess.
Princess Belle's dress consists of three parts:
- 8-piece skirts;
- corset;
- chiffon scarf used to create sleeves;
- crinoline, which gives the dress volume.
Materials needed to make the dress:
| Part of the outfit | What is needed |
| Skirt | The main fabric can be silk, organza, crepe satin or satin in a rich yellow color, 1.6 m long and 1.5 m wide. |
| Petticoat | The net is 1.5 m long and wide. |
| Sleeves | Transparent or yellow chiffon with lurex, 0.45 m long and 1.5-2 m wide. |
| Corset |
|
| Crinoline |
|
| Supporting materials |
|
| Materials for dress decoration |
|
Complement the princess's image:
- gloves made of golden satin or crepe satin;
- a high hairstyle (chignon), decorated with a satin ribbon to match the dress;
- artificial red rose on a long stem.
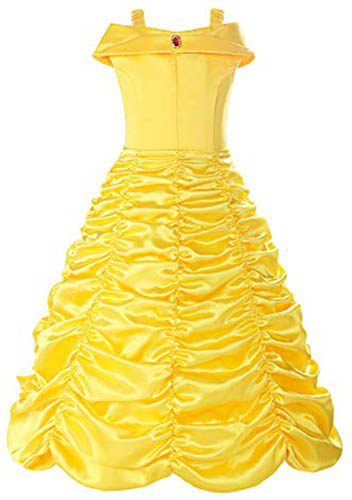
For a girl of 6-7 years old without crinoline
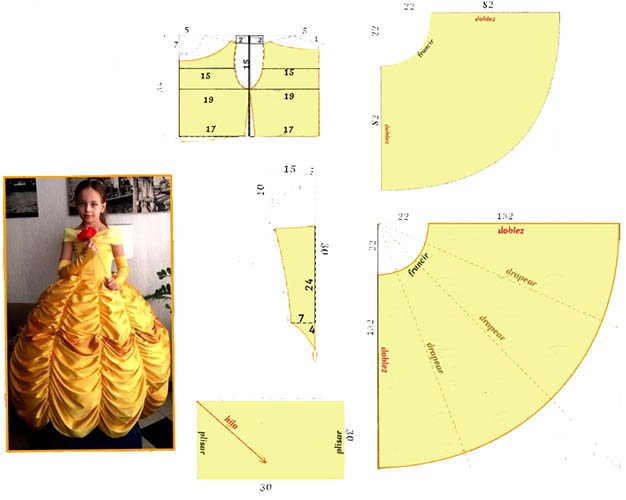
Belle's dress from "Beauty and the Beast" is made using patterns posted on the Internet. The layout contained there must first be transferred to cardboard, taking into account the child's height, and then used as a template when cutting out the outfit.
Making the dress:
- From silk, crepe satin, organza or satin fabric, you need to cut out 6 identical skirt wedges.
- The resulting pieces of fabric need to be ironed, and then the skirt parts need to be pulled together with a thread into a small gathering and stitched. This creates a drapery that repeats the decor on the Disney heroine's outfit.
- To prevent fabric from fraying, all seams on the product should be overlocked.
- The bottom of the skirt needs to be hemmed with ribbing.
- To make a petticoat, the pattern used should first be transferred to the mesh, cut out the parts of the product along the outline, baste and stitch them. There is no need to create a gather on the petticoat.
- At the bottom of the petticoat, you need to make a hem to insert regilin, which allows the product to keep the necessary shape and gives the dress the required splendor. Regilin can be replaced with a strip of plastic corner used when laying tiles.
- The bodice of the outfit can be made from any top (or T-shirt) that matches the color of the rest of the outfit. Make a V-shaped cutout on the front of the top and stitch it carefully. To create a dress, attach the selected bodice to the skirt and petticoat, carefully baste and stitch on the machine.
- The finished dress should be decorated with artificial flowers and roses made from yellow nylon.
- The artificial flowers chosen for decoration should be removed from the stems, all heavy parts should be removed from them and glued to the skirt in a random order using a hot glue gun.
- To add some sparkle to Belle's dress, use decorations made from gold New Year's napkins. To decorate the costume, cut them into pieces and then glue them to the artificial flowers with a glue gun.
- The top of the dress is made of chiffon, measuring 40 x 105 cm.
- The scarf, made of chiffon, should fit loosely around the "princess's" shoulders and fall onto the chest. Its ends should be draped over the chest and shoulders, creating the effect of puff sleeves. The scarf should be attached to the dress where the straps join the top.
- The top of the princess's outfit should be decorated with flowers.
- The outfit is completed with a hairstyle decorated with a gold satin ribbon and roses.
For girls 7-10 years old with crinoline
Belle's dress from "Beauty and the Beast" for girls aged 8-10 is made of organza or crepe satin, with the addition of matte chiffon to decorate the skirt.
The princess's skirt is held up by a crinoline, and a petticoat decorated with frills is worn over it. The corset is duplicated by a rigid regilin, and behind it there is lacing.
Manufacturing process
- To make a skirt from golden crepe satin or organza, 8 wedges are prepared, each of which should be increased in comparison with the pattern by 2.5 times in length and 1.5 times in width (depending on the height of the girl). The final length of the finished product varies depending on the size of the child.
- The resulting wedges should be gathered with thread, and then joined together, finishing the seams with an overlock.
The fullness of the skirt is provided by the crinoline, which is made using:
- On a sheet of graph paper, you need to make a pattern, taking into account the height of the girl (AC). The DC value here corresponds to 5 cm, left for the skirt to be gathered, preventing it from possibly touching the floor.
- Having drawn a skirt of the required length, a line (FD) should be drawn on the diagram, representing the full length of the lower skirt. If you want to make its lower part shorter than the upper one, the length of the latter should be slightly reduced (when creating line BD).
- The ED segment measures a distance of 5 cm, which is necessary to hide the regilin (the hoop that fixes the crinoline) and to prevent it from showing through the fabric of the dress.
- In the BG segment, the G value will correspond to the beginning of the skirt expansion, and the length of the segment itself will vary depending on the dress model.
- Part GE is divided into 4 equal parts (according to the number of crinoline hoops). Starting from the movement of these points, horizontal lines should be drawn corresponding to the size of each hoop. Calculate their value according to the formula: L = 2 * 3.14 * R, where:
- L will correspond to the length of the hoop;
- * — multiplication sign;
- R – equal to the radius of the hoop.
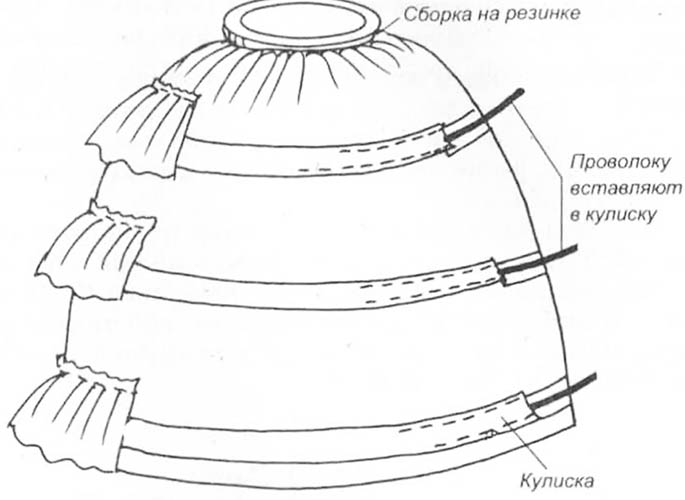
This diagram allows you to obtain the required length of the crinoline hoops, which are accurately reflected in the product drawing.
When sewing a crinoline:
- It is necessary to measure the length of the skirt between the hoops, and then cut them out by cutting 4 strips from the fabric taken for the lining (the width of each should be about 20 cm), and the length should correspond to the size of the hoops (taking into account the seam allowance).
- Having measured the segment KG, it must be substituted into the formula, and then cut out from the main fabric a rectangle with a width corresponding to the value of BG and the length obtained according to the formula (adding the distance for the seams), necessary to insert the elastic.
- The resulting elements of the product must be sewn together, gathering the strip at the top of the skirt.
- You need to insert an elastic band into the waistband and sew on 2 ties.
- At the bottom of each strip, you should sew fabric for inserting hoops (allowances), and then place pieces of regilin in them.
- The rigid mesh should be cut into strips, adding 5 cm to their width. Thus, the fabric sewn over each strip will cover the hoop.
- The length of the mesh should be extended to be 3-4 times longer than the strip, and then, having gathered the mesh to 1 m, it should be attached to the strip.
The top of the dress is made in the form of a corset, decorated with a chiffon scarf that serves as sleeves.
- The pattern of the outfit element can be made from any children's dress with cut sides. Having ripped it, it is necessary to redraw the upper part as a template, having previously ripped the neck and widened the lower part. Using the resulting pattern, it is necessary to make 3 parts of the product:
- from the main fabric (satin or crepe satin) for the front part;
- from calico - for lining;
- made of linen - to create a lining.
- The main fabric for the corset must first be basted and then sewn on the machine, having previously marked the upper and lower parts in the pattern. Before starting sewing, you need to put a paper lining (tracing paper) under the joints.
- In a similar way, you need to sew the lining with the interlining, having first connected them to each other.
- Using threads that match the tone of the face material, stitch the edge of the main corset at 3 cm, and then, having measured out the required amount of regilin, insert it into the corset so that the ends of the material do not reach the side of the product by 1.5-2 cm. This is done so that the finished corset can be easily turned inside out.
- The ends of the rigid synthetic tape should be treated with a soldering iron and wrapped with adhesive tape so that the sharp part of the material does not tear the fabric.
- The prepared regilin should be attached to the lining, and then the corset should be turned over and the seams smoothed out.
- A rigid synthetic band is sewn strictly away from you so that when applied to the body it bends in an arc. The bones in the corset are sewn strictly to the waist line. Otherwise, when bending over, the corset will begin to press on the child's stomach.
- The lining seams should be stitched along the front side, moving along the edge of 3 mm. The previously sewn rigid material should be hemmed again and part of the lining should be cut out, making the seam thinner. All right angles in the corset should also be trimmed.
- When joining the face fabric with the lining, they should be placed on top of each other and basted, leaving an opening for turning the lining inside out. The sewn parts should be adjusted to size, and excess fabric should be cut off.
- The product must be stitched completely, and the remaining part should be glued with tape to prevent stretching. The same action should be done in the side parts of the corset where the lacing is supposed to be inserted.
- To make sewing the hole more convenient, it should first be fixed with adhesive webbing and then sewn with monofilament.
- To install eyelets, you need to take the block itself and measure the size and location of the future hole. Use a hole puncher to punch holes in the selected places and install the eyelets.
- After setting the eyelets (blocks), you need to sew the part of the corset visible due to the lacing. To make it, it is recommended to cut a template out of thick cardboard in a rectangular shape so that it fits the main parts of the corset, and then transfer it to the fabric, sew the product, leaving an opening for turning.
- The finished piece needs to be ironed and then sewn to the main part of the corset.
- The lacing must be inserted into the punched eyelets.
- Transparent or yellow straps need to be sewn to the top of the corset, placing them on the sides of the product.
- The finished corset should first be basted and then sewn to the skirt of the dress.
- To make the sleeves, you need to cut a scarf out of chiffon in the shape of a rectangle.
- Its ends need to be draped on the chest and shoulders, creating the effect of puff sleeves. The scarf is attached to the dress where the straps are attached to the top.
- The finished dress can be decorated with gold stars, which can be attached to the skirt or bodice using hot glue.
You can complement Belle's outfit with yellow gloves made of crepe satin or satin and an artificial red rose.
Belle is one of the most beloved cartoon characters, a Disney princess who managed to fall in love with the seemingly “terrible” Beast.
The yellow ball gown of the Beauty, made of yellow crepe satin, organza or satin, complemented by chiffon and various decorations will give the little princess many magical minutes, allowing her to become the most beautiful girl at the New Year's party.
Video about sewing Belle dress
Master class on sewing a Belle dress for a girl: