A bow on a dress is considered not only a beautiful decoration, but also a stylish element that allows you to disguise some figure flaws. This detail can be placed on the back, neck or belt. When choosing a location, you also need to know how to tie a bow yourself so that it looks especially beautiful and original.
Where to place a bow on a dress
It is acceptable to tie a bow on a dress beautifully in the form of vertical knots or decorate the lower edge of the garment with small details made of satin material. In this case, such an element is allowed to be placed in the front, back or side. Flowers made of textiles for decorating clothes must be placed on one side of the dress or symmetrically.
A bow on clothing can be positioned like this:
| Place | Peculiarities |
| Frontal | If the figure is slim, a belt with a bow can be tied in front. However, a detail placed strictly in the center does not always look good on clothes. In this case, it is recommended to shift it slightly to the right or left. Thanks to slight asymmetry, the image will become more interesting, regardless of the style and figure. A simple bow, which must be fixed in the front, is suitable for decorating a wrap-over dress and a robe-like dress. It is also acceptable to use a half bow or a butterfly. Such details are easy to create from glossy smooth material. |
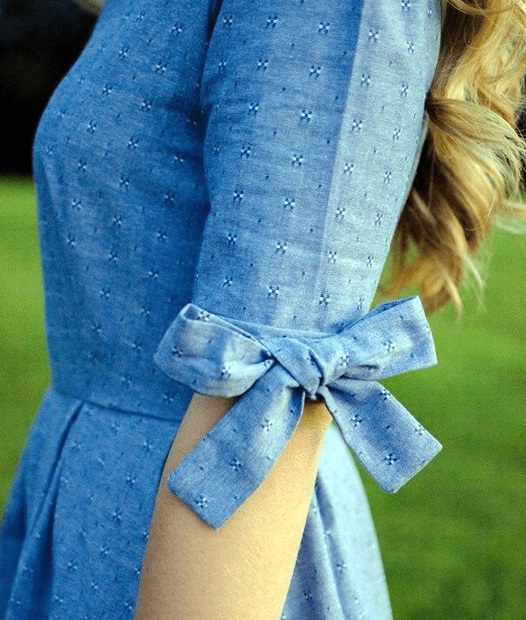
| From the side | Bows placed on the side are more popular than frontal ones. The knot does not need to be fixed strictly on the side, this detail should be slightly in front. At the same time, a belt with a bow, which is located on the side, is combined with a dress, coat, cardigan and raincoat. Side decorative details due to asymmetric placement will allow you to disguise figure flaws, visually balancing the proportions. Most dresses come with textile belts of different lengths. Due to this, it is easy to design a bow on the side of the clothes. |
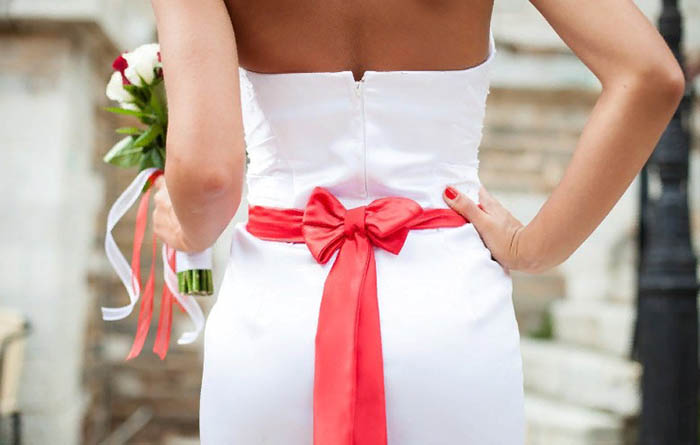
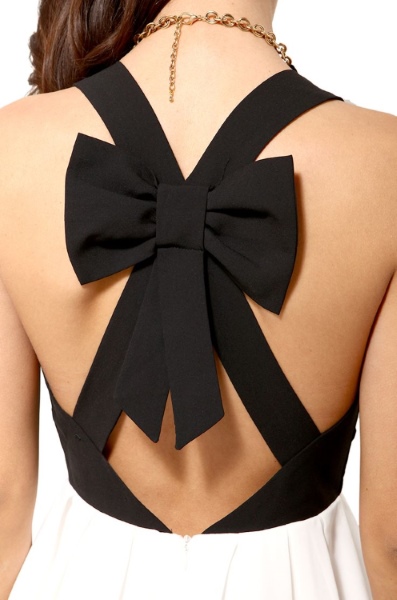
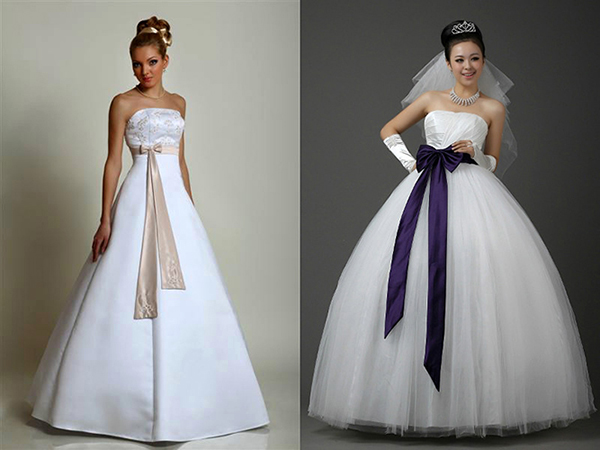
| Behind | On wedding and evening dresses, it is desirable to place a bow at the back. Thanks to the textile belt, which is sewn into the seams on the sides, it is permissible to tighten the waistline, giving the outlines of the figure grace, and the clothes visual splendor. The edges of the bow will fall, disguising themselves in the folds of the clothes. However, it is problematic to make a bow at the back yourself, because it is difficult to reach the back, as a result, the petals of the detail will be slightly slanted. In this case, the arms must be held parallel to the floor so that the loops are parallel and symmetrical. In this case, it is recommended to tie the detail with a double loop. Thanks to this, the bow will not come untied during active movements or while dancing. In this case, the petals must be pulled 2 times. |
Types of bows
Any type of bow can be used to tie a dress. Ribbons with lace and leather are in great demand. Such materials allow you to create a beautiful decorative element that will decorate both everyday and festive clothes.
Types of bows:
- Made of leather. To make the image unusual, it is acceptable to tie a leather bow on the dress. Such material can be easily tied at the waist, and the leather belt will contrast with the clothes.
- Made of lace. It is easy to create bows from such material. The material can have large and small patterns. But often, fabric with small openwork is used to design a decorative element, because it does not add much volume. If a bow made of small lace will not be noticeable on clothes due to its location, it is advisable to use a material with a large pattern. Milky-colored fabric is often chosen.
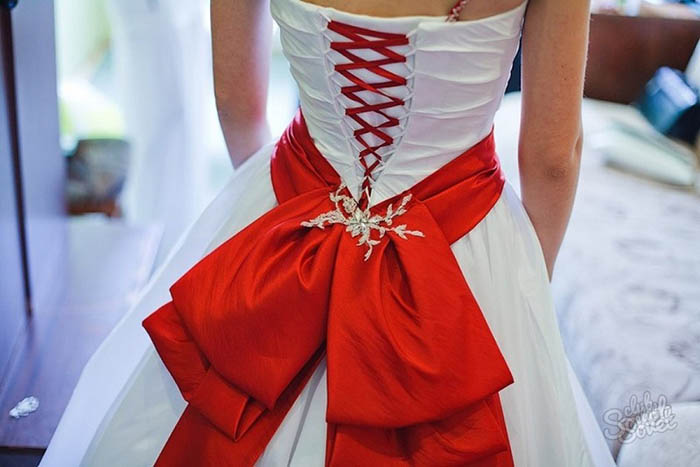
- From the tape. This material is considered universal because there are many options for making a satin bow. Thanks to the wide and smooth material, you can easily decide on the shape of the future detail, which can be voluminous or narrow. Ribbon fabric can have extended or regular edges, and also be long and narrow. It is recommended to fix an accessory made of narrow material at the waist in front, and a voluminous one at the back. Wedding dresses with an open back and a bow at the back look spectacular. In this case, you can choose any shade of ribbon. However, red material is in great demand.
- From a scarf or shawl. If you don't want to decorate your wedding dress with red ribbon material, you can use a scarf or shawl. Thanks to such materials, the bow will be voluminous and airy. When choosing a material, it is recommended to avoid those with colored inserts and a large number of patterns.
How to tie a bow on a dress at the waist
There are many options for tying a bow on a dress, and you can change the location of the detail on the clothes, for example, on the waist, back, neck. It is recommended to master the technique in advance, using step-by-step instructions. Due to this, the process of creating the decoration will be faster and easier.
In order not to be disappointed in the end result, it is necessary to prepare the necessary material in advance. When choosing a textile belt or ribbon, the material should be ironed well. Thanks to this, the fabric will retain its shape, which will add volume to the knitted detail. In other options, corrugated with bouclé, fleecy and crinkled materials are suitable.
It is permissible to create buds with butterflies and flowers on the basis of such fabrics. However, such materials are often used as decorative trim and in rare cases to create a belt.
If you need to make a simple bow, the material should be dense. Thanks to the stiff fabric, large loops will hold their shape. When using a loose material, it is recommended to make the loops small to maintain the shape.
To draw attention away from the stomach and waist area, you need to take a wide belt in the same tone as the item or a darker color. When using a long belt detail, it is acceptable to wrap the waist several times. The stomach area can be hidden under a large bow.
To highlight the waist, it is necessary to give preference to narrow or medium-thickness material, which should match the tone of the clothes or be of a darker color.
The option of tying a bow in the front is not suitable for everyone, because this placement of the detail looks appropriate on slender girls who have a narrow waist and a flat stomach area.
However, this method does not go with every item. In this regard, it is necessary to place the detail on the left or right. Thanks to slight asymmetry, the image will become more interesting regardless of the figure.
If there is no help from the side to make a bow at the back, it is recommended to start making the part from the side or from the front, without tightening the knot too much. Upon completion of the work, it is permissible to twist the bow to place it at the back. When twisting, the actions should be careful, while holding the belt.
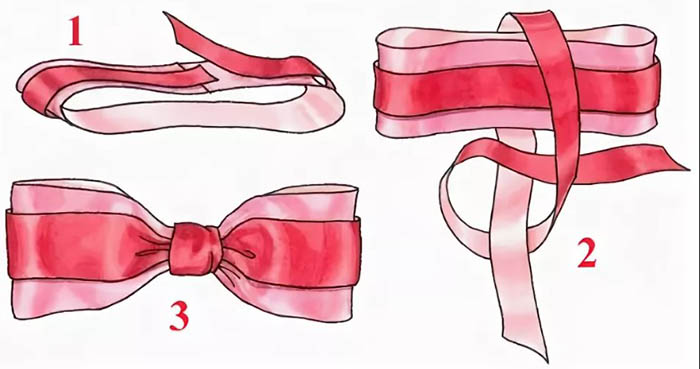
Traditional version
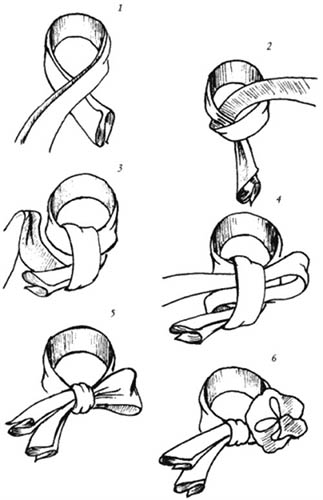
The traditional method of creating a bow on a dress is simple to perform, so children can handle it. To give the image a casual and natural look, it is recommended to make the ends of the bow uneven in size.

Step by step description:
- Place the belt on the waist or other area where you want to create a bow.
- Twist 2 ends of the material to create a single knot.
- Make 2 loops from each end.
- Place one loop over the second.
- Pass the top edge of the loop through the bottom one to tighten the piece.
- Straighten the finished accessory, adjusting the loops to size.
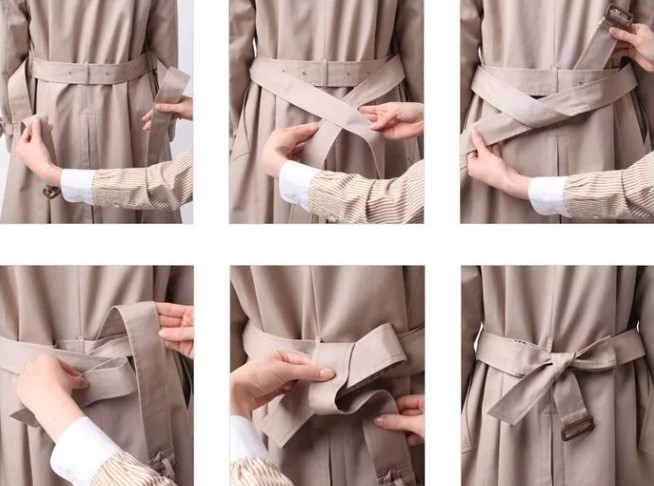
Simple half bow
To create a laconic and discreet image, it is recommended to make a simple half bow.
Operating algorithm:
- To tie the belt, one end of the material should be slightly shorter than the other.
- Wrap the long end around the short end to form a loop.
- Pull the loop through the hole formed when wrapping the shortened edge of the belt.
- When placing the loop on the required area, adjust the edge of the material to the length.
If the material is denser, it is recommended to use a different bow design:
- Pass the extended edge under the belt and pull it over the top.
- Make 1 turn around the waist.
- Thread the end of the material through the formed loop.
- At the end of the work, tighten the knot.
Bow from a strap
If the dress does not have a belt, a simple leather belt can be used to highlight the waist and create a bow. The material should be thick, moderately wide, and match the dress and image.
Step-by-step instructions for making a loop knot:
- Place the belt at waist level and make one turn in a circle.
- Pull the belt through the buckle and pass the edge under the belt.
- Pull it through the belt loop on the other side.
To make a half-bow from a belt you will need:
- Place the belt around the waist area, wrapping it around once.
- Thread the belt through the buckle.
- Pass the edge of the material under the belt and make 1 turn.
- Pull the edge through the formed hole.
To create a figure eight bow you will need:
- The edge of the material from the buckle is initially passed under the belt. The movement should be from the bottom up.
- Do the same steps, passing the end over the belt from top to bottom.
- Pass the end of the belt under the belt at the waist again, forming a figure eight. The movement should be from bottom to top.
- To secure, pull the edge of the belt through the formed knot.
Satin ribbon bow
It is possible to tie a beautiful bow on a dress using satin ribbon, which can be purchased at almost any store specializing in the sale of materials for handicrafts. However, such material is not suitable for bows, in which the loops must retain their shape.
Often, satin material is used to create a decorative accessory that falls in waves. It is recommended to carefully burn the ends of the material with a match to prevent the edges from fraying.
It is easy to create a simple bow on the belt by making a knot, forming 2 loops and crossing them over each other. After that, one of the loops must be passed through the created hole to tighten the tape.
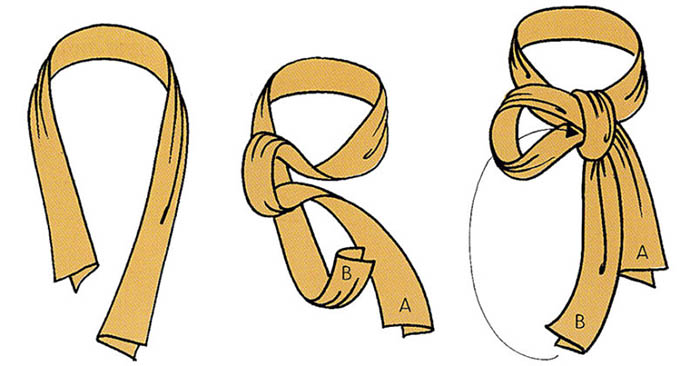
Another way to create a beautiful bow from satin ribbon stands out:
- Form a knot.
- To create a loop, use the other end of the material to wrap around and pull through the knot.
- To complete the decoration, tighten the satin ribbon.
To make the bow stronger and prevent it from curling, it is recommended to first make a pioneer knot, and then proceed to making a classic bow.
Two-color bow
To create a voluminous and two-color bow on a dress, you need to prepare glue, scissors and 2 ribbons that differ from each other in size and shade.
Step by step description:
- Measure the required length of material and cut it.
- When gluing the wide edges of the tape, form an oval or circle.
- Do the same with the narrow ribbon and secure it to the wide tape.
- Using a piece of thin tape, tie the center of the accessory.
The resulting bow can be fixed on a satin ribbon, and then tied around the dress with the created belt.
Wide bow
To decorate lush bows, you need to use wide and loose material. Such details are suitable for decorating festive clothes. In this case, it is recommended to use nylon ribbon, tulle or chiffon, because such fabrics go well with dresses.
In this case, it is permissible to use any technique for decorating a bow. To make the decorative detail lush and elegant, you can make a simple knot. When using ribbons of several shades, it is permissible to create beautiful accessories that will complement the festive look.
Work scheme:
- Making 2 or 4 loops, tie several wide bows from satin ribbons.
- Place the pieces in a stack and secure with a stitch at the waist. It is acceptable to use a French pin or a brooch.
- The fixation area can be masked with a false knot.
Complex bows
For unusual decoration of the dress, there are more complex techniques for creating bows. In this case, you can make a flower, a wedding or a multi-layered decorative element.
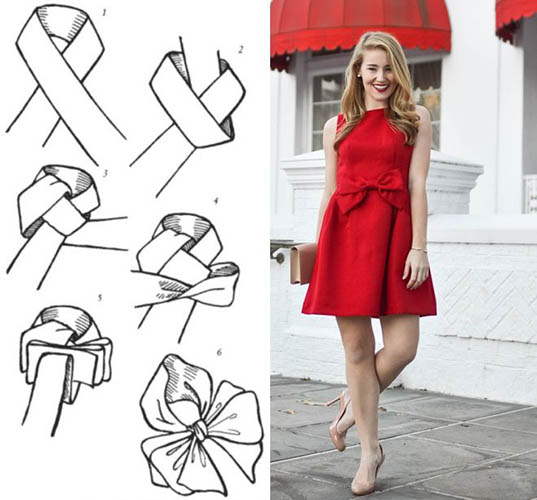
Bow-flower
It is acceptable to tie a bow on a dress beautifully in the form of a flower. This detail will be multi-layered, so it is a good accessory from a belt.
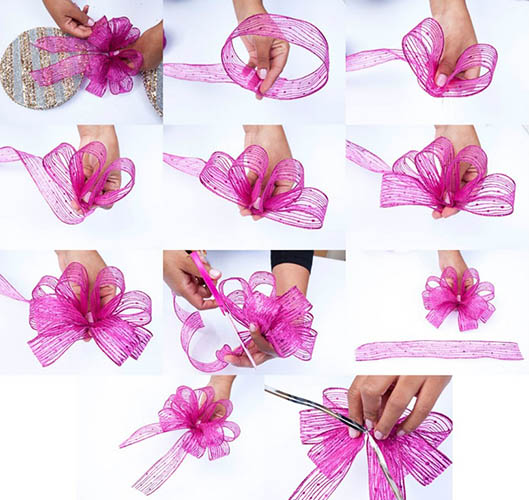
Step by step instructions:
- Fold the ribbon material several times, taking into account the length of the petals. The volume of the flower will depend on the number of layers. In this regard, it is recommended to use a long ribbon.
- Secure the pieces in the center with a stitch.
- Turn the resulting layers inside out.
- Pull out the decorated petals in different directions.
With one loop
It is acceptable to tie a bow on a dress beautifully with one loop. Any type of material can be used for this method. However, satin ribbon is ideal because it adds aesthetics and elegance to the detail. Thanks to the shiny material and simple knot, the image will be completely finished and feminine.
Method of creation:
- Form 2 knots using the traditional pattern.
- Wrap 2 knots around each other and pull through to the center of the loop.
- Pass the knots from the outer halves completely through the loop.
Multilayered
To decorate a multi-layer bow, it is recommended to use satin material. Upon completion of the work, the detail turns out to be voluminous, therefore, it is not recommended to fix additional decorations on the clothes.
Design option:
- Prepare a long ribbon material. Make several knots from the material.
- Place the blanks in a stack and secure with a pin.
- Turn the loops the other way and secure them to the belt.
- The number of layers should not exceed 7.
Wedding
To decorate a wedding dress, it is necessary to select high-quality material that will match the shade of the clothing.
Often preference is given to shades:
- beige;
- blue;
- red;
- dairy.
The part needs to be fixed not in the center, but on the side.
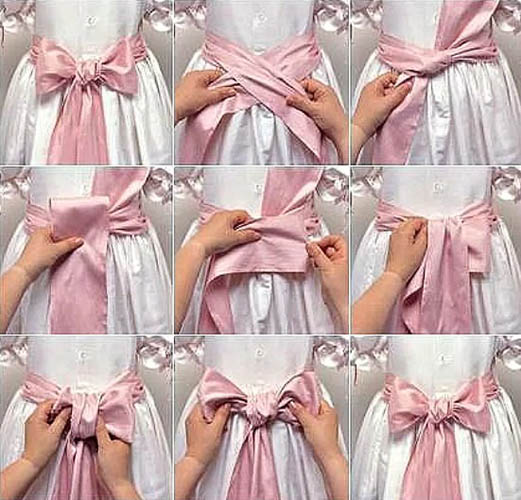
Step by step description:
- Tie a wide ribbon around the waist and pull the edges back.
- Cross the ends and bring them to the side.
- Make a single knot and create a loop from the top edge of the ribbon.
- Wrap the other end around the loop, pulling it through and out.
- Smooth out the central part.
It is acceptable to decorate a wedding dress with a pleated bow. In this case, it is recommended to use a long ribbon.
Method of registration:
- Wrap the belt around your waist and fold it into 4 folds on top.
- Bring the right end up and wrap it.
- Fold the edge down and pass it under the end that hangs down.
- At the end of the work, tie a knot.
The listed variations will allow you to emphasize the image and go beyond the ordinary. At the same time, a tied bow on a dress can be decorated with a brooch with rhinestones or crystals. A beautiful detail complements any style, adding zest.
However, to do this, you need to know how to properly design a bow so that you can add elegance to your clothes for any important event.
Video about tying a bow on a dress
How to tie a beautiful bow: