The tulip is a beautiful flower whose history begins in ancient Persia. The plant was grown in the gardens of Baghdad, and the people composed numerous legends about the origin of tulips. The flower was celebrated in the Arabian fairy tale "1000 and One Nights".
Tulips can be drawn with paints or a pencil - regardless of the method of drawing the flower, you can convey its individuality and beauty, sung about in fairy tales and legends. This made the plant one of the symbols of the East.
Pencils, paper and tools
Drawing a tulip with a pencil is quite simple.
Beginners will need a minimum set of tools:
- a simple pencil (preferably with a soft and hard lead);
- eraser;
- a sheet of white paper;
- sharpener.
You can simplify the process by using rulers or a compass.
Simple drawing
To draw a simple tulip, it is enough to have basic skills and the ability to use geometric paintings.
It is quite difficult to achieve “naturalness” in such a drawing, since the process of detailing is much deeper and more interesting, but it is suitable for quickly drawing flowers with a child or using such a tulip in combination with other flowers.
Step by step process of execution
Algorithm for performing work:
- On a clean sheet of paper, draw 2 triangles. The lines of the figures should intersect. The right triangle should be slightly higher and larger than the neighboring one.
- From the right, large triangle, form a tulip bud. Its outline resembles a large drop, the lower part of which is slightly straightened.
- From the left triangle, form a small leaf, slightly curved towards the main bud. At the bottom, draw a stem that connects the bud and the leaf.
- Form 2 petals. Draw 1 curved line inside the bud, and the other one along its perimeter. It is recommended to draw all the outlines with a pencil with a soft lead.
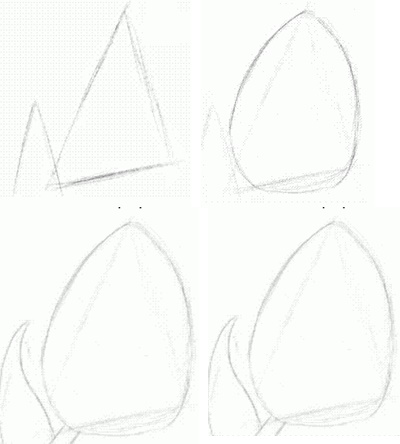
- Erase all auxiliary lines of the triangles using an eraser.
- Using a pencil with a hard lead, mark the lines of the leaf more clearly. Then also duplicate the borders of the upper petal.
- Duplicate the lines of the bud and stem to get an image similar to the one shown in the picture.
- Shade the upper petal with long lines, the intensity of which decreases towards the right edge of the figure. The shading lines should be slightly inclined to form the texture of the flower.
- Also shade the main part of the bud with vertical lines.
- Using a pencil with a hard lead, duplicate the lines of the upper petal.
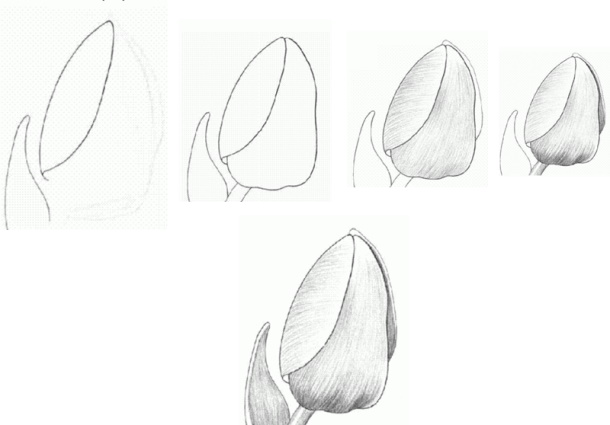
- Add a shadow at the bottom of the bud using more active shading. Also shade the upper petal with darker lines – as shown in the picture.
- Shade the stem area.
- Also shade the leaf using lines of medium color intensity, leaving an unshaded edge.
If desired, you can color the drawing with colored pencils or paints.
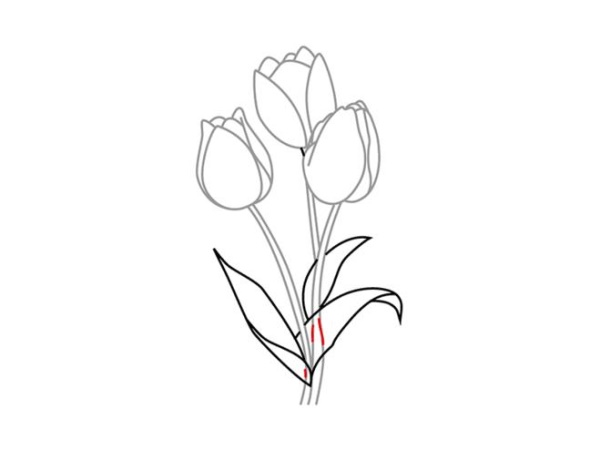
A small bouquet
Tulip (pencil drawing for beginners) can be drawn as a small bouquet of 3 flowers. This version of the drawing is suitable for depicting flowers in the "background".
To draw tulips in this version, no "extra" figures are used, which will have to be erased later. All drawn elements participate in the further drawing of the image.
Step by step process of execution
Algorithm for performing work:
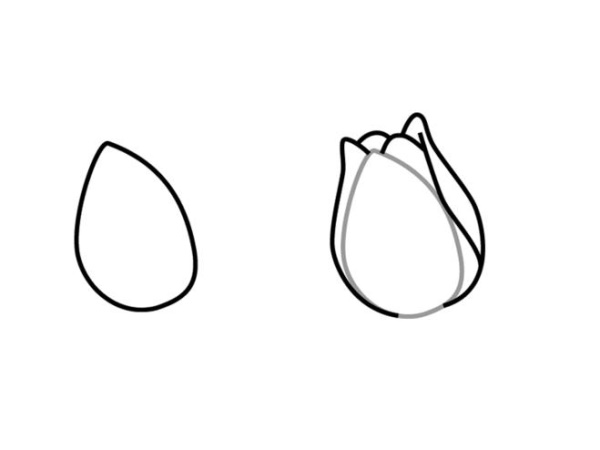
- On a clean sheet of paper, draw the main petal of the tulip, shaped like a drop. Its outlines should be uneven, slightly curved - as shown in the picture.
- Based on the drawn bud, add the side petals. To draw their tips, you can use zigzag lines, and for the walls - curved lines connecting to the base at the bottom.
- Using a similar pattern but changing the direction, draw the second bud. It can be placed on the right side of the previously drawn one. When changing the direction, the location and appearance of the unopened tulip petals changes.

In this situation, you can choose the bends of the petal yourself, or rely on the provided image.
- To draw the last tulip, you will need to draw 2 semi-ovals with sharp corners located close to each other.
- Connect the two figures with several zigzag lines.
- Draw thin stems of tulips. Add curved leaves with sharp tips. Erase pencil in marked places.
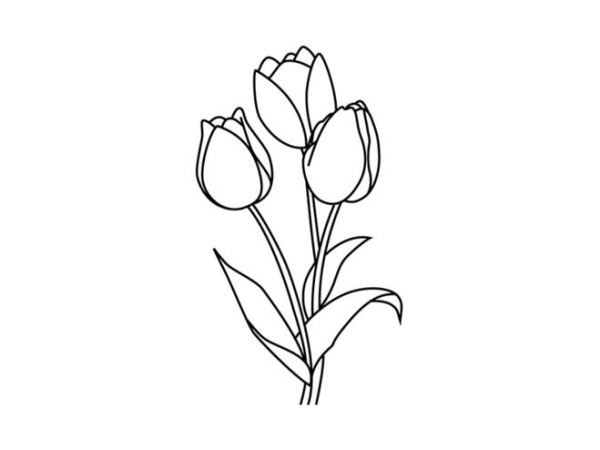
The resulting image can be colored or shaded.
Without using additional figures
Tulip (pencil drawing for beginners without using additional devices and unnecessary elements) can be drawn very simply. The drawing does not turn out to be very detailed, but it has the basic elements of a flower and conveys the overall picture.
Step by step process of execution
Step-by-step process of completing the work:
| Stage | Description of the stage | Image |
| 1 | On a clean sheet of paper, visually measure the middle and draw a parabola. The line should be deep and symmetrical. It is recommended to select the size of the figure depending on the required size of the bud. The parabola forms the outlines of the future tulip. | 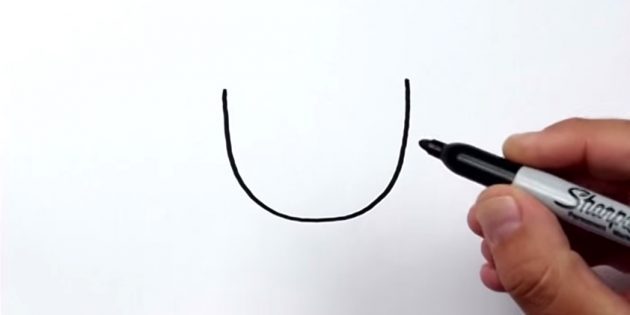 |
| 2 | Add the curves of the bud at the top of the previously drawn image. The lines form the unopened petals of the tulip. |  |
| 3 | Connect the upper border of the bud and the middle of the lower edge with a diagonal curved line. Also connect the opposite edge of the bud to the middle with the previously drawn line. A triangle without an upper border should be formed between the diagonal lines. |  |
| 4 | Between the previously drawn lines, draw a semi-oval, forming the base of the bud. Inside, add the seed receptacle and draw the upper edge of the back petal. | 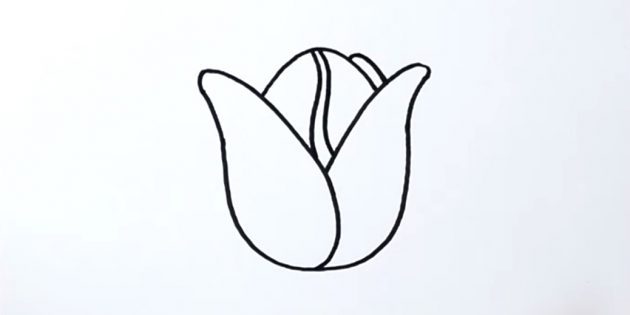 |
| 5 | Draw a thick, rectangular stem with a small rounded lower end. Add leaves that resemble an oval with pointed ends. The tulip leaves should be located at the bottom of the stem, symmetrically to each other. | 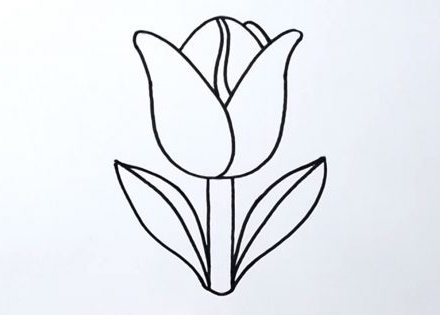 |
The resulting image can be colored or shaded, as desired.
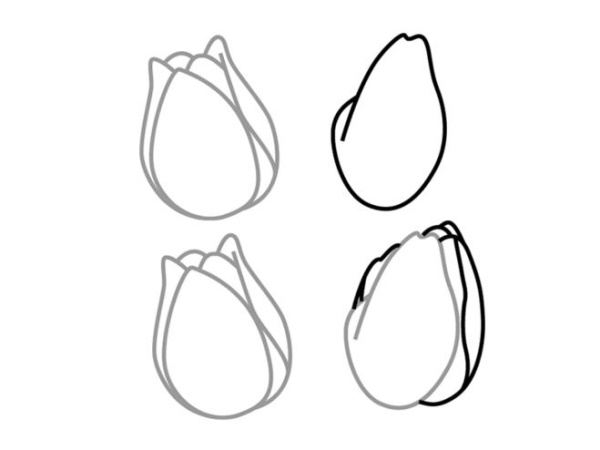
Simple Tulip Using Ovals
Tulip (pencil drawing using geometric shapes) can be drawn using additional tools. For this, you will need rulers and oval objects of suitable size for drawing buds.
Step by step process of execution
The algorithm for performing the work is simple:
- Measure the middle of the sheet. Use a ruler to draw a long vertical line. It is recommended to first measure the size of the stem, and then add the part that will later be needed to draw the bud.
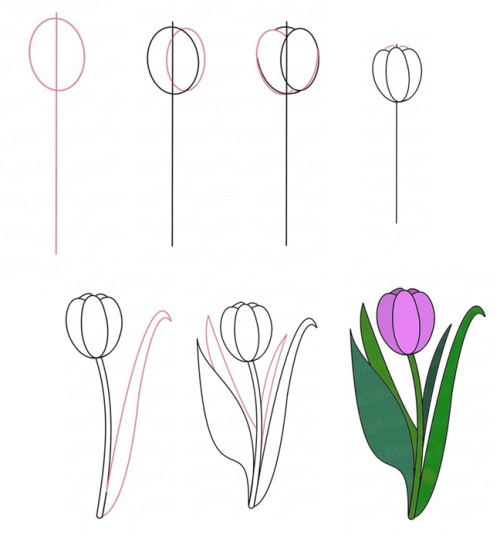
- Add an elongated oval on top of the drawn line. It will form the bud, the main part of the tulip.
- On the right side, draw another oval, slightly tilted to the side. The figure should be slightly smaller in size than the previous one, but at the same time intersect with the perimeter of the main bud and the stem line.
- Draw an oval on the left side of the main bud, also tilted to the left. When drawing lines, the overall picture of the bud should be formed.
- Erase extra lines. Add outlines of petals, as well as the tops of distant petals.
- Form a curved stem. Erase the straight line with an eraser.
- On the left side, add a long leaf, the size of which is equal to the entire length of the flower. Bend the tip of the leaf slightly.
- Draw the leaves. They should be located symmetrically to the stem of the plant.
The resulting image can be shaded or colored. Tulip petals have a wide range of colors, from yellow to purple.
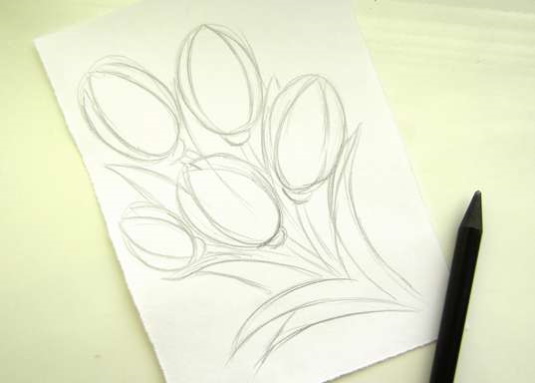
Spring bouquet
You can also draw a spring bouquet consisting of tulips. To make the image complete and bright, it needs to be colored. For this, you can use colored pencils or paints.
Step by step process of execution
Step-by-step process of completing the work:
- Place the sheet of paper so that you can start drawing the stems from the corner.
- Draw curved lines arranged in the form of check marks – as shown in the picture. The leaves should not be too long and should be perfectly even.
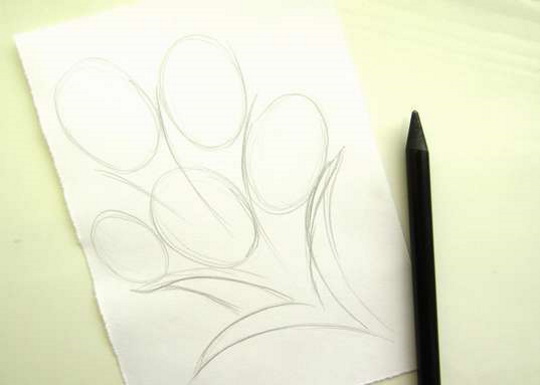
- Use ovals of different sizes to depict tulip buds. The top 5 lines should be occupied by buds, and the remaining lines should form leaves.
- Detail the petals on the buds by adding curved lines. You can also draw more leaves and stems. Draw "caps" under the tulips in the form of a small thickening.
- Use an eraser to remove unnecessary elements and correct the main lines. For further drawing, you will need a set of colored pencils (you can use watercolor pencils) and additional tools.
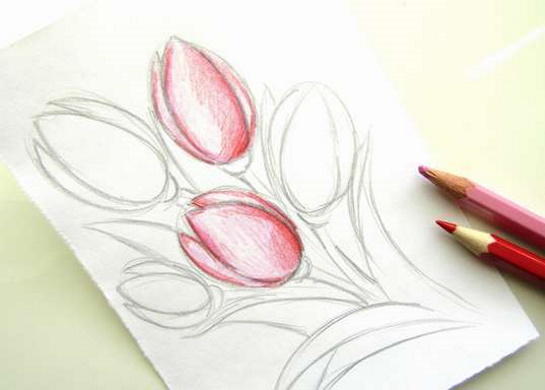
- Fill the edges of several buds with a soft pink shade. The color should be the least intense in the middle and gradually become more intense towards the edge. Fill the sides and bottom of the buds with a red pencil – as shown in the picture.
- Use a yellow pencil to color the remaining tulips, also observing the color intensity rules. Fill the edges with an orange pencil. For greater depth or if you don't have an orange pencil, you can use brown.
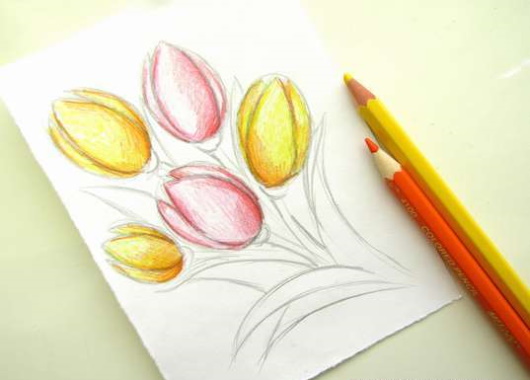

- The resulting voluminous flowers can be painted in any color. It is important to follow the rules for applying shades and color combinations.
- Use a green pencil to fill in the area of the stems and leaves. It is recommended to use a different hatching method to draw the leaves in order to convey the surface structure.
- Color the outlines of the elements using increased pressure on the pencil.
- Use a black pencil to duplicate the inner and outer outlines of the drawing. Use brown to slightly darken the inner side of the leaves.
If watercolor pencils were used in the process, it is necessary to distribute the paint with a brush slightly moistened in water. For thin lines, an appropriate brush and a minimum amount of liquid are required.
Useful tips
When performing work, you can follow the following recommendations:
- Before you start, you need to study the basic concepts that will help you when drawing. It is recommended to review the concepts of light and shadow, penumbra;

- You need to practice the shading technique on a separate sheet. This will help you cope with the processing of the drawing faster, as well as make a beautiful transition. After getting even lines and neat shading, you can start drawing the figures;
- technical lines do not have to be completely erased. To prevent them from interfering with the work process, they can be lightened with an eraser. This will make the drawing more accurate and clean;
- When shading, the sheet must be held vertically. This allows you not to touch the lines with your hands, which avoids blurring the overall picture. Also, in a diagonal position, the lines are more even and clear;
- the easiest way to draw an image is to copy it from the provided image. You can use a laptop or a printed image with thick outlines for this. The resulting drawing can be colored or shaded as you wish;
- Clear strokes can be achieved by drawing on smoother paper. If paper with a rough coating is used, slight distortions and unevenness in the strokes, as well as a change in color intensity, can be noticed;
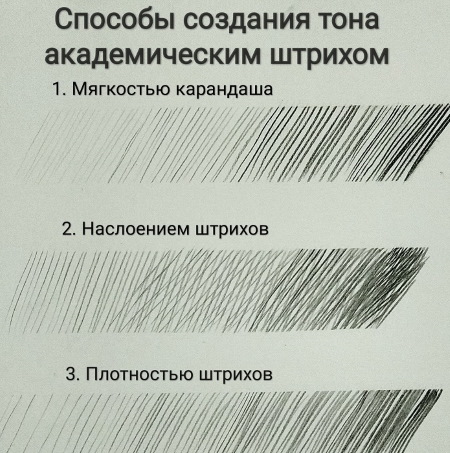
- Before drawing the texture, it is necessary to determine which stroke is more suitable for it. Small dashes are often used. You can use dotted or other shapes.
Using these recommendations, you can create a neat drawing. Tulip is a flower whose history is shrouded in numerous legends and interesting facts. It is considered a sacred plant of the East, which is also a flower whose outlines are close to ideal.
Despite the fact that some time ago the tulip was one of the most expensive flowers, the cost of which is equal to a diamond, they learned to use it as food. Thus, the plant acquired not only a decorative, but also an applied function.
You can draw this plant using simple and colored pencils if you follow the step-by-step processes and use the recommendations.
Video about drawing
Tulip pencil drawing: