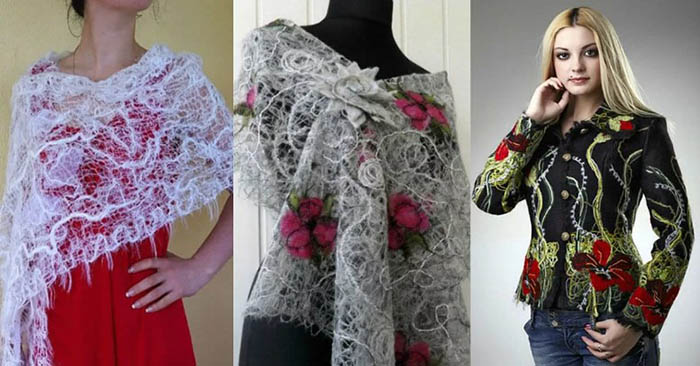
Crazy wool or "Wool” (“crazy wool”) - translated from English means “crazy wool” or “miracle wool”, appeared in the world DIY (Do it yourself) is relatively new. Crazy Wool technique involves using a wool base as the main material for creation of warm clothing.
The basic technique does not use felting as an auxiliary method. No knitting needles or a hook are needed for the work, the main fixing material is interlining. But even without it, excellent things are obtained.
Advantages of Crazy Wool technology
The Crazy Wool technique was founded by designer Jeannette Knake in Germany. She described not so much the technique of execution, but the advantages of the finished products. Many did not agree, because it was difficult to imagine how to wash things, care for them and create new images.
The recommendations fit on a few pages, but the enthusiastic reviews would not fit in a whole book.
- Wool is an affordable and warm material. You can't find a quality knitted item everywhere.
- Drawing and design - the technique allows you to create unique drawings, because an exact copy will not be possible due to the peculiarities of working with the material.
- Crazy wool is made from wool, but you can use cotton yarn.
- The fixatives are universal glue. Strong hold hairspray will also work.
- You can use water-soluble interlining as a base, which can then be washed off, leaving only the design.
- Linen threads are suitable for small designs, but they are thicker and heavier than wool. Beginners are better off using something that contains wool.
- To prevent the item from stretching, the yarn can be mixed with wool.
If wool of different colors and thicknesses is chosen as yarn, its shrinkage properties must be taken into account. Wool shrinks after washing. It is desirable that the yarn parameters are the same, then after wearing the pattern will not be distorted, but will remain in its original form. It is recommended to check the threads for shrinkage in advance.
Fixing materials
Since the technique came from quilling and “crazy quilt” directions, where there are no restrictions and classical rules of position and direction of threads, simple principles underlie the fixing methods. The base can be woven or woven. It is best to use water-soluble fabrics, which disappear over time after the end of the craft.
But to secure the thread during the work process, you can use several options:
| Stabilizer | A translucent fabric that can be printed with yarn and fixed with hairspray. It is also acceptable to use a hot iron. |
| Spray fixer | Professional spray that fixes the position of the threads without shifting the pattern. Can be replaced with hairspray, as it is cheaper. Suitable for beginners. |
| Water-soluble interlining | A non-fabric base on which the yarn threads are laid to form a pattern. For this, a high-density fixative should be selected. Complex patterns are covered with another layer of fixative. |
| Aerosol | This glue is suitable for non-woven bases, woven fabrics and insoluble linings. It is convenient because you can work with it on large areas. |
Water-soluble stabilizers and non-woven bases are considered the most attractive for working with large curls of wool in this technique. Beginners are advised to choose rectangular bases where the desired patterns can be placed. The shrinkage of the threads should not exceed 15% after washing.
Crazy Wool Creation for Beginners
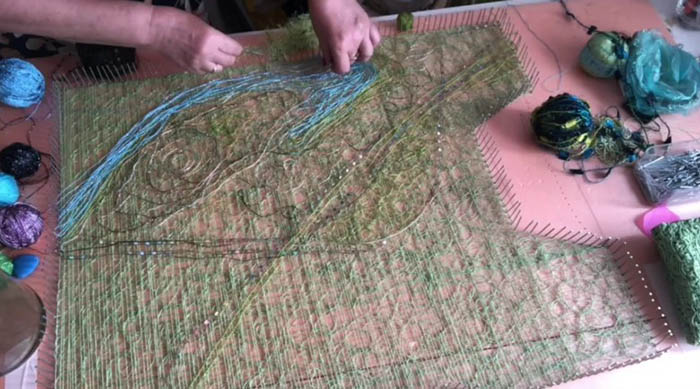
The Crazy Wool technique is easy to perform, and beginners can handle any idea. The important aspects remain - the choice of interlining or base on which the patterns will be laid out, as well as the clamps with which all the threads will be temporarily secured.
The interlining serves as a base that is easy to work with. Yarn is applied to its outline. Each layer of threads must be sprayed with a fixative, and then the composition is performed in a random order.
The direction of the threads can be any, it all depends on your imagination. Untidy coils, shaped curls and arbitrary vision of the picture are acceptable. Abstraction and clear pattern will look good on any form of clothing in this technique.
The stabilizer or interlining base absorbs aerosol adhesives and hairsprays. It is recommended to process the layers of yarn several times so that the design adheres securely to the surface.
It will be useful for beginners to learn the principle of working with such a technique without using a specific master class.
Understanding the essence and sequence of actions will make it easier to create beautiful patterns in the future.
- The base must be dense so that the thread pattern does not “slide” to the side.
- The first layers of the pattern are usually laid out in one color. The base color is the background, onto which yarn of other shades can be placed on top.
- The number of layers depends on the chosen pattern. It is advisable to limit yourself to 5-7 layers. Beginners can try laying out 2-3 layers of threads. For a scarf, you will need up to 5 layers, and for more complex patterns on sweaters - up to 8 layers.
- After laying out each layer of yarn, you need to use a fixer. This will allow you to work each thread, and not the entire pattern superficially. This way, the likelihood of distortion of the pattern will be minimal.
- Once all the layers have been laid out and the patterns are complete, you need to use a fixative glue or hairspray to cover the fabric with another layer of stabilizer on top (water-based interlining will also work).
- The "sandwich" should be placed between heavy presses. Stacks of books will do.
- After a few hours, you can start stitching the pattern. You should start by skipping the central thread to secure the pattern. Then you can delay the pattern, retreating 2-4 cm from the previous line.
- The edges of the fabric need to be stitched with a zigzag stitch so that the curls do not stick out through the spaces between the stitches.
- Afterwards, you can start soaking the fabric in warm water. It will take about 5 minutes for the interlining or stabilizer to dissolve in the water.
- Next, you need to dry the canvas on a horizontal surface.
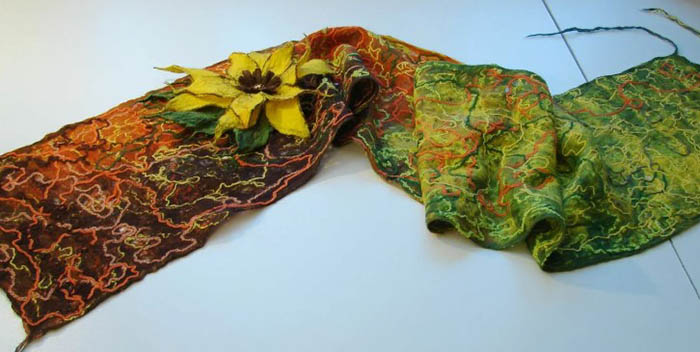
The finished fabric can be used to create simple scarves, ponchos, capes, as well as for sewing complex items - coats with a fitted pattern, bags with a frame, skirts and even paintings for home decor.
Execution without interlining
If for some reason it is impossible to find water-soluble interlining, or its cost is high, Alternative options can be used.
| Mosquito net | Disposable fiberglass mesh can be used as a base instead of interlining. It can be used once. The layers between the mesh and yarn should be coated with glue and wait until they dry completely. Only then can the mesh be carefully removed. The fabric, hardened by the glue, should be stitched on a sewing machine or by hand. Then it can be washed. The only downside is that cleaning the machine and replacing needles damaged by dried glue can affect the budget. |
| Water soluble film for embroidery | The film can have different densities from 10 to 40 microns. For the Crazy Wool technique, the average value is suitable - about 20-30 microns. It dissolves in warm water at 40 degrees. The higher the temperature, the faster the dissolution process. The transparent base has more advantages - it is easier to work, it is easier to select threads to match a certain patch or finished garment. It is also convenient to lay stitches along the threads, so they will be less noticeable in the finished fabric. |
| Newspapers | Previously, waste paper served as a basis for sewing clothes. A pattern with a density of 2-3 threads is usually laid out on one layer of newspaper. The pattern is covered with another newspaper, after which everything is fixed by heat treatment with an iron. Before starting to lay the lines, you will have to overcast all the edges and central guide lines with large stitches. The most difficult part is removing newspaper particles from the finished product. |
| Tracing paper | Tracing paper is useful for creating dense patterns due to its transparency. Like paper, it needs to be ironed before removing from the stitches. |
| Paste and tulle | The technology replaces the standard fixative and interlining. Paste or wallpaper glue should be applied in a thick layer on the base (you can use tulle or mesh). Then the pattern is applied, after which glue is applied again. This technology also damages sewing machines and clogs them with debris. |
| Gelatin | A gelatin solution can be prepared in a proportion of 40 g per 1 liter of water. After swelling, the gelatin should be heated, without bringing to a boil, and cooled to room temperature. This mixture can be applied to yarn covered with tulle. However, Eurotulle is not suitable, since it is elastic. Tulle can be removed before the glue dries, replacing it with a film. This way the pattern will be smooth without protruding threads. Tulle can be replaced with a waffle or paper towel. |
Gelatin should be washed under running cold water. Unlike interlining, it sets at low temperatures and comes off the surface in pieces. Similar alternatives to interlining can be used in decoupage of fabrics, in working with steam.
“Crazy thread” in this case may not only be wool. You can use cotton yarns of the same density and different shades. Sometimes the technique is associated not only with the ability to randomly arrange the threads: “Crazy” and “Wool” can sometimes be found in felting, where wool is also present, but in a mixed technique.
Using the technique in felting
Just like with the replacement of interlining, the Crazy Wool technique allows you to replace the fastenings on the yarn. If not everyone has a sewing machine, you can use an alternative method - wool felting. In this way, you can supplement the yarn with unspun merino.
To do this, you need to use a certain combination of threads, which must be laid out in different directions:
- On a film-like base, you need to lay out the yarn using a spiral technique.
- The first layer of threads should be processed using felting wool threads. They should be placed on top of the first layer so that they cover the entire yarn.
- The next layer of yarn should be laid out perpendicular to the previous one. The second layer should be sprinkled with merino wool also in the transverse direction.
- Then you need to use viscose so that its fibers are located over the entire area of the product.
- If desired, you can add fibers of a different color as decoration.
- After finishing laying out the yarn, the entire finished work should be treated with a soap solution. It is easier to do this with a spray bottle, since regular splashes can spoil the appearance of the yarn. The fibers will not be as fluffy under the weight of the water.
- The sprayer should be 100 cm away from the yarn. Too small a distance can cause deformation of the pattern due to the water pressure.
- After impregnation, the entire product is covered with film.
- Next, you can continue with the wet felting technique. The yarn will roll up by friction and compression.
- The finished product must be treated in a contrast shower.
- After drying, the wool is ready for further use.
Felting technique together with crazy wool can be used to create hats and accessories.
Beret in Crazy Wool technique plus felting
To create a beret you will need the following materials:
- Knitting yarn with 50% natural wool and 10% mohair content.
- Viscose threads, linen threads and decorative threads.
- Bubble wrap can be used as a base.
- A mosquito net may be needed to secure the results.
- The beret pattern should be made from transparent tracing paper.
- A container with soapy water is needed for soaking the product.
The process of creating a beret:
- Place the bubble wrap on a flat surface.
- Next, you need to lay out the yarn in rings so that it extends slightly beyond the desired size.
- On top you need to lay out viscose with the remaining threads in any shape.
- Additional inclusions can be used to create patterns.
- On top of this layer, you need to lay a mosquito net, simultaneously wetting it with a soap solution.
- After turning the product over to the other side, you need to bend all the threads and edges that form unevenness.
- Next, you need to transfer the workpiece onto the pattern and fold all the edges along the beret contour to repeat the shape of the product.
- Then you need to put the mosquito net on this side, wetting the already folded edges with water.
- The finished beret needs to be wound onto a straight stick to begin piercing.
- As you pierce, you need to change the direction of the beret.
- The pattern needs to be taken out of the beret and placed on top of the wet product.
- The beret must be rubbed, crumpled and squeezed until its shape and appearance satisfy the future owner.
- The shrinkage of the wool will occur in the direction in which the product is rolled out. The beret begins to take the desired shape.
- From time to time, you need to try on the beret to ensure that the wool shrinks correctly.
- The finished product must be dried after rinsing on a horizontal surface.
The “Crazy Wool” technique together with the felting process allows you to make beautiful hats, vests and coats. Finished jackets can be decorated with this method, decorating them with individual patterns. Gloves and mittens, sweaters for teenagers and children will also look unusual.
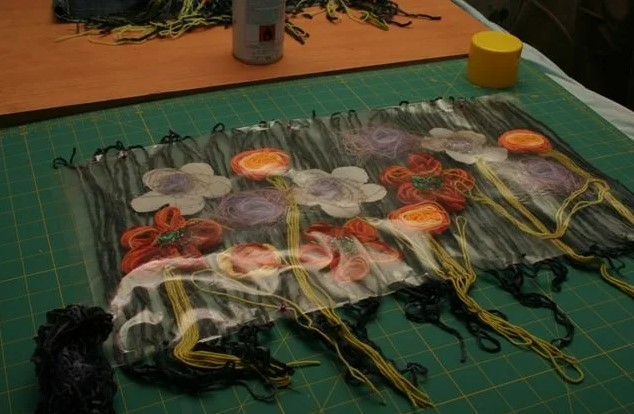
The technique of working with wool can be complemented with various accessories: organza leaves, artificial flowers and more.
Ideas for Crazy Wool
Despite the limited materials, the technique is popular in hand-made works that require imagination. Craftswomen find many ways to replace basic materials, use different compositions of glue and substrates. For example, gelatin instead of glue and film instead of interlining. This is how the direction of creating patterns for ready-made outfits became popular.
Scarf on a film base
To create a scarf you will need the following materials:
- Wool and cotton threads can be combined when testing for shrinkage.
- Drilling glue - 1 pack.
- Mosquito net or film measuring 2*1 m. It needs to be cut in half along the larger side. You will get 2 parts of 2*0.5 m.
- A dishwashing sponge for wetting the product.
- Scissors, pins - everything you need to fix the materials.
- Sewing machine or needles with thread in the same color as the first layer of wool.
Before starting work, you need to prepare the adhesive solution and film, and then start laying out the yarn:
- Dilute the glue in water in a ratio of 1 liter to 1 glass of water. Leave the solution to swell for 3-4 hours.
- Place the mesh or film on a horizontal surface to make it easy to lay out the threads.
- You can use organza as a decoration - cut out the leaves schematically and burn the edges. You can skip this step or add it to the work while the glue is swelling.
- The first layer of the base should be fluffy and light. Wool threads of one color will do.
- For finishing, you can set aside thin fluffy threads that will go into the last layer of the scarf.
- Next, you need to lay out all the skeins of threads in layers, without being afraid of complex patterns. The future decor and design of the scarf depends on this.
- After finishing laying out the threads, you need to fix the pattern. For this, the second part of the film or mesh measuring 2*0.5 m will do.
- Place a wet sheet over the mesh and iron the entire creation on the “wool” setting.
- After ironing, apply the adhesive solution generously over the entire design using a sponge.
- The entire work needs to be turned over and the previous step repeated again.
- Once finished, you need to leave the adhesive solution to dry. This process can take several days.
- After the glue has dried, the film or mesh should be separated from the wool threads very carefully. As the mesh separates from the wool, fibers may appear. This means that the glue has completely dried.
- After removing the film, you need to coat all the unglued threads with adhesive solution again. Do the same on the other side.
- The scarf turns out stiff, it will be difficult to lay the threads. You can take an awl and make several holes for stitches. The needle in the sewing machine should be thick. You can use an industrial overlock.
- Within 3-4 hours, you can lay all the lines in a long straight line. After work, you must clean the sewing machine.
Such a product requires a lot of time and resources. If you don’t have a sewing machine, you can replace it with a 0.2 cm hole punch. Then it will be easier to lay the seams manually.
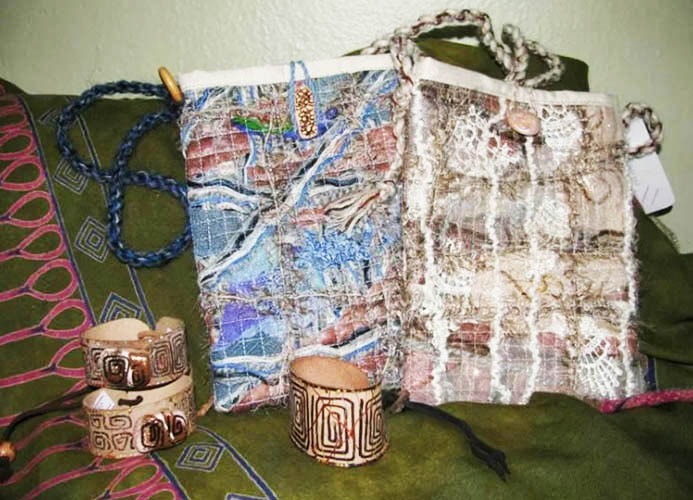
Bag on tracing paper
The “Crazy Wool” technique can be combined with other methods of decorating accessories and clothing elements. Thus, many different variations of sewing bags appeared. This master class is based on a simple pattern of a bag of the desired size without a bottom and side parts. They should be knitted separately if you need to supplement the product with depth and width.
The flaps and fastener are also made on the pattern sketch and then decorated with fittings.
To work you will need:
- Wool with additions of angora, mohair - the threads will be more voluminous and bright. You will need up to 3-4 skeins.
- Fantasy yarn is easy to work with and is appreciated by embroiderers and craftswomen. You can get by with 1 skein of yarn.
- Threads of different colors and fringe are suitable for diluting the pattern and decoration.
- The covering material can be any, but dense. A thick film of 100 microns will do.
- Pattern - it is recommended to build the height and width of the bag yourself, adding handle elements. You will need 2 of these for the front and back of the bag.
Lighting is important during the work process - the more there is, the better the unfilled areas are visible.
- The skein of thread for the first layer should be thrown on the floor. Taking hold of the end of the thread, you can pull and lay the yarn on the pattern.
- The thread will lay itself out in the pattern, so it should be distributed randomly over the surface.
- The fancy thread can be laid out in a lattice pattern, as for clothing.
- All decorative elements must be distributed over the first layer.
- Then the drawing is covered with film and fixed with pins.
- On a sewing machine, stitch several threads using a polyester thread in the same color as the main layer. A universal needle #90-94 will do.
- Having stitched the thread along the perimeter, you can lay the central axes of the thread along and across so that the pattern is fixed. Then you need to lay the threads like stitches, retreating from the previous line by 1-2 cm.
- The result is squares 2 cm on a side, like in a quilted jacket or blanket.
- The tracing paper can be removed with tweezers. This will take about 3 hours.
- To knit the sides of the bag, you can cast on chain stitches the length of the bag's height, and knit the width as desired using single crochets.
- The side strips can be reinforced with covering material and also stitched with the main elements on a sewing machine.
- If you want to make a lining, you can use a ready-made pattern for the bag, reducing the inner compartment by 1 cm.
- Next, the product needs to be supplemented with a strap and a clasp. This can be knitted or you can buy ready-made fittings and attach them to the product.
- Belt loops can be sewn separately.
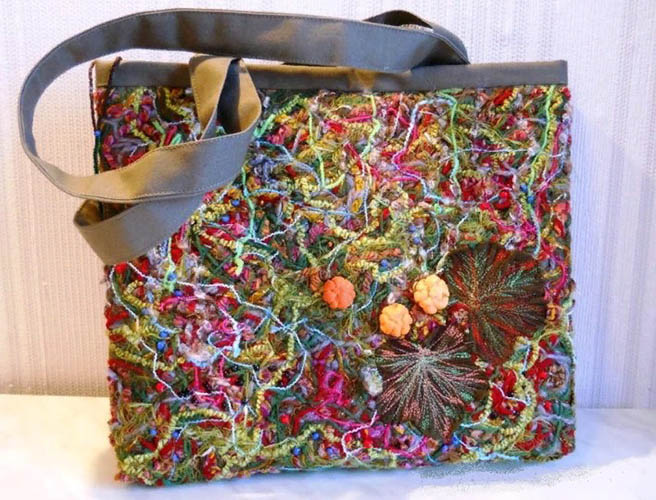
The strips for the sides and bottom can be sewn in separately, making them from fabric. This step can be skipped if the width and depth of the bag are satisfactory. For decoration, you can use beads, large elements, fasteners, zippers, and more. The bottom of the bag can be reinforced with cardboard covered with fabric or thick linoleum.
Advice from experts
When newcomers get to know new technology, it is important to know a few tricks that will help them in their work:
- It is important to follow the density of the curls so that they are of the same thickness in all parts of the base.
- When using monofilament, you cannot iron the patterns with hot steam, as the thread may melt. The “nylon” or “wool” modes are considered the maximum temperature settings for such patterns.
- The stitches should be started and finished outside the fabric and pattern so that the pattern is not disturbed when the fabric is sewn or cut.
- The construction of the pattern will depend on the width of the fabric and the location of the pattern. It is more convenient to work with horizontal projections, when the vertical stitching lines are leading.
- When using newspaper as an alternative to interlining, it is best to iron the product after stitching. This will make it much easier to remove the pieces of paper.
“Crazy thread” has already become a “lazy” alternative for craftswomen who are tired of knitting scarves and ponchos according to patterns. “Crazy” already means a flight of fancy, and “Wool” kind of hints that wool is not the main wool that can be present in the work.
Despite all the predeterminations, wool yarns are still used in felting, where “crazy thread” has also reached with its individual patterns and unique decors.
Video about the “Crazy Wool” technique