Triangle applique, in comparison with the use of other geometric figures in this creative work, can rightfully be considered a favorite pastime of children. Triangular figures allow you to create animals, transport, buildings, plants on paper. They make original holiday cards.
Application, being a creative activity, is important for the child's mental development. Children expand their knowledge by imagining and creating compositions either from a certain type of geometric figures (for example, a triangle) or using several of their types at once (square, circle, rectangle).
This creativity introduces the child to the concept of “technology”, because to obtain the final result, it is necessary to carry out a certain sequence of specific actions: prepare the parts, spread glue on the paper, place the parts in the right place.
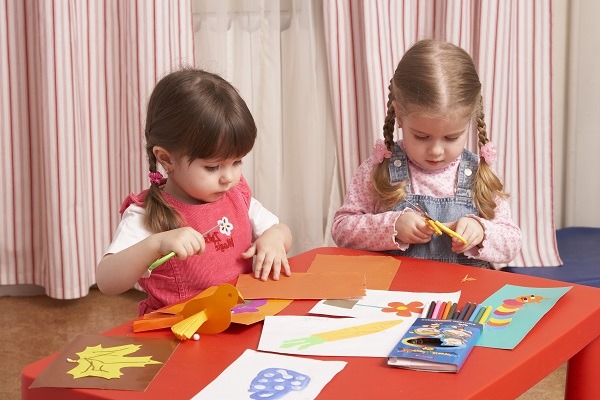
Children love working with paper. They cut out figures, glue them together, add a drawing and get a handmade work of art.
Application classes help a child develop:
- design thinking - you need to assemble a whole from the provided parts;
- tactile sensations;
- correct perception of color;
- motor skills;
- creative potential;
- eye;
- artistic imagination;
- fantasies;
- aesthetic taste.
In addition to developing the above abilities, the child learns perseverance and making his own decisions during the classes. Application is a creative activity that all children enjoy.
Triangle applications for preschoolers
Triangle applique allows preschoolers to learn how to use scissors, develops small muscles and helps them understand the diversity of the world around them.
Application for the younger group "New Year's tree"
To work you will need:
- green and brown colored paper;
- a sheet of white cardboard;
- scissors;
- glue;
- orange and yellow markers.
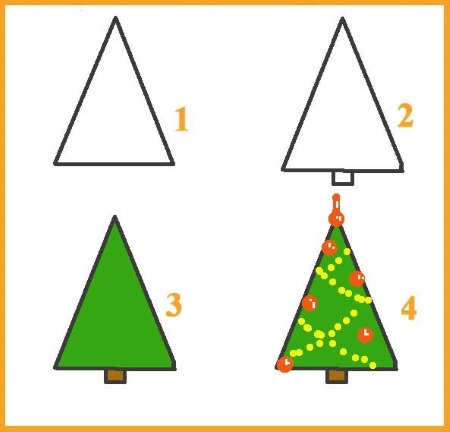
Procedure:
- From green paper you need to cut out an elongated isosceles triangle.
- From brown paper you need to cut out a small rectangle, which will be the leg of the tree.
- The prepared blanks must be glued onto a sheet of white cardboard: first a triangle for the tree, then a rectangle for its leg.
- Use an orange felt-tip pen to draw balls on the tree, and use a yellow felt-tip pen to draw garlands.
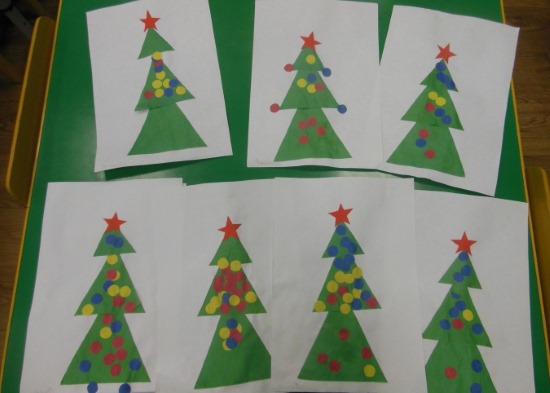
A child can draw decorations for the Christmas tree independently. If he has difficulty doing this, the teacher can help him.
Application for the younger group "Mountains"
To work you will need:
- paper of green, blue, light blue, purple, yellow colors;
- a sheet of beige cardboard;
- glue;
- scissors;
- yellow felt-tip pen.
Procedure:
- From blue, light blue and purple paper you need to cut out elongated isosceles triangles - these will be the mountains.
- You need to cut a long strip from green paper - this will be the grass.
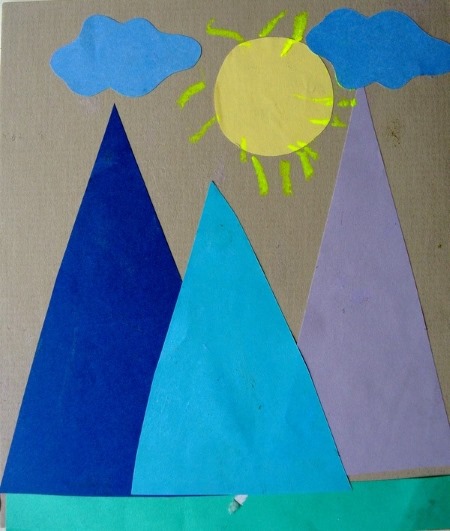
- From yellow paper you need to cut out an oval for the sun, and from blue paper - figured blanks in the form of clouds (2 pcs.).
- The prepared parts need to be glued onto a sheet of cardboard in the following order: on the left side - a purple triangle, on the right - a blue one, between them - a light blue one (it is glued so that its edges cover part of the previously glued triangles).
- At the bottom of the cardboard sheet, on top of the triangles, you need to glue a green strip - this will be the grass.
- At the top of the cardboard above the mountains, you need to glue an oval for the sun and blanks for the clouds.
- Using a yellow felt-tip pen, draw stripes-rays around the sun.
The child can change the color scheme of the mountains at his own discretion. They can be red, orange, brown. If the kid can't cut out the shaped blanks in the form of clouds, it's okay if they are oval.
Application for the middle group "Umbrella"
To work you will need:
- a sheet of white cardboard;
- paper of yellow, light green, purple, red colors;
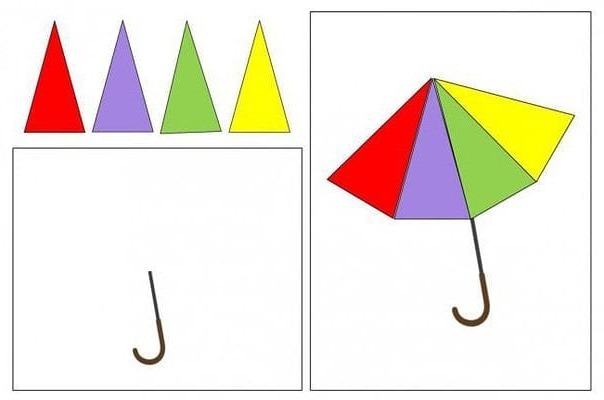
- scissors;
- glue;
- Brown felt-tip pen.
Procedure:
- From colored paper, you need to cut out elongated isosceles triangles of the same size.
- Now they need to be glued onto a sheet of cardboard in the following order: yellow, light green, purple, red (the triangles need to be glued so that their vertices touch, and, accordingly, the sides of the yellow triangle touch the light green one, the light green one touches the purple one, and the purple one touches the red one).
- After the triangles are glued, you need to draw the umbrella handle with a brown marker.
The child can change the color of the blanks at his own discretion.
Application for the middle group "Frog"
To work you will need:
- a sheet of beige cardboard;
- green, white and black paper;
- scissors;
- glue.
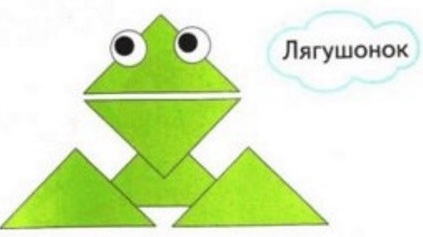
Procedure:
- From green paper you need to cut out one large equilateral triangle of any size and four equilateral triangles of smaller size.
- From white paper you need to cut out two ovals for the eyes, and from black paper – smaller ovals for the pupils (2 pcs.).
- In the central part of the cardboard sheet, you need to glue a cut-out large triangle so that its base is at the bottom and its top is facing up.
- Now you need to take two smaller triangles and glue them along the edges of the base of the previously glued part in such a way that you get the frog's legs (these parts are also attached with the base down and the top up).
- The remaining triangles need to be glued in the area of the frog's head (one so that its top faces down and is located on top of the frog's upper body, and the second one - at some distance from the previously glued part so that the base faces down and the top faces up).
- Now you need to glue two ovals of white paper in the area of the frog's eyes, and on them - two black ovals, which will depict its pupils.
The child can decorate the applique with a frame or add additional details, such as grass or, by placing dots, depict midges.
Application for the senior group "Kitten"
To work you will need:
- a sheet of white cardboard for the base;
- yellow and orange paper;
- glue;
- simple pencil;
- scissors.
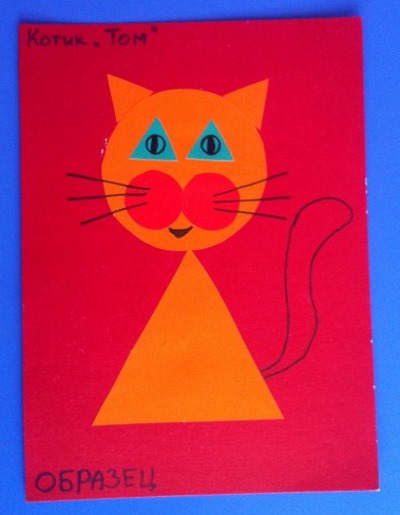
Procedure:
- First of all, you need to make a sketch of the future kitten on a piece of cardboard with a simple pencil. This will help you understand the sizes of the parts needed to make the applique.
- From yellow paper you need to cut out triangles: one elongated isosceles one for the body, one equilateral one for the head, one thin long isosceles one for the tail, two small equilateral ones for the ears.
- From orange paper you need to cut out triangles: two equilateral ones for the ears, two thin elongated isosceles ones for the paws, one small equilateral one for the nose and two of the same size, but half the size, for the eyes, four thin elongated isosceles ones for the whiskers.
- You need to glue the triangles onto a sheet of white cardboard in the following order:
- body (base down, top up),
- head (top down so that it touches the body, base up),
- orange ear pieces (their bases should point downwards and touch the upward-facing base of the kitten's head triangle),
- paws (bases down, tops up, so that they touch the base of the kitten's body triangle),
- tail (on the lower right side of the kitten's body, with the tip towards it).
5. Now you need to glue the yellow pieces onto the orange parts of the ears (base down, tops up).
6. To decorate the kitten’s face, you need to glue on the eyes, a blank for the nose (top down, base up), and whiskers to the nose – two pieces for each side (tops towards the nose).

The child should pay attention to the fact that this applique of triangles has a secret: Depending on how the kitten's eyes are glued on, you can notice a change in the expression on its face.
Application for the senior group "Mouse"
To work you will need:
- a sheet of white cardboard for the background;
- black and gray colored paper;
- glue;
- simple pencil;
- scissors.
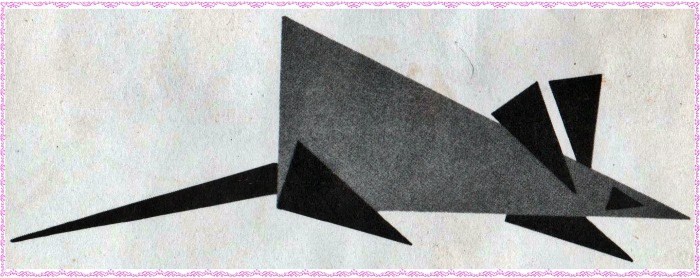
Procedure:
- For the body, you need to cut out a right triangle from gray paper.
- From black paper you need to cut out the following triangles: two elongated equilateral ones for the ears, two slightly larger than the previous ones for the paws, one small isosceles one for the eye, one thin elongated equilateral one for the tail.
- On a sheet of white cardboard, using a simple pencil, you need to make markings where the parts of the future mouse will be located.
- The first thing you need to do is glue the back ear, back paw and tail.
- Now you need to glue the body of the mouse so that it covers the previously glued parts, touching them.
- At the final stage of creating the applique, you need to glue on the second ear, paw and eye.
At the child's request, the applique can be decorated with a frame.
Triangle applications for children grades 1-3
An applique of triangles allows students in grades 1-3 to consolidate the skills they acquired in kindergarten.
The complexity of the work should depend on the degree of development of the children's small muscles, as well as on the stock of knowledge about the world around them that they have acquired by this age. The simplest applications for grades 1-3 are "Fox-beauty" and "Sailboats"
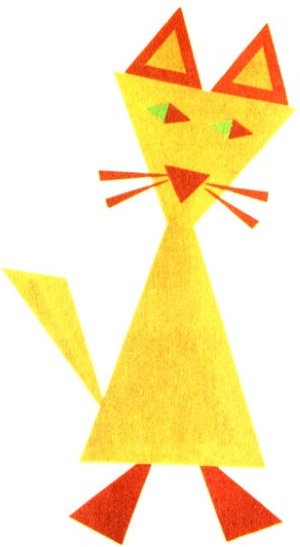
Application "Beauty Fox"
To work you will need:
- a sheet of white cardboard for the base;
- orange and white paper;
- glue;
- scissors;
- black marker;
- white gouache;
- brush.
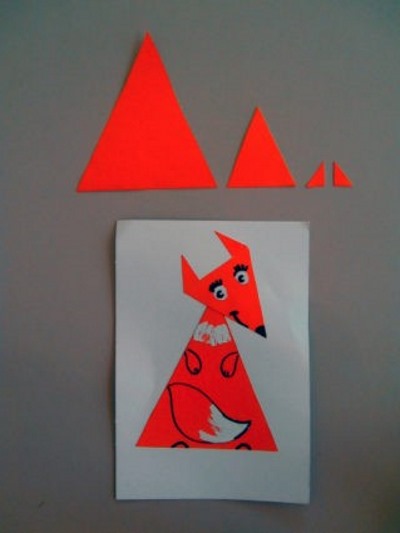
Procedure:
- From orange paper you need to cut out two equilateral triangles (one larger for the fox’s body, the second smaller for its head) and two small isosceles triangles (for the ears).
- From white paper you need to cut out two small ovals for the animal's eyes.
- A large equilateral triangle with its base down needs to be glued onto a sheet of white cardboard. A smaller triangle needs to be glued to its top so that it touches the fox's body and its base looks up to the right. The ears need to be glued to the base of the triangle for the animal's head.
- Now you need to glue two ovals for the eyes, use a black marker to draw the pupils and eyelashes, as well as the nose and mouth of the fox.
- On the triangle for the animal's body, use a black felt-tip pen to draw the upper and lower paws and tail. The tip of the fox's tail and the area around the neck should be outlined with white gouache to create the effect of fur.
Instead of fur on the fox's neck, the child can draw beads. He can also additionally decorate the applique at his own discretion.
Application "Sailboats"
To work you will need:
- a sheet of white cardboard;
- yellow, black, red and blue paper;
- glue;
- scissors.
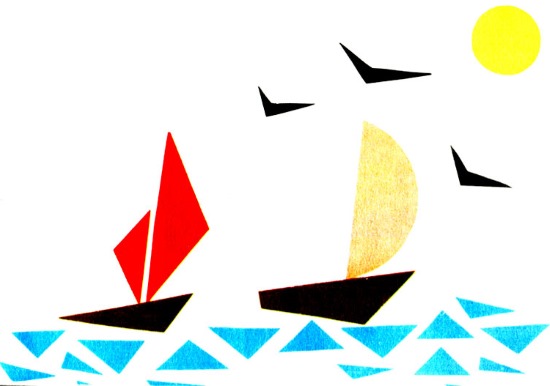
Procedure:
- The following triangles must be cut out of black paper: six small thin elongated rectangular ones – for the seagulls, two equilateral ones (of different sizes) with a long base – for the base of the ship.
- From red paper you need to cut out two equilateral triangles (of different sizes) with a long base - these are the sails of the ship.
- From yellow paper you need to cut out one small circle for the sun and one semicircle for the sail of the second ship.
- From blue paper you need to cut out small triangles in any quantity for the waves.
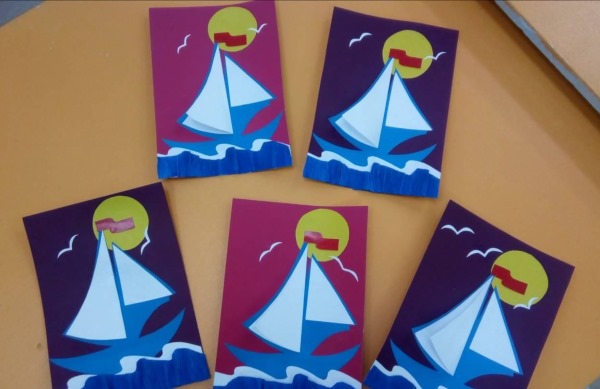
- First of all, at the bottom of the cardboard, leaving room for the waves, you need to glue one large black triangle, and at some distance from it - a second smaller one (their bases should face upwards).
- You need to glue a yellow semicircle to the base of the large black triangle so that it looks like a sail, and two red triangles with their bases facing each other to the base of the second piece.
- In the upper left part of the cardboard, you need to glue a circle for the sun, and between it and the sailboats, thin long triangles with their bases facing each other so that you get “check marks” (these are the seagulls of the applique being made).
- Blue triangles should be randomly glued under the sailboats to represent waves.
Blanks for the waves can be made from paper of any color (light blue, blue, purple).
Triangle applications for children of grades 4-5
An applique of triangles for a 4th-5th grade student should not consist of only geometric shapes. At this age, the child is already required to be specific in the topic that is offered to him for work.
For example, if the theme of the applique is "Spring", then in addition to the main element (a spring flower made of triangles), the work should include additional ones (remnants of snow, a running stream). The simplest appliques for grades 4-5 are "Butterfly" and "City in Greenery".
Application "Butterfly"
To work you will need:
- colored cardboard of green and white colors;
- paper of green, purple, blue and yellow colors;
- scissors;
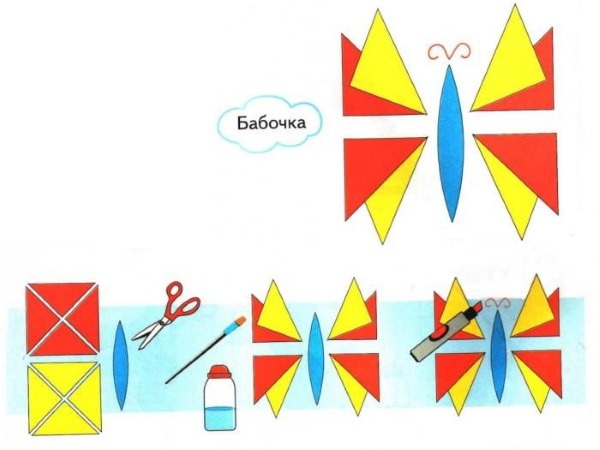
- 2 beads;
- glue;
- 2 pieces of wire.
The triangle applique is done in this way:
- From green paper you need to cut out one equilateral triangle (for the butterfly’s head) and one elongated isosceles triangle (for its body).
- From purple and blue paper, you need to cut out two elongated right-angled triangles. These blanks will be the upper wings of the butterfly, consisting of two parts - the top is purple, and the bottom is blue.
- From yellow paper you need to cut out two elongated ovals, which will become the lower wings of the insect in the applique.
- The prepared triangles and ovals need to be glued onto a sheet of white cardboard as follows:
- isosceles triangle for the body - acute angle down, and base up;
- above the base of the triangle for the body - an equilateral triangle for the head;
- on the right and left sides of the body, symmetrically to each other - first a purple triangle with an acute angle towards the body of the insect and the hypotenuse upwards, then under it a blue triangle also with an acute angle towards the body of the butterfly, but its hypotenuse should point downwards;
- The elongated yellow oval needs to be glued on both sides between the lower part of the butterfly's body and the lower part of its upper wings.
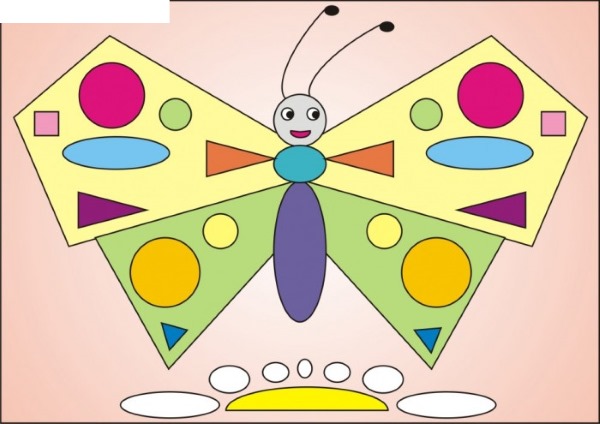
- Now you need to make antennae for the insect. To do this, attach a bead to the ends of two pieces of wire and glue them to the butterfly's head.
- To design an applique from green cardboard, you need to cut out a frame and glue a composition with a butterfly into it.
The child can decorate the frame as he or she wishes, for example, with a bow or beads.
Application "City in greenery"
To work you will need:
- white and green cardboard;
- brown, yellow, pink, beige, orange, green paper;
- scissors (regular and curly);
- glue.
Procedure:
- The following pieces need to be cut out from multi-colored paper: brown rectangles for houses, pink triangles for roofs, yellow squares for windows.
- Using decorative scissors, cut out semicircles for the greenery from beige, orange and green paper.
- On a white sheet of cardboard, starting from its upper right corner, you need to glue the blanks for the houses, moving downwards, then the triangles for the roofs on them.
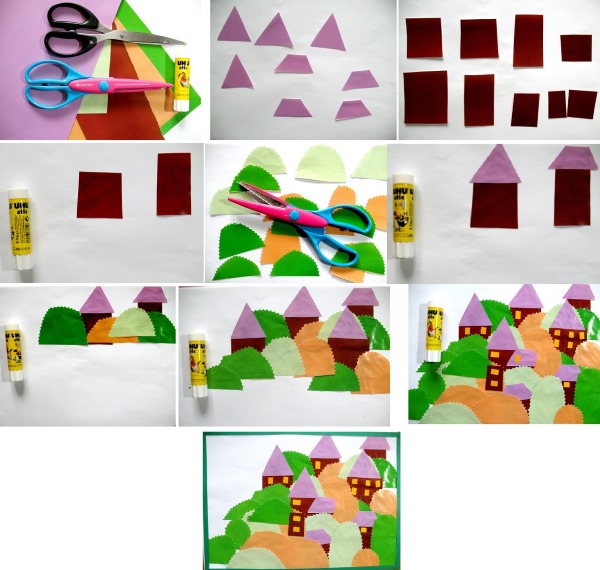
- Then, in layers, filling the empty space on the cardboard, you need to glue the greenery. It's okay if the green bushes end up on the houses.
- Now you need to glue yellow windows onto the houses visible from behind the greenery and make a frame for the applique out of green cardboard.
The color scheme of the greenery can be changed according to the child’s wishes.
Triangle applications for children of grades 6-7
Students in grades 6-7 should complement their triangle appliqués with other geometric shapes, thematic details, and drawings, which allows them to convey the essence of the composition as much as possible.
To make their work more expressive, students are advised to focus on conveying the specifics of the topic suggested by the teacher.
For example, an owl on an applique must have big round eyes. If it is a swan, its neck must be gracefully curved in the form of a question mark. The simplest appliques for this age are "Forest Bird" and "Firebird".
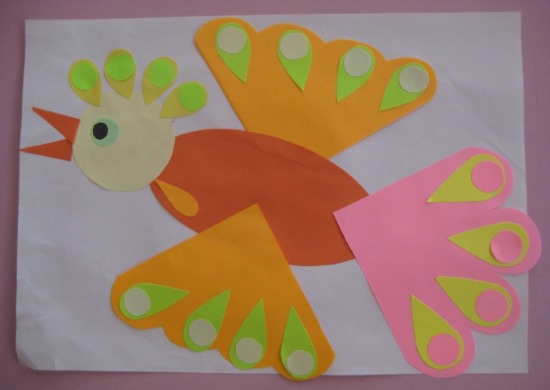
Application "Forest Bird"
To work you will need:
- paper in blue, white, purple, black, pink, green, light blue, orange, yellow and red;
- a sheet of yellow thick cardboard for the background;
- simple pencil;
- glue;
- scissors.
Procedure:
- You need to draw and cut out multi-colored triangles: blue (4 pcs.), purple (4 pcs.), pink (5 pcs.), green (3 pcs.), yellow (2 pcs.), red (1 pc.).
- The red triangle must be glued to the bottom of the cardboard in the middle so that its top faces up.
- Now you need to glue the rest of the triangles in rows on top of the red one in the following order: yellow, green, blue, purple, pink – all the parts should be facing down.
- The next step is to cut out two blue circles of the same size (5 cm in diameter) and glue them on top of the triangles so that they touch.
- Now you need to cut out 8 more circles of a smaller size: 2 pink (diameter 2 cm), 2 white (diameter 1.5 cm), 2 orange (diameter 1 cm) and 2 black (diameter 0.5 cm).
- All cut out circles in descending order must be glued on top of the blue circles.
- All that remains is to cut out two blue petal-shaped pieces for the ears and one yellow piece for the beak and glue them in the appropriate places.
Before starting work on the applique, it is necessary to think through all the details of its implementation. The child can change the color scheme at his own discretion.
Application "Firebird"
The triangle applique for children “Firebird” is one of the brightest and most special.
To work you will need:
- white cardboard for the background;
- paper of yellow, red and orange colors;
- simple pencil;
- glue;
- felt-tip pens;
- scissors.
Procedure:
- From yellow, red and orange paper you need to cut out triangles of the same size, which will be the feathers of the firebird - 13 of each color.
- From yellow paper you need to cut out a blank in the shape of a bird's body and glue it in the middle of the cardboard.
- Now, using a simple pencil, you need to draw the lines along which the bird's tail and wings will run.
- To decorate the bird's tail, glue 3 orange triangles to the bottom of its body, placing them with their tops up. Now glue 3 red triangles in rows, and then 3 yellow ones, taking into account the following arrangement: the tops of the triangles of each new row are glued to the bottom of the triangles of the previous row.
- To decorate the bird's wings, you need to glue a row of orange triangles along the topmost drawn lines, 5 pieces for each of the wings.
- Now you need to glue 5 red triangles on top of the orange ones, and 5 yellow triangles on top of them. Their arrangement should be as follows: the tops of the triangles of each new row are glued to the bottom of the triangles of the previous row.
- All that remains is to draw the bird's beak and eyes with a felt-tip pen and, if desired, add decorative elements.
The number of triangles for the tail and wings can be added at the child's discretion. The color scheme of the bird's feathers can also be changed.
When creating triangle appliques with children, it is important to explain to them the main points that will allow the work to be done safely. Emphasize to your child that scissors are not a toy, but a sharp instrument that can cause pain if used incorrectly.
Explain that they cannot be run with, jumped on, or taken without permission from adults. Such measures will not allow unexpected injuries to ruin the fun that everyone will get from creating the applique!
Author: Anastasia (zodners)
Article formatting:Natalie Podolskaya
Video about applications for children
Triangle appliques - how to make a boat: