You can knit any style of winter hats with knitting needles. In recent years, youth models of headwear for girls in the style of beanies, caps, berets, hats have been in fashion. Hats with pompoms, ears, and lapels do not lose their relevance. It is better to choose wool yarn with a small admixture of acrylic to maintain the shape and neatness of the headwear.
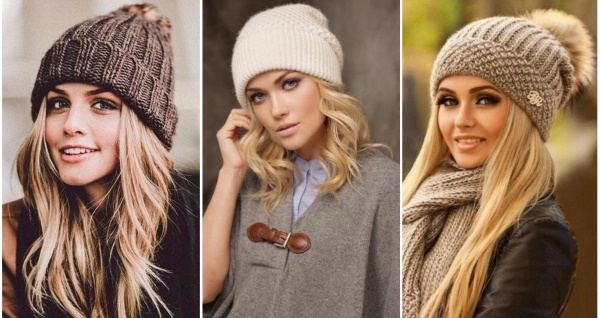
Alpaca, mohair, and cashmere threads are also suitable for a youth hat for a girl. Braids and elastic bands are considered to be win-win patterns: they have not lost their relevance for several decades.
Abbreviations in knitting patterns
The following symbols are used in the descriptions of the master classes:
- P - loop;
- R - row;
- LP - front loop;
- IP – purl loop;
- UB - decrease;
- PR - increase;
- KRP - edge loop (the first one in the row is always removed without being knitted, and the last one is performed as a WS).
Calculating loops based on head circumference
The number of loops is calculated based on a pre-knitted sample:
- You need to knit a sample with the selected threads and pattern, 10 sts wide (or 2-3 repeats of the selected pattern) and 5-6 cm high.
- Next, you should measure the length of the sample and write down how many loops there are per 10 cm.
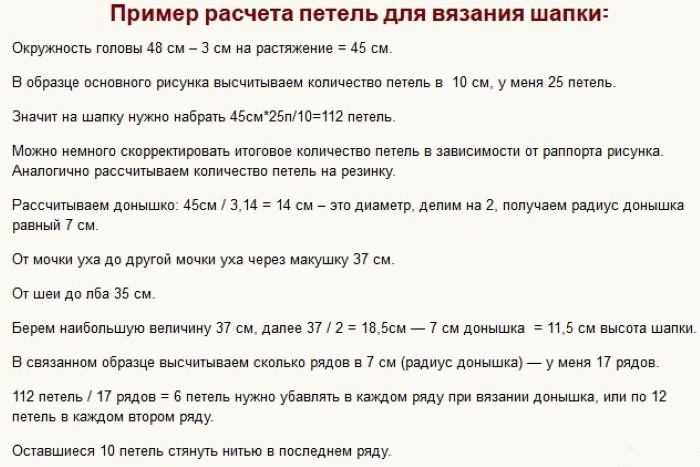
- Measure the circumference of your head and divide the resulting number by 10, then multiply the result by the number of loops calculated in step 2.
Add 2 edge loops to the resulting number.
Knitted hat with ribbing, ears and a lapel
Youth hats for girls are the easiest to knit with knitting needles in this version. The pattern in the form of an elastic band is easy to perform even for beginners.
The yarn should be chosen with a content of 70% acrylic and 30% polyester. You will need knitting needles number 4.5 or 5 mm.
Step by step guide to creating a header:
- Cast on the number of stitches on the knitting needles that corresponds to the measurements of the head circumference and the knitted sample with the elastic pattern.
- 1 R: KrP, alternately make LP and IP, the last KrP is knitted as IP.
- 2 R: KrP, knit LP over the front stitches, and IP, KrP over the back stitches.
- Alternate 1-2 rows until the length of the fabric reaches the desired height of the headdress (30-32 cm for a hat without a lapel or 38-40 cm with a lapel).
- All loops are closed: knit 2 P together as if to RS, throw the knitted loop back onto the knitting needle, knit 2 P together again and return the loop to the working knitting needle. Continue closing to the end of the row.
- When the base of the hat is ready, it is sewn in half so that the seam is located at the back of the head.
- Next, sew the top of the hat with a straight seam, forming a square from it. Its corners will be the ears on the headdress.
Air beret
The master class uses white yarn "Laska" (50% mohair, 50% acrylic; 430 m/100 g) and knitting needles No. 5.5. The knitting density of the beret is 17 P x 24 R = 10 x 10 cm on knitting needles No. 5.5 with a 1/1 elastic band folded in half with thread.
Special instructions for knitting a beret:
- Elastic band 1/1. In knitting, alternate 1 LP and 1 IP.
- Elastic band 1/2. In knitting, alternate 1 LP and 2 IP.
- Elastic band 1/3. In knitting, alternate 1 LP and 3 IP.
- 2УБ (double decrease). If the first of the decrease loops is LP, then you should knit 3 P together as LP. If the first is IP, then you need to remove 3 P on the right needle, insert the left one before work into the second P, pull the right needle out of the third and first P, pick up the second P on it, put all 3 P on the left needle and knit them together as LP behind the front walls.
Instructions for knitting a beret:
- First you need to cast on 71 sts onto the needles.
- 1-21 R: knit in turning rows with a 1/1 rib pattern.
- 22 R: continuing to knit the elastic, make a PR in all LP. The work should turn out to be 105 P.
- 23-42 R: perform a 1/2 elastic pattern.
- 43 R: in all LPs it is necessary to make a PR so that there are 139 P in the work.
- 44-56 R: knit with 1/3 rib pattern.
- 57 R: Each 2 LP should be done together as LP. There should be 105 R remaining in the work.
- 58-66 R: knit with 1/2 elastic pattern.
- 67 R: each 2 LP together as LP is required. There should be 71 R remaining in the work.
- 72-74 R: perform a 1/1 elastic pattern.
- 75 R: all loops are made as 2UB. There should be 24 P. left in the work.
- 76 R: all loops are performed as 2UB. The work should result in 8 P.
- The needle is pulled out of the loops, the thread is cut with a small margin and threaded through all the removed loops, tightened and tied.
- Make a connecting seam on the back of the hat.
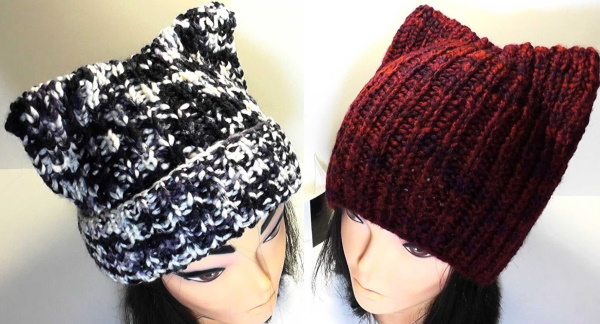
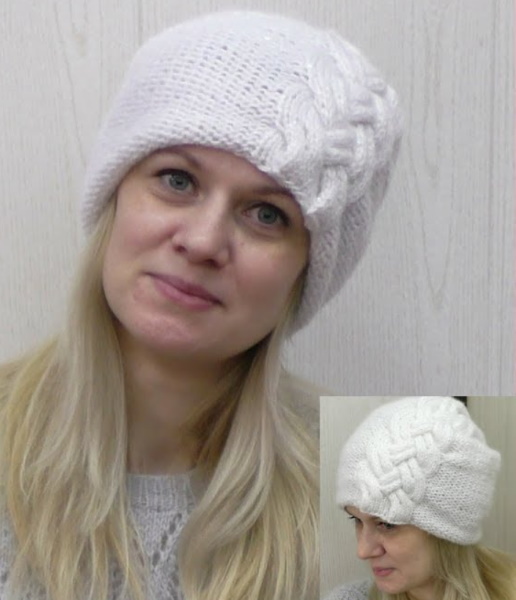
Complicated braid on beanie hat
Youth hats for girls can be knitted with knitting needles in the beanie style both with and without a pattern. The master class considers the option of making a pattern in the form of a complex braid, the width of which is 24 P. The work uses Alize Angora Gold Simli threads with lurex (100 g per 500 m).
The hat is knitted with 3 threads on circular needles:
- On needles No. 4.5 cast on 82 sts.
- The first 7-8 rows are knitted IP (58 P) except for the loops that will be the pattern. In the chosen place, knit 24 LP.
- Switch to needles No. 5.
- 9 R: knit 3 LP, remove the next 3 P to an additional knitting needle before work, knit 3 LP on the main knitting needle. Next, knit 3 LP from an additional knitting needle. Then do 6 LP, remove 3 P to an additional knitting needle before work, knit 3 LP from the main knitting needle, knit 3 LP from an additional knitting needle. The remaining loops of the row are performed as IP.
- 10 R: knit all the loops in the same way, without changes: over the purl ones - IP, over the knit ones - LP.
- 11 R: remove 3 sts onto an additional needle before work, knit 3 sts from the main needle, knit the previously removed 3 sts. Repeat the rapport 3 more times. Knit the rest of the row in WS.
- 12 R: performed without changes.
- 13 R: repeat 9 R.
- 14 R: performed without changes.
- 15 R: perform in the same way as 11 R, only remove the loops onto an additional knitting needle behind the work, and not in front of it.
- 16 R: knit stitches are performed over the front stitches, and purl stitches are performed over the back stitches.
- 17 R: make 6 LP, remove 3 P to an additional needle behind the work, make 3 LP from the main needle and 3 more P from the additional needle. Then remove 3 P to an additional needle, 3 LP and 3 P from the additional needle, 6 LP. Make the rest of the row IP.
- 18 R: performed without changes.
- 19 R: make 9 LP, remove 3 P for work, make 3 LP from the main needle, also 3 P from the additional one. Then knit 9 LP, the remaining loops are IP.
- 20 R: performed without changes.
- From row 21, make a pattern, repeating the pattern from rows 9 to 20. Continue working until the hat reaches the desired length (about 20-22 cm).
The closing of the loops is performed on 4 double-pointed needles. Each should have 20-21 sts. All loops during closing are performed the same as they were knitted in the previous row: LP is performed over the front loops, IP is performed over the back loops.
Loop closing algorithm:
- 2 LP at the beginning of the pattern are knitted together, then continue to repeat LP until the end of the pattern. If at the end there are 2 LP, they are also done together LP. If the loops are purl, then one is transferred to another knitting needle without knitting, the next one is done as LP and pulled through the removed loop. On each knitting needle you need to make 1 decrease.
- In the next row, also make 1 decrease on each needle.
- Continue reducing in rows until there are 40 sts in the work.
- Next, make 2 decreases on each needle at the beginning and end. Continue decreasing until there are only 12-15 sts left.
- The thread is cut, its end is pulled through all the loops with a hook and the top of the product is pulled together.
When the top of the hat is pulled together, the end of the thread is tucked inside the product, where it is tied and hidden in the knitted fabric.
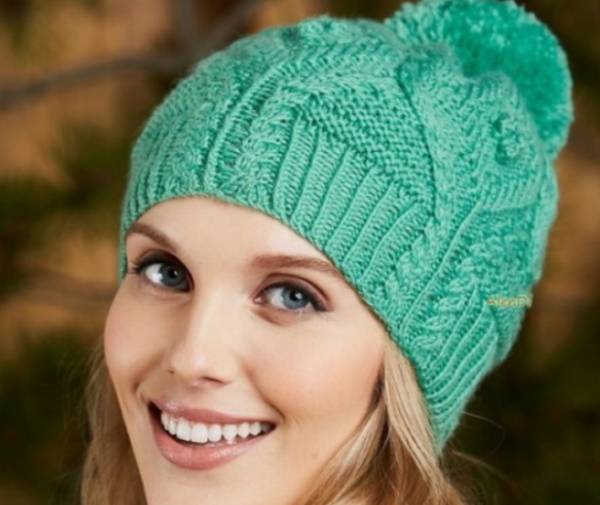
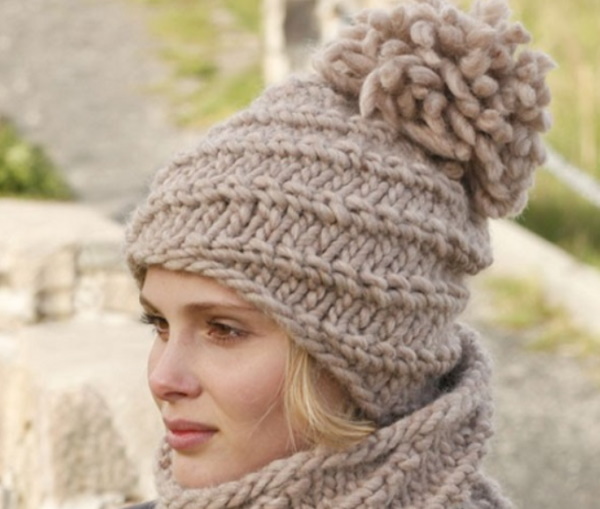
Knitted hat with complex pattern and pompom
Youth hats for girls can be knitted with knitting needles in a few hours if they do not have a complex pattern. Knitting a headdress with complex ornaments can take 1-2 days.
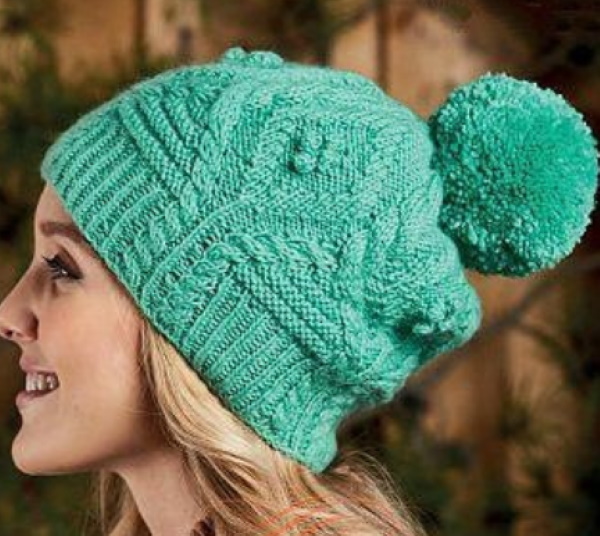
To create the model from this master class, an inexperienced craftsman will need several days.
Headdress sizes, knitting density, materials and tools
The master class describes the instructions for knitting a hat 20 cm high, the circumference of which is 53-57 cm. The work uses woolen threads Cygnet Superwash Pure Merino DK, 104 m / 50 g in a skein. In total, 2 skeins are required.
Tools required:
- circular knitting needles No. 3.25 and 3.75, length of the line 40 cm;
- double-pointed knitting needles No. 3.75;
- knitting markers;
- 1 additional needle.
Knitting density on needles No. 3.75:
| Stockinette stitch | 20 P and 29 R per 10 cm |
| Pattern density | 24 P and 36 R per 10 cm |
Step-by-step instructions for knitting a hat
Basic pattern diagram:
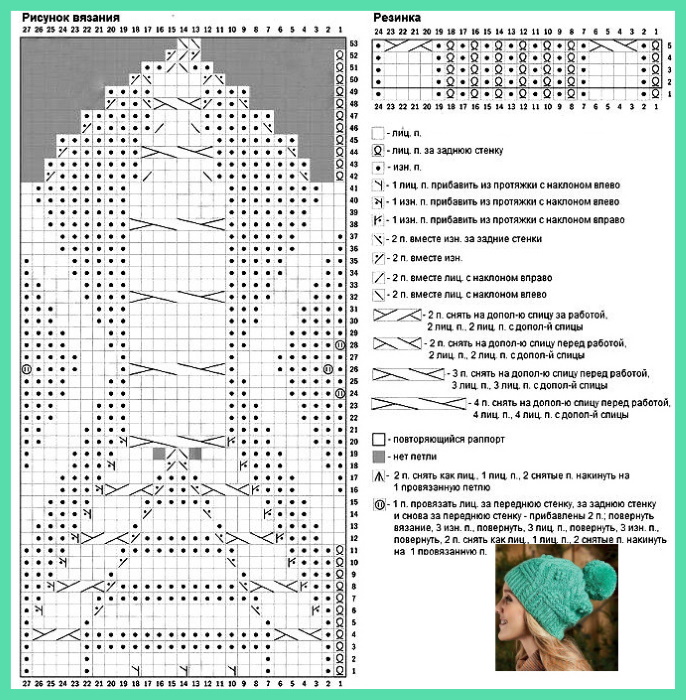
The headdress is knitted from the bottom up. Double-ended knitting needles are used on the decrease loops on the top of the hat.
Start of knitting (bottom edge):
- Using needles No. 3.25 cast on 120 sts.
- Connect the loops in a circular row.
- Place a marker in the first stitch of the row.
- 1-5 Rows are knitted according to the elastic pattern.
- Repeat rows 2-5 4 more times.
- Change the needles to size 3.75.
- Knit rows 1-53 according to the pattern that describes the knitting pattern.
- Cut the thread, use its free end to collect the remaining loops, pull them tightly together and secure the thread.
When the hat is knitted, you need to tuck the ends of the threads into the knitted fabric. Next, you need to slightly moisten the product and put it on a round form so that the hat acquires the anatomical features of the structure. You can not stretch the elastic, so the form should be slightly smaller than the diameter of the hat. Next, you need to make a pompom and sew it to the top of the hat.
How to Make a Fluffy Pompom Quickly
For the hat you need a fluffy pompom of medium size. It can be made without additional tools.
Instructions for making a pompom:
- Press the end of the knitting thread against your palm with your thumb.
- Wind the yarn around 3 or 4 fingers, depending on the desired volume. You need to make more than 100 turns to make the pompom fluffy.
- Cut the thread, make 2 transverse turns with its end, pulling the yarn as tightly as possible.
- Tie a strong knot.
- Cut the threads from the outside (opposite the knot).
- Straighten the pompom, trim the protruding ends with scissors, which are knocked out from the overall diameter of the hat.
You need to sew the pompom to the headdress with the same threads that were used when knitting the hat.
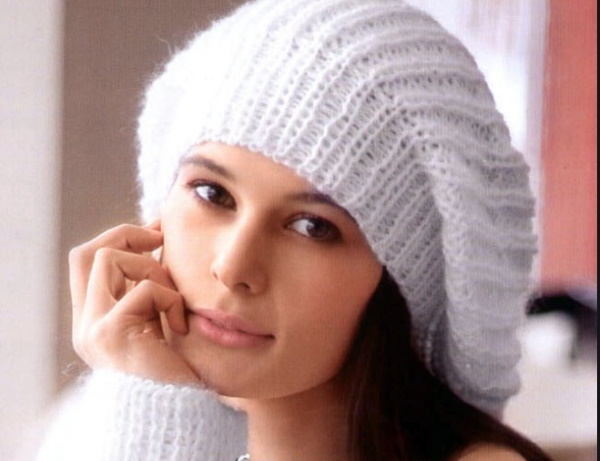
Youth hat with garter stitch turn-up
The calculation of the number of threads and loops, knitting density is given in the master class for making a hat for a head circumference of 54-56 cm. You can choose any color of yarn.
For the headdress model as in the photo you will need:
- a skein of thick semi-woolen yarn (200 g/120 m);
- circular knitting needles No. 10, length of line – 40 cm;
- double-pointed knitting needles No. 10.
Step-by-step description of the master class:
- Using circular needles, cast on 42 sts.
- 1 R knit LP.
- 2 R – transition to the “spiral” pattern. Each next row will have 7 pattern repeats. Pattern diagram: IP, 4 LP, IP.
- 3 R: 2 IP, 4 LP.
- 4 R: LP, 2 IP, 3 LP.
- 5 R: 2 LP, 2 IP, 2 LP.
- 6 R: 3 LP, 2 IP, 1 LP.
- 7 R: 4 LP, 2 IP.
- 8 P and then repeat the pattern of rows 2-7.
- When 20 cm of fabric has been knitted, start knitting the descent using double-ended straight knitting needles. The loops are distributed over 4 knitting needles (2 by 11 P and 2 by 12 P).
- In the front row, knit 2 P in pairs. Knit 3 rows in this way until there are 21 P left in the work.
- Perform another decrease by knitting the purl stitches as well.
- When there are 14 P, you need to cut the thread, leaving a small reserve (20-30 cm). It is passed through all 14 P, tucked inside the hat and tightened, secured on the back side.
A pompom is sewn onto the finished headdress. You can make it yourself from the same yarn as the hat, or use a ready-made one made of fur.
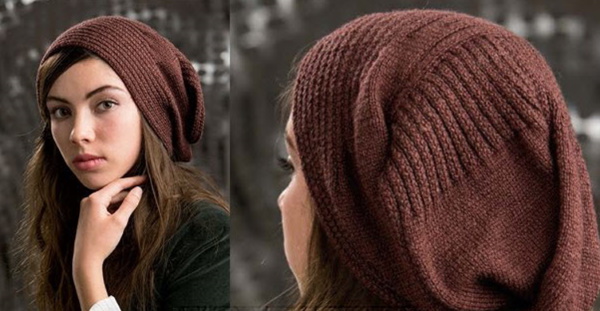
Homebody beanie hat
Youth hats for girls can be knitted with knitting needles, knowing only the rules for performing basic elements. In the master class described further in the article, all patterns consist of front and back loops. The headdress resembles the structure of an envelope. To create it, first knit a long piece of fabric with a pattern, which is then sewn together, forming a hat.
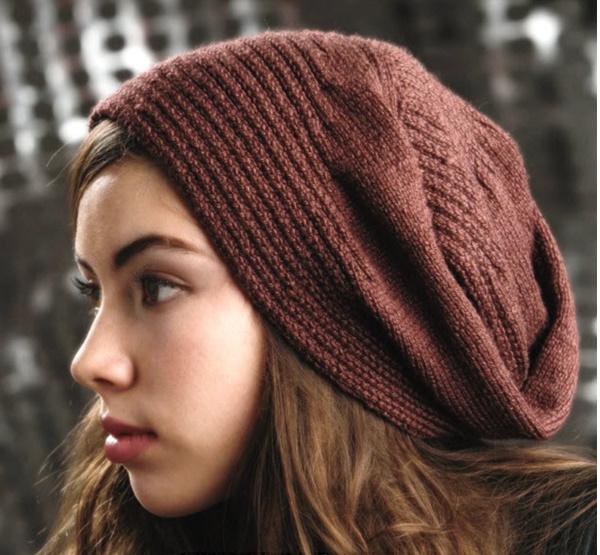
For a head circumference of 54-56 cm, you need to knit a piece of fabric 107.5 cm long and 17.5 cm wide. The work uses 1 skein of thin Sport yarn (55% superwash merino, 45% silk, 365 m / 100 g). For knitting, you need double-ended straight knitting needles No. 2.75, 1 removable marker and a needle for knitted fabric.
Knitting density: 32 P and 40 R = 10 cm in stocking stitch.
Knitting algorithm
Additional abbreviations are used in the master class description:
- LS - front side;
- IS - reverse side;
- [*] – pattern rapport (the pattern is repeated until the end of the row or the specified number of times).
Girls can knit a youth hat with knitting needles using a step-by-step master class:
- Cast on 62 sts onto needles.
- 1 R (LS): [2 IP, 2 LP] 15 times, 2 IP.
- 2 R (IS): [2 LP, 2 IP] 15 times, 2 LP.
- Repeat rows 1-2 another 14 times, finish knitting on the WS.
- 17 R (LS): 2 PI, 2 LP, 2 PI, 50 LP, 2 PI, 2 LP, 2 PI.
- 18 R (IS): 2 LP, 2 PI, 2 LP, 50 PI, 2 LP, 2 PI, 2 LP.
- Repeat rows 17-18 another 34 times, finish knitting on the WS.
- 52 R (LS): [2 PI, 2 LP] 2 times, 2 PI, 46 LP, 2 PI, 2 LP, 2 PI.
- 53 R (IS): 2 LP, 2 PI, 2 LP, 46 PI, [2 LP, 2 PI] 2 times, 2 LP.
- 54-61 R: repeat 52-53 R alternately 4 times.
- 62 R: [2 PI, 2 LP] 3 times, 2 PI, 42 LP, 2 PI, 2 LP, 2 PI.
- 63 R: 2 LP, 2 PI, 2 LP, 42 PI, [2 LP, 2 PI] 3 times, 2 LP.
- 64-71 R: repeat 62-63 R 4 times.
- 72 R: [2 PI, 2 LP] 4 times, 2 PI, 38 LP, 2 PI, 2 LP, 2 PI.
- 73 R: 2 LP, 2 PI, 2 LP, 38 PI, [2 LP 2 PI] 4 times, 2 LP.
- 74-81 R: repeat 72-73 R 4 times each.
- 82 R: [2 IP, 2 LP] 5 times, 2 IP, 34 LP, 2 IP, 2 LP, 2 IP.
- 83 R: 2 LP, 2 PI, 2 LP, 34 PI, [2 LP, 2 PI] 5 times, 2 LP.
- 84-91 R: repeat 82-83 R 4 times.
- 92 R: [2 IP, 2 LP] 6 times, 2 IP, 30 LP, 2 IP, 2 LP, 2 IP.
- 93 R: 2 LP, 2 PI, 2 LP, 30 PI, [2 LP, 2 PI] 6 times, 2 LP.
- 94-101 R: repeat 92-93 R 4 times.
- 102 R: [2 IP, 2 LP] 7 times, 2 IP, 26 LP, 2 IP, 2 LP, 2 IP.
- 103 R: 2 LP, 2 PI, 2 LP, 26 PI, [2 LP, 2 PI] 7 times, 2 LP.
- 104-111 R: repeat 102-103 R 4 times.
- 112 R: [2 IP, 2 LP] 8 times, 2 IP, 22 LP, 2 IP, 2 LP, 2 IP.
- 113 R: 2 LP, 2 PI, 2 LP, 22 PI, [2 LP, 2 PI] 8 times, 2 LP.
- 114-121 R: repeat 112-113 R 4 times.
- 122 R: [2 IP, 2 LP] 9 times, 2 IP, 18 LP, 2 IP, 2 LP, 2 IP.
- 123 R: 2 LP, 2 PI, 2 LP, 18 PI, [2 LP, 2 PI] 9 times, 2 LP.
- 124-131 R: repeat 122-123 R 4 times.
- 132 R: [2 IP, 2 LP] 10 times, 2 IP, 14 LP, 2 IP, 2 LP, 2 IP.
- 133 R: 2 LP, 2 PI, 2 LP, 14 PI, [2 LP, 2 PI] 10 times, 2 LP.
- 134-141 R: repeat 132-133 R 4 times.
- 142 R: [2 IP, 2 LP] 11 times, 2 IP, 10 LP, 2 IP, 2 LP, 2 IP.
- 143 R: 2 LP, 2 PI, 2 LP, 10 PI, [2 LP, 2 PI] 11 times, 2 LP.
- 144-151 R: repeat 142-143 R 4 times.
- 152 R: [2 IP, 2 LP] 12 times, 2 IP, 6 LP, 2 IP, 2 LP, 2 IP.
- 153 R: 2 LP, 2 PI, 2 LP, 6 PI, [2 LP, 2 PI] 12 times, 2 LP.
- 154-461 R: repeat 152-153 R 4 times.
- 162 R: [2 IP, 2 LP] 15 times, 2 IP.
- 163 R: [2 LP, 2 IP] 15 times, 2 LP.
- 164-171 R: repeat 162-163 R 4 times.
- 172-181 R: repeat 142-151 R.
- 182-191 R: repeat 132-141 R.
- 192-201 R: repeat 122-131 R.
- 202-211 R: repeat 112-121 R.
- 212-221 R: repeat 102-111 R.
- 222-231 R: repeat 92-101 R.
- 232-241 R: repeat 82-91 R.
- 242-251 R: repeat 72-61 R.
- 252-261 R: repeat 62-51 R.
- 262-271 R: repeat 52-41 R.
- 272-281 R: repeat 42-31 R.
- 282 R (LS): 2 PI, 2 LP, 2 PI, 50 LP, 2 PI, 2 LP, 2 PI.
- 283 R (IS): 2 LP, 2 IP, 2 LP, 50 IP, 2 LP 2 PI, 2 LP.
- Repeat 282-283 R 34 more times, ending with a WS.
- Next row (RS): [2 RP, 2 LP] 15 times, 2 RP.
- Next row (RS): [2 LP, 2 IP] 15 times, 2 LP.
- Repeat the last 2 rows 14 more times.
- Close all loops.
How to sew a hat
Step by step guide:
- The finished long piece of fabric needs to be folded in half and its center marked with a marker.
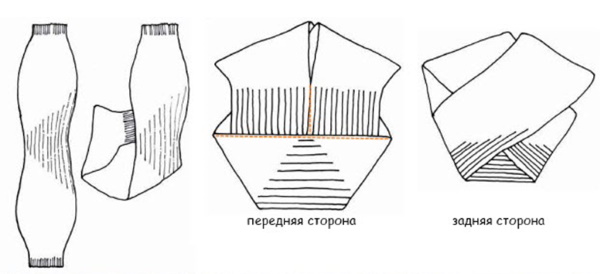
- Next, the knitting is straightened out and placed with the wrong side up.
- Fold the short end of the fabric parallel to the long side to the right of the marker. You need to connect the edge to the center where the marker is placed and sew a seam.
- Fold the second short end on the other side in the same way as the first. Connect the edge to the center where the marker is placed and sew a seam.
- From the marker, sew 2 sides end to end 7-8 cm up.
- Fasten the thread and hide its ends inside the headdress.
Useful tips
When knitting, it is important to choose tools that match the diameter of the threads. If the needles are thinner, the knitting density will increase and, conversely, with a diameter exceeding the thickness of the yarn, the density will be less. For a hat for cold weather, you can choose needles whose number will be 0.25 mm smaller than the diameter of the threads. This way, the headdress will be less blown through and retain the temperature.
If you have no experience in choosing yarn, it is better for girls to use the same threads that are indicated in the master classes. This way you can knit a stylish youth hat without large gaps (if the threads are thinner or the needles are larger). It is allowed to replace the yarn with one similar in composition and weight, but it can be very difficult to choose it.
Video on how to make youth hats for girls with knitting needles
Stylish youth hat knitted: