There are different types of seams that cannot be made using a sewing machine, so in the sewing process it is often necessary to manually sew some sections of the fabric. These types of seams are used in the manufacture of clothing and accessories.
Types of hand stitches and their use in sewing
Sewing of any product begins with cutting out the parts and temporarily sewing them along the necessary contours. After trying on and adjusting the product to the customer, machine stitching is used along the contour of the temporary seams, or stronger hand stitches are used for permanently sewing the components of clothing.
The main element of a hand stitch is a stitch, which is a piece of thread between two adjacent punctures in the fabric during sewing.
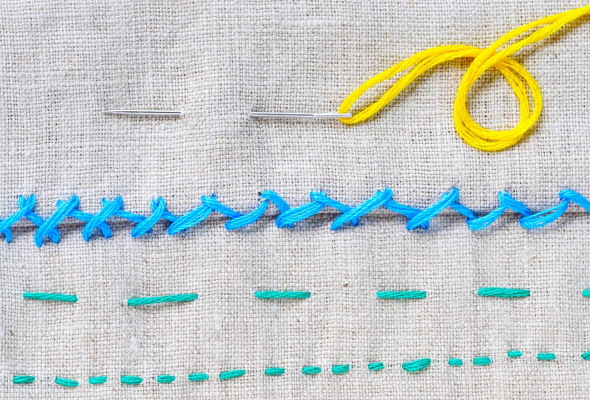
The stitch size required depends on the fabric and the type of stitch. Its length is the visible section on the front side and the invisible space before the start of the next stitch.
The stitches form a line that looks like a dotted line.If a 2-line parallel stitch was used, then the stitch width is the distance between them. Depending on the angle and direction of each stitch, stitches of different shapes are obtained.
Each type of stitch is used depending on the tasks that need to be performed in a particular situation during sewing. As a result of the stitched connection of fabrics, a seam is obtained. The distance from the edge of the fabric to the stitch is called the width.
Types of stitches for hand sewing, types of stitching depend on the type of stitches being made.
Depending on their purpose, stitches and the types of stitches they form can be presented in the form of a table:
| Stitch type | Stitches used | Application |
| Note | straight | Inconsistent hem of the product |
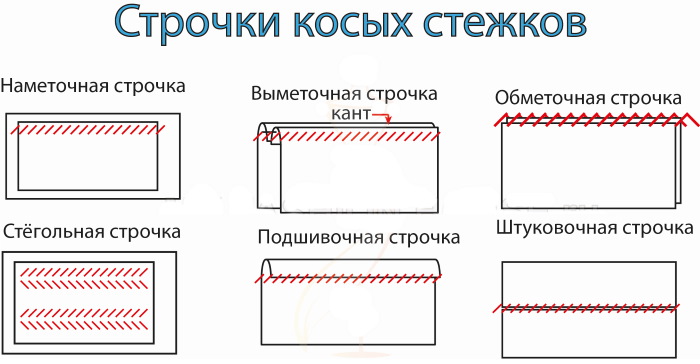
| Basting | straight or oblique | Temporary attachment of a part superimposed on a second one |
| Vymetochnaya | straight or oblique | Finishing the edge of the stitched parts |
| Estimating | straight | Temporary connection of parts |
| To form assemblies | straight | Forming folds on the product |
| Overcasting | oblique | Sheathing the edges of a part to protect it from fraying |
| Quilting | oblique | For fastening the main fabric and the lining |
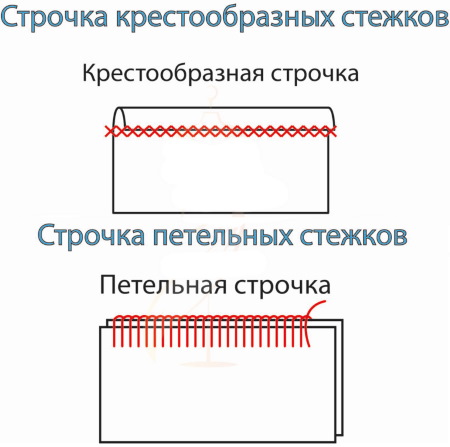
| Finishing | cruciform | Securing the edges of folded parts |
| Hemming | oblique or cross-shaped | Fixing the hem of the bottom of the garment and sleeves |
| Fluffy | loop-shaped | For external finishing of product edges |
| Stash | loop-shaped | Strong stitching similar to machine stitching |
| Marking | loop-shaped | For flexible bonding of several layers of a product. |
| Copying | straight or looped | Contour transfer between parts |
| Overcasting loops and edges | looped | For processing edges of bedspreads, clothes |
| Securing seams | loop-shaped | For attaching buttons, decorations |
Straight stitches
Hand sewing stitches that use straight stitches are designed to temporarily hold material together. The shape of such stitches looks like a dotted line.
They are laid by successive needle punctures through the material along the intended line (using the “forward needle” method), inserting and removing it each time at equal intervals of length corresponding to the required stitch length.

Straight stitches are used for non-permanent joining of cut parts to prevent them from shifting during subsequent machine stitching or customer fitting. After use, straight stitches are easily removed, as they are made with contrasting threads 1-2 mm from the line of the future cut.
The stitch size can range from 0.3 to 1.8 cm. Such stitches are used, for example, when basting the edges of clothing cuts, sleeves and collars with the main part of the product.
Oblique stitches
Oblique stitches are made at an angle to the desired stitch line and are used to securely or temporarily fasten parts of a material.
Fastening with oblique stitches is more reliable than straight stitches and is used when it is necessary to guarantee that the connected parts of the product will not shift during fitting. The resulting seams have increased elasticity and allow the fabric to stretch. The stitch length is usually from 0.8 to 2.5 cm.
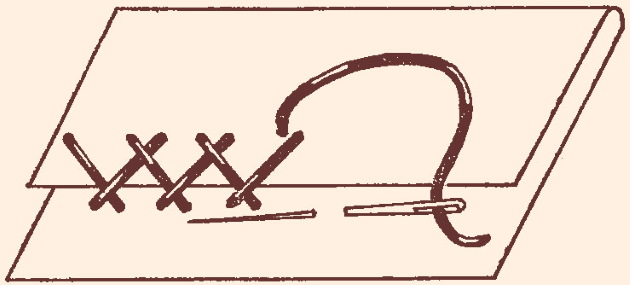
Cross stitches
Hand sewing stitches that use cross stitches are designed to permanently join pieces of a garment together. Cross stitches are used to strengthen folds from the inside of garments, for hemming, to strengthen edges and to prevent fabric from fraying.
At the bottom of the product, such stitches are laid from left to right, and from the side from top to bottom. When hemming the hem of products with these stitches, the threads remain invisible from the front side. The length of cross stitches is usually from 0.3 to 0.7 mm.
Loop stitches
Loop stitches are used for high-quality final fastening of cutting parts and are laid in loops along the marked line between the two parts of the product.

These stitches look like machine stitches, since each subsequent entry of the needle is made into the exit of the previous stitch. Loop stitches are used to make a hidden hem stitch, when the thread is not visible from both sides of the material.
Loop stitches
Loop stitches are used to decorate edges and protect cutouts in products from fraying. These stitches are also widely used in artistic handicrafts.
The needle is pierced through the fabric 0.3 cm from its cut, then the thread of the previous stitch is wrapped and pulled tight before starting the next one. The loops are tightened with the same force.
How to make a knot at the beginning of work
The knot is necessary so that it is firmly attached to the fabric at the beginning of any hand sewing work. After the thread is threaded into the needle, you need to clamp the end of the thread between the first and index fingers of your left hand and make 2-3 turns of the thread around the tip of your index finger.
Then you need to pinch the thread wound on the index finger with your thumb and twist it with a sliding motion of the thumb towards the tip of the index finger. After the thread is twisted, you need to pinch it between the third finger and the thumb and pull the other end of the thread with your right hand until the twisted thread is completely tightened into a knot.
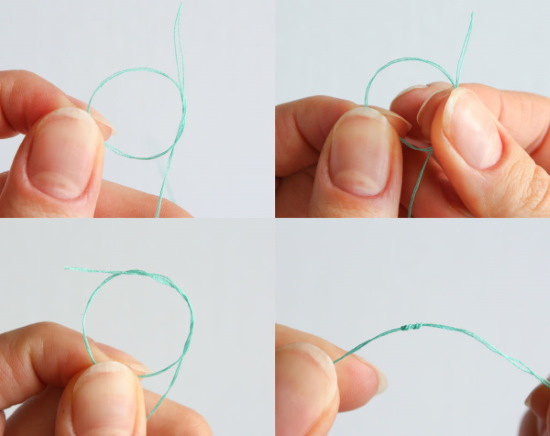
The result will be a strong and small knot. If the fabric on which you plan to use this thread with a knot is not dense enough, then the size of the knot can be made large. For this, in the process of winding the thread on the index finger, the number of turns of the thread around it should be doubled.
How to secure a thread at the end of a seam
Securing the thread at the end of any seam is done by tying a knot at the place of the final stitch. Before laying the seam, you need to make sure that the length of the thread is sufficient to tie the securing knot.
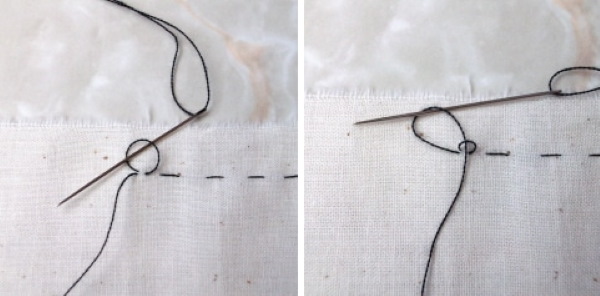
To make such a knot, you need to do the following:
- Place the needle under the stitch and pull it out on the other side so that a small loop is formed, no more than 1 cm in size.
- Thread the needle through this loop and pull it tight. The resulting knot will secure the seam.
- Carefully cut off the excess thread with scissors at a distance of 0.3 – 0.5 cm from the knot.
Hand Sewing Stitch Patterns. Step-by-Step Description
Types of seams for hand sewing are temporary (used for marking and temporarily fastening parts of a product during sewing and fitting) and permanent (used for their final connection).
Depending on the purpose, there are different types of stitches using straight, oblique, cross, loop and buttonhole stitches.
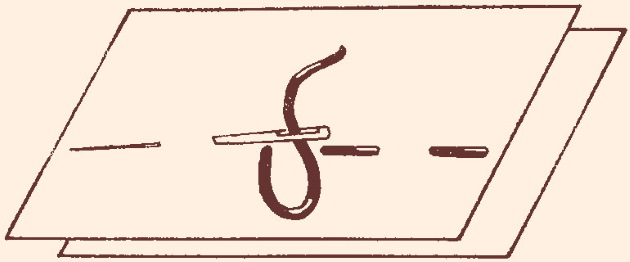
Copying snares
Tracing snares are used to transfer marked lines and outlines from one pair of pieces to another. This procedure is performed using straight or loop stitches.
In order to transfer the required outline from one part of the product to another, it is necessary:
- Place one piece on its copy and align them along the edges.
- Lay a basting line with straight stitches along the contour of the upper part, while the needle catches both parts, piercing them through. During the process of applying the seam, the thread of each stitch should protrude above the fabric in the form of a loop 0.5 cm high.
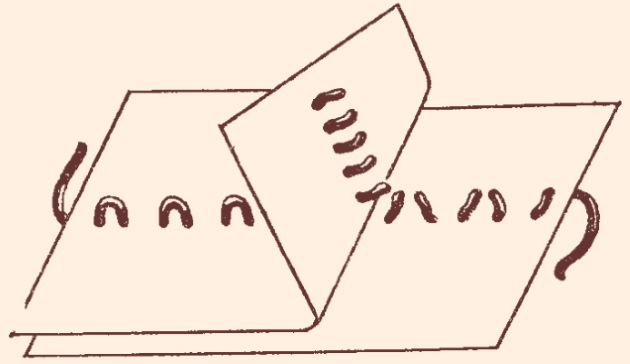
- After finishing laying the seam along the entire contour, bend the two fastened parts along the contour of the seam and cut the threads.
- The remaining parts of the threads on the second part will be a copy of the outline of the first part.
The tracing stitches must be done with contrasting threads so that they are clearly visible against the background of the main fabric.
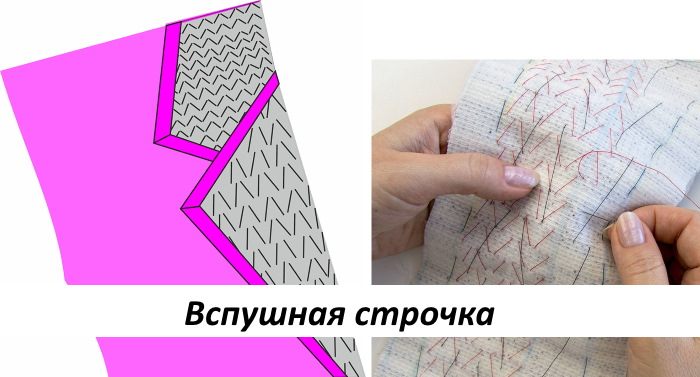
Back the needle
The backstitch is used to permanently and firmly fasten parts together, while the connection of the parts of the product is quite elastic. This stitch is very similar to a machine stitch, with the only difference being that a small gap is left between the stitches.
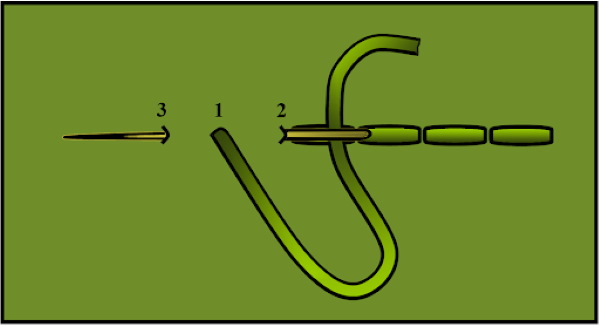
To fasten the cut pieces together using the backstitch, you need to:
- Connect 2 parts along the line where they are attached.
- Make a puncture with a needle from top to bottom at the beginning of the seam line.
- Make a stitch 0.25 cm long, piercing the needle along the seam line from bottom to top.
- Insert the needle into the previous puncture in the fabric and bring it down through this puncture.
- Make a stitch at the bottom 0.75 cm long, piercing the needle along the seam line from bottom to top.
- Insert the needle back along the seam line and at a distance of 0.25 cm from the previous top stitch and pierce both fabrics with the needle from top to bottom (as a result, you will get the next top stitch 0.25 cm long).
- Repeat the previous two steps consistently along the entire seam line.
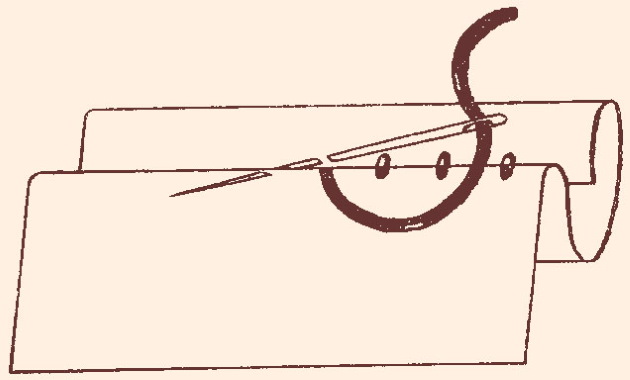
Dotted stitches
Dotted stitch seams are used to temporarily fasten parts of a future product. This is necessary at the initial stage of production to prevent possible shifting of parts during fittings and to prepare the product for the final machine stitching. Dotted stitch seams are also called basting stitches.
To make such a seam, you need:
- Connect 2 parts along the line where they are attached.
- Pierce both fabrics with a needle from bottom to top at the beginning of the seam line.
- Make a stitch 0.5 cm long, piercing the needle along the seam line from top to bottom.
- The following stitches are made of the same length, along the seam line, sequentially alternating the upper and lower punctures of the fabric.
To mark the construction lines on the cutting details (center lines, control marks), use a dotted seam in which the upper stitches are longer than the lower ones.
Machine-type stitches
Types of seams, such as piecing stitches, like machine stitches, are used for permanent and strong fastening of parts, and in terms of quality are almost no different from machine stitching. Such seams are used for hand sewing in those places of the product where it is not possible to use a sewing machine.
To fasten the cut parts using piecing stitches, you need to:
- Connect 2 parts along the line where they are attached.
- Make a puncture with a needle from top to bottom at the beginning of the seam line.
- Make a 0.25 cm long stitch, piercing both fabrics with a needle along the seam line from bottom to top.
- Insert the needle into the previous puncture in the fabric and bring it down through this puncture.
- Make a stitch at the bottom 0.5 cm long, piercing the needle along the seam line from bottom to top.
- Insert the needle back into the adjacent puncture of the fabric from above and bring it down through this puncture (as a result, you will get the next top stitch 0.25 cm long).
- The remaining stitches are also made from below, 0.5 cm long along the seam line, each time inserting the needle from above back into the adjacent puncture.
On the top side, the stitches of the seam will be continuous and neat (the length of each stitch on top will be 0.25 cm). On the bottom (wrong side), the stitches will overlap each other and look like a double seam (the length of each stitch on the bottom will be 0.5 cm).
French tack
French tack is used to attach the fly lining to the garment, as well as to secure pockets in the seam. This type of seam not only has practical application, but also plays an additional decorative role.
To sew a lining to the folded edge of a garment using a French seam, you need to:
- Pierce the needle through the place where you plan to connect it to the lining.
- Insert the needle into the edge of the lining and make a 0.25 cm stitch so that the length of the connecting thread between the puncture point of the main product and the stitch of the lining is 2-3 cm.
- Remove the needle from the interlining and insert it into the main product at a distance of 0.25 from the previous puncture, and make a stitch, removing the needle from this puncture.
- Insert the needle again into the edge of the lining into the previous puncture and make the same stitch over the previous one.
- Take the needle out of the lining and place it around the thread being connected to the product and the lining so that a loop is formed and tighten it tightly at the base of the lining. Do the same operation on the side of the main product, tightening the second loop now at the base of the main product.
- Repeat the previous steps along the entire length of the lining.
Buttonhole overcasting
Buttonhole overcasting is used to overcast the edges of bedspreads, clothing, and buttonholes. This prevents threads from falling off the edges of the garment.
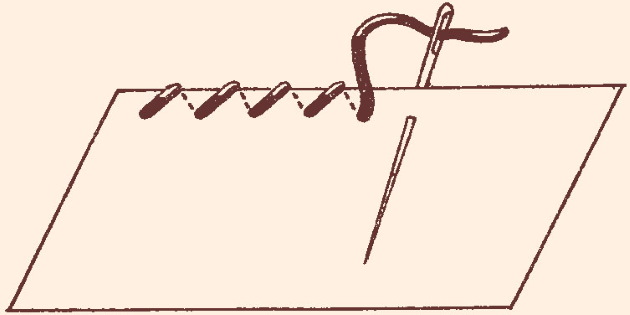
To perform buttonhole overcasting you need:
- Insert the needle from the bottom up from the edge at a distance of 0.5 cm from it.
- Place the needle down around the edge of the item and again pierce the needle from the bottom up, into the existing puncture.
- Insert the needle at the edge of the resulting stitch, form a loop and, pushing the needle through it, tighten the knot.
- Place the needle down around the edge of the product and pierce the needle from the bottom up along the seam line to the right of the previous puncture at a distance of 0.5 cm.
- Form a loop from the thread coming from the previous stitch. Then insert the needle into it and tighten the knot.
- Repeat the previous two operations along the entire intended length of the seam.
Round stitch overcasting
A round seam is used to decorate cuts from light fabrics folded in several layers from the edge of the product.
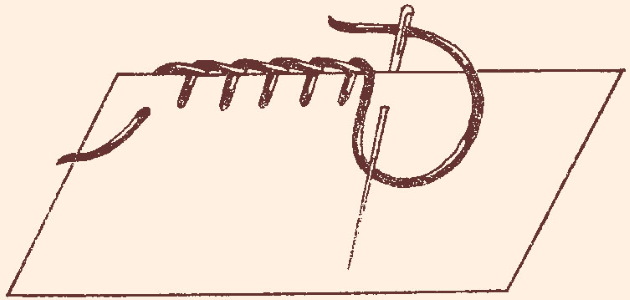
To perform this seam you need:
- Turn the edge of the product by 3 mm twice in a row.
- Make a securing stitch from the right end of the edge of the product, then insert the thread from the front side at the base of the edge and, without touching the folded section of the fabric, bring it out from the back side.
- Repeat the previous operation along the entire edge, shifting along the seam to the left every 3 mm.
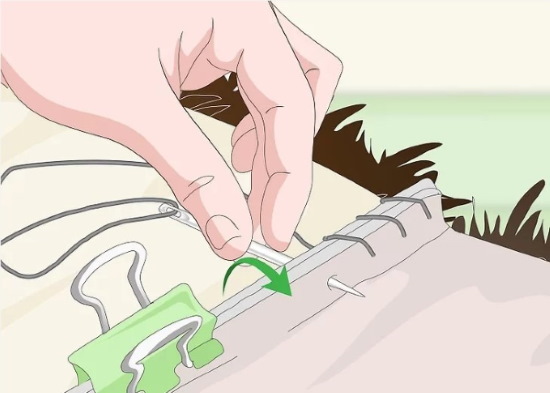
Blind hem stitch
A blind hem stitch for hemming the bottom of clothing is used when it is necessary that the threads are not visible from the front side.
This seam can be made using diagonal stitches from right to left, for which you need to:
- Pierce the folded edge with a needle at a distance of 0.5 cm from its edge.
- Next, make a diagonal stitch, hooking several threads at the base of the main product near where the thread comes out of the folded edge (the width of the hook should be 0.3 cm).
- Repeat the previous procedure along the entire cutting line, moving from right to left in 0.5 cm increments.
Hemming goat
The “Hemming Goat” stitch is mainly used for hemming the folded edges of thick fabrics, made of material with crumbling edges. The stitch is made with cross stitches from left to right.
To perform this seam you need:
- Pierce the folded edge with a needle at a distance of 0.5 cm from its edge on the left side of the product.
- Diagonally to the right and up from the puncture, grab a few threads of the main fabric of the product with the needle and make a stitch.
- Diagonally to the right and down, grab a few threads of the folded edge along the seam line with the needle and make another stitch.
- Repeat the previous two operations along the entire cutting line, moving from left to right in 0.5 cm increments.
Fluffy stitch
The fluff stitch is similar in execution technique to the back stitch and is used when it is necessary to obtain a highly elastic seam.
Unlike the backstitch, the distance between the front stitches of the fluff stitch is several times larger. This stitch will not interfere with the stretching of the product in the joining area.
Quilting stitch
The quilting stitch is used to increase the fastening of the connected parts of the product. (for example, for joining materials used as gaskets).
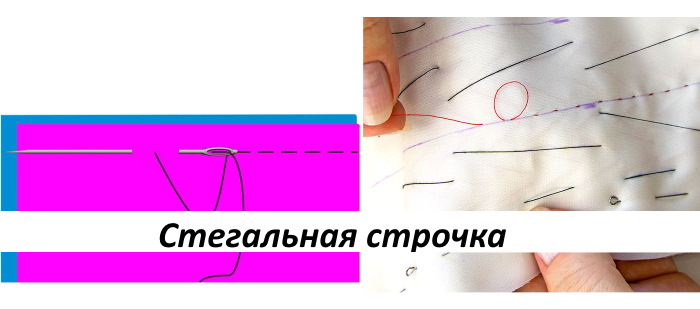
The quilting seam is made with diagonal stitches in parallel rows, covering the entire surface of the interlining material. The interlining material is pierced through, and the fabric of the main product is captured only by half its thickness.
Stitching and cover stitches for invisible darning
Stitching and cover stitches are used when sewing together damaged areas of a product. When making stapling stitches, the sections of fabric to be sewn are placed end to end and connected with loop stitches so that the thread is not visible from the front side.
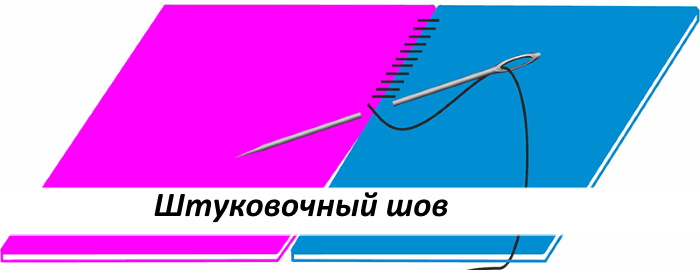
When making overlock stitches, the fabrics are folded along the line of the future seam from the back side of the product. After that, they are sewn with frequent loop stitches. After ironing the joining area, the seam becomes invisible.
Furrier's stitch
The furrier's stitch is used to sew together parts of fur products. To make this seam, 2 pieces of fabric are folded wrong side out and the edges of the pieces to be sewn are joined by hand with loop stitches from right to left.
After each stitch, the thread is pulled tight and another stitch is made in its place through the same holes. Moving from right to left with a step of 0.5 cm, the following double stitches are made to the end of the seam line. This type of seam is necessary because fur is a fairly heavy material and requires the appropriate strength of the connection when sewing.
Video about seams
Types of stitches for hand sewing: