Tassels made from yarn, can become a beautiful decoration for a hat, scarf or any interior item. It is easy to make such decoration, so both beginner needlewomen and more experienced craftswomen will be able to please themselves with yarn tassels. You will not need a lot of accessories or materials for the work: to create a tassel from yarn, you only need threads.
An easy way to make tassels from threads
Tassels made from threads or yarn can be used to decorate the edges of a knitted blanket, or to decorate curtains or a headdress. If the tassel is made only from threads, without adding beads or other decorative elements, it can be finished in no more than 15 minutes.
Despite the fact that this decorative element is made quite quickly, it is necessary to follow several recommendations:
- It is important to consider what item the finished tassel will decorate. The type of thread, the length of the tassel or the addition of other decorative elements (for example, beads) depend on the size of the item. So, if the tassel is added to curtains, it is necessary to choose longer threads than for a tassel on a hat.
- To add volume to the finished tassels, you can use thick threads of contrasting colors. Such tassels will complement a knitted blanket or bedspread well.
- Thinner threads, such as floss, can be used to create earrings. This type of tassel is more complex, since several techniques are combined during the work on the decoration, such as beading, macrame.
- To start working, you should choose threads, prepare scissors, a base on which the threads will be wound during the creation of tassels. Thus, a small piece of cardboard can serve as a base for a future tassel. But you need to pay attention to the surface of the base, since abrasions, nicks on it can prevent the removal of the tassel from the base or spoil the threads.
To create the simplest tassel from yarn, you need to prepare threads, for example, soft yarn, scissors and a base, the length and width of which depend on the length of the future decoration.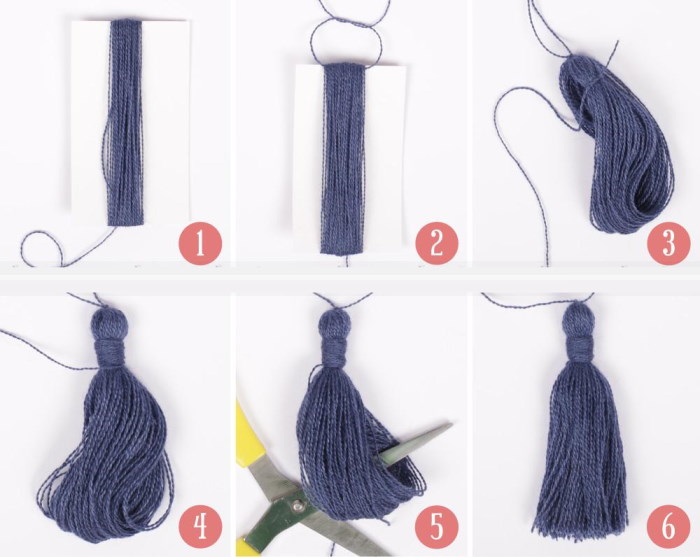
Yarn tassels, which both an inexperienced needlewoman and a more experienced craftswoman can make, are created using the following steps:
- Take the selected ball of thread, unwind a small piece and wind it onto the selected base. To avoid making a mistake when determining the size of the tassel, do not cut the thread from the ball or skein before it is completely wound onto the base.
- After this, you need to secure the tassel on one side. To do this, you need to cut a small piece of thread of the same color, thread it through the entire bunch and tie a knot. It should be very strong so that the tassel does not unravel.
- On the other side, the threads are cut. To make the cut more even, it is necessary to cut with sharp scissors.
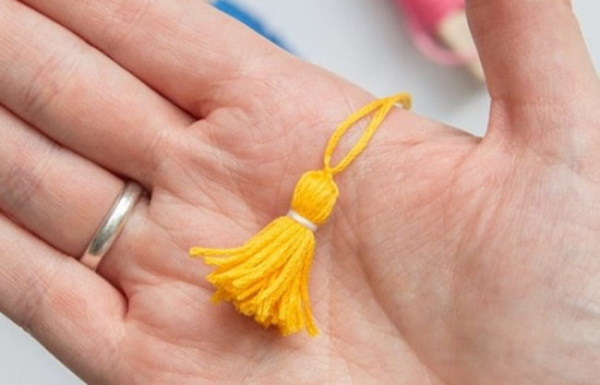
- The last step in the design is to braid the tassel with a thread in one more turn. When the winding is finished, the free ends should be hidden under the tassel. Take scissors and trim the edges of the cut. The option considered is the easiest way to create a tassel from threads.
How to Make a Tassel from Mouline Threads
Tassels made of floss can be used to decorate a scarf, bag or earrings. You can also decorate a bookmark with a tassel made of floss. You will need floss threads, scissors and a fork, which is the basis for winding the threads.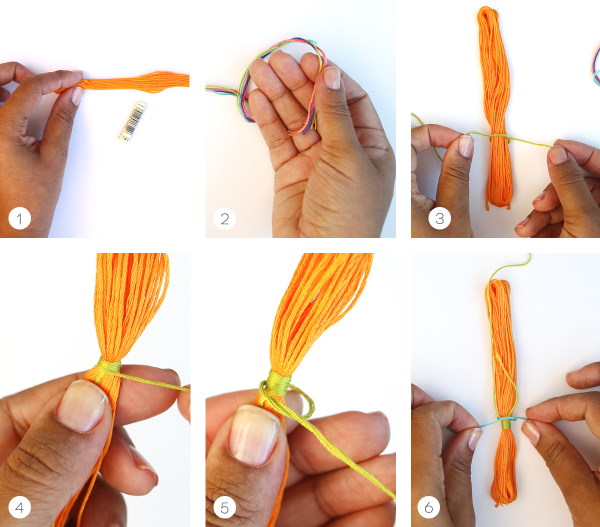
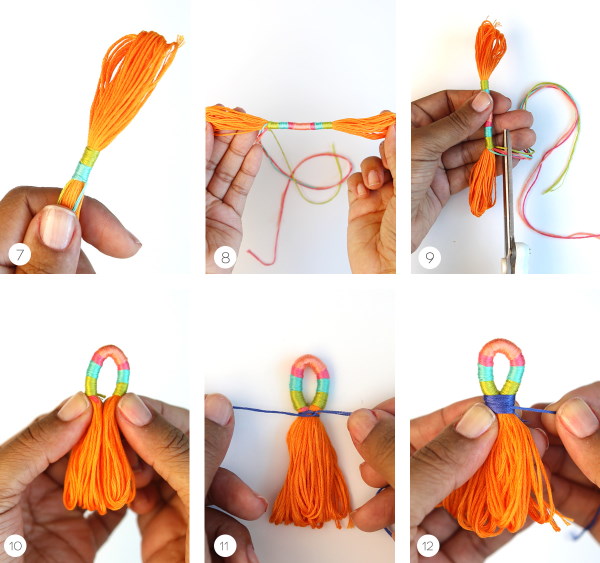
The process of creating a tassel from floss can be described as follows:
- Select all the necessary thread colors.
- Wind the selected threads onto the fork. They should be wound along the width, not along the length of the cutlery. After the first turns of the threads, a piece of thread should be threaded through one side, which should then be tied into a knot to strengthen the tassel.
- Continue winding the thread until the tassel reaches the required thickness.
- Tie a knot on the side where the piece of thread was pulled through. This knot will help the tassel not to unravel.
- Between the top and next teeth of the fork, thread a thread of the same color as the braided tassel, wrap it several times and secure it tightly. Remove the tassel from the fork. In order to attach the tassel to things, you can attach another thread or cord to it.
Made of silk threads
According to craftswomen who weave tassels from various types of threads, the most suitable material for creating tassel earrings is silk thread.
To weave a tassel from silk threads, you will need the following materials and tools:
- Silk threads
- Threads similar in color to the threads from which the tassel will be made (they will be needed for tying)
- Clear nail polish
- A box or piece of cardboard used as a base
- A piece of paper that can be used to trim the edges of the brush
The table below shows the types of threads that can be used to create silk thread tassels.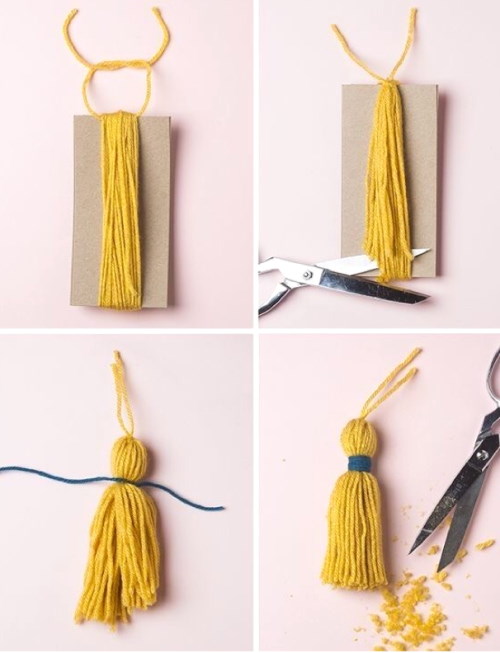
| Manufacturer | Description of threads | Advantages of threads | Disadvantages of threads |
| Doli (India) | The most popular brand among needlewomen. Composition – viscose. | They wind quickly, are dense to the touch. If you pull the threads too tightly, they will break. | No deficiencies were found. |
| Gamma (China) | Composition: viscose. | They wind quickly and are pleasant to the touch. | They may seem thin, do not hold their shape even on a spool, and the winding may unwind during work. |
| Shoe nylon 50K (Russia) | Composition: polyamide. | The threads do not fluff or break during work. | No deficiencies were found. |
Tassels from this type of thread can be woven according to the following instructions:
- Wind the prepared threads onto the base. To prevent the thread from unraveling on the base, you can hold it with your finger until the first turns are wound.
- When enough thread is wound, it is necessary to tightly tie the future decoration. When tying future tassels, it is also necessary to tightly wrap the thread around them several times. This will prevent the silk thread tassel from untying.
- To catch all the threads when removing from the base, you can hook them with a ruler. You need to try to cut the bundle so that the wound threads are in the center. As a result, a bundle of threads is formed, tied in the middle.
- Since silk threads can fluff up and spoil the appearance of the finished product, it is necessary to carefully straighten the threads over a hot teapot. To avoid getting burned, you can hang a bunch of threads on a pencil.
- Next, rewind the brush with a new thread at a distance of about 1 cm from the bend of the bunch, making 2-3 knots during winding. To prevent the knots from unraveling, you can coat them with a small amount of varnish. After the varnish dries, press the knot with your fingers.
- To make the tassel more even, take a sheet of paper and wrap the tassel in it so that almost half of the future decoration remains unwrapped in this sheet. As a result, you will get a roll, on one side of which there will be a thread tying the tassel, and on the other - the end of the tassel, which needs to be trimmed. For a more accurate trim, you can pull the thread, after which only uneven edges will remain on the outside.
- Squeeze the roll tightly in your hand and cut off any loose threads with sharp scissors. Pull the brush out of the paper. The brush is now complete.
Tassels for a hat
Yarn tassels, which can be made from any type of yarn, can decorate a hat. Children also really like this decoration. To fit these tassels into the product, needlewomen knit a hat with small ears, to the ends of which you can sew cords with tassels. A yarn tassel can replace a pompom on a hat. It is more difficult to make a pompom, so you can make a tassel instead.
To work you will need:
- Threads that match in color and thickness. You can use threads of the same color as the hat itself.
- The base on which the tassel will be wound.
- If desired, you can add decorative elements to the tassel itself, for example, thread large beads onto a thread.
- Sharp scissors to cut the threads.
Work on the product is carried out in accordance with the following steps:
- Start winding the thread onto the previously prepared base. The thread should be wound tightly so that it does not unwind and does not worsen the appearance of the tassel. When enough thread is wound, cut it off from the ball.
- Take 3 threads and put them together. The threads should be long, because they will be woven into a braid. Pass them under the entire future tassel in the middle on one side and tie them in a knot so that the tassel does not unravel.
- Turn the cardboard with the winding over, cut it down the center with scissors, making sure that the ends of the tassel are even.
- Straighten the tassel, take a small piece of thread, wrap it around the center, forming a neat knot. Securely fix the end of the thread and hide it in the tassel.
- Start forming a tourniquet that will connect the ears and the tassel itself. The tourniquet is woven from 3 threads threaded through the tassel: from them it is necessary to weave a dense and neat braid.
- If desired, you can add beads by threading them onto the braided plait. After that, you can sew the plait with the tassel onto the hat.
For a scarf
Yarn tassels, which any needlewoman can make, will decorate both a warm winter scarf and a light summer shawl. To make this element, you will need yarn, scissors and a base on which the yarn will be wound.
After this, yarn matching the color of the scarf should be wound onto the base, tied with another piece of thread and the future tassel secured with a knot. The ends of the thread that will be tied around the tassel can be hidden in the other threads that form the tassel.
The bottom edge should be cut with sharp scissors and all uneven ends should be trimmed. After that, it is necessary to tie the tassel at a distance of about 1 cm from the top of the decoration. Tassels made of thick yarn can be a decoration for a winter or autumn scarf.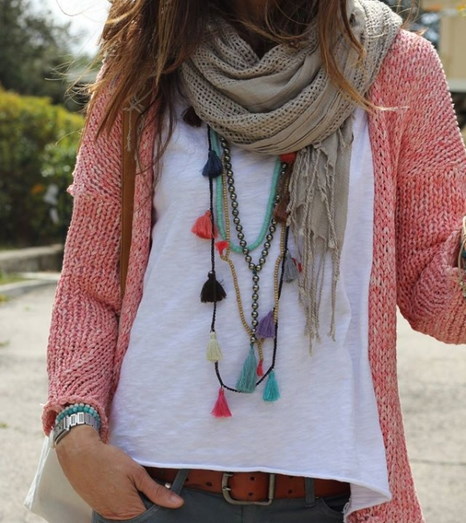
To decorate a thin and light scarf, the yarn can be replaced with thin sewing threads. The materials for making the scarf element remain the same, except for the yarn.
To make the tassels dense and neat enough, you can make 100 turns of thread around the base. Then you should pick up the wound threads with a needle. Then pull a new thread through the entire winding and tie it into 2 knots.
After this, remove the threads from the base and cut the threads that tied the tassel in the center shorter. The entire tassel should be tied with a new piece of thread. The upper part of the tassel should be wrapped with the same thread that was used to tie the top of the tassel. You should tie the 2 ends of this thread with strong knots. The final step is to trim the lower part of the tassel.
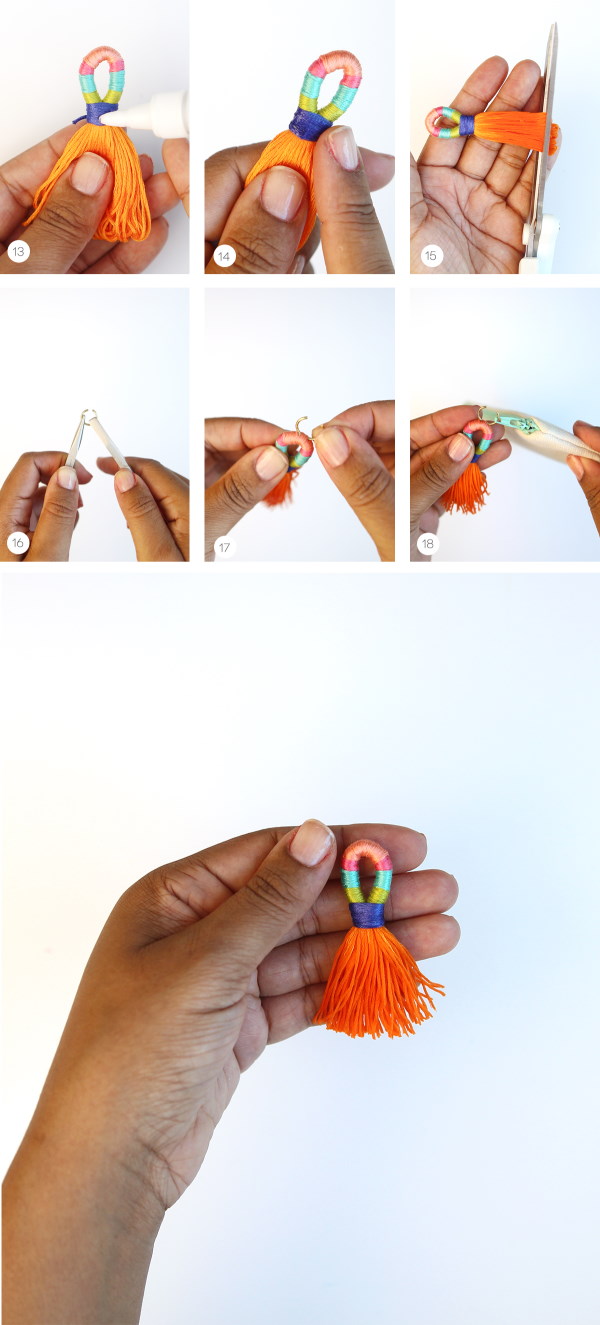
Thread Tassel Earrings
To weave tassel earrings from threads, you can prepare viscose or silk threads. Polyester is also used, one of the advantages of which is their neat appearance: while all other silk threads need to be steamed so that they become smoother, this should not be done with polyester threads. You also need to prepare a piece of cardboard, the width of which will be slightly larger than the width of the tassel.
The thread must be wound on the base. It is necessary to ensure that the same amount of thread is wound for both tassels. If you cannot determine this by eye, you can count the number of turns.
Next, you need to prepare a few more pieces of thread that match the color of the future tassels. Each of the tassels should be tied, and on the other side of the winding, a cut is made with sharp scissors. After this, the threads may fluff up, so they should be steamed for a few minutes. As a result, the tassels will straighten out and look neater.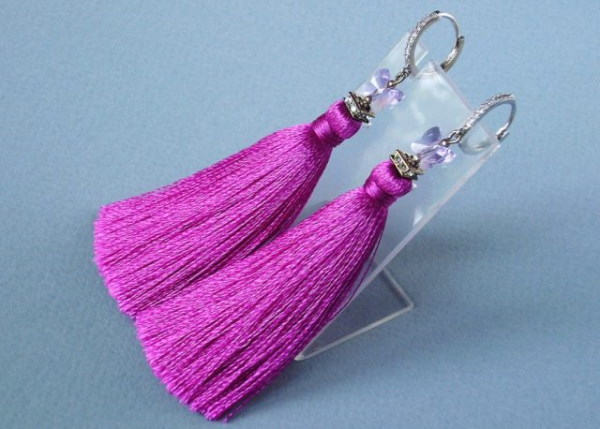
After this, it is necessary to thread the tassels into the earring fittings. The pin ring should be opened and threaded through the tassel loop. Then the ring is closed with round-nose pliers. The end caps are put on the pins, the pin is bent at a right angle, cut with nippers. It is necessary to leave about 8 - 10 mm and form a ring. If desired, you can add beads or crystals. This step completes the assembly of the earrings.
For decorating curtains
Yarn tassels, which can be made to decorate curtains, are best made from thick yarn. Before starting work, you need to determine how thick and what size the tassels will be on the curtains and prepare cardboard for the base.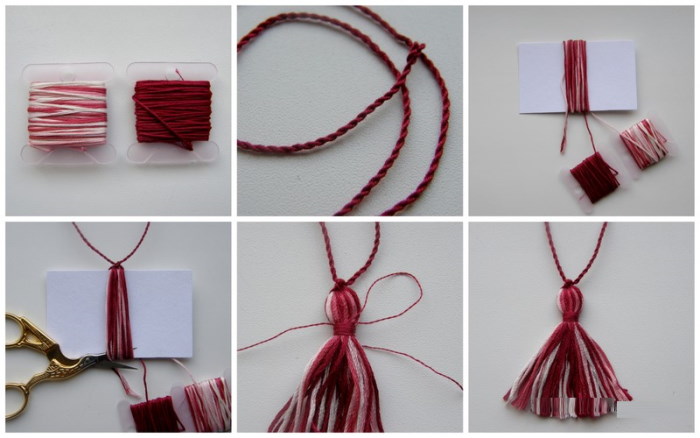
After this, the following steps are performed:
- Cut a piece of thread 30-40 cm long. The tassel will hang on this piece.
- Place the thread on the base and wind the threads along it at right angles.
- After a sufficient number of turns have been made, cut the winding from the ball and tie the other end of the brush with a knot.
- Remove the thread from the cardboard and tighten the knot that ties the brush.
- Cut the brush on one side with sharp scissors.
- Decide on the method of fastening. Method 1 - bringing the fastening thread to the top, method 2 - placing the fastening inside.
- A simpler option: the thread that holds the future curtain decoration is pulled upwards, and the upper part of the tassel is tied under it. To secure the garter, you should wrap a piece of thread around the tassel several times.
- A more complicated version is described as follows: after cutting the winding, lower the thread to which the future decorative element will be attached. Form the top of the tassel by winding a piece of thread several times. Take the fastening thread and turn it over, distributing the ends of the tassel. Wind the remaining piece of thread several times around the top. Tighten and tie a knot. Trim the ends so that the tassel earrings look neat.
Tassels for bracelets made of floss
Bracelets made of floss are popular among children and teenagers. Many needlewomen who weave these bracelets strive to decorate them beautifully by adding unusual ties in the form of tassels made of floss threads.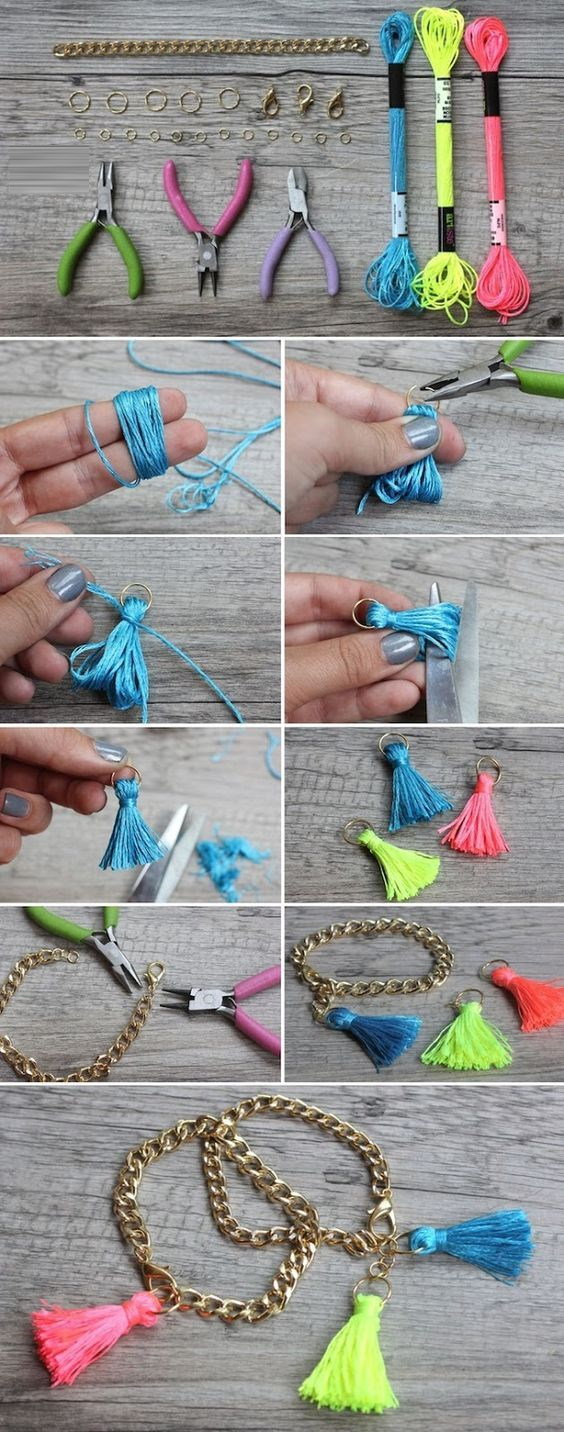
To weave a tassel for a bracelet, you will need the following materials:
- Braided bauble with threads for ties;
- Mouline threads;
- A small piece of cardboard or a bank card;
- Sharp scissors;
- Glue or nail polish.
You can decorate the finished bracelet with tassels according to the following instructions:
- Before you start creating the tassel, you should design the bracelet ties: weave braids, strands or so-called fish tails.
- Start winding the thread onto the cardboard or card. You can use different colors of thread for this.
- Start connecting the tassel and the ties of the bracelet. Divide the bundle coming from the tie into 2 parts and pull one half over the winding and remove it from the base. Tie a knot with the remaining threads from the tie and secure the future tassel to the ends of the tie. After that, cut the tassel. To make the tie more reliable, you can coat the middle of the tassel with glue.
- Move all the threads down, make them look like a tassel and add the last thread, tying it on the future decoration. Wrap the entire bunch with this piece of thread. To secure this thread on the bunch, you can pass its end through the entire tassel.
- When finishing the brush, you should cut the brush, making it either shorter or longer. To make the brush fluffier, you can comb it with a brush.
A beautiful and simple decoration – tassels woven from yarn can be used as a decorative element. They can be seen on curtains, hats and decorations. Tassels can be made by both beginners and more experienced craftswomen, so even teenagers can decorate woven bracelets from floss with tassels made of thread.
Video about yarn tassels
How to make a tassel from threads: