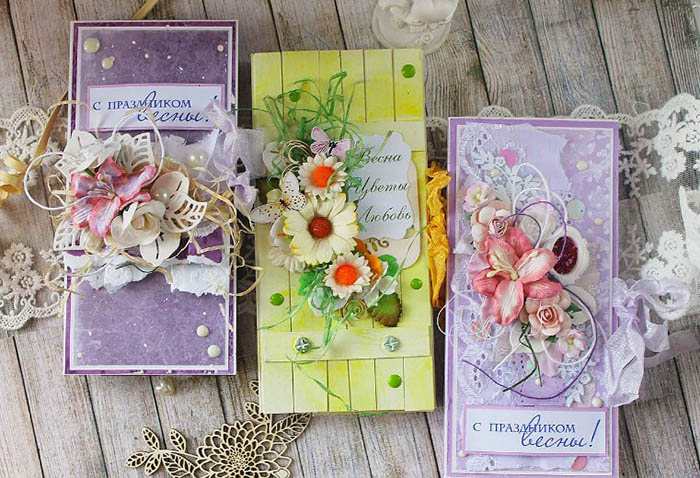
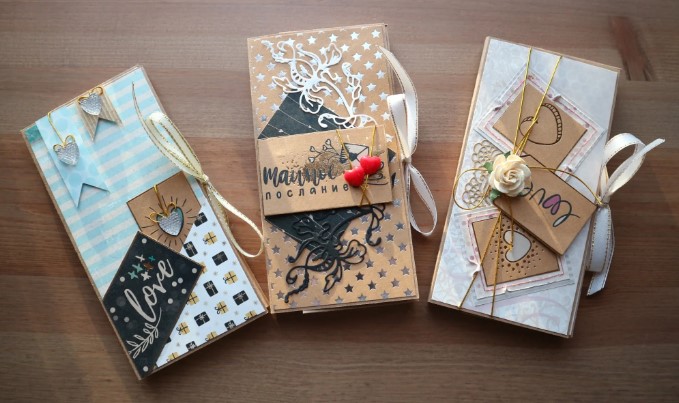
A chocolate box is the most interesting way to give chocolate, when the content is not as important as the style of presentation. Moreover, it can be made with your own hands, even if the person has never been involved in creativity. Homemade things (DIY) are usually made in scrapbooking style, as well as in the form of postcards and simple congratulations.
Preparation of tools and materials
To create a chocolate box in scrapbooking style, you will need the following tools:
| Box or container | You need to choose a suitable box or container that will serve as the base for the chocolate box. You can use a cardboard box or a plastic container, depending on your preferences. |
| Decorative paper | You need to select beautiful decorative papers in different colors and patterns. They will be used to cover the box and create the background of the chocolate box. |
| Various cutouts and stickers | You should choose cutouts and stickers in the theme of chocolate, candy or other relevant elements. They will be used to decorate the chocolate box and create interesting details. |
| Scissors and glue | Only sharp scissors are suitable for cutting out decorative paper and cutouts. Glue (preferably food-safe) is needed for safely gluing the blank parts and decorating the packaging. |
| Ribbons, bows and decorations | Additional elements may be needed to give the chocolate box additional charm. You can use various ribbons, bows, rhinestones, 3D stickers or other decorations in accordance with the chosen theme. |
| Photos or labels | If you want to add a personal touch to your chocolate box, you can use photos or create labels with the names of different chocolate treats or congratulatory messages. |
Making a chocolate maker with your own hands will require careful consideration of all materials used. You should make sure that all tools, materials, and glue that will be used are safe and meet the required quality standards.
Remember to maintain cleanliness and hygiene when working with food products.
Selecting a template
The choice of template for creating a chocolate box in scrapbooking style depends on taste and preferences.
Here are some ideas for choosing a template:
- Classic Rectangular Pattern: A simple and popular option that works for most projects. This template has a rectangular shape and a lid that can be decorated with decorative paper, cutouts, stickers and other scrapbooking elements.
- Heart shape: If you want to create a chocolate box with a romantic mood, you can choose a heart-shaped template. This is a great choice for a special gift or for a holiday associated with love.
- Shape of the box with removable lid: This template allows you to create a chocolate box with a convenient removable lid that you can decorate as you wish. This is an ideal option if you want the contents of the chocolate box to remain accessible and at the same time look attractive.
- Multi-level chocolate box: You can create a chocolate box with several compartments or levels for different types of chocolate or other treats; you can choose a design with additional partitions or inserts. Such a chocolate box will be not only functional, but also visually interesting.
- Thematic template: A chocolate box for a specific holiday or event can be made by choosing a template that matches the theme. For example, for Christmas you can choose a layout in the shape of a Christmas tree or a snowman, and for a birthday - a template with festive elements.
A do-it-yourself chocolate box can be made using a layout different from the initial one. It is enough to set the desired dimensions and assemble the packaging to your taste. You can also add additional decorations, use different color schemes or vary the sizes and shapes.
It is important to bring a creative idea to life and create a unique chocolate box that will reflect your style and mood.
Master class on creating a chocolate box using scrapbooking technique
Almost all master classes that use scrapbooking techniques use the same materials. The order of work is determined by the complexity of the task. You need to choose in advance the paper that is suitable for creating applications and blanks.
There are several popular types of scrapbooking paper:
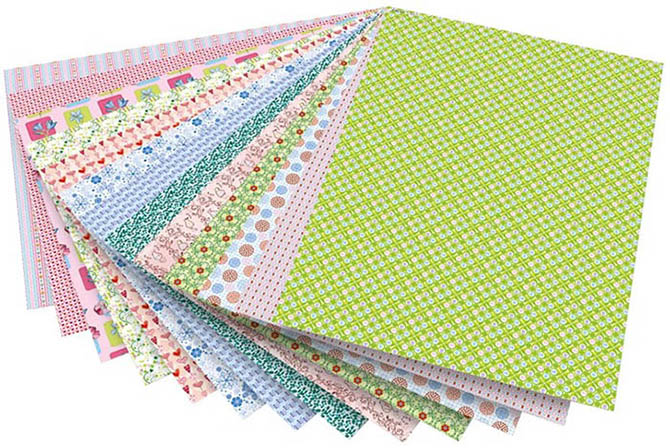
- Decorative paper: the main material in scrapbooking. It has different colors, patterns and themes, which allows you to create unique and colorful compositions.
- Cardstock: Thick and durable paper, ideal for creating basic scrapbooking elements such as backgrounds, frames and decorative borders. It is available in a variety of colors and shades.
- Textured paper: has various textures such as light relief, glossy, velvety or metallic sheen. It adds interesting visual and tactile effects to various scrapbooking projects.
- Paper with mother-of-pearl effect: has a delicate pearlescent shine, which gives special elegance and sophistication to finished works. It is ideal for creating chic and festive compositions.
- Foil-coated paper: has a metallic foil coating that reflects light and gives the project a metallic shine. It is an excellent choice for creating expressive accents and decorations.
- Parchment paper: It has a translucent texture and allows you to create layer effects, as well as use it to create cutouts, stickers or inserts with text.
These are just a few of the many possibilities. You can experiment with them, combine different types of paper and create unique effects in scrapbooking projects.
And so that all the crafts are perfectly assembled, You need to choose the glue that can be used in crafts near food products.
- PVA glue (white glue): The most common type of glue in scrapbooking. It is transparent after drying and is suitable for gluing paper, cardstock, photographs and other materials. This glue has good adhesion and is easy to apply with a brush or applicator.
- Double sided tape: It is ideal for gluing paper, cuttings, stickers and other elements. Scotch tape provides strong fastening and is easy to use.
- Scotch tape pen: a type of glue that looks like a pen or marker. It has an adhesive layer that is applied to the surface when rolled over the material. A tape pen is easy to use for applying glue accurately and neatly to small items.
- Liquid glue (gel glue): has a thick consistency and provides strong bonding. It is suitable for gluing three-dimensional elements, such as three-dimensional stickers, three-dimensional cutouts or decorative elements. Liquid glue can also be used to create layer or volume effects in scrapbooking projects.
- Spray adhesive: is applied by spraying the adhesive onto the surface of the material. It allows the adhesive to be applied evenly to large surfaces such as backdrops or decorative paper. Spray adhesive has good adhesion and is usually permanent.
It is important to choose an adhesive that is safe for use with photographs and other valuable materials.
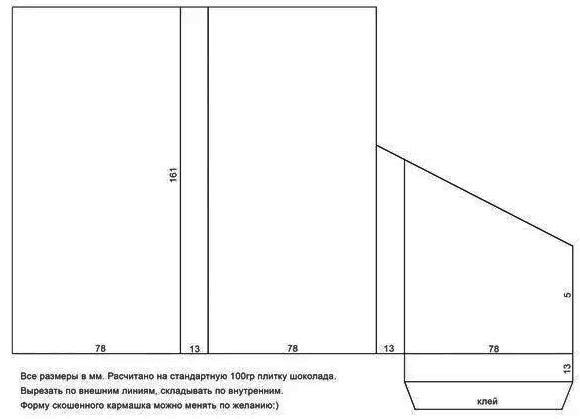
Chocolate box in the form of a box or envelope
You can create a chocolate box in the form of a regular cardboard or thick paper package with your own hands. The standard size of the product is 20*10 cm. Initially, you need to prepare the necessary materials: cardstock or thick paper, tape measure, scissors, glue, ribbon or other decorations of your choice.
Next, you need to select the template layout and transfer it to the workpiece.
- To carefully bend a sheet of thick cardboard or decorative paper, you need to make notches for future lines. Without them, there is a risk of creases on both sides of the workpiece.
- A knife or knitting needle will do if you don't have a scoring tool to create fold lines.
- The prepared template must be prepared, notches must be marked and several lines must be drawn with a little pressure to form indented grooves.
- Then you should carefully bend the cardboard or paper along these lines and smooth them out.
- Then you need to prepare several patterns - they can be cut out of printed paper. The front part will serve as a cover for future pockets.
- The size of the pocket is determined by the size of the insert - you need to leave 1 cm for the reserve, which will serve as an additional fold for gluing the part.
- The pocket itself can be decorated with drawings or cutouts with stamps.
- Before assembling the chocolate bowl, it is recommended to cover its base with scrapbook paper.
- To beautifully glue the workpiece, you need to unfold the scrapbook paper, place the base on it, and then mark all the edges with dots.
- Next, you need to apply glue and let it soak into the paper a little.
- While the glue is setting, you can decorate the inside of the blank. Then the side parts of the paper need to be glued to the sides of the chocolate box.
- Only then can all the cuts be joined.
- You can use ribbons or decorative tape for tying. Stepping back from the edge, you need to glue the ribbon on the front side so that the length of the free edge is 10-12 cm.
You can also add decor if the chocolate box does not look fancy. You can find butterflies, prints and even crystals to match the tone and style of the packaging, which will decorate the future chocolate box.
If desired, you can create a product in the form of an envelope.
- First, you need to prepare the base for the future chocolate box by cutting out the base of the desired size. As a rule, you need to add 3-4 cm to the size of the chocolate on all sides.
- For decoration, you can use scrap parts, decorated in scrapbooking style - using a hole punch, curly scissors, aged paper and more.
- Then you should position the cardboard reel so that there is a 5-6 cm margin on one side for gluing.
- Next, you need to fold the envelope and secure the edges with glue.
- The sweet can be placed in an envelope so that it takes the shape of a rectangle. You can decorate the package using double-sided tape so as not to wet the scrapbook paper during decoration.
Instead of a large package, you can make an envelope with a small depression for the chocolate:
- The cardboard sheet should be folded in half with an indent of 4-5 cm so that one side of the backing is longer.
- Then fold it again, leaving a couple of centimeters.
- Only the lower part of the envelope is finished.
- On the other hand, you should apply glue to the base and glue decorative paper to it.
- You can cover the corners of the envelope with designer paper of a lower density. It will look unusual.
- To thread the ribbon through the hole, you need to coat it with glue beforehand until it dries completely. This will prevent the appearance of torn scraps of paper.
This way you get a very creative chocolate box made with your own hands.
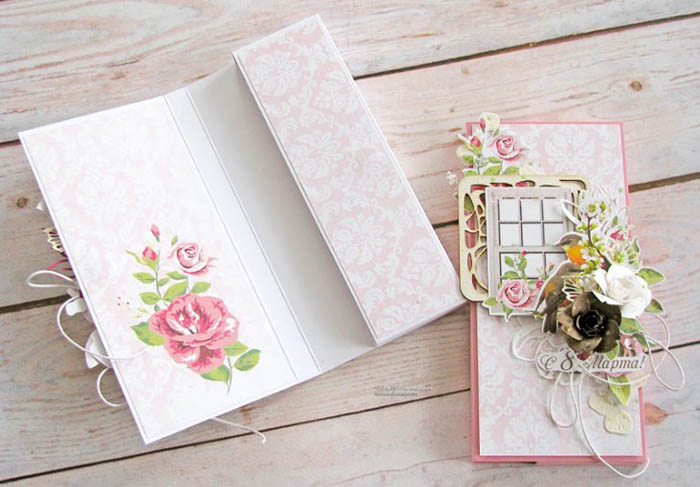
In the form of a postcard
A chocolate box made by hand can be made in the form of a regular postcard. Considering the size and thickness of the chocolate bar, you can develop a sketch and create a prototype for standard crafts. Scrapbooking allows you to decorate the blank not only with beautiful paper, but also with decor that is almost never found even in branded packaging.
To work you will need standard materials and tools for scrapbooking:
- ink;
- stamps;
- paints;
- decorative elements.
Using a sea coral stamp, you need to make a base for the card.
- First, you need to cover the paper with blue paint or ink.
- Next, you need to apply a darker color to the stamp to create a marine design.
- Then you need to take green ink and cover the second part of the card.
- You need to cut the edge so that it looks like seaweed.
- You will also need a piece of mesh and tape.
- You need to attach the butterfly decoration and assemble everything into one whole. To do this, you just need to bend the blank and stitch.
This type of preparation is done very quickly.
This master class will require more time to create a sketch, since you need to mark everything out in advance, make allowances for folds and gluing.
A scrapbooking postcard can be made from regular designer paper or special paper for scrap modeling.
The basic tools you will need are:
- medium density pressed sheet cardboard;
- scrapbook paper of different colors;
- shaped or regular hole punch;
- wafer paper for impregnation;
- PVA glue;
- template or sketch of the development;
- decorative ribbons;
- flowers and decorations;
- die-cut with imprint or text;
- ruler;
- decorative and regular double-sided tape;
- tight elastic band.
First, you need to cut out a sketch, according to which you can draw the dimensions of the workpiece and cut them out.
- On the workpiece, you should mark the places where the inserts will be located.
- The template should be folded along the grain lines and the fold lines should be marked so that the package can be assembled without creases.
- All dimensions need to be transferred to cardboard and all fold lines need to be repeated with a creaser. The sketch can be put aside, and the original packaging can be prepared for decoration.
- The ribbons or lacing should be glued to the front side of the package. This can be done using pieces of double-sided tape.
- To decorate the top of the package, you can use individual pieces of designer paper. On one side, you can process the edge with curly scissors or a hole punch.
- Using hot glue or PVA glue, you need to glue additional decor to the base of the chocolate box.
- It is better to first decorate the pocket with paper napkins, and then attach it to the base on the inside of the chocolate box.
- If desired, you can add a congratulatory text, decorate the front part with pendants and metal beads.
- The chocolate bar needs to be placed in the pocket, tied with a ribbon and the package closed.
Such a gift can be made for colleagues, on the occasion of a symbolic holiday and not only.
Chocolate box with pockets
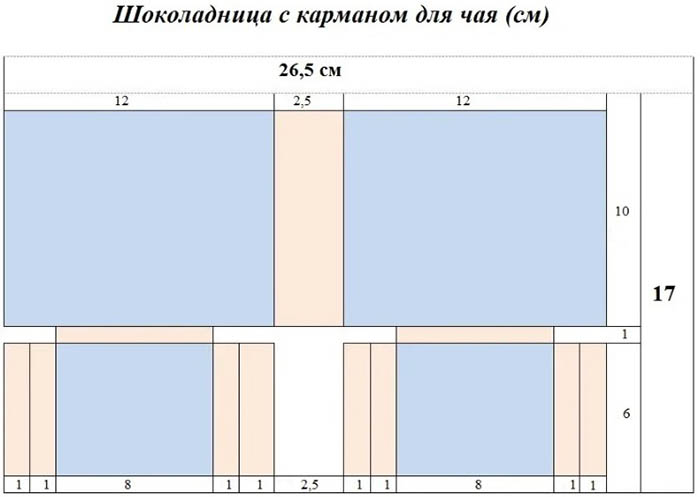
A chocolate box made by hand can be made not only according to a standard sketch. There can be pockets inside for tea or coffee bags.

To work, you should prepare the following materials:
- sheet pressed or corrugated cardboard;
- scrap sheets of different colors;
- office glue and PVA;
- scissors;
- creasing or ruler and knitting needle;
- decorations;
- sweets;
- coffee or tea bags.
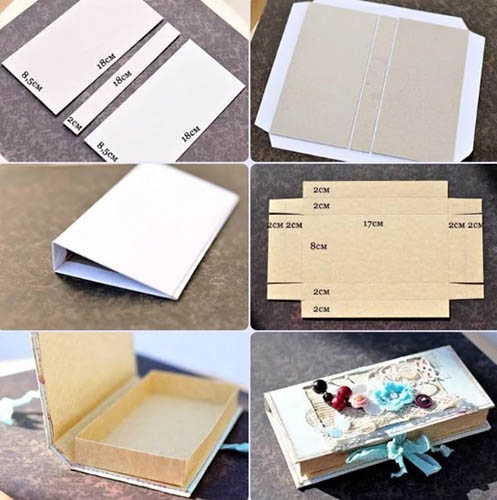
All parts should be prepared in advance in a disassembled form, and then assembled according to the sketch.
- You need to prepare cardboard rectangles measuring 17x22 cm and mark the fold lines in the middle with a creaser, leaving 8-9 cm from the edges.
- Next, you need to prepare the next part - a pocket. From a separate cardboard sheet, you should cut out a part in the shape of a rectangle or a square with equal sides. The size will depend on the size of the inserts and the chocolate box itself.
- Next, you need to go over both sides with a creasing tool so that the folds are even.
- Using a creaser or a ruler and a knitting needle, mark the lines along which the pockets will be folded on rectangles measuring 8x12 cm. It all depends on the size of the tea or coffee bags.
- You also need to mark a fold in the middle perpendicular to the previously prepared folds. The long side should be divided in half, or by 7-9 cm, taking into account the distance from the edge.
- Next, you can make cuts to make it easier to fold all the parts.
- To fold the pocket correctly, the pieces need to be notched on one side to create notches for attaching the other sides.
- Then you can bend all the parts to form a cell.
- The "ears" should be glued with office glue so that the bottom is firmly fixed to the bottom of the pocket base.
- The cross will be attached at the edges to the base.
- Next, you need to prepare pockets for tea. You should make a separate part from the blanks and glue the cells to the base.
The packaging for the chocolate gift is ready.
The chocolate box can serve as a package that will remain even after the treat is eaten. It is a pleasant surprise made with your own hands, including a sweet treat and delicious coffee or tea.
It is a great hand-made gift when visiting guests and a pleasant unexpected visit. Instead of chocolate, you can use traditional and national sweets to taste.
Video about making a chocolate box