The swing style gives the opportunity to introduce a chaotic, in the good sense of the word, note into a meditative knitting process. Craftswomen with a creative mindset, who like not only to “decode” knitted masterpieces of world-famous brands, but also to create unique designer products, appreciate this “musical” technique for the limitless possibilities of partial knitting.
Basics of Swing Knitting Technique
This method is sure to please beginners as well. The monotony of stocking stitch (the basic pattern of the swing technique) is diluted by the winding lines of the turning rows.
It is easy to master this style. It is enough to grasp the principle of pattern formation and practice the techniques of partial knitting. Then it remains only to connect the imagination and take into account the features of knitting a particular product.

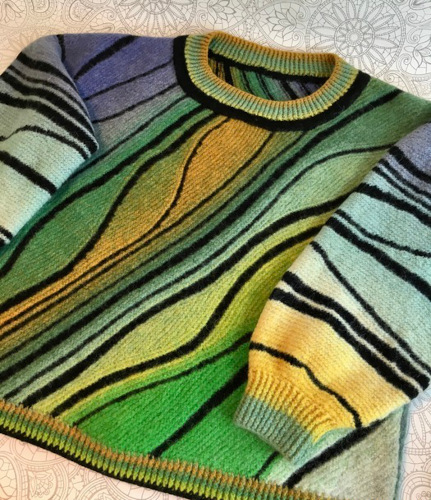
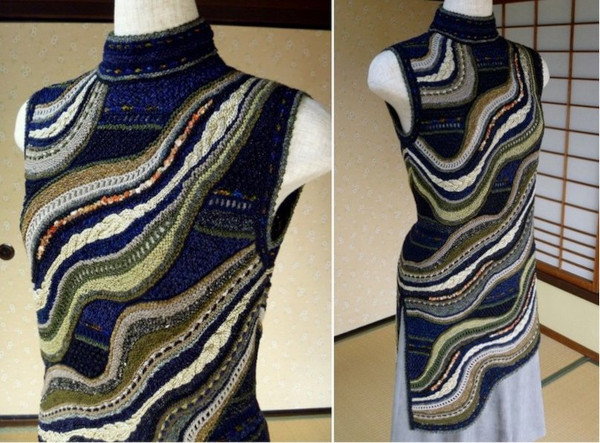
Socks and leg warmers, mittens and fingerless gloves, hats, snoods and baktus, sweaters and tops – this technique will help to decorate any wardrobe item. And even the interior – experienced craftsmen create luxurious paintings, panels and blankets on its basis.
The information below will help anyone who has been drawn to the masterpieces of swing knitting to take their first steps in this direction or expand their knowledge.
The modern version of the swing technique is attributed to the German knitter Gabrielle Kluge. The craftswoman introduces everyone interested to the widest possibilities of this, as she puts it, “extraordinary” method of knitting on her English-language platform.
The technique of partial knitting was invented a long time ago. It is a combination of back-and-forth rows of garter stitch, separated by more or less thin stripes of stockinette stitch. The unique look of things created using this method is given by the design features.
Swing knitting can be considered a “musical” type of handicraft in some way. The author draws a clear analogy between the techniques of this technique and musical terms.
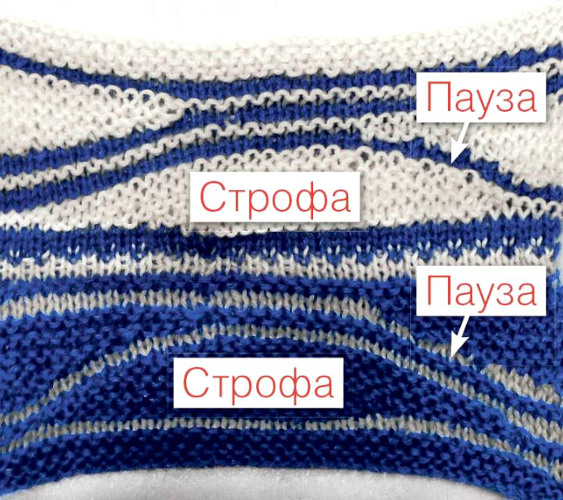
Relaxing knitting of a single-colored fabric periodically “revives” a contrasting or harmonious color element “stanza”. It resembles a calm melody, into which minor and major notes periodically flow, depending on the color scheme, interspersed with pauses.
The usual patterns in classic knitting are a rhythmically repeating sequence of loops - rapport. In swing knitting, rhythm is not the only thing. The master's task is to create a complete composition in which colors and patterns characteristic of the technique are harmoniously combined.
Advantages of the technique:
- This is a great option for using up small amounts of yarn left over from other processes.
- No complex patterns – all work is done with only front and back loops.
- The ability to create a unique design item. Elements of different colors, sizes and their combinations allow you to develop an infinitely diverse "pictures".
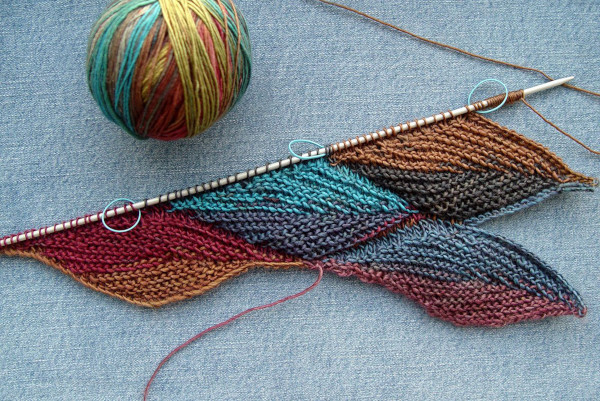
- The word for the technique is taken from the English language. Translated from it, Swing means oscillation, rocking. Indeed, the rhythmic addition and subtraction of loops in the pattern resemble oscillations with increasing and decreasing amplitude. With the help of this method, smooth curved lines are "drawn" - waves, pointed elongated leaves. Each colored element is knitted into the main fabric. After moving to a fragment, it is knitted to the end and with further continuous knitting, the main background of a different color seems to "flow" around it. Due to this, the rows acquire a curvilinear shape. The pattern obtained using the swing technique vaguely resembles the pattern of a longitudinal cut of wood.
When working on a swing style product, only two types of loops are used - front and back.
The fabric can be knitted in two versions:
- Stripes of stockinette stitch + garter stitch elements.
- Garter stitch stripes and garter stitch elements.
The stripes of the stockinette stitch are knitted with front loops on the front side, and with back loops on the back side. The elements of the garter stitch (as well as the stripes of the garter stitch) are knitted with front loops on both sides. The names of the elements of the pattern in the swing technique are borrowed from the jazz style of the same name. What do these concepts mean when translated into the language of knitting?
Stanzas are sections of the work connected by reverse-turning rows - leaves, triangles, diamonds, ovals, arrows. All of them can be of different sizes and slightly different in shape.
When starting to knit each such element, it is formed from the starting point completely, and only after that a row of the entire work piece is knitted to the last loop.
Pauses are stripes of different thicknesses that run from edge to edge of the work. In the pauses, all the loops of the row are knitted, from the first to the last. Melody is the number of loops in each even (purl) row of the stanza, after the turn. Rhythm shows how many loops need to be lengthened or shortened in the back-turn row that runs along the front side.
Swing knitting may seem complicated in that the upper edge of the fabric loses the shape of a straight line during work. If the model requires it, then it is easy to align it - the elements of the pattern should be staggered and there should be an even number of them.
This principle is used when knitting rectangular parts for snoods, blankets, socks, mittens, leg warmers. In hats and mittens, on the contrary, they try to narrow one of the edges.
A fragment of a different color is created using turning rows. The principle is simple: after introducing a contrasting thread into the work, it is as if “drawn” a pattern, changing the turning point in each subsequent row. That is, the point at which a segment of contrasting loops begins and ends.
An area is drawn that will be "flown around" by the loops of the contrasting thread after finishing the work on the fragment. The shape of the element depends on the measure, that is, how many loops will be left unfinished or how many additional ones will be knitted in each row.
How to get rid of the defect in the patterns at the turning points?
The turning loops can be knitted in three ways:
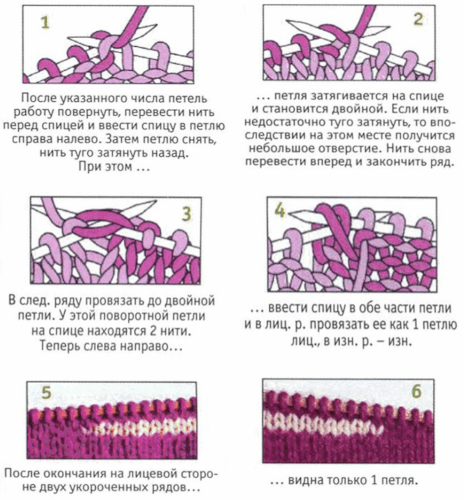
- The classic German way. All loops from the front and back are knit. Without knitting the row to the end, stop and turn the knitting with the back side. In this case, the thread that was behind the right working needle before the turn ends up in front of the left needle. The first loop of the left needle, from which the working thread comes, is transferred to the right needle. The working thread is pulled BEHIND the needle (right) so that the transferred loop forms a double loop. This double loop in further knitting will be considered one loop - "cross" - and knitted with the front one. The advantage of this method is its simplicity. The disadvantage is that at the place of the turn when knitting some patterns (leaves, ovals) a "rib" can form due to the accumulation of double loops of the turn.
- German method with knitting the turning loop at the end of the purl row. They are also made after turning doubled in the manner described above. In the front rows, doubled loops are knitted (face) behind the front walls. The disadvantage of this method is that a hole may form at the turning point if the thread is not pulled tight enough.
- Modified German method. The last loop in the back row of the stanza is a back loop. The difference is that after turning it is made double by pulling the thread forward instead of back. Then the working thread is put behind the left knitting needle and knitting continues.
On circular needles, items that are knitted in the usual way, the described method will allow you to knit only in the form of an open part, which is closed into a ring using a knitted seam.
The knitted stitch is used for many items made in the swing style: hats, snoods, socks, mittens, fingerless gloves, leg warmers. It creates an imitation of circular knitting.
Swing patterns
Swing knitting is a great way to create a plant ornament in a product. Most works use patterns of stylized leaves, diamond-shaped, triangular figures, waves and their combinations.
The table below describes the formation features of these basic patterns:
| Title of the fragment ("stanza") | Peculiarities of pattern formation |
| Leaves | Symmetrical along the "sheet" axis. The reduction in the first half of the pattern and then the extension in the second half are performed with the same stroke at the end of each (both front and back) row. |
| Ovals | It forms in the same way as leaves, but with a different rhythm. |
| Triangular figures with straight or curved sides | Only shortening or only lengthening with the same (for straight lines) or changing (for figures with convex or concave sides) stroke is performed in each row in one or both directions. A detailed description of the variation of this pattern will be given in the section devoted to knitting socks in the swing style. |
| Rhombuses | In each odd (purl) row, the "melody" is shifted by the same or different number of bar loops. That is, each groove of two rows is shifted. If several shifts are performed first in one direction and then in the other, the result is a stylized arrow pattern. |
The simplest and most beautiful pattern is the “leaf”.
The "leaf" diagram and its description
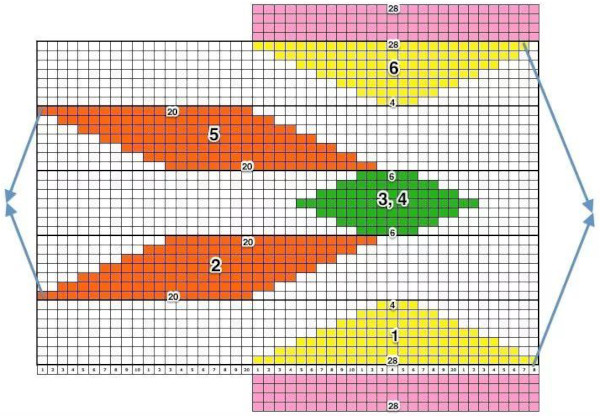
For this pattern with measure 1, you need to know the number of loops in the first row and the number of "grooves" formed by pairs from the front and back rows. The more grooves, the wider the fragment.
- Let the "leaf" of a contrasting color consist of 16 loops. Another 5 loops will be needed to knit the stem. Having knitted a total of 21 loops with the front ones, make a turn and knit the length of the melody in the opposite direction - 16 loops.
- Again, make a turn and knit the front row, without knitting 1 loop to the double loop of the turn.
- This is repeated in each direction, turning behind the purl 1 loop to the turning loop, until the required number of grooves is knitted.
- Let's say in this example the sheet consists of 6 grooves - 3 narrowing and 3 widening. This means that you need to knit 12 rows in total.
- Having knitted 6 rows back and forth, we move on to the expansion. The turn is made on the first purl loop after the first double loop of the turn.
- The signal to finish knitting a fragment is a double loop of a contrasting color. Or a marker indicating the top of the sheet where the first turn was made.
Swing models
Swing knitting is suitable only for one-sided items. This nuance should be taken into account and if the hat or snood should be beautiful from the front and back, it is better to make them double-layered.
This way the drawstrings will be hidden between the layers. Since the garter stitch is quite voluminous, you can use thinner yarn when working on such accessories.
“Stanzas” and “pauses” can be made not only from yarn of different colors, but also of different thicknesses and textures. For example, combine a dense knit of thick wool with openwork stripes of the finest mohair. The main thing is to consider the similarity of the properties of the yarn and recommendations for its care.
Swing knitting can also be used for single-color items. In this case, the "pauses" must be made with a stocking stitch.
You will get a variation of the "shadow" pattern with the difference that the lines will be smooth, while regular "shadow" patterns are characterized by strict straight lines. In addition, in a single-color product, both the front and back sides look beautiful.
Black and white items knitted in this technique look extremely stylish. Any two contrasting or matching colors are enough to create a beautiful product.
Craftswomen use this technique partially or completely in almost all wardrobe items and accessories - mittens), snoods, tops, pullovers, socks, stoles. Some panels can truly be called masterpieces of handicraft.
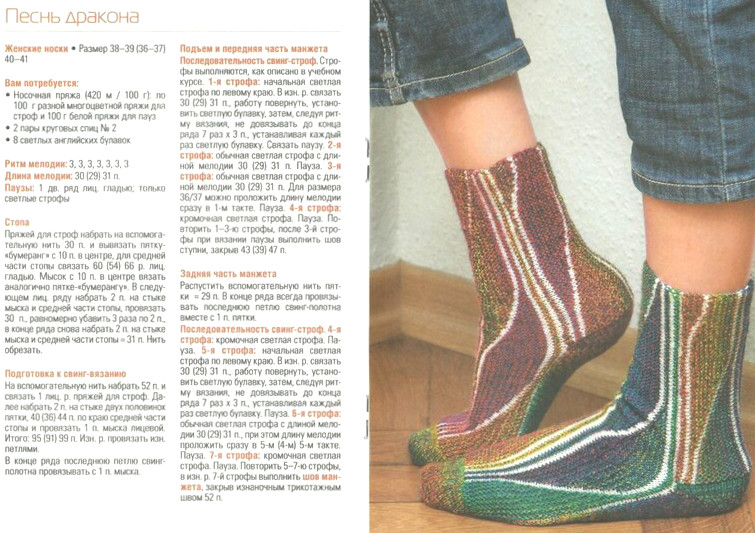
Swing socks
The swing technique is convenient to practice when knitting socks - a small product that will require only about 100 grams of yarn and a little time to work.
Models with a successful color combination are truly exclusive. Knitted socks of an interesting design will be a wonderful gift for friends and loved ones, young and old.
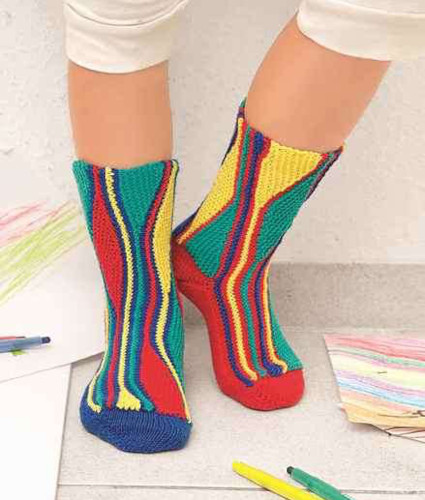
This accessory is convenient because the use of the swing technique makes it possible to use even a small amount of different yarn left over from other works in one product. The main thing is to select knitting threads of approximately the same thickness and competently combine colors and patterns.
There are several ways to knit socks using the swing technique:
- Crosswise knitting in a circle from the cuff to the toe or vice versa. The entire sock is knitted in one piece.
- Longitudinal knitting with expansion when moving to knitting the foot, sewing the part into a ring and sewing on a separately knitted sole.
- Longitudinal knitting of the bootleg with the upper part of the foot. After sewing, the sole is attached to this part, knitted as a whole with the heel and toe.
When knitting socks, you can combine the front surface in the "pauses" with the garter stitch "strophes". Or you can knit the entire product in turning rows using only front loops, that is, garter stitch.
The swing method can be used for knitting the entire sock or just the bootleg. There are many variations. For clarity, we will describe one model in which the bootleg is made using the shortened row technique.
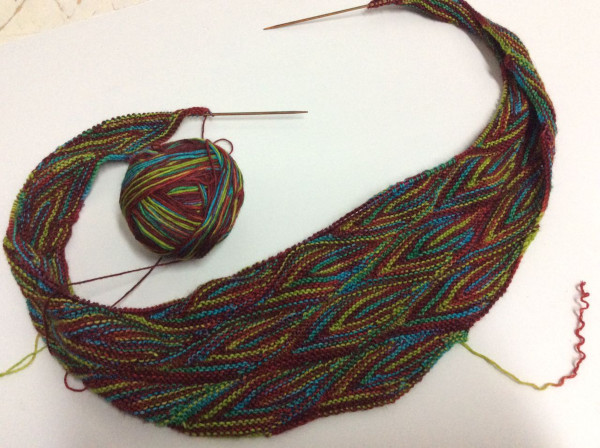
The pattern taken as a sample is called "zigzag". On the outer and inner side, the combination of horizontal and diagonal stripes of the stockinette stitch with triangular fragments of garter stitch resembles a zigzag. Contrasting colors highlight it well. The combination of single-color yarn with melange or sectional yarn looks excellent.
Using this model as an example, we will describe the principle of knitting a zigzag pattern using the swing technique. You can knit using the magic loop method on circular needles or five stocking needles, dividing the loops equally.
For knitting you will need yarn of the main color and contrasting. You will need less contrasting yarn, it will be used to make the "pauses" - straight and oblique narrow stripes of the front surface.
When knitting in the round, two socks are often knitted at the same time, but working with several types of yarn makes this method very difficult. Therefore, it is better to knit them one by one at a time, making notes as you go.
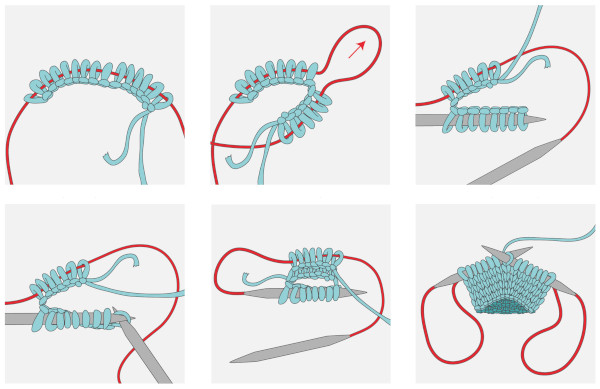
- Knitting begins with a cast-on row with the main thread. For socks, we recommend a cross-shaped cast-on (Bulgarian cast-on). It is ideal for any product with a frequently stretched edge (tightly fitting cuffs, neckline, headdress edge). Of course, you can cast on stitches in the usual way or in any other way that provides elasticity to the edge. When knitting tightly, it is better to form the cast-on edge on two working needles or a working needle and an additional needle, one full size or number smaller.
- The cuff is easiest to make with a 1*1 or 2*2 elastic band. Over time, you can complicate the work - add an i-cord cord to the edge of the cuff or use more complex types of elastic bands. The width of the cuff is optional. On average, it is 5-7 cm.
- Having finished the elastic, attach a thread of a different color and proceed to knitting the next 3 rows with face stitches. Hold the main thread with the fingers of the right hand. This will maintain an even density of the last loops of the main color before changing the thread. At the end of the first row, cross the threads, twisting them as you work and pulling them up. In total, you need to knit 3 rows with the face stitch.
- Next, proceed to forming a fragment of garter stitch from shortened rows. The thread is again changed to the main one, twisting it with the additional one behind the knitting needles. This will avoid the appearance of broaches on the wrong side of the sock.
- The next 2 rows are knitted with garter stitch: the 1st row is knitted entirely with face loops. The 2nd row is also knitted entirely, but with purl loops. The 3rd row is knitted, not reaching the end of 3 loops.
- After this, the work is turned to itself with the wrong side, moving on to the turning knitting. The working thread is located in front of the needles. The first loop from the left needle is transferred to the right one. It will act as a turning loop. It is formed in the German way, described above, in the section on the swing knitting technique. The tension of the thread after the turning loop should be strong. This will prevent holes from appearing in the turning places.
- 4th row – knit, also leaving 3 loops at the end. The end of the row from the wrong side is indicated by the place where the contrast thread is attached. Turn again in the same way.
- 5th row — knit stitches, without finishing knitting 3 loops to the double turn loop. That is, to the end of the previous row. There are now 7 loops left on the left knitting needle — 3 unknitted loops of the first row, 1 double turn loop and 3 unknitted loops of the third row. Continue knitting this way, leaving 3 unknitted loops in each turning row. Repeat these actions with turns until there are 1, 2 or 3 loops left between the two double loops closest to the row being knitted. That is, until the row being knitted is reduced to 1, 2 or 3 loops. Finish forming the triangular fragment when there are three or fewer knitted loops left on the left knitting needle before the last (before the first double turn) three loops.
- Make the last turn and knit all the loops of the previously reduced rows to the end of the whole circular row of loops of the sock from the front side. This section is marked with a marker or a tail of thread left from the cast-on edge. Knit the double loops of the turn, pulling the thread tightly. In the given example, the rhythm is 3 loops, on which the reduction is performed. This value can be changed. If you do not knit 2 loops, then the oblique decrease line will be steeper, 4 - more gentle. This way you can adjust the shape of the triangle. However, it should be taken into account that with a longer decrease line, the part of the boot leg made with the zigzag pattern will be higher.
- The next element is a "pause" of three rows of stockinette stitch with a contrasting thread. When changing colors, the threads are again crossed and pulled tight to avoid a decrease in knitting density in the transition area between colors. The first half of the row falls on the side of the triangle with double turning loops. Each of them is also knitted with one front loop, tightening the thread tightly.
- Now the needles are at an angle to the edge of the cuff. The next fragment of garter stitch will align the resulting inclined line and the last row will lie parallel to the cast-on row. Again, change, crossing, the threads and knit two full circular rows: the 1st row with front loops, the 2nd with back loops. In this fragment, the rows are lengthened by knitting them with the same back-and-forth rows and maintaining the same rhythm (3 loops), but already performing increases. The difference here is that in each subsequent row you need to knit 1 loop more than you did not finish knitting when reducing. This additional loop will act as a turn loop.
- In the 1st shortened row, knit 4 loops (3 + 1 turn st) and make a turn. Make the 1st loop double, knit the next 3 and knit 4 more loops, lengthening the row. It is easy to figure out where to stop - the last 4 additional loops are always knitted after the double.
- Increase the rows until all the loops are included in the work. Then repeat the algorithm, starting from the 3rd point.
The number of triangular fragments must be a multiple of 2, since the section with increases aligns the edge, beveled due to reductions in the first triangle. This rapport must be observed separately when knitting the bootleg to the heel, and when knitting the section of the foot from the heel to the toe. The heel and toe can be knitted in any convenient way.
The described geometric pattern is quite simple. It is enough to knit 2 rapports, and the principle of the scheme will fit into memory, and the reduction and extension of rows will be performed automatically. The only difficulty may arise when calculating the length of the foot.
If the number of rapports is not critical for the bootleg (you can limit yourself to 1, or you can knit a high sock from 3 pairs of triangles), then for the foot it is more difficult to calculate.
Let's give an example. For example, the length of the foot is 24 cm, which corresponds to a size 36 foot. For symmetry, you need to allocate a number equal to the heel's height, that is, 24 cm: 4 = 6 cm.
Let the pattern rapport (horizontal stripe + 1st triangle + oblique stripe + 2nd triangle) be 4.5 cm. Then 3 rapports can be placed in the remaining area of the foot (4.5 * 3 = 13.5 cm). The remaining 4.5 cm will go to the toe.
The rapport can be slightly adjusted to the size by reducing or increasing the number of rows in the stockinette stitch "pauses". This will depend on the design of the heel and toe. However, the number of triangles in any case should be even. And in order for the pattern in the socks to be harmonious, the "pauses" on the foot should be identical to the "pauses" on the bootleg.
You can do it easier - use the swing technique only in the bootleg area, and knit the foot only with the front surface.
You can combine not only 2 colors in the model from the example. For each triangular fragment, you can take different colors. It should be noted that the looseness and large, in comparison with the satin stitch, volume of the garter stitch are not always suitable for knitting the sole. Therefore, for the lower part or the entire section of the foot, it is more practical to use the front satin stitch.
Tips and tricks
In practice, the following tricks are used:
- The main and additional threads should be periodically twisted from the inside of the product. This will prevent the appearance of long stretches from the inside.
- The yarn should be of approximately the same composition and properties. This will eliminate distortion and deformation of the product after WTO and during use.
- The yarn should not shed, otherwise even a single fragment of low-quality thread can ruin the entire work.
- The pattern of the future work is first drawn up in the form of a diagram. On it, stanzas, pauses are marked and their colors are indicated, as well as the type of canvas.
- After completing the process, it is necessary to carry out WTO according to the recommendations for yarn care.
Having mastered knitting with needles of only two types of fabric (front and back stitch), a needlewoman will be able to create a rare thing in its beauty. Having worked out the above-described needlework technique on simple models, you can create a wardrobe or interior item in the swing style, unique in its artistic design.
Swing Knitting Video
Master class on knitting a hat using the Swing technique: