Quilling is an art of nuns from Western Europe. Even in the Middle Ages, they created magnificent icons from golden paper. In modern quilling art, you can use paper of any shade. Beginners need to learn how to create basic quilling elements, what tools and materials may be needed for work, and it will also be useful to consider several schemes.
Quilling Basics for Beginners
The art of quilling is diverse. From small openwork modules you can create paintings, panels, postcards. They can be used to decorate a family photo frame, a mirror or a clock face. Twisted paper strips make nice and, most importantly, functional things. You can assemble a box, a vase for dry flowers, a keychain. Experienced craftsmen can create three-dimensional figures of cartoon characters, interior figurines and decorative flowers.
A beginner master, in order to master the skills listed above, needs to try his hand at different quilling techniques. The table provides a brief description of each technique.
| Name of the technique | Brief description |
| Classical | The work is created by gluing together only basic paper modules. |
| Beehive (paper honeycomb) | The technique is applicable to creating flat and volumetric works. The outline of the detail is filled with long strips of twisted paper. The result is thin, delicate works. |
| Fringed | On one side of the paper strips, small cuts are made, due to which the basic modules acquire fluffy, fringed edges. |
| Contour | The strips are not twisted. They are glued to the paper sideways using tweezers. One of the most difficult paper-rolling techniques. |
| Looped | This method of paper rolling allows you to create delicate flat paintings and the finest volumetric works. |
Works that combine several quilling techniques look extraordinary and captivate attention.
Necessary tools
Quilling for beginners (patterns for work can be drawn by hand or printed on a printer) will not be easy if you do not use special tools.
What you will need for work:
- double-sided colored paper (you can buy pre-cut strips for quilling);
- scissors and a stationery knife;
- ruler;
- simple pencil;
- glue stick or PVA.
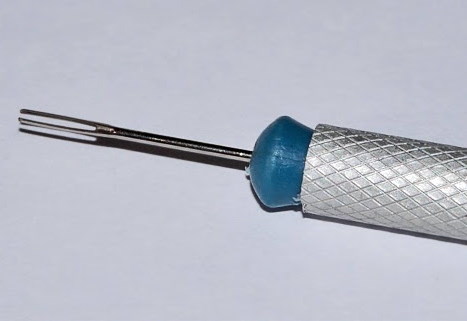
This is the basic set of accessories. You also need to have special tools on hand, such as a twisting handle. This is a metal rod with the tip cut in half. The tip of the paper strip is inserted into the slot and the plastic handle of the tool is twisted. The paper is tightly wound onto the rod, after which the ends of the strip are fixed with glue and the finished basic module, called a "roll", is removed from the rod.
If you cannot purchase a tool, you can replace it with a knitting needle, a wooden skewer, or an unusable pen rod.
You will also need a set of safety pins for the work. They are used to fix the parts during the gluing process. With the help of such fastening, not only flat but also three-dimensional works are created.
You can pin the paper to a piece of foam, but experienced craftsmen advise using a cork board. It will last much longer. In addition, the texture of the cork is denser than that of foam, so the needles stuck into such a board hold well and do not jump out of the holes when the paper is slightly pulled.
To create round elements of the same size, you can use a ruler with holes of different diameters. The strip is rolled inside the circle. The paper fills the empty space, resulting in a "roll" that completely occupies the circle. It is taken out and a new one is rolled in the same hole of the ruler.
Basic elements
Basic elements can be used to create flat and volumetric works. The master prepares modules of certain shapes in advance and then assembles the product following the diagram.
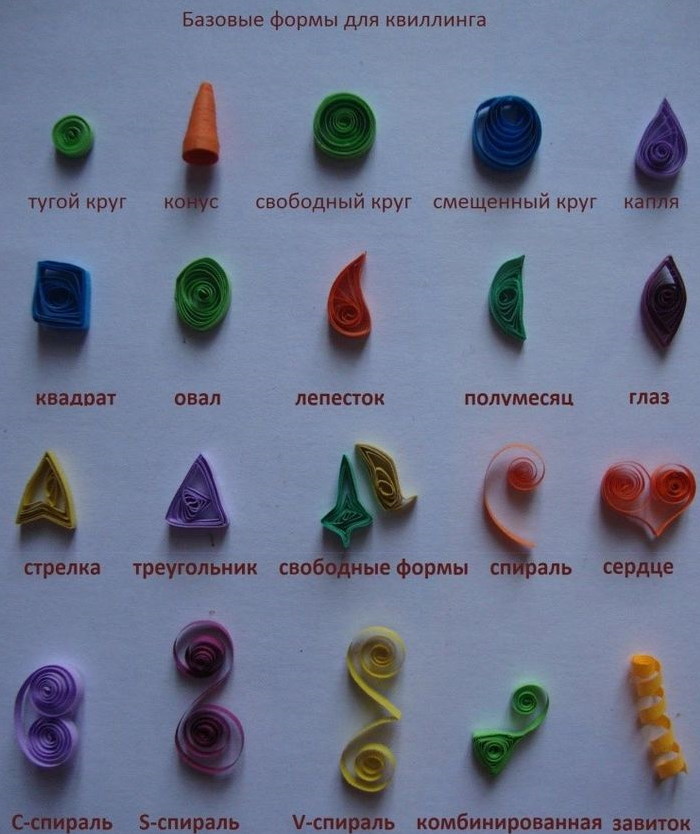
List of basic quilling elements:
- Tight roll. Paper tightly rolled into a spiral. The end of the strip is fixed with glue and held with fingers until it dries completely.
- Cone. The center of the tight roll is slightly pushed forward, using fingers or a pen rod. Cover with glue so that the paper does not slide apart.
- Free roll. A strip of paper is twisted into a spiral without tension.
- Drop. The element is obtained by squeezing 1 edge of a free roll with flats.
- Square. The loose roll is squeezed with fingers from 2 sides. Then folds are made on the side sides of the element. Carefully straightened.
- Oval. The loose roll is slightly pulled out without making creases in the paper.
- Petal. The free roll is bent and creased on one side. The result is a slightly grimy teardrop shape.
- Crescent. The free roll is folded on both sides, leaving a small distance between the folds.
- Eye. On a free roll, make 2 folds parallel to each other.
- Arrow. On a free roll make 1 fold. On the opposite side of the part make 3 folds at the same distance from each other.
- Triangle. The loose roll is squeezed with 4 fingers, forming 3 folds.
- Heart. The strip of paper is folded in half. Both ends are twisted into a spiral towards the fold line.
A free roll can be given any shape. Craftsmen often make abstract elements to fill empty space on the scheme. The details are carefully fixed with glue, placing them between the base modules, like a mosaic.
Additional elements
Beginners need to know how to fill empty spaces in a quilling-style painting, and they also need to learn how to make elements that can be used to decorate the finished work.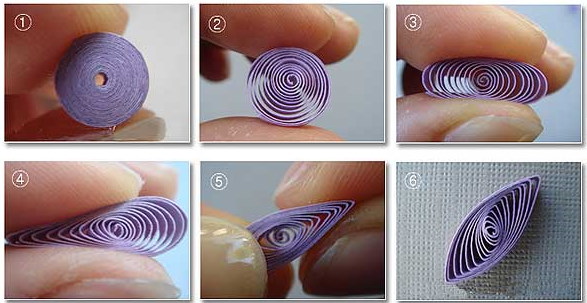
List of additional quilling elements:
- Spiral. The paper strip is twisted from one end. The second end of the strip remains unsecured with glue.
- C-shaped spiral. The paper is rolled from both ends until the “rolls” touch each other.
- S-shaped spiralThe paper is twisted from 2 sides, while the tool is rotated in different directions.
- V-shaped spiral. The strip is twisted from 2 ends towards the center. Then a fold is made in the center. The corner of the paper should protrude between the spirals.
- Curl. The paper tape is stretched and pulled along with the tip of the scissors. The tape curls into an elastic curl.
Further in the article you can look at master classes on creating beautiful works in the quilling style.
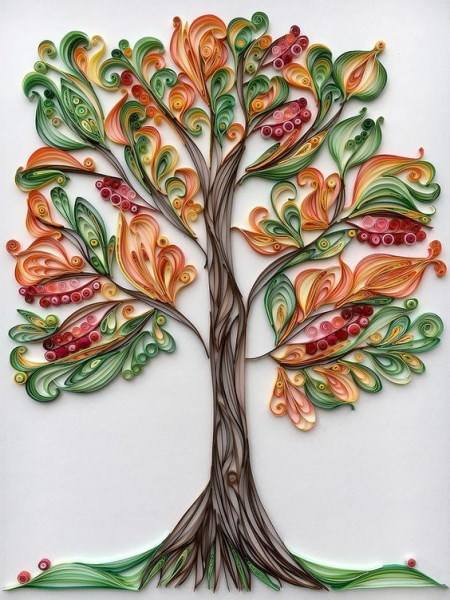
Tree
Quilling for beginners (the patterns can be copied from children's coloring books) should not be difficult. It is advisable to fold the first picture from large basic elements.
To make a tree you will need:
- a sheet of white cardboard (A4 format);
- simple pencil;
- PVA glue;
- colored paper or ready-made quilling strips in brown, light green and dark green.
 Procedure:
- Place a sheet of cardboard vertically on the table.
- Use a simple pencil to draw a thick tree trunk.
- Add 3 large branches.
- Complete the sketch of the crown shape.
- If you don't have ready-made strips for quilling, you can cut them yourself. Mark the colored paper along parallel lines, at a distance of 8 mm. Cut the sheet along the markings using a ruler and a stationery knife.
- Cut strips of the same width from light green and dark green paper.
- Make eye-shaped elements from brown stripes.
- Apply a few drops of glue to the bottom of the tree trunk.
- Attach the brown pieces in a row, placing them vertically.
- Glue the following parts in the same way, placing the sharp corners between the parts from the previous row. In this way, completely fill the outline of the tree trunk and branches.
- Make tight rolls from dark green and light green paper. For beauty, you can alternate the colors of the paper, creating 1 element, example: wind 1 light green strip on the tool, fix it with glue, and wind a strip of dark green on top. You need to make about 35 tight rolls of different diameters.
- Glue small rolls between tree branches. Try to cover the gaps as much as possible.
- The remaining parts can be glued randomly, completely filling the outline of the tree crown.
When the glue dries, the work is ready.
Flower
Quilling for beginners (it is not necessary to create patterns for simple works, all the details can be arranged "by eye") may seem difficult if you choose the contour or beehive technique to create 1 work. Do not rush. Working with simple, classic details will allow the novice master to learn how to create neat modules of 1 size.
The flower in this master class will consist of only 2 basic elements. Details of different sizes will help the product achieve volume and beauty.
What you will need for work:
- green cardboard;
- compass;
- scissors;
- PVA glue;
- Double-sided paper in yellow and orange.
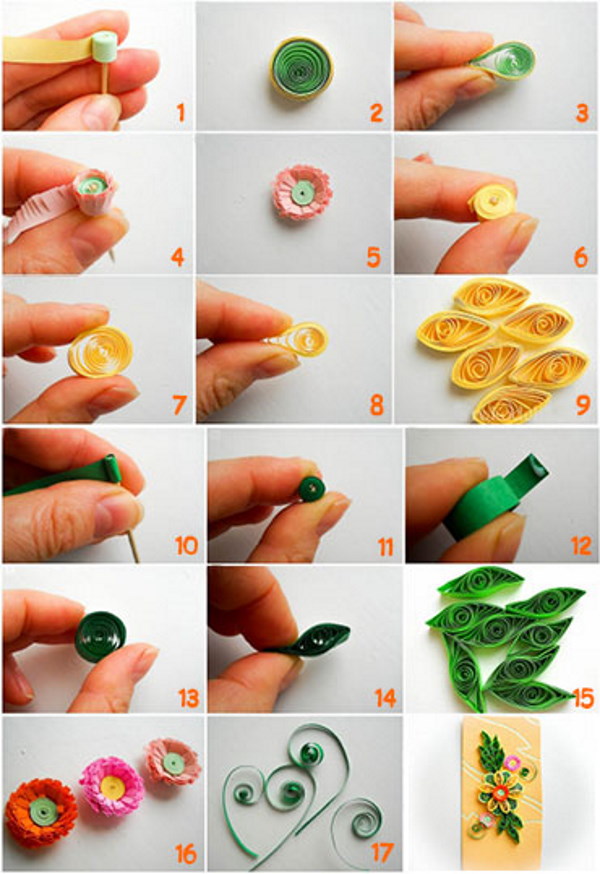
Procedure:
- On the cardboard, using a compass, draw a circle about 12 cm in diameter. This will be the backing to which the parts are glued.
- Glue the ends of 5 yellow strips together. Roll this tape into a tight roll.
- Glue the piece to the center of the backing.
- Glue 4 orange strips into 1 long strip. Twist the loose roll and shape it into a drop. Make 4 such modules.
- Glue 2 orange strips, twist the loose roll, give it a teardrop shape. In total, you will need to make 4 such parts.
- Glue all the drops around the flower core. The sharp ends of the pieces should touch the middle of the flower. Large elements should be alternated with smaller ones.
Wait for the glue to dry.
Frog figurine
Quilling of the figurine can be done without a cardboard backing. If you soak the finished craft with transparent acrylic varnish, it will become durable. The frog figurine made according to this master class can be used as a keychain or as a pendant for a children's necklace.
What you will need for work:
- scissors;
- PVA glue;
- double-sided paper in yellow, green, white and black;
- clear acrylic varnish;
- large art brush with soft bristles.
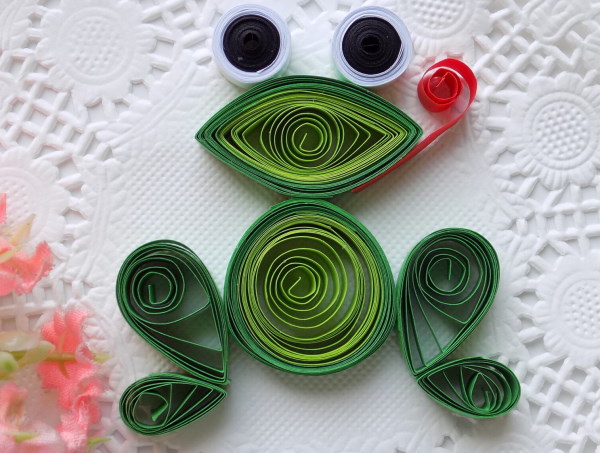
Procedure:
- Glue 10 strips of yellow paper into 1 long strip. Roll into 1 tight roll. Secure the end of the last strip with a drop of glue.
- Glue 7 strips of green paper into 1 strip. Wrap around the yellow roll. Secure the end of the strip with glue.
- Glue 10 strips of green paper. Roll up a loose roll. Give the part a teardrop shape. Make another such part.
- Attach the drops to the bottom of the large two-color roll. These will be the frog's legs.
- Glue 12 green strips together. Glue the ring together, winding the paper in layers. You can wind the tape on a round object, such as a deodorant bottle.
- Remove the ring from the auxiliary form. Flatten it slightly to form an oval.
- Glue this piece to the top of the workpiece.
- Glue 5 black strips together. Roll the tape into a tight roll. Make another identical piece.
- Glue 7 strips of white paper together. Cover the black roll with white tape. Cover the other part in the same way.
- Glue the frog's eyes on.
- Wait until the glue is completely dry.
Soak the items with varnish, applying it in several layers.
Lamb with plastic eyes
Animal figurines can be decorated with plastic eyes, which are sold in craft stores.
To make a funny lamb, you will need:
- scissors;
- cardboard;
- PVA glue;
- white and black paper;
- ruler with holes;
- a pair of plastic eyes.

Procedure:
- Cut 10 strips of white paper. Roll up loose rolls of the same size using a ruler.
- Glue 2 strips of 4 black strips together. Roll each into a loose roll. Shape the pieces into a triangle.
- Roll 2 loose rolls from 2 black strips and shape them into a drop.
- Glue 4 black strips into 1 strip. Roll up a loose roll. Give it a teardrop shape.
- Glue 4 white rolls to the cardboard, making a horizontal row.
- Glue the remaining white pieces on top and bottom (3 pieces in each row), placing them above the gaps between the pieces from the central row.
- Glue the black triangles on the bottom. These are the lamb's hooves.
- Turn the large droplet with the sharp corner down. Glue it on top of the white rolls. This is the head of the lamb.
- Glue small drops to the top of the head, turning their sharp ends inward.
Glue 2 plastic eyes to the head.
Paper earrings
Quilling allows you to create beautiful jewelry.
Materials needed for work:
- paper strips 1.5 or 3 mm wide and 120 mg/m3 density2(color can be any)
- metal rings;
- Earring hooks;
- scissors;
- ruler with holes;
- PVA glue and glue gun;
- clear acrylic varnish in aerosol;
- tweezers.
You will also need small multi-colored rhinestones and 2 large half-beads. You can buy self-adhesive rhinestones, but experienced craftsmen believe that you need to attach the decorations with Moment glue or hot glue.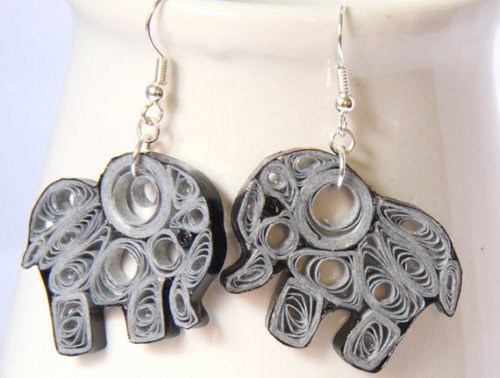
Earrings made according to this master class will look like foxes, decorated with rhinestones that imitate drops of dew.
Procedure:
- Glue 2 strips of paper together and form a loose roll. For small earrings, the part can be twisted from 1 strip. There is no need to glue the end of the paper strip.
- Slightly unroll the roll to the desired size (the diameter depends on the author’s idea).
- Fix the end of the paper strip with glue. Press the loose roll from 2 sides, give it a drop shape. You will need 4 of these elements. To make them the same size, use a ruler with holes.
- Glue the petals together in pairs, connecting their sharp corners and one of the sides.
- Pass metal rings through the upper corner of each paired element. The rings must first be opened. This can be done using scissors.
- Attach hooks to the rings. Close each ring so that there is no gap where the base of the hook can slip through.
- Glue small rhinestones to the sides of the earrings.
- Attach large rhinestones to the bottom edge of each earring.
Spray the finished work with acrylic varnish.
Tips for Beginners
Quilling for beginners (the patterns can be outline or colored) will be a pleasant and interesting activity if you know a few secrets:
- It is more convenient to place small parts on the substrate using tweezers.
- Finished products can be tinted with dry pastels and paints. In this way, experienced craftsmen obtain soft transitions from one color to another, and also give the products visual volume.
- To store paintings and panels, you need deep frames with glass. They will help protect the craft from dust and sudden temperature changes (for example, if you plan to give the painting as a gift and take it out of the house for a while).
- When working in contour technique, it is better to give preference to thick paper or double-sided cardboard. Thin materials can be deformed by glue, and such paper is harder to fix on cardboard.
- When printing black and white diagrams for work, it is necessary to reduce the brightness of the document so that the lines remain barely visible.
- In craft stores you can buy ready-made quilling kits. They include all the necessary tools, as well as a ruler-template on which you can make parts of different shapes.
- From colored corrugated cardboard you can create large, three-dimensional figures, for example, interior figurines.
- Costume jewelry, keychains and three-dimensional crafts must be treated with varnish. Without coating, the products will quickly lose their shape and fade.
- To preserve the bright colours of paintings and panels, they must be protected from prolonged exposure to ultraviolet rays.
- Items created for interior decoration should be regularly cleaned from dust using a soft brush. If not cleaned in time, the dust settles in a thick layer and turns into a dirty, sticky substance that will spoil the appearance of the craft.
- You can cut even strips from paper using a document shredder. This device cuts sheets into strips from 6 to 12 mm wide.
It is not difficult to learn how to create beautiful paper crafts. Beginners need to practice creating large basic modules, and then proceed to more complex quilling techniques. Schemes for work should be selected taking into account the experience of the master. Beginners should give preference to simple drawings, without detailed detailing.
Video about quilling
Quilling for beginners: