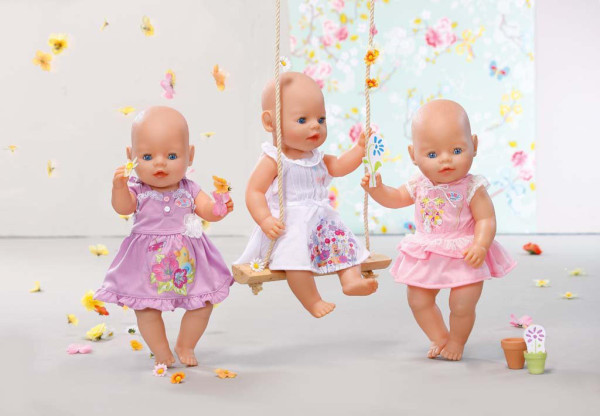
Clothes for Baby Born dolls are not sold together with the dolls, so many people decide to sew them themselves. It is not so easy to take measurements correctly, create a pattern and select the fabric material.
You can even sew combination outfits with your own hands - trousers with pockets, overalls with linings, hats, multi-layered dresses and even sets.
How to make patterns
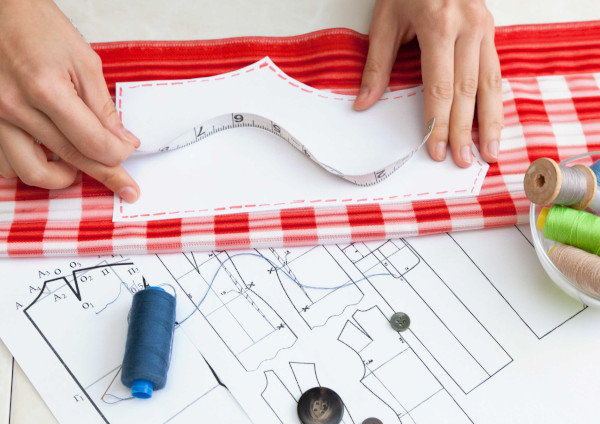
To model a pattern, you need to take measurements from the doll. You can apply tracing paper to the finished clothes to compare the measurements taken from the doll and get a rough idea of the finished clothes.
If you already have the first pattern, you can use it as a starting point to sew something similar but with different dimensions. But it is better to learn how to build patterns based on basic measurements (the doll does not grow, the data will not change).
DIY Baby Born clothing will require the following tools and materials:
- tracing paper or paper;
- cutter's ruler or transparent ruler;
- pencil M, 2M or TM;
- the eraser is soft;
- paper tape;
- toothed wheel for transferring the pattern onto the fabric;
- needles and pins;
- tailor's tape measure;
- tailor's scissors.
It is advisable to have several types of scissors - large ones for fabric, small ones for threads, but do not use tailor's scissors to cut paper. For this you need regular scissors.
If you don't have millimeter paper (A3, A4 rolls), don't rush to buy square rulers. You can easily get by with regular items from office supply stores.
It is more convenient to work with a cutter's ruler - you can easily transfer smooth lines, armholes and necklines. If you don't have one, you can use a regular one, but for transferring values it is better to get a toothed wheel.
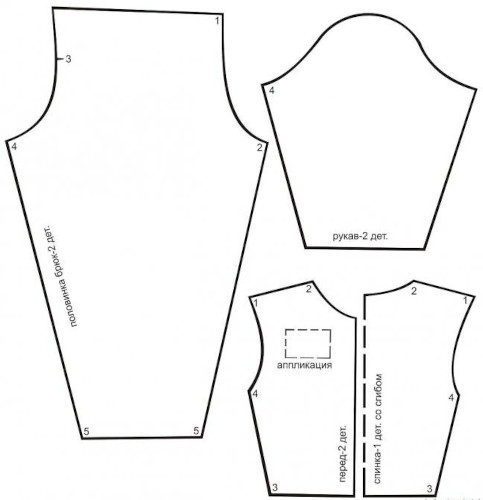
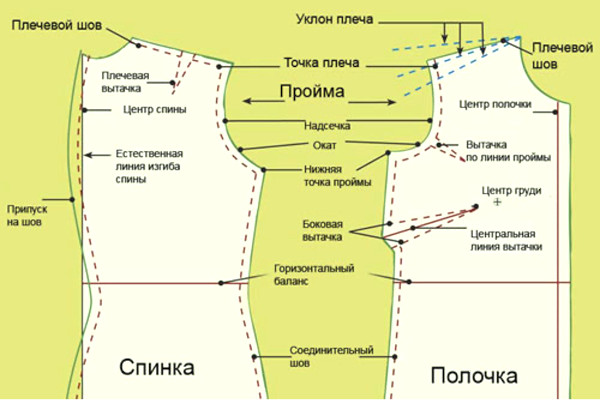
Patterns for doll clothes use the same symbols as real patterns for people. Designer terms (ready-made patterns) may not be useful if you make the patterns yourself.
It is important to know the basic concepts:
- back;
- shelf;
- round;
- armhole;
- seam allowance.
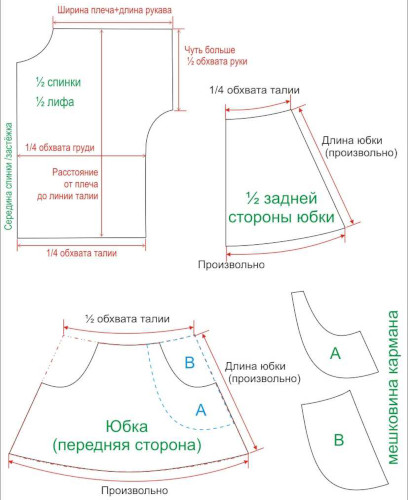
Below is a picture of a typical pattern and its symbols:
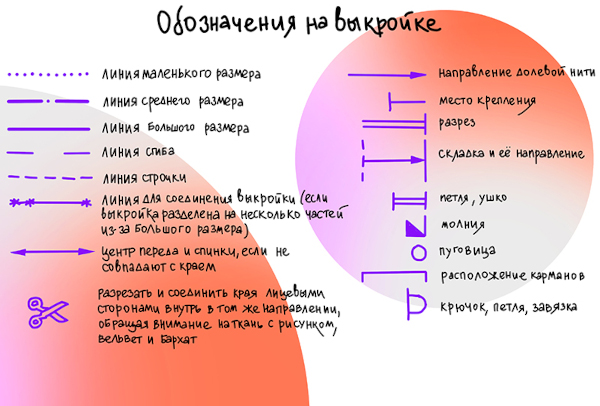
For ease of reading the patterns, the table will help:
| Arrow marked "DN" or "Fracture" | The grain direction is when the fabric stretches wider than it stretches tall. |
| Folding the fabric | The pattern should be folded in half along the fabric cut. |
| Label | When applying fabric to the pattern, you need to put marks taking into account seam allowances. They are needed so that when joining two pieces of fabric, the lines do not shift. For example, the waist and chest lines. |
| Pleat or tuck | The direction of laying the fabric is indicated. |
| Okat | The fabric needs to be gathered or pulled. For example, the sleeve cap should always be cut with a larger armhole, while the upper part of the sleeve needs to be gathered. |
| Dotted line or stars | The fabric needs to be gathered or gathered. |
In finished patterns, solid lines indicate the contours of the products, and dotted lines indicate the stitching lines.
Clothes for Baby Born can be designed with your own hands using only a few measurements. You need to know the hips, waist and length of the part. These values are enough to sew dresses, skirts, jumpers and T-shirts.
For a trouser pattern, you will need more measurements. Of course, to create a complex dress, you need to know the position of the shoulder, chest, armhole volume, etc. But for clothes for dolls, minimal knowledge and measurements are enough.
How to sew a dress for a Baby Born doll
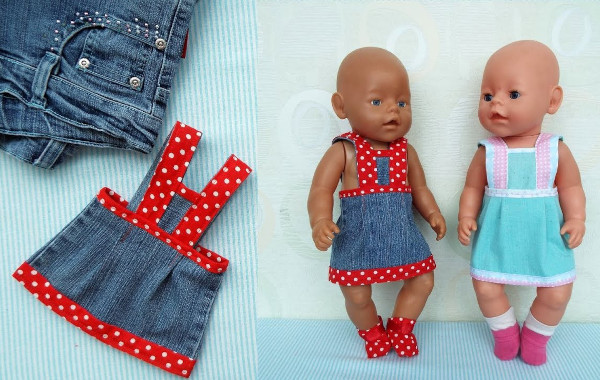
To sew a dress, you will need knitwear, denim and applique. The dress is fastened with Velcro. If desired, you can make a loop for a button. If working with knitwear is difficult, you do not have an overlock for topstitching, any other fabric that stretches or is elastic along the grain will do. The top of the dress can be replaced with corduroy, abandoning the denim.
- The pattern consists of two parts – for a T-shirt and a skirt.
- Additionally, you need to cut out a piece for the lining from chintz or thin fabric without elastane.
- Leave seam allowances of 0.7-1 cm for the top.
- Next, you need to fold both parts of the T-shirt face to face and baste. Then sew both parts, leaving the free edge unsewn, leaving 3-4 cm for the allowance.
- Turn the T-shirt right side out and stitch the bottom with a decorative stitch.
- To sew on an applique, you need to cut a square piece out of fabric, overcast the edges and sew on with a zigzag stitch.
- Next, sew the straps - place the back part on the front and stitch on a sewing machine with a straight stitch or zigzag, or by hand with a blind stitch.
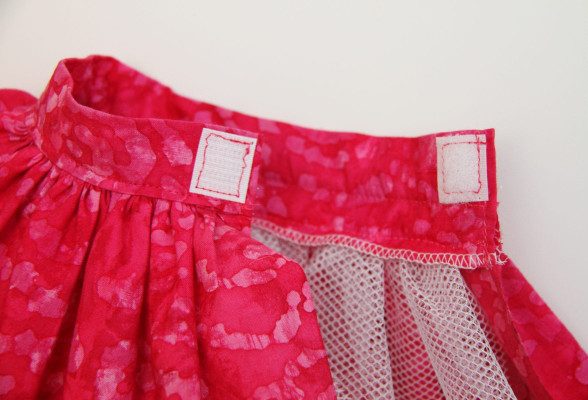
- Next, you need to sew the Velcro onto both parts of the cut, using the remaining allowance of 3-4 cm.
As a result, the length of the knitted fabric is 14-15 cm, the width is 28 cm. These are the standard sizes of Baby Bona dolls, so the resulting sizes can be taken as standard initial data in the future.
Next you need to sew the skirt and connect it to the T-shirt:
- The skirt should be cut in the form of a square, since it will be sewn to the T-shirt later. This is a loose cut.
- The width of the finished skirt should be 10 cm larger than the width of the finished T-shirt. The height depends on the desired length of the dress.
- The bottom of the skirt needs to be stitched with a zigzag. To get a full skirt, you can stretch the knitwear while stitching.
- Top the skirt with a straight stitch and gather it to create folds. The length of the pleated skirt waistband should be equal to the length of the T-shirt.
- Next, you need to overcast the top of the dress and sew the T-shirt to the waistband of the skirt. The seams should be topstitched.
- The shoulder seams should also be sewn together.
- The armholes need to be finished with bias binding (mattress binding will do).
- To fasten the belt, you need to make a lining strap - put some fabric underneath and stitch it. Then put some Velcro on both parts and sew it on.
- The neckline needs to be overcast and sewn with bias tape.
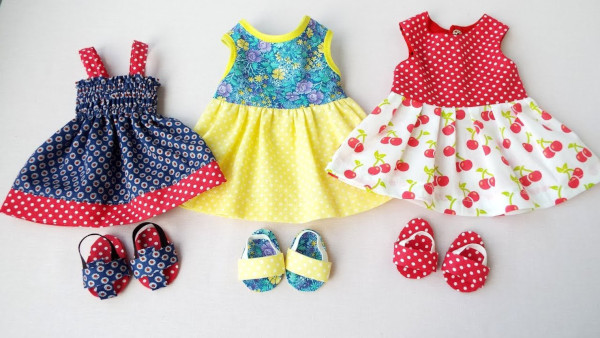
This dress can be made from any knitted fabric, using color appliques. If desired, the length of the skirt can be adjusted, as well as the presence of volume for folds.
Sarafan
It is best to sew a summer outfit with straps and a Velcro fastener. From the materials, you can choose knitwear, denim or calico. It is worth remembering that the stretch of the fabric is very important, so it is better to give preference to linen, calico or thin denim.
- A sundress can be sewn without a pattern, just according to a diagram.
- On the pattern, schematically draw half of the front and back.
- Make the back part in 2 copies - left and right. Leave seam allowances of about 2 cm, 0.7 cm on the sides.
- In the front you need to make folds of 3 cm and stitch them.
- Taking into account the folds, the fabric consumption will increase; you need to make sure that no more than 10 cm is spent on folds.
- All parts of the pattern pieces must be overcast along the edges.
- The front part needs to be sewn to the back, placing the pieces face to face with each other.
- The cuts need to be turned inside out with an allowance of up to 1 cm.
- Baste and stitch all the folds, leaving 5 cm for the Velcro at a distance of 2 cm from the top line. Do the same for the second half.
- The bottom of the sundress needs to be folded over and stitched with an overcast and straight stitch.
- The straps of the sarafan can be made from knitted fabric. For this, you need 5 cm pieces (the length can be adjusted).
- Trim with 3 cm wide tape, sew face to face and turn inside out. Then stitch the tape to the neck and fastener joints.
- Trim the edge of the tape in the Velcro area only on the side where the Velcro will be visible when fastened.
- The armhole should be trimmed with tape in the same way as the neck. The edges of the armholes should be folded inward (towards the wrong side).
- Overcast the free edge and sew with a zigzag stitch on the machine.
Clothes for Baby Born can be sewn with your own hands using diagrams or ready-made patterns. The only thing you should always take into account is the characteristics of the fabric. For example, to sew a sundress from suit fabric or doll knitwear, you will have to take into account the stretch of the material, the allowances and the density for creating the assembly.
Thick denim is suitable for overalls, and calico is suitable for dresses. In this regard, it is necessary to think through the cutting of the parts and take into account the width of the allowances for folds when sewing.
Skirt
It is better to sew a skirt for Baby Born from a fluffy fabric of a free cut. A narrow skirt with a tight silhouette will not look so good.
You can sew according to a diagram or pattern:
- Prepare fabric, paper, pencil. Draw a diagram and transfer it to the fabric, secure with pins.
- Prepare a ribbon for decoration, you will need it at the end to trim the skirt.
- The pattern is made in the form of a circle. To draw a circle, you need to mark the waist circumference - the doll's waist circumference needs to be measured, then the diameter is calculated and 2 cm is added for allowances.
- The length of the skirt can be from 5 to 15 cm.
- If desired, you can take two different fabrics to create a non-monochromatic skirt.
- Then the pattern from the second material will match the first.
- Two identical pieces need to be cut out of two types of material. For example, white and colored. Then the white fabric will be on the bottom, as a lining.
- Next, connect them together and stitch. Sew a ribbon to the edge of the skirt.
- For the belt you will need a strip 10 cm wide. Stitch the edges with a zigzag stitch and wrap it around the top edge of the skirt.
- The edges of the ribbon need to be sewn to the waistband, gathering the skirt into folds for fullness.
- If desired, you can insert elastic into the waistband after sewing it to the skirt. Then the stitching should be done along the edge of the tape/ribbon.
For Baby Born, you can create several skirt patterns. They will all have the same waist measurement. The length can be adjusted as desired. Fabric for fluffy skirts - heavy jacquard, denim, knitted.
To sew a fluffy light skirt, shirt fabrics, knitted and summer (linen, cotton, chintz) are suitable. Clothes from different fabrics can be sewn by hand or on a sewing machine.
Tunic
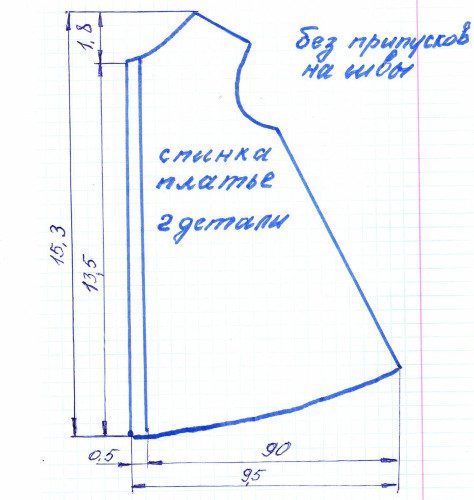
The tunic without allowances has a height of 34 cm. This is an important parameter, since in the cutting process you will have to make minimal allowances - up to 0.5 cm. The tunic can be sewn from three parts, or based on the pattern of the jacket - from 5 parts.
Option one:
- Draw the front piece on tracing paper and transfer it onto the fabric.
- Leave 1 cm seam allowance.
- On the back pieces, you need to leave 1.5 cm for the facing. This will be the area that needs to be hidden under the fold.
- Transfer the back two pieces onto paper and cut them out. Transfer the sketch onto the fabric.
- The edges of the sleeves need to be folded and stitched. If you don’t have an overlock, do it on a sewing machine – with a straight seam and a zigzag stitch.
- The neck can be decorated with a ribbon if desired. You need to stitch the edges and trim the edge with a zigzag.
Second option:
- You need to prepare five pattern pieces - two fronts with a hood, a back and two sleeves.
- The finished tracing paper sketches should be applied to the fabric from the back side and traced along the outline.
- The back piece needs to be folded in half so that the center line coincides with the fold of the fabric. The contours need to be traced and the tracing paper removed.
- The pieces need to be cut taking into account allowances, so it is recommended to make up to 1 cm at the bottom and front of the shelves. For the remaining seams, it is enough to make 0.5 cm allowances.
- Next, you need to sew the sleeve parts together. It is best to initially baste the side stitches by hand, attach the hood and process all the edges.
- In the area of the corners where the hood transitions to the shoulder, cuts need to be made.
- The sleeves should be secured with a temporary seam to make finishing the edges easier.
- The sleeves need to be carefully sewn into the armholes. At this stage, you need to try them on.
- All elements should be stitched or sewn on a sewing machine with a straight stitch.
- The edges of the product must be finished with a goat stitch.
- To sew the flap and the zipper to the tunic, you need to use a blind stitch. You can get by with Velcro.
The finished product should be prepared for wearing. The seams should be ironed, steamed and smoothed.
Trousers
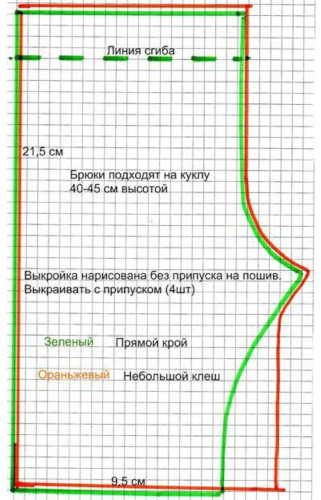
Clothes for Baby Born are easy to make with your own hands from scrap materials. You can take any fabric to sew doll pants. To create a pattern, you can use a diagram, making changes to the sizes of the parts. You can sew pants from two or four parts, depending on the type of fabric.
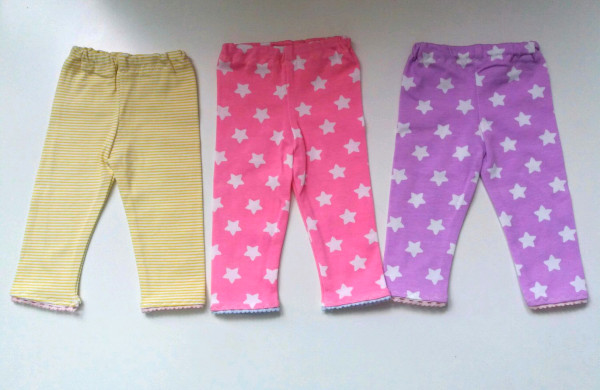
- Allowances should be made for each detail. For the pants in the area between the doll's legs - 0.8 cm. 2 cm is enough for allowances at the top and bottom. It is recommended to set aside 0.7 cm for the side seams.
- All cut out pieces need to be overcast and sewn together with a temporary seam.
- The side seams should not be sewn all the way through - leave 1 cm of unsewn part at the top so that you can insert the elastic later.
- The top of the product needs to be turned inside out by 2 cm. Stitch the piece and baste the elastic onto it.
- Instead of an elastic band, you can use a belt or sash.
All edges of the parts should be overcast and stitched on a sewing machine. It is enough to make one seam, having previously turned 1 cm of fabric inside out. The seam can be straight or zigzag.
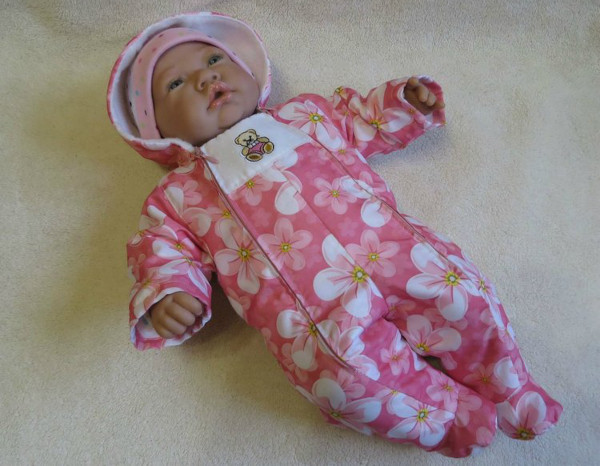
Overalls
Since the Bebin Bon doll is very popular and children rarely part with them, it would be a good idea to sew a warm jumpsuit for the toy. So the child will be able to walk with the doll and realistically dress it according to the season.
To sew a warm jumpsuit with a hood, you will need warm flannel fabric for the lining, bologna fabric (you can take any thick one), and a zipper for the fastener.
The cutting will take place like this:
- For the neckline, sides and armholes you need to take 0.7 cm for allowances.
- You need to leave 2 cm at the bottom for seam allowances.
- The front and back are cut identically.
- In the front, you need an allowance of about 1 cm for the wrap around fastener.
- The clasp will be located on one side.
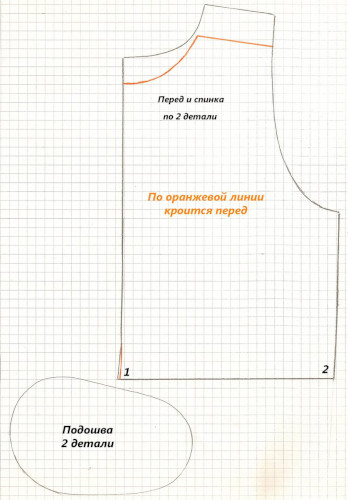
The jumpsuit should be cut out of two parts if you have little sewing practice. Patterns of 4 parts are easier to sew together evenly, but it is more difficult to make the same allowances and seam joints in the fastener area. It should be solid.

Therefore, to make the cut loose and the process of sewing the parts together simple and quick, you can make a pattern from 2 parts:
- For the pattern, you can take pants and a blouse, outline them schematically. All measurements need to be taken and written down.
- Next, you need to transfer the measurements onto the fabric, taking into account the size of the doll.
- The back is cut from one piece, and the front will be divided into two parts, taking into account the insertion of the fastener.
- After cutting out all the pieces, you need to overcast the edges on all sides.
- Next, you need to connect the halves of the front, the upper part should be free. There will also be a velcro instead of a button (imitation of the fastener of a real jumpsuit).
- Next, sew the side seams between the legs.
- The bottom of each leg needs to be tucked in and basted.
- Sew the Velcro by lining the part with the allowance on the front with less allowance or none at all. Sew the soft part of the Velcro at a distance of 1.5-2 cm from the top.
- There is no need to put anything under the Velcro on the other half.
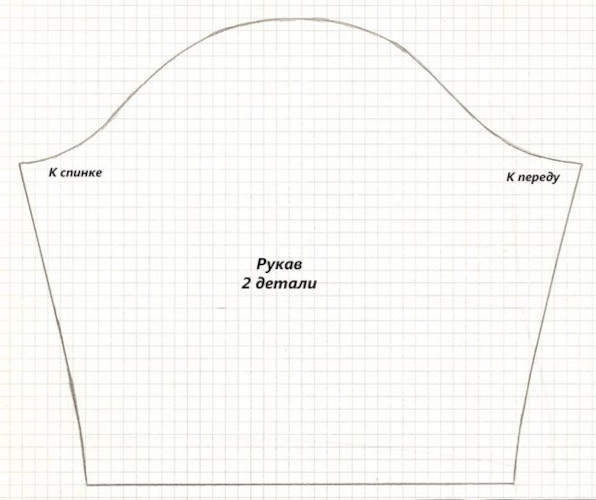
- The sleeves need to be sewn together, lining them up.
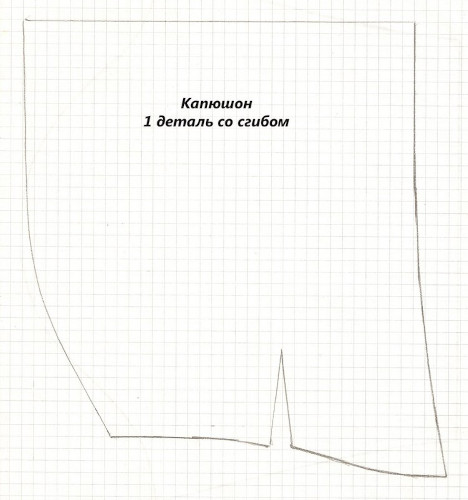
- The hood is also sewn with the lining.
- Sew the hood to the neck with tucks on the sides and back. You can use an additional piece of fabric no more than 4 cm wide. It needs to be connected face to face with the overalls and hood, stitch the parts with an indent of 1 cm.
The neck can also be finished separately from the hood with bias binding. If desired, the fastener can be moved to the back.
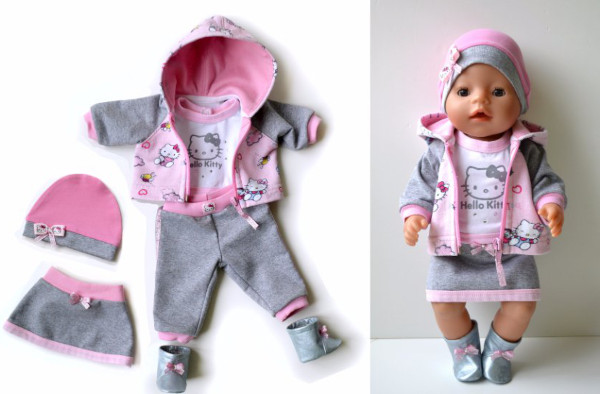
Clothes for Baby Born can be made with your own hands from scrap materials, scraps of clothes or children's things. A quilted jumpsuit will look great on dolls, but it is worth complementing the outfit with a hat and mittens to form a complete set of clothes.
How to make shoes with your own hands?
Doll shoes can be made from any materials, with or without a frame, if the fabric is thick enough and holds its shape on its own. Depending on the patterns, you can make sandals, shoes, and even boots.
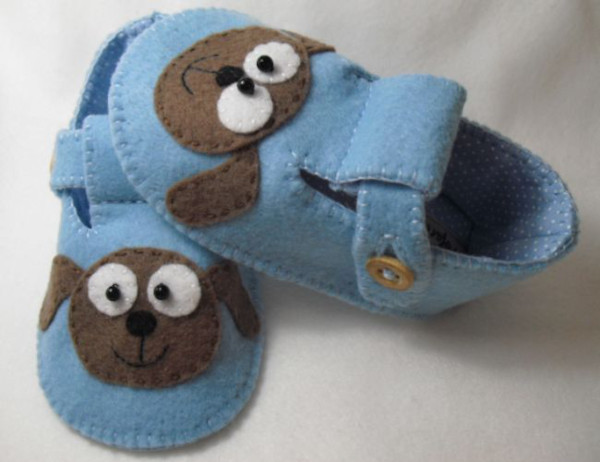
As a rule, the following materials are used:
- felt;
- artificial suede;
- fur;
- interlining;
- genuine or eco leather;
- denim.
Any footwear is made of 2-3 parts and a separate element - the sole. For it, you can choose thick cardboard, fleece, foam rubber or special soles, which are already sold in specialized stores.
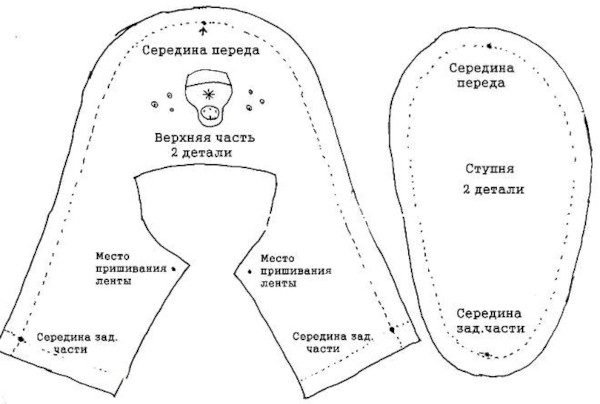
- First of all, you need to take measurements - outline the foot and add 1 cm of reserve. Regular paper will do - this is a pattern for the sole.
- The sole can be cut out of cardboard and then covered with cardboard and fabric.
- Visually, you need to divide the sole into two parts - the back and the front.
- The nose piece will be glued to the front part, and the back piece to the other.
- To create a pattern for the nose piece, you can use leather or felt, a pencil, and a hot glue gun.
- The toe of the boot should be slightly longer than the back, so the arc should be drawn with some extra space. Cut out the detail and try it on the sole.
- You can glue the nose part with hot glue from the center to the sides.
- The back should be cut out according to the rectangle pattern. The upper corners should be smoothed.
- The part should also be glued to the sole from the center to the sides, going to the toe part.
- Depending on the height of the arch in the toe part, you can make low shoes - shoes, sandals (make an additional arch and a strip to form a loop).
- If you want to make boots, you need to increase the height of the arch. In this case, you can use two parts for the front part. This is necessary when the fabric is soft, but the shape does not hold. If there is a seam on the toe part of the boot, it will hold its shape and will not bend inward.
- To create two parts of the nose, you need to draw an arc in the shape of a slice of fruit. On top there will be a part in the shape of a rectangle. The length should be the same.
- Both parts need to be sewn together along the arc line.
- The front part of the two parts should be sewn to the back with even side seams. After that, you can glue it to the sole.
- If the sole is soft, the boot should be turned inside out and sewn to the sole.
- If desired, you can make holes for laces, decorate the joint between the fabric and the sole with regular braid or ribbon.
Clothes for Baby Born are as easy to make as shoes. For decoration, you can sew a fur insert on the top edge of the boots, either the front side or the back side, but then turn it outward.
To create doll clothes, you can use both the sketches described in the article and ready-made patterns as a basis, or construct them yourself. Baby Bona dolls can be dressed in dresses, pants and sweaters, the collections are complemented by overalls and shoes.
Video about clothes fucking Baby Bona
How to sew a winter jumpsuit with fur trim for Baby Born: